Set up your HoloLens (1st gen)
The first time you turn on your HoloLens, you'll be guided through calibrating your device, setting up your device, and signing in. This article walks through the HoloLens (1st gen) first start and setup experience.
In the next section, you'll learn how to work with HoloLens and interact with holograms. To skip ahead to that article, see Get started with HoloLens (1st gen).
Before you start
Before you get started, make sure you have the following available:
A Wi-Fi connection. You'll need to connect your HoloLens to a Wi-Fi network to set it up. The first time you connect, you'll need an open or password-protected network that doesn't require navigating to a website or using certificates to connect. Learn more about the websites that HoloLens uses.
A Microsoft account or a work account. You'll also need to use a Microsoft account (or a work account, if your organization owns the device) to sign in to HoloLens. If you don't have a Microsoft account, go to account.microsoft.com and set one up for free.
A safe, well-lit space with no tripping hazards. Health and safety info.
The optional comfort accessories that came with your HoloLens, to help you get the most comfortable fit. More on fit and comfort.
Note
- The first time that you use your HoloLens, Cortana is already on and ready to guide you (though she won't be able to respond to your questions until after you set up your device). You can turn Cortana off at any time in Cortana's settings.
- In order to switch to the Chinese or Japanese version of HoloLens, you’ll need to download the build for the language on a PC and then install it on your HoloLens. For more information, see Install localized versions of HoloLens (1st gen).
Start your Hololens and set up Windows
The first time you start your HoloLens, your first task is to set up Windows Holographic on your device.
Connect to the internet (HoloLens guides you to select Wi-Fi network).
Sign in to your user account. Choose between My work or school owns it and I own it.
- When you choose My work or school owns it, you sign in by using a Microsoft Entra account. If your organization uses Microsoft Entra ID P1 or P2 and has configured automatic MDM enrollment, HoloLens automatically enrolls in MDM. If your organization doesn't use Microsoft Entra ID P1 or P2, automatic MDM enrollment isn't available, so you'll need to manually enroll HoloLens in device management. To sign in to your device the first time by using a work or school account, follow these steps:
- Enter your organizational account information.
- Accept the privacy statement.
- Sign in by using your Microsoft Entra credentials. These credentials—when used to sign in—may redirect to your organization's sign-in page.
- Continue setting up the device.
- When you choose I own it, you sign in by using a Microsoft account. After setup is complete, you can manually enroll HoloLens in device management.
- Enter your Microsoft account information.
- Enter your password. If your Microsoft account requires two-step verification (2FA), complete the verification process.
- When you choose My work or school owns it, you sign in by using a Microsoft Entra account. If your organization uses Microsoft Entra ID P1 or P2 and has configured automatic MDM enrollment, HoloLens automatically enrolls in MDM. If your organization doesn't use Microsoft Entra ID P1 or P2, automatic MDM enrollment isn't available, so you'll need to manually enroll HoloLens in device management. To sign in to your device the first time by using a work or school account, follow these steps:
The device sets your time zone based on information that it obtains from the Wi-Fi network.
Calibration
After Cortana introduces herself, the next setup step is calibration. For the best HoloLens experience, you should complete the calibration process during setup.
HoloLens (1st gen) uses the distance between your pupils (IPD or interpupillary distance) to make holograms clear and easy to interact with. If the IPD isn't correct, holograms may appear to be unstable or at an incorrect distance.
During calibration, HoloLens asks you to align your finger with a series of six targets per eye. HoloLens uses this process to set the correct IPD for your eyes. If the calibration needs to be updated or adjusted for a new user, the new user can run the Calibration app outside of setup.
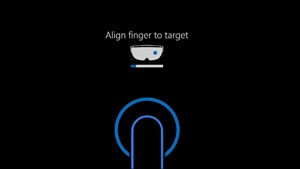
IPD finger-alignment screen at second step
Congratulations! Setup is complete and you can begin using HoloLens.