Note
Access to this page requires authorization. You can try signing in or changing directories.
Access to this page requires authorization. You can try changing directories.
Overview
The <add> element of the <authoringRules> element specifies the access permissions for users or groups for specific content types for a unique authoring rule.
Authoring rules can be defined per-URI within a Web site, and specifies the WebDAV authoring permissions for that URI space. The permissions in this element are inherited, so child URIs will have the same permissions as a parent URI, provided that the child URI does not have unique permissions defined.
Compatibility
| Version | Notes |
|---|---|
| IIS 10.0 | The <add> element was not modified in IIS 10.0. |
| IIS 8.5 | The <add> element was not modified in IIS 8.5. |
| IIS 8.0 | The <add> element was not modified in IIS 8.0. |
| IIS 7.5 | The <add> element of the <authoringRules> element ships as a feature of IIS 7.5. |
| IIS 7.0 | The <add> element of the <authoringRules> element was introduced in WebDAV 7.0, which was a separate download for IIS 7.0. |
| IIS 6.0 | N/A |
Note
The WebDAV 7.0 and WebDAV 7.5 modules shipped out-of-band for IIS 7.0, which required downloading and installing the modules from the following URL:
With Windows 7 and Windows Server 2008 R2, the WebDAV 7.5 module ships as a feature for IIS 7.5, so downloading WebDAV is no longer necessary.
Setup
To support WebDAV publishing for your Web server, you must install the WebDAV module. To do so, use the following steps.
Windows Server 2012 or Windows Server 2012 R2
- On the taskbar, click Server Manager.
- In Server Manager, click the Manage menu, and then click Add Roles and Features.
- In the Add Roles and Features wizard, click Next. Select the installation type and click Next. Select the destination server and click Next.
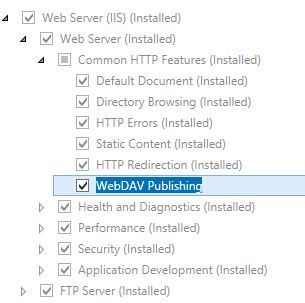
- On the Server Roles page, expand Web Server (IIS), expand Web Server, expand Common HTTP Features, and then select WebDAV Publishing. Click Next.
- On the Select features page, click Next.
- On the Confirm installation selections page, click Install.
- On the Results page, click Close.
Windows 8 or Windows 8.1
- On the Start screen, move the pointer all the way to the lower left corner, right-click the Start button, and then click Control Panel.
- In Control Panel, click Programs and Features, and then click Turn Windows features on or off.
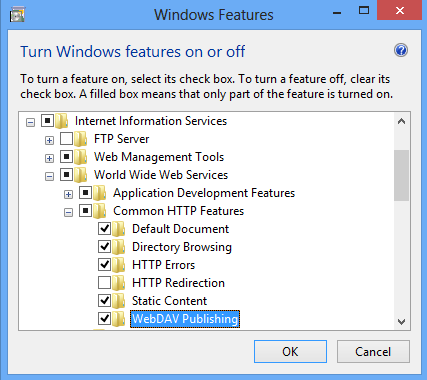
- Expand Internet Information Services, expand World Wide Web Services, expand Common HTTP Features, and then select WebDAV Publishing.
- Click OK.
- Click Close.
Windows Server 2008 R2
- On the taskbar, click Start, point to Administrative Tools, and then click Server Manager.
- In the Server Manager hierarchy pane, expand Roles, and then click Web Server (IIS).
- In the Web Server (IIS) pane, scroll to the Role Services section, and then click Add Role Services.
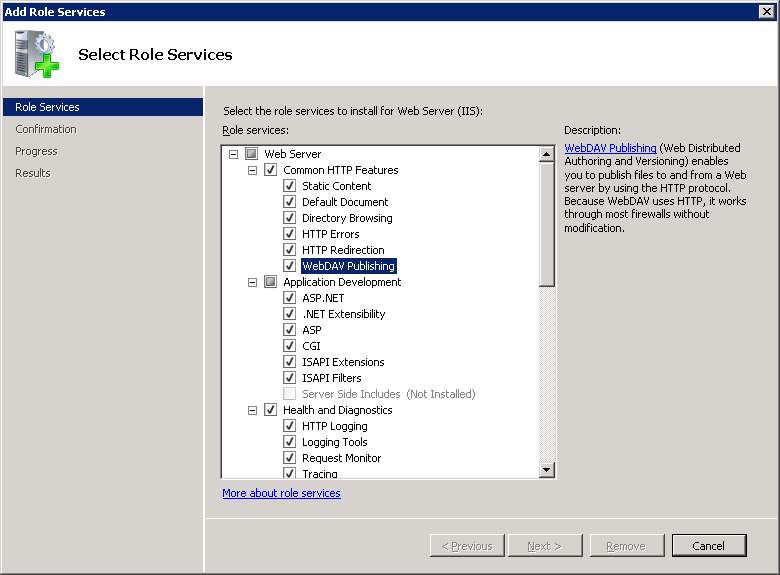
- On the Select Role Services page of the Add Role Services Wizard, expand Common HTTP Features, select WebDAV Publishing, and then click Next.
- On the Confirm Installation Selections page, click Install.
- On the Results page, click Close.
Windows 7
- On the taskbar, click Start, and then click Control Panel.
- In Control Panel, click Programs and Features, and then click Turn Windows Features on or off.
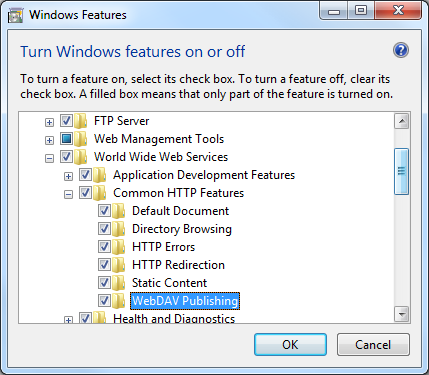
- Expand Internet Information Services, then World Wide Web Services, and then Common HTTP Features.
- Select WebDAV Publishing, and then click OK.
Windows Server 2008 or Windows Vista
Download the installation package from the following URL:
Follow the instructions in the following walkthrough to install the WebDAV module:
How To
How to add WebDAV authoring rules
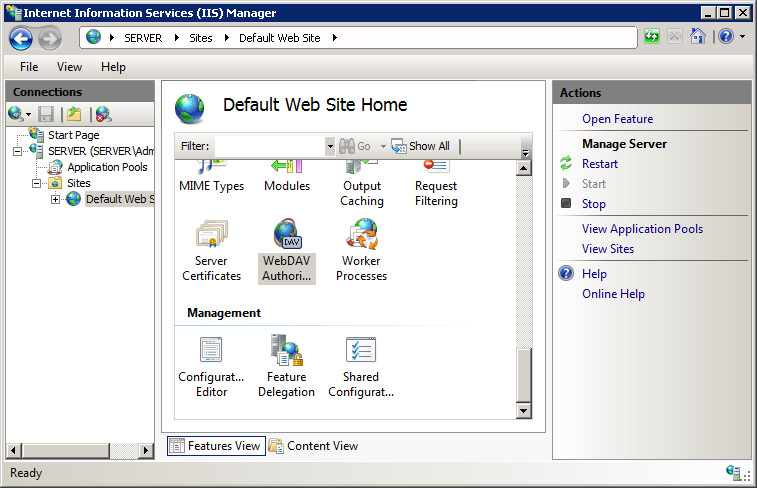
Open Internet Information Services (IIS) Manager:
If you are using Windows Server 2012 or Windows Server 2012 R2:
- On the taskbar, click Server Manager, click Tools, and then click Internet Information Services (IIS) Manager.
If you are using Windows 8 or Windows 8.1:
- Hold down the Windows key, press the letter X, and then click Control Panel.
- Click Administrative Tools, and then double-click Internet Information Services (IIS) Manager.
If you are using Windows Server 2008 or Windows Server 2008 R2:
- On the taskbar, click Start, point to Administrative Tools, and then click Internet Information Services (IIS) Manager.
If you are using Windows Vista or Windows 7:
- On the taskbar, click Start, and then click Control Panel.
- Double-click Administrative Tools, and then double-click Internet Information Services (IIS) Manager.
In the Connections pane, expand the server name, and then go to the site, application, or directory where you want to enable directory browsing.
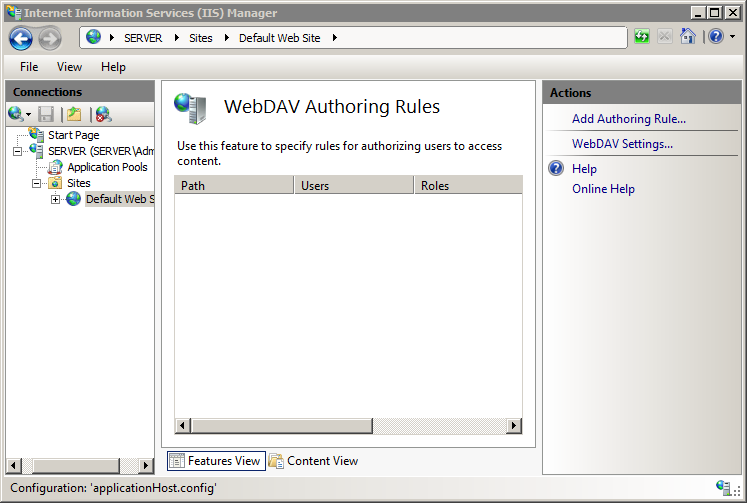
In the Home pane, double-click WebDAV Authoring Rules.
In the Actions pane, click Add Authoring Rule...
In the Add Authoring Rule dialog, specify the following options:
- Allow access to: Specify whether the authoring rule should apply to all content types, or specify specific content types to allow.
- Allow access to this content to: Specify whether the authoring rule should apply to all users, to specific groups or roles, or to specific users.
- Permissions: Specify whether the authoring rule should allow Read, Write, or Source access for the specified content types and users.
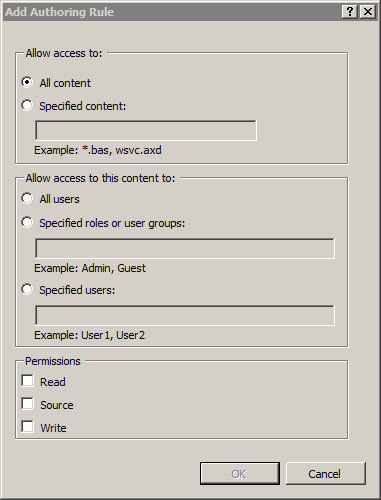
Click OK.
Configuration
The <authoringRules> element is configurable per-URI in the ApplicationHost.config file. Settings can be stored globally, at the site level, or per folder. The <authoringRules> element cannot be delegated, so any <authoringRules> elements in Web.config files are ignored.
Attributes
| Attribute | Description | ||||||||||
|---|---|---|---|---|---|---|---|---|---|---|---|
access |
Optional flags attribute. Specifies the access settings for the authoring rule. These values combined with a logical OR operation, so "None, Read" = "Read." Note: Source access allows a WebDAV client to request the contents of a script-mapped file, such as an ASP.NET or PHP file, as opposed to the processed output of the file.
None. |
||||||||||
path |
Optional string attribute. Specifies the file name or the file name extension for which the authoring rule applies. For example, "*.aspx", "*.php", etc. In addition, the following special identifiers have been defined.
|
||||||||||
roles |
Optional string attribute. Specifies roles or groups for an authorization rule. Multiple roles can be added in a comma-separated list. There is no default value. |
||||||||||
users |
Optional string attribute. Specifies users for an authorization rule. Multiple users can be added in a comma-separated list. In addition, the following special identifiers have been defined.
|
Child Elements
None.
Configuration Sample
The following example lists a sample <webdav> element for the Default Web Site. This example clears any existing authoring rules, adds a single rule for the administrators group, enables WebDAV authoring, specifies that hidden files are allowed, enables WebDAV locks and specifies the lock provider, and enables WebDAV properties and specifies the default XML namespace for property mapping.
<location path="Default Web Site">
   <system.webServer>
      <webdav>
         <authoringRules defaultAccess="none" allowNonMimeMapFiles="true" defaultMimeType="text/plain">
            <clear />
            <add roles="administrators" path="*" access="Read, Write, Source" />
         </authoringRules>
         <authoring enabled="true" requireSsl="false">
            <fileSystem allowHiddenFiles="true" />
            <locks enabled="true" lockStore="webdav_simple_lock" requireLockForWriting="false" />
            <properties allowAnonymousPropfind="false" allowInfinitePropfindDepth="false" allowCustomProperties="true">
               <clear />
               <add xmlNamespace="*" propertyStore="webdav_simple_prop" />
            </properties>
         </authoring>
      </webdav>
   </system.webServer>
</location>
Sample Code
The following examples configure WebDAV authoring rules so that WebDAV clients can publish files that are not listed in the IIS MIME map, and add a single authoring rule that grants Read, Write, and Source access to the administrators group.
AppCmd.exe
appcmd.exe set config "Default Web Site" -section:system.webServer/webdav/authoringRules /allowNonMimeMapFiles:"True" /commit:apphost

appcmd.exe set config "Default Web Site" -section:system.webServer/webdav/authoringRules /+"[roles='administrators',path='*',access='Read, Write, Source']" /commit:apphost
Note
You must be sure to set the commit parameter to apphost when you use AppCmd.exe to configure these settings. This commits the configuration settings to the appropriate location section in the ApplicationHost.config file.
C#
using System;
using System.Text;
using Microsoft.Web.Administration;

internal static class Sample
{
   private static void Main()
   {
      using (ServerManager serverManager = new ServerManager())
      {
         Configuration config = serverManager.GetApplicationHostConfiguration();

         ConfigurationSection authoringRulesSection = config.GetSection("system.webServer/webdav/authoringRules", "Default Web Site");
         authoringRulesSection["allowNonMimeMapFiles"] = true;

         ConfigurationElementCollection authoringRulesCollection = authoringRulesSection.GetCollection();

         ConfigurationElement addElement = authoringRulesCollection.CreateElement("add");
         addElement["roles"] = @"administrators";
         addElement["path"] = @"*";
         addElement["access"] = @"Read, Write, Source";
         authoringRulesCollection.Add(addElement);

         serverManager.CommitChanges();
      }
   }
}
VB.NET
Imports System
Imports System.Text
Imports Microsoft.Web.Administration

Module Sample
   Sub Main()
      Dim serverManager As ServerManager = New ServerManager
      Dim config As Configuration = serverManager.GetApplicationHostConfiguration

      Dim authoringRulesSection As ConfigurationSection = config.GetSection("system.webServer/webdav/authoringRules", "Default Web Site")
      authoringRulesSection("allowNonMimeMapFiles") = True

      Dim authoringRulesCollection As ConfigurationElementCollection = authoringRulesSection.GetCollection

      Dim addElement As ConfigurationElement = authoringRulesCollection.CreateElement("add")
      addElement("roles") = "administrators"
      addElement("path") = "*"
      addElement("access") = "Read, Write, Source"
      authoringRulesCollection.Add(addElement)

      serverManager.CommitChanges()
   End Sub
End Module
JavaScript
var adminManager = new ActiveXObject('Microsoft.ApplicationHost.WritableAdminManager');
adminManager.CommitPath = "MACHINE/WEBROOT/APPHOST";

var authoringRulesSection = adminManager.GetAdminSection("system.webServer/webdav/authoringRules", "MACHINE/WEBROOT/APPHOST/Default Web Site");
authoringRulesSection.Properties.Item("allowNonMimeMapFiles").Value = true;

var authoringRulesCollection = authoringRulesSection.Collection;

var addElement = authoringRulesCollection.CreateNewElement("add");
addElement.Properties.Item("roles").Value = "administrators";
addElement.Properties.Item("path").Value = "*";
addElement.Properties.Item("access").Value = "Read, Write, Source";
authoringRulesCollection.AddElement(addElement);

adminManager.CommitChanges();
VBScript
Set adminManager = createObject("Microsoft.ApplicationHost.WritableAdminManager")
adminManager.CommitPath = "MACHINE/WEBROOT/APPHOST"

Set authoringRulesSection = adminManager.GetAdminSection("system.webServer/webdav/authoringRules", "MACHINE/WEBROOT/APPHOST/Default Web Site")
authoringRulesSection.Properties.Item("allowNonMimeMapFiles").Value = True

Set authoringRulesCollection = authoringRulesSection.Collection

Set addElement = authoringRulesCollection.CreateNewElement("add")
addElement.Properties.Item("roles").Value = "administrators"
addElement.Properties.Item("path").Value = "*"
addElement.Properties.Item("access").Value = "Read, Write, Source"
authoringRulesCollection.AddElement(addElement)

adminManager.CommitChanges()