Note
Access to this page requires authorization. You can try signing in or changing directories.
Access to this page requires authorization. You can try changing directories.
Follow these steps to validate your implementation before rolling out Dragon Copilot to your users.
If you find it useful to work with a printout of this article:
- Right‑click this page, select Print > Save as PDF.
- Select More settings, clear Headers and footers and activate Background graphics on.
- Select Save.
Step 1: Launch Dragon Copilot desktop and sign in
| Test case | Pass | Fail | Comments |
|---|---|---|---|
| Select the Dragon Copilot desktop icon to launch the app and sign in with user credentials. |
Step 2: Settings
| Test case | Image | Pass | Fail | Comments |
|---|---|---|---|---|
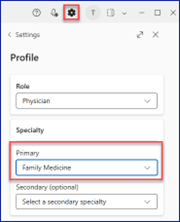
| Select the settings icon |

|
|||
Confirm the primary specialty is Family Medicine:
|
|
|||
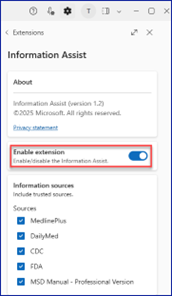
Confirm Information Assist is enabled:
|
|
Step 3: Microphone input
| Test case | Image | Pass | Fail | Comments |
|---|---|---|---|---|
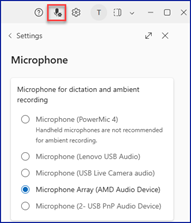
1. Select the microphone settings icon  at the top of the screen.
2. Select a microphone. An omnidirectional microphone is recommended, as it captures sound evenly from all directions (front, back, and sides). 3. Confirm the microphone you want to use. |
|
Step 4: New session and timeline tab
| Test case | Image | Pass | Fail | Comments |
|---|---|---|---|---|
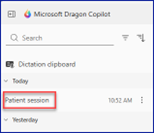
| To see the Sessions list, select the expand sessions icon in the upper left corner. |
|
|||
| 1. Select the New session button in lower left corner. 2. Select session from the Patient session list. |
|
Step 5: Create an ambient recording
| Test case | Image | Pass | Fail | Comments |
|---|---|---|---|---|
| Select the ambient recording button in the lower right corner. |

|
|||
| Confirm the waveform icon turns blue and the timer begins counting. |

|
|||
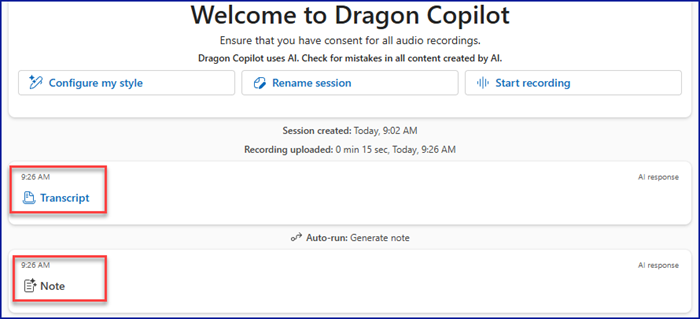
| 1. Say, This 18-year-old male presents to the emergency department with severe abdominal pain following the consumption of 35 spicy chicken wings, which he ate as part of a lost bet. 2. Select the ambient recording button to turn off the microphone. 3. Confirm the Transcript and Note cards appear as shown. |
|
Step 6: Transcript
| Test case | Image | Pass | Fail | Comments |
|---|---|---|---|---|
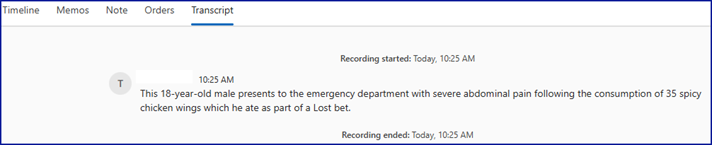
| Select the Transcript tab and confirm the ambient dictation output is present. |
|
Step 7: Orders (if enabled)
| Test case | Image | Pass | Fail | Comments |
|---|---|---|---|---|
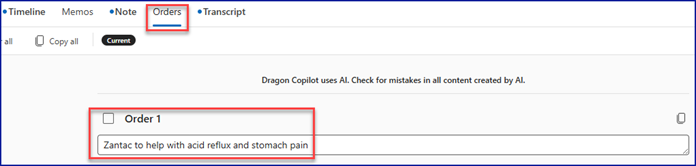
| 1. Select the ambient recording button in the lower right corner and say, I'll prescribe Zantac to help with acid reflux and stomach pain. 2. Turn off the microphone. 3. After the output is generated select the Orders tab and confirm "Order 1" contains "Zantac". |
|
Step 8: Dictation microphone
| Test case | Image | Pass | Fail | Comments |
|---|---|---|---|---|
| Select the Note tab and then select the dictation microphone icon in the lower left. |
|
|||
| Confirm the microphone has a solid blue background indicating the microphone is on. |

|
|||
| Say, go to allergies and confirm the cursor is in the Allergies section. | ||||
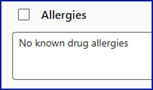
| With microphone on, say, no known drug allergies, then turn off the microphone and confirm the text appears in the Allergies section. |
|
Step 9: Chat box
| Test case | Image | Pass | Fail | Comments |
|---|---|---|---|---|
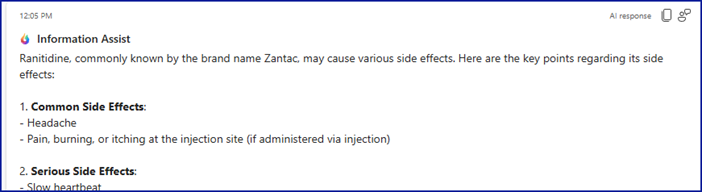
| 1. Place the cursor into the chat box. 2. Turn on the dictation microphone and say, what are the side-effects of Zantac, then turn off the microphone. 3. Select the right arrow inside the chat box. 4. Once the output is generated, confirm the Information Assist card appears as shown, then close the card. |
|
Step 10: Transfer content to EHR
| Test case | Image | Pass | Fail | Comments |
|---|---|---|---|---|
| Locate the History of Present Illness section and select the Copy icon to the far right. |

|
Step 11: Transfer content to EHR (voice commands - desktop app)
| Test case | Pass | Fail | Comments |
|---|---|---|---|
| 1. Place the cursor in the target app. 2. Turn on the dictation microphone and say, transfer HPI or transfer history of present illness. 3. Confirm the content is transferred to the target app. |
Step 12: Library
| Test case | Image | Pass | Fail | Comments |
|---|---|---|---|---|
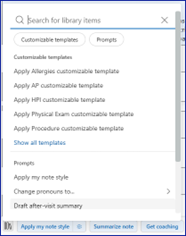
| Select the library icon to the left of the Apply my note style button. |
|
|||
| Confirm the Library menu appears. |
|
|||
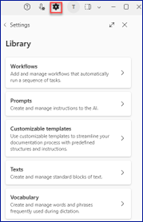
| 1. Select the settings icon in upper right corner. 2. Select Library. 3. Confirm the Library menu appears. |
|
Step 13: Resources
| Test case | Image | Pass | Fail | Comments |
|---|---|---|---|---|
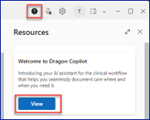
1. Select the help icon  in the upper right corner
2. Select Resources. 3. Select View. 4. Confirm that the "Welcome to Dragon Copilot" video is displayed. |
|
|||
| Select the play icon and confirm the video plays. |
|
|||
| 1. In the Resources section scroll down to the Support and training section. 2. Select Join drop-in support. 3. Follow the on-screen prompts and confirm a new Teams meeting window opens. 4. Confirm an active Join now button is available. |
|
|||
| 1. In the Resources section select Schedule remote training. 2. Confirm a new Schedule Appointment with Microsoft window opens with the ability to select a date and time to schedule an appointment. |
|
Step 14: Install Dragon Copilot mobile and sign in
| Test case | Pass | Fail | Comments |
|---|---|---|---|
| 1. On your mobile device, open the App Store and search for Dragon Copilot. 2. Install the app and open it. 3. Sign in with your credentials and follow the on-screen instructions. |
Step 15: Create an ambient recording (mobile app)
| Test case | Pass | Fail | Comments |
|---|---|---|---|
| 1. Select the New session button at the bottom of the Dragon Copilot mobile app. 2. Select the ambient recording button to turn on the microphone. 3. Confirm the waveform icon turns blue and the timer begins counting. |
|||
| 1. Say This 24-year-old female presents to the emergency department with complaints of a sore throat with fever and chills. 2. Select the ambient recording button to turn off the microphone. 3. Confirm the Transcript and Note are created. |
|||
| Select the Note tab and confirm dictated text is added in the History of Present Illness section. | |||
| Return to Dragon Copilot desktop and confirm the note created from the mobile app is in the Sessions list. |
Step 16: Resources (mobile app)
| Test case | Image | Pass | Fail | Comments |
|---|---|---|---|---|
| 1. Select the help icon
in the upper right corner. 2. Select Resources. 3. Select View and confirm the "Welcome to Dragon Copilot" video is displayed. |
|
|||
| Select the play icon and confirm the video plays. |
|
|||
| 1. In the Resources section scroll down to the Support and training section. 2. Select Join drop-in support. 3. Follow the on-screen prompts and confirm a new Teams meeting window opens. 4. Confirm an active Join now button is available. |
|
|||
| 1. In the Resources section select Schedule remote training. 2. Confirm a new Schedule Appointment with Microsoft window opens with the ability to select a date and time to schedule an appointment. |
|