Note
Access to this page requires authorization. You can try signing in or changing directories.
Access to this page requires authorization. You can try changing directories.
Important
Some or all of this functionality is available as part of a preview release. The content and the functionality are subject to change.
Microsoft Sustainability Manager uses built-in reference data in factor mappings. You can extend the available set of factor mappings with custom factor mappings. For example, you might want to pivot your activity calculations based on factors such as fiscal year or custom region. This article guides you through this advanced configuration, which you must complete in the Power Platform admin center.
Note
The procedures in this article require advanced expertise in Microsoft Dataverse management and APIs. This article doesn't describe common platform operations in detail. Only authorized administrators with full access to the Power Platform admin center can complete these configuration steps.
To extend Sustainability Manager to use custom factor mappings, follow these steps:
- Create custom reference data
- Link factors to Sustainability Manager factor mappings
- Link Sustainability Manager reference data to new factors
- Authorize Sustainability Manager to access external tables
- Authorize users to access the tables
- Test the link between the custom reference data and the factor mappings
- Use extended factors in calculation models
Create custom reference data
Create new table
In the Power Apps portal, create the new table that you want to use in factor mappings as reference data.
Rename the primary column to Name.
The following example shows a new table for Custom Region.

In our example, we also created a new custom factors table for Fiscal Year.
Set the Name column as an alternate key called naturalkey.


Add table to Sustainability Manager
When you add a new table in Power Apps, you also need to add it to the Sustainability Manager app module.
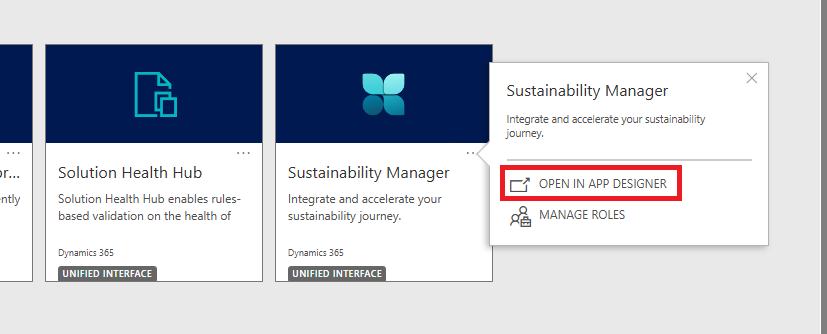
In the Power Apps portal, select Sustainability Manager.
On the Sustainability Manager tile, select the ellipsis (...), and then select OPEN IN APP DESIGNER.
In the app designer, select Data and then select Find table name.
Select the ellipsis (...), select Add to app, select Save, and then select Publish.

The table is added to Sustainability Manager and appears in the reference data list and in the navigation.
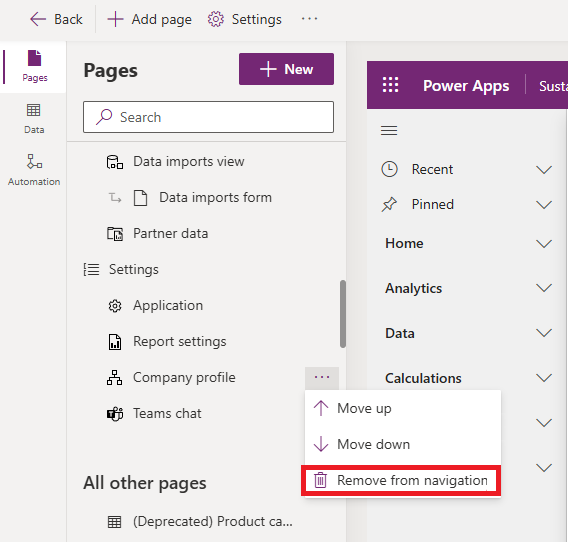
If you want to remove it from the navigation, select Pages on the left navigation pane. Select the table, select Remove from navigation, select Save, and then select Publish.
Create solution for customizations
Because default entities are in a managed solution, you must create a new solution and import activity entities and new custom reference data entities into it.
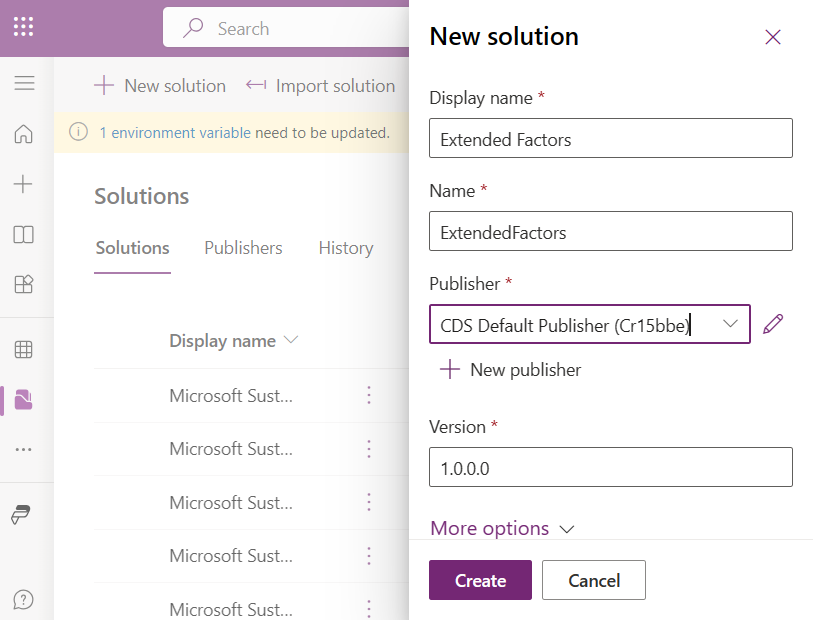
On the Solutions page, select New solution. Enter the information for your new solution, and then select Create.
On the Objects page, select Add existing, and then select Table.

On the Add existing tables page, select the activity and the custom reference data tables you created. In our example, we added the Purchased energy activity table and the Custom Region reference data table.


Extend the activity table with lookups
Add a new many-to-one relationship from the activity table to the extended factors table. In our example, we're adding a many-to-one relationship from the Purchased energy activity table to the Custom Region reference data table.


Add the custom reference data table to the app
Note
This is a required step. Even if you don't want to include the custom reference data table into the navigation menu, it is still necessary to add the table to the app. If this step is skipped, the reference data will not be available in the factor mapping import or manual entry experience.
Add the Sustainability Manager App object to the new solution.

The following example shows the new solution and its resources.

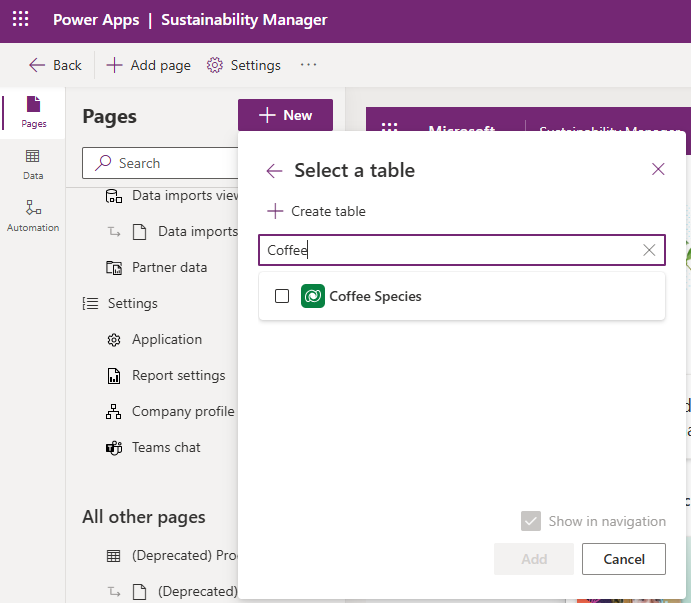
Select Sustainability Manager, open it in edit mode, and then select New. On the Add page window, select Dataverse table.

Select Select existing table. In the Select a table pane, select each of the custom reference data tables you want to use for factor mappings. Select Add.
Note
If you don't want the custom reference tables to appear in the navigation menu, uncheck the Show in navigation checkbox.
Under All other pages, the new added custom tables appear.
Save and publish your changes.


Link factors to Sustainability Manager factor mappings
This procedure requires developer expertise because it's only available via Dataverse APIs.
You need to customize multi-table lookups for factor mappings for your custom tables. You can use the Power Apps Web API with a tool like Insomnia or your preferred API client. For information about sending authenticated POST requests with Insomnia, go to Use Insomnia with Dataverse Web API.
For each custom table, you need to enable factor mappings in calculations. In our example, we need to do that for the Custom Region and Fiscal Year tables. You need the logical name for each table. For example, the logical name for Custom Region is cr040_newtable, and the logical name for Fiscal Year is cr040_newtable1.
For each custom table, we need to update each of the polymorphic lookups used for factor mappings, a table with the logical name msdyn_emissionlookup. These lookups have the following logical names:
- msdyn_referencedataid
- msdyn_referencedata2id
- msdyn_referencedata3id
- msdyn_referencedata4id
For a single custom table, you need to send four POST requests, one for each of the four lookups used in the factor mappings. Use an advanced tool such as Insomnia or your preferred API client to make the POST requests to your organization's RelationshipDefinitions API.
In our case, the endpoint is https://<orgurl>/api/data/v9.2/RelationshipDefinitions. We used the following sample payload for each of the eight POST requests (two tables with four requests each):
Note
"SchemaName" must be unique within your Dataverse environment.
{
  "SchemaName": "msdyn_msdyn_emissionlookup_<custom factor table name>",
  "@odata.type": "Microsoft.Dynamics.CRM.OneToManyRelationshipMetadata",
  "CascadeConfiguration": {
    "Assign": "NoCascade",
    "Delete": "RemoveLink",
    "Merge": "NoCascade",
    "Reparent": "NoCascade",
    "Share": "NoCascade",
    "Unshare": "NoCascade"
  },
  "ReferencedEntity": "<custom factor table logical name>",
  "ReferencingEntity": "msdyn_emissionlookup",
  "ReferencingAttribute": "<polymorphic lookup name>",
  "Lookup": {
    "AttributeType": "Lookup",
    "AttributeTypeName": {
      "Value": "LookupType"
    },
    "SchemaName": "<polymorphic lookup name>",
    "@odata.type": "Microsoft.Dynamics.CRM.LookupAttributeMetadata"
  }
}
The following table shows the values we used for <custom factor table name>, <custom factor table logical name>, and <polymorphic lookup name> for our eight POST requests.
| Request | Custom factor table name | Custom factor table logical name | Polymorphic lookup name |
|---|---|---|---|
| 1 | FiscalYear_RDId | cr040_newtable1 | msdyn_referencedataid |
| 2 | FiscalYear_RDId2 | cr040_newtable1 | msdyn_referencedata2id |
| 3 | FiscalYear_RDId3 | cr040_newtable1 | msdyn_referencedata3id |
| 4 | FiscalYear_RDId4 | cr040_newtable1 | msdyn_referencedata4id |
| 5 | CustomRegion_RDId | cr040_newtable | msdyn_referencedataid |
| 6 | CustomRegion_RDId2 | cr040_newtable | msdyn_referencedata2id |
| 7 | CustomRegion_RDId3 | cr040_newtable | msdyn_referencedata3id |
| 8 | CustomRegion_RDId4 | cr040_newtable | msdyn_referencedata4id |
A successful POST request gives you an HTTP 204 response.
You can verify these operations by inspecting the relationships of the Factor mapping table.

If you want to export your changes to a different environment, you can include the relationships you added earlier into a solution and export that.
Link Sustainability Manager reference data to new factors
In Tables, select the All tab, and then select Reference data (msdyn_referencedata).
Add the following information for each new factor type:
Field Description Name Plural name for your table. For example, Custom regions or Fiscal years. Category Reference data Entity name Logical name of your table, all lower case (not the schema name of the table). For example, cr040_newtable or cr040_newtable1.
Authorize Sustainability Manager to access external tables
If not already provided, Sustainability Manager needs to be given access to external tables so it can use them in calculations.
Go to Solutions > Microsoft Sustainability Manager Application.
Select Security roles, and then select Sustainability Service Application Role – Custom. A new browser tab opens.
In the new browser tab, select the Custom Entities tab.
For each of the custom tables you want to use for factor mappings, provide Read and Append To privileges at the organizational level.
Note
For each custom table, you also need to give org-wide Read privileges to any table that it points to via a lookup. For example, if Custom Region has a lookup to the table Contoso SKU, you must give Read privileges to the Contoso SKU table.
Save and close.
Authorize users to access the tables
For each custom table, such as Custom Regions or Fiscal Year, make sure that the Power Apps user who ingests factor mappings or runs calculations has the following org-wide privileges for the table:
Append To for ingestion
Read for creating factor mappings or using factor mappings within a calculation that uses a custom table
Test the link between the custom reference data and the factor mappings
Ensure all customizations are published in the Power Apps portal.
Populate the custom reference data tables (Custom Regions and Fiscal Year in our example).

Import or enter the factor mappings with Sustainability Manager or the Power Apps portal.

Import or enter the activity data with Sustainability Manager.


The following image shows an example of a factor library called Extended Factors Library containing mappings that use custom reference data (Custom Regions and Fiscal Year).

Use extended factors in calculation models
In the Power Apps portal, design the calculation model and use it in the calculation profile.

Note
You can use filtering in the calculation profile to make sure the lookup has a value.
You can use extended attributes in the calculation profile as needed.

FAQ
When I create a new factor mapping manually, I don't see my custom table as an option for Reference data
Make sure the user has proper privileges for the custom table.
Make sure that the custom table has at least one record.
Make sure you added the schema name (case-sensitive) of your custom table in msdyn_referencedata.
Make sure that the custom table is added to the Sustainability Manager App object as described earlier in this article.
Hard-refresh the page from your browser.
When I import factor mappings, I don't see my custom reference data table as an option in the field mapping experience
Make sure the user has proper privileges for the custom table.
Make sure you added the schema name (case-sensitive) of your custom table in msdyn_referencedata.
Make sure that the custom table is added to the Sustainability Manager App object as described earlier in this article.
Hard-refresh the page from your browser.
Are records for custom tables considered "approved" or "pending" for purposes of data approval?
All records for custom tables are considered "approved" for purposes of data approval in the context of factor mappings for calculations.
My import of factor mappings failed with a missing privilege prvAppendTo_[your custom table] for a user
The Sustainability Manager application user or the current user wasn't granted the Append To privilege for the custom table. Ensure that both Sustainability Manager and the user has the appropriate privileges, and then try the import again.
In the calculation model, I don't see my custom table as an option in the Factor mappings section of the Report node's Emission factor or Estimation factor node's Estimation factor dropdown
Make sure you added the msdyn_referencedata record for your custom table.
Check to make sure the value for Entity name in the msdyn_referencedata record for your custom table has the logical name of your table (case-sensitive), not the schema name. Go to Table > Properties, expand Advanced options, and view the logical name.
Make sure that the activity data for the source of your calculation has a lookup field that points to your custom table. For example, if you customized Stationary combustion to have a lookup to Custom Region, but not Mobile combustion, then calculations for Mobile combustion can't use factor mappings based on the Contoso region.
Customize multiple environments
You might need to make these customizations on one environment and then apply them to another. For example, you might make all your customizations in a dev environment and then need to import them into your production environment. In this case, you can follow these steps to minimize duplicating work.
For any solution you used to export changes from one environment to another, you need to include these customizations in that solution:
The additions of your custom tables to Sustainability Manager.
The additions of more relationships to factor mappings' polymorphic lookups.
Then you can import the solution for application lifecycle management (ALM).
On a per-environment basis, perform the following actions:
Add the msdyn_referencedata records.
Customize the Sustainability Manager application security role.
