Note
Access to this page requires authorization. You can try signing in or changing directories.
Access to this page requires authorization. You can try changing directories.
This quickstart shows you how to implement the client initialization pattern that the MIP SDK .NET wrapper uses at runtime.
Note
Any client application that uses the MIP .NET wrapper's Protection SDK requires the steps in this quickstart. Complete these quickstarts serially after application initialization and implementation of authentication delegate and consent delegate classes.
Prerequisites
If you haven't already, be sure to:
- Complete the steps in Microsoft Information Protection (MIP) SDK setup and configuration. This "Protection profile and engine setup" quickstart relies on proper SDK setup and configuration.
- Optionally:
- Review Profile and engine objects. The profile and engine objects are universal concepts, required by clients that use the MIP File/Policy/Protection SDKs.
- Review Authentication concepts to learn how authentication and consent are implemented by the SDK and client application.
Create a Visual Studio solution and project
First, create and configure the initial Visual Studio solution and project that the other quickstarts build on.
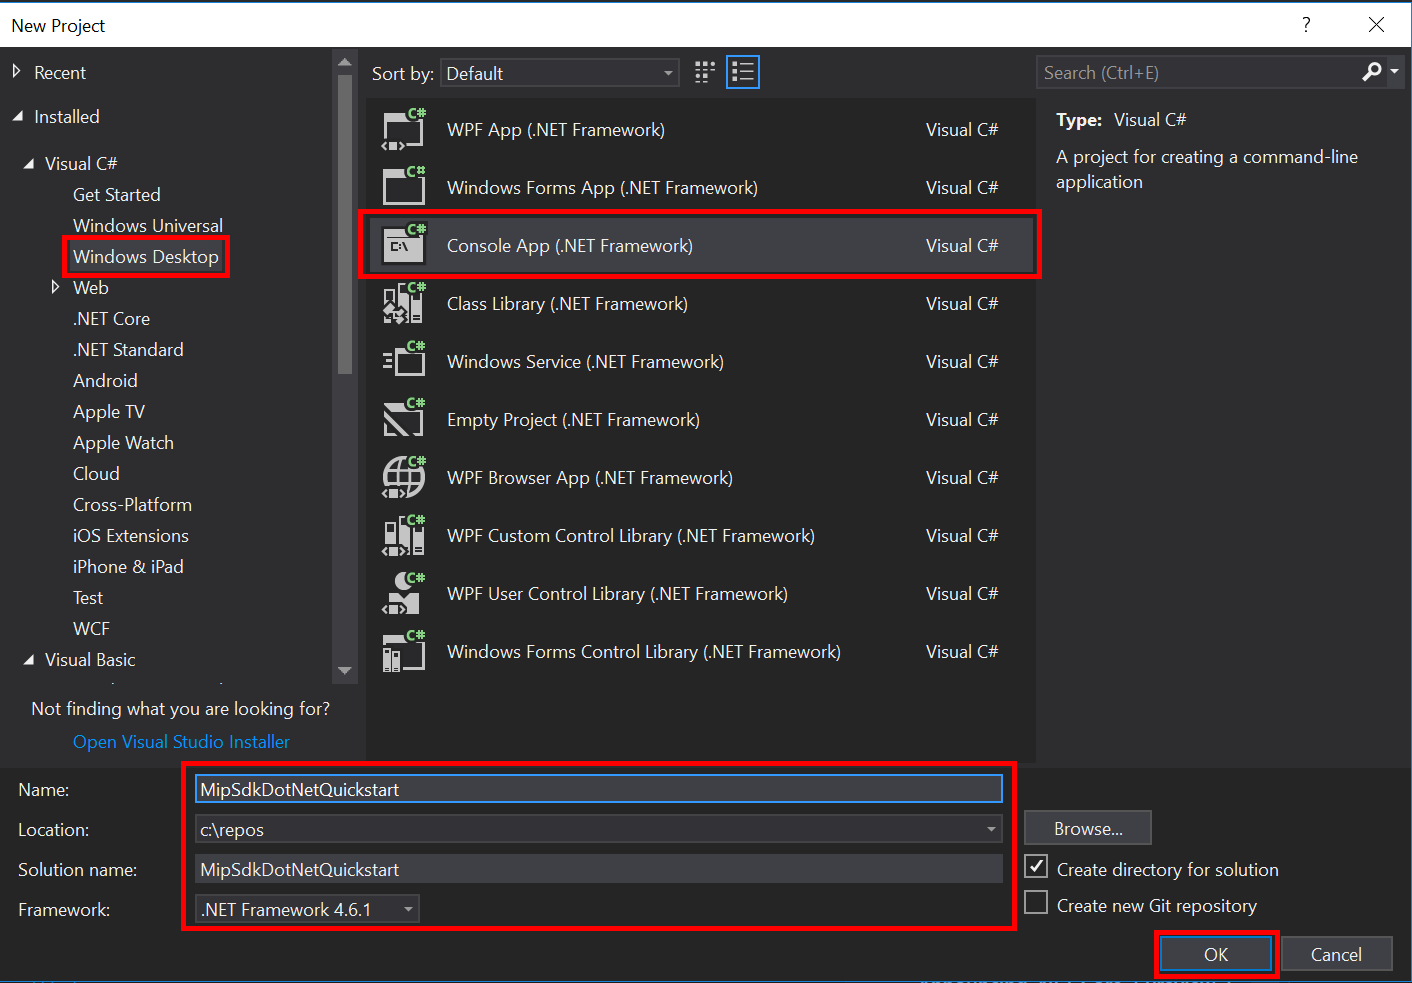
Open Visual Studio 2022 or later, select the File menu, New, Project. In the New Project dialog:
In the left pane, under Installed, Visual C#, select Windows Desktop.
In the center pane, select Console App (.NET Framework).
In the bottom pane, update the project Name, Location, and the containing Solution name accordingly.
When finished, select OK in the lower-right corner.
Add the NuGet package for the MIP Protection SDK to your project:
- In Solution Explorer, right-click the project node directly under the top solution node, and then select Manage NuGet packages...:
- When the NuGet Package Manager tab opens in the Editor Group tabs area:
- Select Browse.
- Enter
Microsoft.InformationProtectionin the search box. - Select the
Microsoft.InformationProtection.Protectionpackage. - Select Install, and then select OK when the Preview changes confirmation dialog appears.
Repeat the previous steps, but instead add
Microsoft.Identity.Client(MSAL) to the application.
Implement an authentication delegate and a consent delegate
If not already implemented, follow the steps listed in File SDK application initialization to implement the authentication and consent delegate.
Initialize the MIP SDK managed wrapper
From Solution Explorer, open the .cs file in your project that contains the implementation of the
Main()method. It defaults to the same name as the project containing it, which you specified during project creation.Remove the generated implementation of
main().The managed wrapper includes a static class,
Microsoft.InformationProtection.MIP, for initialization, creating aMipContext, loading profiles, and releasing resources. To initialize the wrapper for Protection SDK operations, callMIP.Initialize()and pass inMipComponent.Protectionto load the libraries necessary for protection operations.In
Main()in Program.cs, add the following code, replacing <application-id> with the ID of the Microsoft Entra application registration that you created previously.
using System;
using System.Threading.Tasks;
using Microsoft.InformationProtection;
using Microsoft.InformationProtection.Exceptions;
using Microsoft.InformationProtection.Protection;

namespace mip_sdk_dotnet_quickstart
{
    class Program
    {
        private const string clientId = "<application-id>";
        private const string appName = "<friendly-name>";

        static void Main(string[] args)
        {
            //Initialize Wrapper for Protection SDK operations
            MIP.Initialize(MipComponent.Protection);
        }
    }
}
Construct a Protection profile and engine
As mentioned, SDK clients that use MIP APIs require profile and engine objects. Complete the coding portion of this quickstart by adding code to load the native DLLs and then instantiate the profile and engine objects.
using System;
using System.Threading.Tasks;
using Microsoft.InformationProtection;
using Microsoft.InformationProtection.Exceptions;
using Microsoft.InformationProtection.Protection;

namespace mip_sdk_dotnet_quickstart
{
     class Program
     {
          private const string clientId = "<application-id>";
          private const string appName = "<friendly-name>";

          static void Main(string[] args)
          {
               // Initialize Wrapper for Protection SDK operations.
               MIP.Initialize(MipComponent.Protection);

               // Create ApplicationInfo, setting the clientID from Azure AD App Registration as the ApplicationId.
               ApplicationInfo appInfo = new ApplicationInfo()
               {
                    ApplicationId = clientId,
                    ApplicationName = appName,
                    ApplicationVersion = "1.0.0"
               };

               // Instantiate the AuthDelegateImpl object, passing in AppInfo.
               AuthDelegateImplementation authDelegate = new AuthDelegateImplementation(appInfo);

               // Create MipConfiguration Object
               MipConfiguration mipConfiguration = new MipConfiguration(appInfo, "mip_data", LogLevel.Trace, false, CacheStorageType.OnDiskEncrypted);

               // Create MipContext using Configuration
               MipContext mipContext = MIP.CreateMipContext(mipConfiguration);

               // Initialize and instantiate the ProtectionProfile.
               // Create the ProtectionProfileSettings object.
               // Initialize protection profile settings to create/use local state.
               var profileSettings = new ProtectionProfileSettings(mipContext,
                                        CacheStorageType.OnDiskEncrypted,
                                        new ConsentDelegateImplementation());

               // Load the Profile async and wait for the result.
               var protectionProfile = Task.Run(async () => await MIP.LoadProtectionProfileAsync(profileSettings)).Result;

               // Create a ProtectionEngineSettings object, then use that to add an engine to the profile.
               var engineSettings = new ProtectionEngineSettings("user1@tenant.com", authDelegate, "", "en-US");
               engineSettings.Identity = new Identity("user1@tenant.com");
               var protectionEngine = Task.Run(async () => await protectionProfile.AddEngineAsync(engineSettings)).Result;

               // Application Shutdown
               // handler = null; // This will be used in later quick starts.
               protectionEngine = null;
               protectionProfile = null;
               mipContext = null;
          }
     }
}
Replace the placeholder values in the source code that you pasted in by using the following values:
Placeholder Value Example <application-id> The Microsoft Entra Application ID assigned to the application registered in "MIP SDK setup and configuration" (2 instances). 00001111-aaaa-2222-bbbb-3333cccc4444 <friendly-name> A user-defined friendly name for your application. AppInitialization Now do a final build of the application and resolve any errors. Your code should build successfully.
Next steps
Now that your initialization code is complete, you're ready for the next quickstart, where you start to experience the MIP Protection SDKs.
- Explore the MIP Protection SDK .NET sample on GitHub.