Exercise - Troubleshoot a network by using Network Watcher monitoring and diagnostic tools
Azure Network Watcher helps you diagnose configuration errors that prevent virtual machines (VMs) from communicating.
Suppose you have two VMs that can't communicate. You want to diagnose the problem and resolve it as fast as possible. You want to use Network Watcher to do that.
In this unit, you troubleshoot connectivity between two VMs in different subnets.
Important
You need your own Azure subscription to complete this exercise, and you might incur charges. If you don't already have an Azure subscription, create a free account before you begin.
Configure a virtual network and VMs
Let's start by creating the infrastructure. We're also going to purposely create a configuration error:
In your browser, open an Azure Cloud Shell session.
Open the directory in which you want to create resources.
Select Bash in the top left of the Cloud Shell menu bar.
List the supported regions for your subscription.
az account list-locationsCreate a resource group and assign it to the variable name RG by running the following code, replacing
<resource group name>with a name for your resource group, and<name>with the name of a region from the previous output.az group create --name <resource group name> --location <name> RG=<resource group name>Create a virtual network named MyVNet1 with a subnet named FrontendSubnet by running this command.
az network vnet create \
    --resource-group $RG \
    --name MyVNet1 \
    --address-prefixes 10.10.0.0/16 \
    --subnet-name FrontendSubnet \
    --subnet-prefixes 10.10.1.0/24
Create another subnet called BackendSubnet by running this command.
az network vnet subnet create \
--address-prefixes 10.10.2.0/24 \
--name BackendSubnet \
--resource-group $RG \
--vnet-name MyVNet1
Deploy a VM in FrontendSubnet by running this command, replacing
<password>with a complex password of your choice.az vm create \ --resource-group $RG \ --name FrontendVM \ --vnet-name MyVNet1 \ --subnet FrontendSubnet \ --image Win2019Datacenter \ --admin-username azureuser \ --admin-password <password>Note
If you get an error with the message partofthepassword: event not found, create a new password using allowed characters.
Install Internet Information Services (IIS) on FrontendVM by running the following code.
az vm extension set \
    --publisher Microsoft.Compute \
    --name CustomScriptExtension \
    --vm-name FrontendVM \
    --resource-group $RG \
    --settings '{"commandToExecute":"powershell.exe Install-WindowsFeature -Name Web-Server"}' \
    --no-wait
Deploy a virtual machine in BackendSubnet by running this command, replacing
<password>with a complex password of your choice.az vm create \ --resource-group $RG \ --name BackendVM \ --vnet-name MyVNet1 \ --subnet BackendSubnet \ --image Win2019Datacenter \ --admin-username azureuser \ --admin-password <password>Install IIS on BackendVM by running this command.
az vm extension set \
    --publisher Microsoft.Compute \
    --name CustomScriptExtension \
    --vm-name BackendVM \
    --resource-group $RG \
    --settings '{"commandToExecute":"powershell.exe Install-WindowsFeature -Name Web-Server"}' \
    --no-wait
Create a network security group (NSG) MyNsg by entering the following command.
az network nsg create \
    --name MyNsg \
    --resource-group $RG
Create a configuration mistake that prevents communication between the VMs.
az network nsg rule create \
    --resource-group $RG \
    --name MyNSGRule \
    --nsg-name MyNsg \
    --priority 4096 \
    --source-address-prefixes '*' \
    --source-port-ranges '*' \
    --destination-address-prefixes '*' \
    --destination-port-ranges 80 443 3389 \
    --access Deny \
    --protocol TCP \
    --direction Inbound \
    --description "Deny from specific IP address ranges on 80, 443 and 3389."
Run the following command to associate a network security group with a subnet.
az network vnet subnet update \
    --resource-group $RG \
    --name BackendSubnet \
    --vnet-name MyVNet1 \
    --network-security-group MyNsg
Enable Network Watcher for your region
Now, let's use Azure CLI to set up Network Watcher in the same region as the infrastructure.
- Enable Network Watcher by running this command, replacing
<location>with the Azure region you used when you created your resource group at the beginning of this session.
az network watcher configure \
    --enabled true \
    --resource-group $RG \
    --locations <location>
Use Network Watcher to show the topology
Now, you can use Network Watcher in the Azure portal to troubleshoot connectivity between two VMs in different subnets. Your colleague reported a connectivity issue over HTTP/HTTPS between the two VMs. First, investigate the network topology.
Sign in to the Azure portal.
In the global search, enter Network Watcher and select that service. The Network Watcher Overview pane appears, listing the active network watcher.
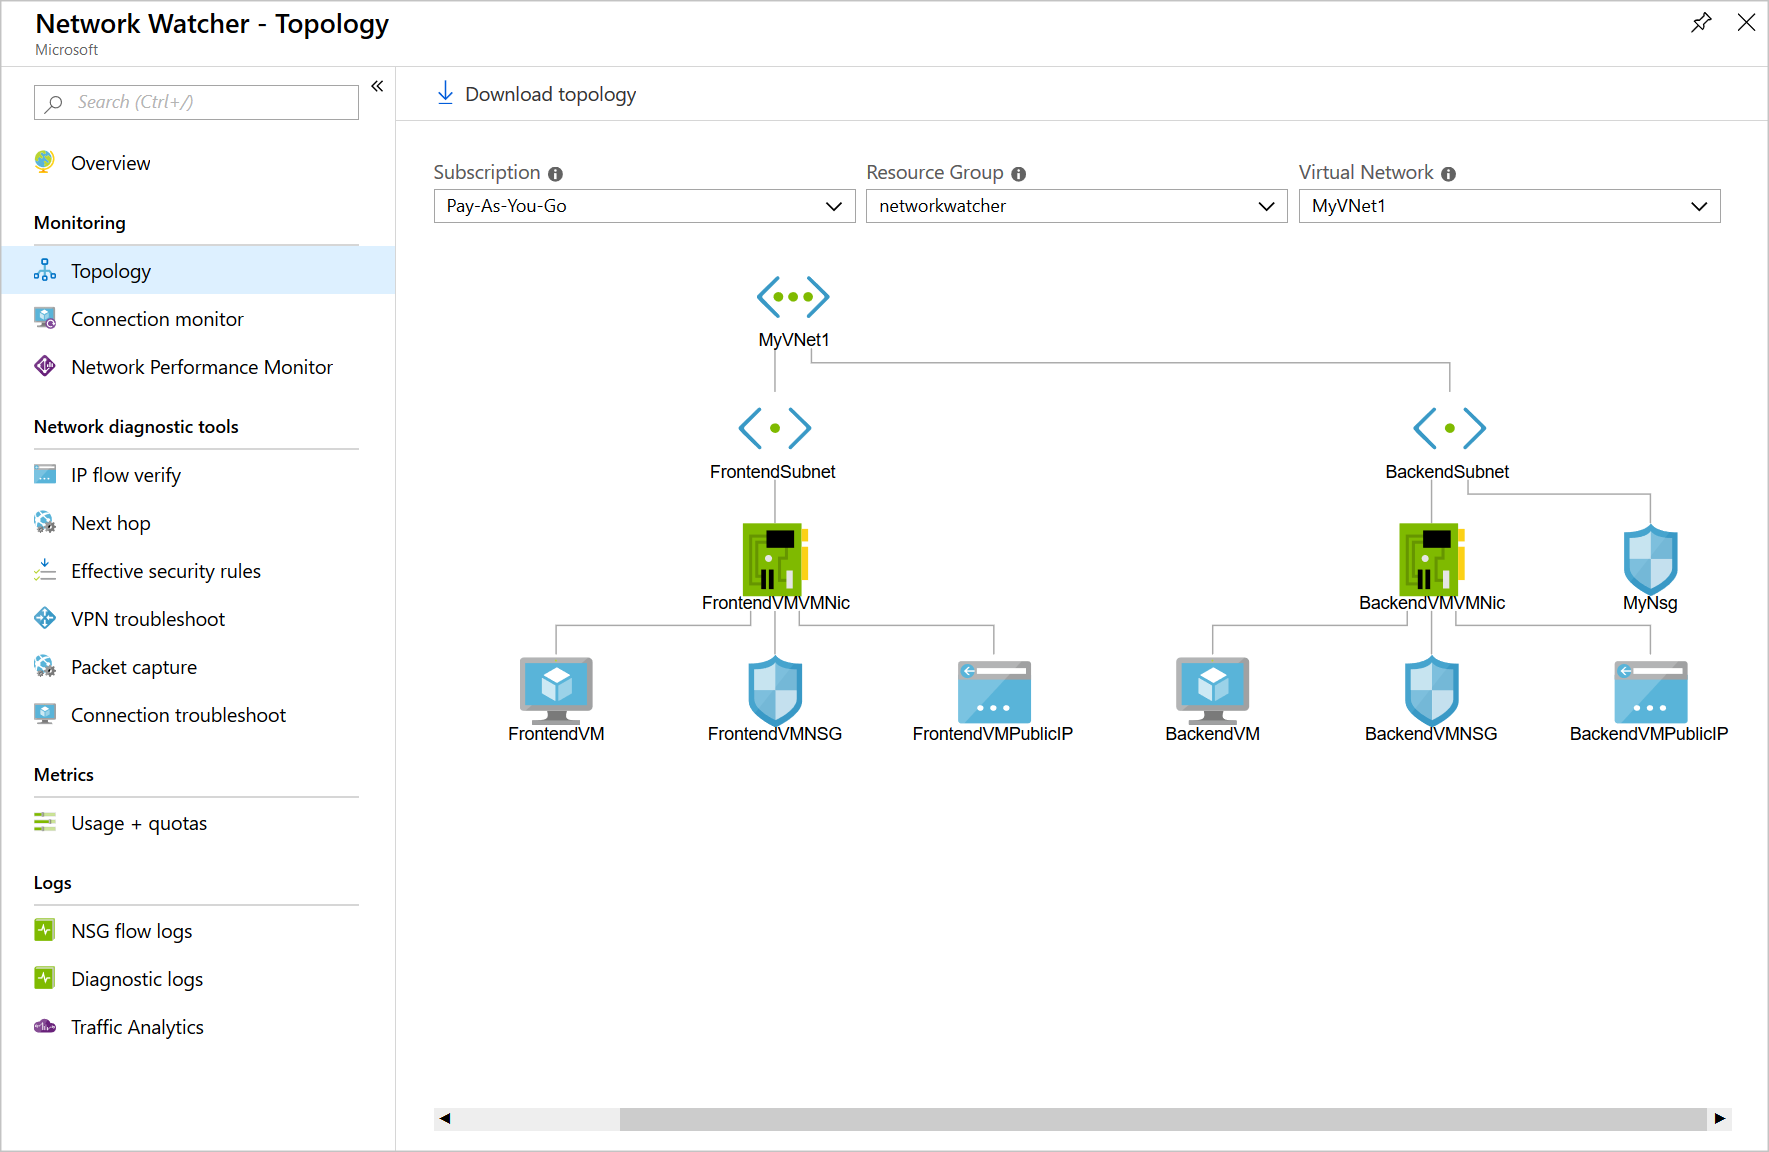
In the Network Watcher menu, under Monitoring, select Topology. The Network Watcher | Topology pane appears.
In the dropdown fields, select your Subscription and Resource Group for this exercise. The network topology for MyVNet1 displays the frontend and backend VM interfaces. This virtual network is the one you created at the beginning of this exercise.

Use Connection Monitor to run tests from the backend to the frontend
The topology appears to be correct. To get more information, let's set up some tests in Connection Monitor. Start by creating a test from the backend VM to the frontend VM.
In the Network Watcher menu, under Monitoring, select Connection monitor. The Network Watcher | Connection monitor Overview pane appears.
From the command bar, select Create. The Create Connection Monitor page appears.
On the Basics tab, enter the following values for each setting.
Setting Value Connection Monitor Name Back-to-front-HTTP-test Subscription Select your subscription from the drop-down list Region Select the Azure region in which you deployed your resources Workspace configuration Use workspace created by connection monitor (default) is checked Select Next : Test groups. The Add test group details pane appears.
For Test group name, enter Back-to-front-HTTP-test-group.
In the Sources box, select Add sources. The Add Sources pane appears.
On the Azure endpoints tab, select Subnet, ensure your subscription is selected, and then select BackendSubnet from the list.
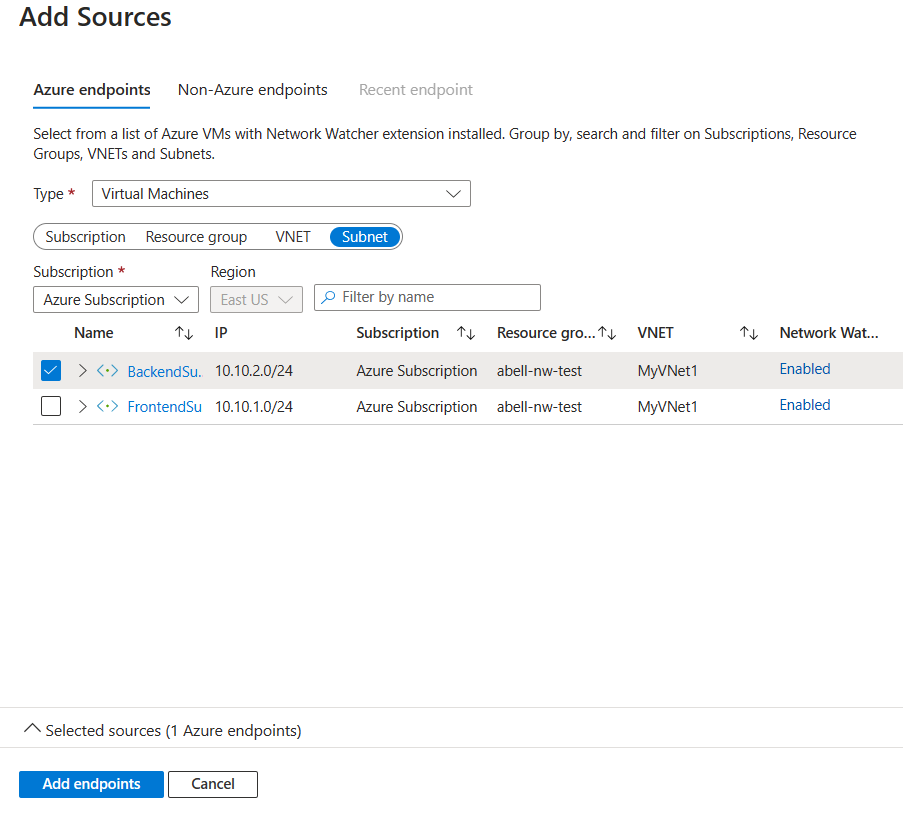
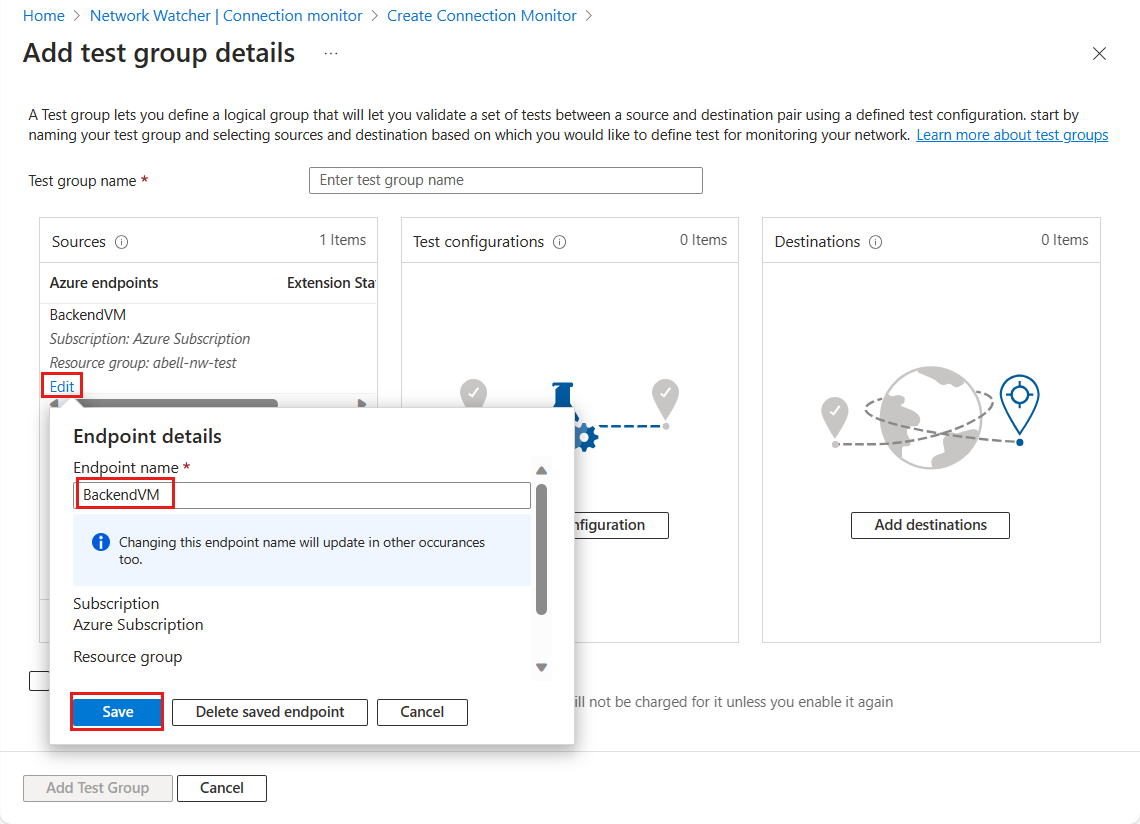
Select Add endpoints. In the Sources box with the BackendSubnet identified as your source. Select this endpoint, select Edit, and rename it to BackendSubnet, then select Save.
In the Test configurations box, select Add Test configuration. The Add Test configuration pane appears.
On the New configuration tab, enter the following values for each setting.
Setting Value Test configuration name Back-to-front-HTTP-test-configuration Protocol HTTP Destination port 80 Test Frequency Every 30 seconds Keep the default values for the remaining settings Select Add Test configuration to add this test configuration to your test group. The Add test group details reappears with your test configuration identified.
In the Destinations box, select Add destinations. The Add Destinations pane appears.
On the Azure endpoints tab, select Subnet, ensure your subscription is selected, and then select FrontendSubnet from the list.
Select Add endpoints. The Add test group details reappears with the FrontendSubnet identified as your destination.
At the bottom of the pane, select Add Test Group. The Create Connection Monitor pane appears.
On the Test groups tab, notice that your test group is listed with source as backend and destination as frontend.
Select Review + create and Create.
If your test doesn't appear on the Connection Monitor pane, select the Refresh button. The results of the Back-to-front-HTTP-test should show that, because the NSG is associated with the backend subnet, traffic flows without issues from the backend VM to the frontend VM.
Use Connection Monitor to run tests from the frontend to the backend
Run the same test in the opposite direction. Let's set up another test in Connection Monitor. Start by creating a test from the frontend VM to the backend VM.
On the Connection Monitor pane, select Create.
On the Basics tab, enter the following values for each setting.
Setting Value Connection Monitor Name Front-to-back-HTTP-test Subscription Select your subscription from the drop-down list Region Select the Azure region in which you deployed your resources Select Next : Test groups. The Add test group details pane appears.
In Test group name, enter Front-to-back-HTTP-test-group, then select Add sources in the Sources box. The Add Sources pane appears.
On the Azure endpoints tab, select Subnet, ensure your subscription is selected, and then select FrontSubnet from the list.
Select Add endpoints. In the Sources box with the BackendSubnet identified as your source. Select this endpoint, select Edit, and rename it to FrontendSubnet, then select Save.
In the Test configurations box, select Add Test configuration. The Add Test configuration pane appears.
On the New configuration tab, enter the following values for each setting.
Setting Value Test configuration name Front-to-back-HTTP-test-configuration Protocol HTTP Destination port 80 Test Frequency Every 30 seconds Accept the default values for the remaining settings Select Add Test configuration. The Add test group details reappears with your test configuration identified.
In the Destinations box, select Add destinations. The Add Destinations pane appears.
On the Azure endpoints tab, select Subnet, ensure your subscription is selected, and then select BackendSubnet from the list.
Select Add endpoints. The Add test group details pane reappears with the BackendSubnet identified as your destination.
At the bottom of the pane, select Add Test Group. The Create Connection Monitor pane reappears.
On the Test groups tab, notice that your Front-to-back-HTTP-test-group is now listed.
Select Review + create and Create.
If your test doesn't appear on the Connection Monitor pane, select the Refresh button. The results of the Front-to-back-HTTP-test should show that, because the NSG is associated with the backend subnet, no traffic flows from the frontend VM to the backend VM.
Use IP flow verify to test the connection
Let's use the IP flow verify tool to get more information.
Select Network Watcher, and in the resource menu under Network diagnostic tools, select IP flow verify.
Configure the test by entering the following values for each setting, and then select Check.
Setting Value Subscription Select your subscription Resource group Select your resource group Virtual machine BackendVM Network interface BackendVMVMNic Protocol TCP Direction Inbound Local IP address 10.10.2.4 Local port 3389 Remote IP 10.10.1.4 Remote port 3389 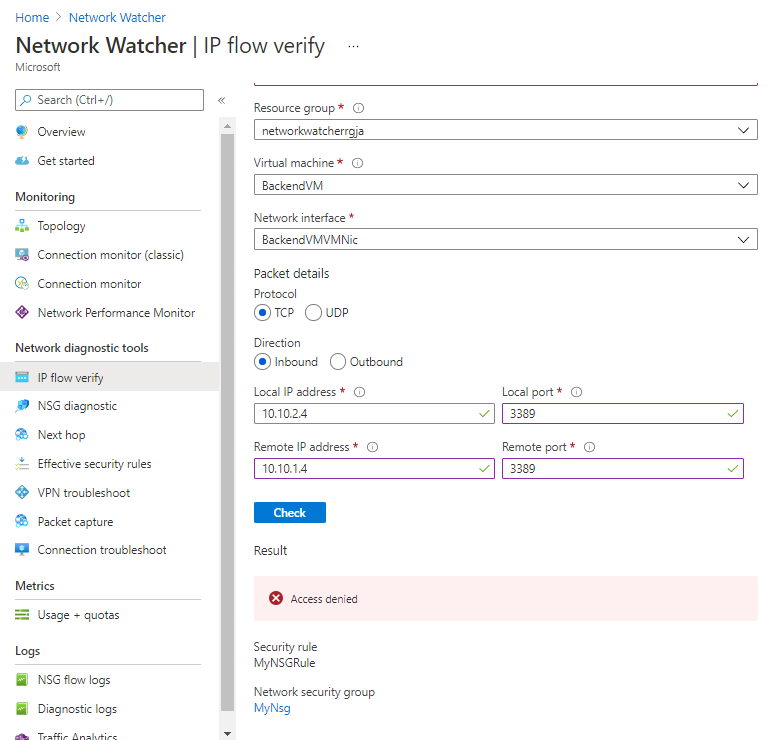
The Result shows Access denied because of NSG and security rules.
In this exercise, you successfully used Network Watcher tools to discover the connectivity issue between the two subnets. Communication is allowed one way but blocked the other way because of NSG rules.