Note
Access to this page requires authorization. You can try signing in or changing directories.
Access to this page requires authorization. You can try changing directories.
For native apps that don't have a reliable way to keep secrets, this documentation will walk you through using Proof Key for Code Exchange (PKCE) support to integrate LinkedIn OAuth 2.0 into your native apps. For more information about PKCE, please see the PKCE RFC.
Step 1 - Configure your LinkedIn application
If you have not already done so, create an application. If you have an existing application, select it to modify its settings.
To prevent fraudulent transactions during the authentication process, we will only communicate with loopback IPs. Ensure your application has opened HTTP server on a random port of loopback interface and listen to the loopback to complete your portion of the authentication workflow. The lookback IP representation supported for IPv4 is http://127.0.0.1:{port} while for IPv6 is http://[::1]:{port}. We will be supporting both HTTP and HTTPS loopback IPs.
Once you save your configuration, your application will be assigned a unique Client ID (otherwise known as Consumer Key or API key) value. Make note of this value — you will need to integrate it into the configuration files or the actual code of your application.
Once you have the app created, please reach out to your point of contact at LinkedIn, and we will enable PKCE OAuth 2 flow for your app.
Important
At the risk of your own application's security, DO NOT share your Client Secret value with anyone! This includes posting it in support forums for help with your application.
Step 2 - Request an Authorization Code
Once your application is properly configured, it's time to request an authorization code. The authorization code is not the final token that you use to make calls to LinkedIn with. It is used in the next step of the OAuth 2.0 flow to exchange for an actual access token. This is an important step because it provides assurance directly from LinkedIn to the user that permission is being granted to the correct application, with the agreed-upon access to the member's LinkedIn profile.
Generate a code verifier and challenge
The PKCE flow requires a code_verifier and code_challenge to prevent the authorization code from being exchanged for an access token by a malicious attacker.
Create a code verifier:
A random URL-safe string (43 to 128 characters long) generated by clients for every authorization request. It is required to be sent to LinkedIn servers with an authorization code to obtain access token as a security measure
Create a code challenge:
The code_challenge is a Base64-URL-encoded string of the SHA256 hash of the code_verifier. It should be sent with authorization code request to LinkedIn. LinkedIn verifies the identity of requester by validating the code challenge was generated from the code verifier while generating an access token.
For more information about the implementation of generating code_verifier and code_challenge, please see PKCE RFC #page-17
Redirecting the User
To request an authorization code, your application should first start an HTTP server on a port on the loopback interface and direct the user's browser to LinkedIn's OAuth 2.0 authorization endpoint. Once the request is made, one of the following two situations will occur:
- If the user has not previously accepted the application's permission request, or the grant has expired or been manually revoked by the user, the browser will be redirected to LinkedIn's authorization screen (as seen below). When the user completes the authorization process, the browser is redirected to the loopback IP provided in the
redirect_uriquery parameter. - If there is a valid existing permission grant from the user, the authorization screen is by-passed and the user is immediately redirected to the loopback IP provided in the
redirect_uriquery parameter.
Note that if you ever change the scope permissions that your application requires, your users will have to re-authenticate to ensure that they have explicitly granted your application all of the permissions that it requests on their behalf.
Important
It's a requirement that all native applications use the default browser launched by user's operating system to perform OAuth authorization request, rather than an embedded in-app browser or webview.
GET https://www.linkedin.com/oauth/native-pkce/authorization
| Parameter | Description | Required |
|---|---|---|
| response_type | The value of this field should always be: code |
Yes |
| client_id | The "API Key" value generated when you registered your application. | Yes |
| redirect_uri | The loopback IP your users will be sent back to after authorization. Start an HTTP listener to listen to the redirect. e.g. http://127.0.0.1:3000/redirect or http://[::1]:3000/redirect |
Yes |
| state | A unique string value of your choice that is hard to guess. Used to prevent CSRF. For example state=DCEeFWf45A53sdfKef424 |
Yes |
| scope | A URL-encoded, space-delimited list of member permissions your application is requesting on behalf of the user. For example scope=r_sales_nav_analytics. See Understanding application permissions for additional information about scopes. |
Optional |
| code_challenge | The encoded code_verifier used to secure authorization code grants via Proof Key for Code Exchange (PKCE) from a native client. For more information, see the PKCE RFC. | Yes |
| code_challenge_method | The method used to encode code_verifier for code_challenge. The value of this field should always be: S256. |
Yes |
Sample Request
GET https://www.linkedin.com/oauth/native-pkce/authorization?response_type=code&client_id={your_client_id}&redirect_uri=http://127.0.0.1:3000&state=foobar&scope=r_liteprofile&code_challenge=E9Melhoa2OwvFrEMTJguCHaoeK1t8URWbuGJSstw-cM&code_challenge_method=S256
The User Experience
Once redirected, the user will be presented with LinkedIn's authentication dialog box. This identifies your application as well as outlines the particular member permissions that your application has requested. If desired, the logo and application name can be changed in your application configuration.
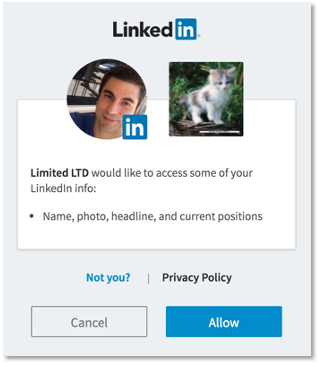
Application Approved
By providing valid LinkedIn credentials and clicking on the "Allow Access" button, the user is approving your application's request to access their member data and interact with LinkedIn on their behalf. This approval instructs LinkedIn to redirect the user back to the loopback IP that you defined in your redirect_uri parameter, and the HTTP server your application started should be able to receive the authorization request in the loopback interface.
Attached to the redirect_uri will be two important URL arguments that you need to read from the request:
code— The OAuth 2.0 authorization code.state— A value used to test for possible CSRF attacks.
The code is a value that you will exchange with LinkedIn for an actual OAuth 2.0 access token in the next step of the authentication process. For security reasons, the authorization code has a very short lifespan and must be used within moments of receiving it - before it expires and you need to repeat all of the previous steps to request another.
Before you accept the authorization code, your application should ensure that the value returned in the state parameter matches the state value from your original authorization code request. This ensures that you are dealing with the real original user and not a malicious script that has somehow slipped into the middle of your authentication flow. If the state values do not match, you are likely the victim of a CSRF attack and you should throw an HTTP 401 error code in response.
Application Rejected
If the user choses to cancel, or the request fails for any other reason, their client will be redirected back to your redirect_uri callback URL with the following additional query parameters appended:
error- A code indicating the type of error. Two available strings are:- user_cancelled_login - The user refused to login into LinkedIn account.
- user_cancelled_authorize - The user refused to authorize permissions request from your application.
error_description- A URL-encoded textual description that summarizes error.state- A value passed by your application to prevent CSRF attacks.
Step 3 - Exchange Authorization Code for an Access Token
The final step towards obtaining an Access Token is for your application to ask for one using the Authorization Code it just acquired. This is done by making the following "x-www-form-urlencoded" HTTP POST request:
POST https://www.linkedin.com/oauth/v2/accessToken
| Parameter | Description | Required |
|---|---|---|
| grant_type | The value of this field should always be: authorization_code |
Yes |
| code | The authorization code you received from Step 2. | Yes |
| redirect_uri | The same redirect_uri value that you passed in the previous step. |
Yes |
| client_id | The "API Key" value generated Step 1. | Yes |
| code_verifier | The code_verifier you used to generate code_challenge in the previous step. |
Yes |
Sample Request
POST https://www.linkedin.com/oauth/v2/accessToken

Content-Type: application/x-www-form-urlencoded
grant_type=authorization_code&code={authorization_code_from_step2_response}&redirect_uri=http://127.0.0.1:3000&client_id={your_client_id}&code_verifier=dBjftJeZ4CVP-mB92K27uhbUJU1p1r_wW1gFWFOEjXk
Access Token Response
A successful Access Token request will return a JSON object containing the following fields:
access_token— The access token for the user. This value must be kept secure, as per your agreement to the API Terms of Use.expires_in— The number of seconds remaining, from the time it was requested, before the token will expire. Currently, all access tokens are issued with a 60 day lifespan.
Important
The length of Access Tokens is ~500 characters. We recommend that you plan for your application stack to handle tokens with length of at least 1000 characters in order to accommodate current and any future expansion plans. This applies to both Access Tokens as well as Refresh Tokens.
Access Token Scopes and Lifetime
Access Tokens stay valid until the number of seconds returned in the expires_in field in the API response. A user can go through the OAuth flow on multiple clients (browsers or devices) and simultaneously hold multiple valid access tokens as long as the same scope is requested. If the user requests a different scope than the previously granted scope, then all the previous access tokens are invalidated.
Step 4 - Make authenticated requests
Once you've obtained an Access Token, you can start making authenticated API requests on behalf of the user. This is accomplished by including an "Authorization" header in your HTTP call to LinkedIn's API. Here is a sample HTTP request including the header value that includes the token:
Sample Request
GET https://api.linkedin.com/v2/me/

Connection: Keep-Alive
Authorization: Bearer {access_token}
Invalid Tokens
If you make an API call using an invalid token, you will receive a "401 Unauthorized" response back from the server. A token could be invalid and in need of regeneration because:
- It has expired.
- The user has revoked the permission they initially granted to your application.
- You have changed the member permissions (scope) your application is requesting.
- A subsequent OAuth2 flow that generated a new access token. The previous token will be invalidated.
Since a predictable expiry time is not the only contributing factor to token invalidation, it is very important that you code your applications to properly handle an encounter with a 401 error by redirecting the user back to the start of the authorization workflow.
Note
In case of downstream failures in verification of the access token, you will receive a 500 error response back.
Step 5 - Refresh your Access Tokens
To protect our member's data, LinkedIn does not generate excessively long-lived access tokens. You should ensure your application is built to handle refreshing user tokens before they expire, to avoid having to unnecessarily send your users through the authorization process to re-gain access to their LinkedIn profile.
Refreshing a token
To refresh an Access Token, simply go through the authorization process outlined in this document again to fetch a new token. During the refresh workflow, provided the following conditions are met, the authorization dialog portion of the flow is automatically skipped and the user is redirected back to your callback URL, making acquiring a refreshed access token a seamless behind-the-scenes user experience:
- The user is still logged into www.linkedin.com
- The user's current access token has not expired
If the user is no longer logged in to www.linkedin.com, or their access token has expired, they will be sent through the normal authorization process outlined at the start of this document.
Understanding application permissions
All REST API calls require certain permissions to be granted from the LinkedIn member before they can be made. This system ensures that members are made aware of what an application could possibly access or do on their behalf before approving it.
The permissions that members are asked to grant are determined based on the permissions you tell your application to ask for during the OAuth 2.0 authentication process. They can be specified within the LinkedIn application configuration itself, or they can be explicitly requested using the scope argument during the authorization step of the OAuth 2.0 process.
If your application requires multiple permissions to access all the data it requires, your users will be required to accept all of them to proceed. It is not possible for users to accept only a subset of the requested application permissions. Ensure that your application requests the fewest necessary permissions, to provide the best experience for the user.