Features in Configuration Manager technical preview version 1905
Applies to: Configuration Manager (technical preview branch)
This article introduces the features that are available in the technical preview for Configuration Manager, version 1905. Install this version to update and add new features to your technical preview site.
Review the technical preview article before installing this update. That article familiarizes you with the general requirements and limitations for using a technical preview, how to update between versions, and how to provide feedback.
The following sections describe the new features to try out in this version:
Improved control over WSUS Maintenance
You now have more granular control over the WSUS maintenance tasks that Configuration Manager runs to maintain healthy software update points. In addition to declining expired updates in WSUS, Configuration Manager can now remove obsolete updates from the WSUS database. The WSUS maintenance occurs after every synchronization.
Permissions
When the WSUS database is on a remote SQL Server, the site server's computer account needs the following SQL Server permissions:
- The
db_datareaderanddb_datawriterfixed database roles. For more information, see Database-Level Roles. - The
CONNECT SQLserver permission must be granted to the site server's computer account. For more information, see GRANT Server Permissions (Transact-SQL).
Try it out!
Try to complete the tasks. Then send Feedback with your thoughts on the feature.
In the Configuration Manager console, navigate to Administration > Overview > Site Configuration > Sites.
Select the site at the top of your Configuration Manager hierarchy.
Click Configure Site Components in the Settings group, and then click Software Update Point to open Software Update Point Component Properties.
In the WSUS Maintenance tab, select Remove obsolete updates from the WSUS database.
The obsolete update removal will be allowed to run for a maximum of 30 minutes before being stopped. It will start up again after the next synchronization occurs.
Improvements to Configuration Manager console
Based on customer feedback at the Midwest Management Summit (MMS) 2019, this release includes the following improvements to the Configuration Manager console:
Collections tab in devices node
In the Assets and Compliance workspace, go to the Devices node, and select a device. In the details pane, switch to the new Collections tab. This tab lists the collections that include this device.
Note
This tab currently isn't available from a devices subnode under the Device Collections node. For example, when you select the option to Show Members on a collection.
Task sequences tab in applications node
In the Software Library workspace, expand Application Management, go to the Applications node, and select an application. In the details pane, switch to the new Task sequences tab. This tab lists the task sequences that reference this application.
Show collection name for scripts
In the Monitoring workspace, select the Script Status node. It now lists the Collection Name in addition to the ID.
Real-time actions from device lists
There are various ways to display a list of devices under the Devices node in the Assets and Compliance workspace.
In the Assets and Compliance workspace, select the Device Collections node. Select a device collection, and choose the action to Show members. This action opens a subnode of the Devices node with a device list for that collection.
- When you select the collection subnode, you can now start CMPivot from the Collection group of the ribbon.
In the Monitoring workspace, select the Deployments node. Select a deployment, and choose the View Status action in the ribbon. In the deployment status pane, double-click the total assets to drill-through to a device list.
- When you select a device in this list, you can now start CMPivot and Run Scripts from the Device group of the ribbon.
Multiselect and delete packages
In the Software Library workspace, expand Application Management, and select the Packages node. select more than one package. In the Package group of the ribbon, you can now delete more than one package at a time.
Order by program name in task sequence
In the Software Library workspace, expand Operating Systems, and select the Task Sequences node. Edit a task sequence, and select or add the Install Package step. If a package has more than one program, the drop-down list now sorts the programs alphabetically.
Correct names for client operations
In the Monitoring workspace, select Client Operations. The operation to Switch to next Software Update Point is now properly named.
Configure the default maximum run time for software updates
You can now specify the maximum amount of time a software update installation has to complete. You can specify the maximum run time for the following:
Feature updates - An update that is in one of these three classifications:
- Upgrades
- Update rollups
- Service packs
Non-feature updates - An update that isn't a feature upgrade and whose product is listed as one of the following:
- Windows 10 (all versions)
- Windows Server 2012
- Windows Server 2012 R2
- Windows Server 2016
- Windows Server 2019
- Microsoft 365
All other products and classifications are not configurable with this setting. If you need to change the maximum run time of one of these updates, configure the software update settings
Try it out!
Try to complete the tasks. Then send Feedback with your thoughts on the feature.
- In the Administration workspace, expand Site Configuration and click on Sites.
- Right-click on your top-level site, and select Configure Site Components then Software Update Point.
- In the Maximum Run Time tab, modify the values for the following settings:
- Maximum run time for feature updates (minutes)
- Maximum run time for non-feature updates (minutes)
Important
These settings only change the maximum runtime for new updates that are synchronized from Microsoft Update. It doesn't change the run time on existing feature or non-feature updates.
Known issue
This feature is listed in the What's New workspace of this technical preview version, but isn't available yet.
Windows Defender Application Guard file trust criteria
There's a new policy setting that enables users to trust files that normally open in Windows Defender Application Guard (WDAG). Upon successful completion, the files will open on the host device instead of in WDAG. For more information about the WDAG policies, see Configure Windows Defender Application Guard policy settings.
Prerequisites
- Clients running Windows 10 version 1809 or later
Permissions
- Author Policy, Read, Run Report, and Modify Report under Settings for Windows Defender Application Guard
Try it out!
Try to complete the tasks. Then send Feedback with your thoughts on the feature.
Create a new WDAG policy
- In the Assets and Compliance workspace, expand Endpoint Protection, then select the Windows Defender Application Guard node.
- Select Create Windows Defender Application Guard policy in the ribbon.
- In wizard, provide the Name for policy, and any other WDAG policies you need.
- Under the File Management page, choose your option for Allow users to trust files that open in Windows Defender Application Guard.
- Prohibited: Don't allow users to mark files as trusted (default).
- File checked by antivirus: Allow users to mark files as trusted after an antivirus check.
- All files: Allow users to mark any file as trusted.
- Complete the wizard for additional policies, then select Close to exit the wizard once you're done.
- Deploy the policy by selecting Deploy in the ribbon.
Edit an existing WDAG policy
- In the Assets and Compliance workspace, expand Endpoint Protection, then select the Windows Defender Application Guard node.
- Right-click on the policy you want to edit, then select Properties.
- Switch to the File Management tab and choose your option for Allow users to trust files that open in Windows Defender Application Guard.
- Prohibited: Don't allow users to mark files as trusted (default).
- File checked by antivirus: Allow users to mark files as trusted after an antivirus check.
- All files: Allow users to mark any file as trusted.
- Select OK to save your selection and close the policy properties.
- Deploy the policy by selecting Deploy in the ribbon.
Known issues
In the client's DCMReporting.log, you may see errors logged which typically don't effect functionality:
- On compatible devices:
- FileTrustCriteria_condition not found
- On non-compatible devices:
- FileTrustCriteria_condition not found
- FileTrustCriteria_could not be located in the map
- FileTrustCriteria_condition not found in digest
- On compatible devices:
Application groups
Create a group of applications that you can send to a user or device collection as a single deployment. The metadata you specify about the app group is seen in Software Center as a single entity. You can order the apps in the group so that the client installs them in a specific order.
Try it out!
Try to complete the tasks. Then send Feedback with your thoughts on the feature.
In the Configuration Manager console, go to the Software Library workspace. Expand Application Management and select the Application Group node.
On the General Information page, specify information about the app group.
On the Software Center page, include information that shows in Software Center.
On the Application Group page, select Add. Select one or more apps for this group. Reorder them using the Move Up and Move Down actions.
Complete the wizard.
Deploy the app group using the same process as for an application. For more information, see Deploy applications.
To troubleshoot an app group deployment, use the AppGroupHandler.log and AppEnforce.log files on the client.
Known issues
- Deploy the app group as required, without user interaction, and to a device collection.
- The app group isn't currently shown in Software Center.
- The deployment of an app group doesn't show in the Deployments node of the Monitoring workspace.
Task sequence as an app model deployment type
You can now install complex applications using task sequences via the application model. Add a deployment type to an app that's a task sequence, either to install or uninstall the app. This feature provides the following behaviors:
Deploy an app task sequence to a user collection
Display the app task sequence with an icon in Software Center. An icon makes it easier for users to find and identify the app task sequence.
Define additional metadata for the app task sequence, including localized information
You can only add a non-OS deployment task sequence as a deployment type on an app. High-impact, OS deployment, or OS upgrade task sequences aren't supported. A user-targeted deployment still runs in the user context of the local System account.
Prerequisites
Create a custom task sequence:
Use only non-OS deployment steps, for example: Install Application, Run Command Line, or Run PowerShell Script. For more information including the full list of supported steps, see Create a task sequence for non-OS deployments.
On the task sequence properties, User Notification tab, don't select the option for a high-impact task sequence.
Try it out!
Try to complete the tasks. Then send Feedback with your thoughts on the feature.
In the Configuration Manager console, create an application. Use the option to Manually specify the application information.
Tip
You can also add this deployment type to an existing app.
When you add a deployment type, select Task Sequence from the list of Types.
On the Task Sequence page of the Create Deployment Type wizard, select an Install task sequence. Optionally, select an Uninstall task sequence.
Note
If your task sequence doesn't appear in the list, double-check that it doesn't include any OS deployment or OS upgrade steps. Also confirm that it isn't marked as a high-impact task sequence. For more information, see the Prerequisites.
Further configure the app and deployment type as necessary. For example, customize the icon on the Software Center tab of the app.
Deploy the app as usual.
Known issue
The client-side functionality isn't yet completed, so you won't see the deployment in Software Center.
BitLocker management
You can now use Configuration Manager to install and manage the Microsoft BitLocker Administration and Monitoring (MBAM) client.
For more information, see Microsoft expands BitLocker management capabilities for the enterprise.
Try it out!
Try to complete the tasks. Then send Feedback with your thoughts on the feature.
In the Configuration Manager console, go to the Assets and Compliance workspace, expand Endpoint Protection, and select the BitLocker Management (MBAM) node.
In the ribbon, select the action to create a policy.
On the General page, specify a name and optional description. Select the components to enable on clients with this policy:
Client Management: Manage the key recovery service backup of BitLocker Drive Encryption recovery information
Operating System Drive: Manage whether the OS drive is encrypted
On the Client Management page, specify the following settings:
Configure MBAM Services: If you enable this setting, key recovery info is automatically and silently backed up to the Configuration Manager site.
Select BitLocker recovery information to store: Configure it to use a recovery password and key package, or just a recovery password.
Enter client checking status frequency in (minutes): This value is the interval at which the MBAM client checks with the site for updated policy.
On the Operating System Drive page, specify the following settings:
Operating System Drive Encryption Settings: If you enable this setting, the user has to protect the OS drive, and BitLocker encrypts the drive. If you disable it, the user can't protect the drive.
Note
If the drive is already encrypted, and you disable this setting, BitLocker decrypts the drive.
Allow BitLocker without a compatible TPM (requires a password)
Select protector for operating system drive: Configure it to use a TPM and PIN, or just the TPM.
Configure minimum PIN length for startup: If you require a PIN, this value is the shortest length the user can specify. The user enters this PIN when the computer boots to unlock the drive.
Complete the wizard.
Deploy the policy to a device collection.
Monitor
Use the following logs to monitor and troubleshoot:
Client
- MBAM event log: in the Windows Event Viewer, browse to Applications and Services > Microsoft > Windows > MBAM
- BitlockerManagementHandler.log in client logs path,
%WINDIR%\CCM\Logsby default
Management point
- MBAM Recovery Service event log
- MBAM Recovery Service trace logs:
<Default IIS Web Root>\Microsoft BitLocker Management Solution\Logs\Recovery And Hardware Service\trace*.etl
Task sequence debugger
The task sequence debugger is a new troubleshooting tool. You deploy a task sequence in debug mode to a collection of one device. It lets you step through the task sequence in a controlled manner to aid troubleshooting and investigation.
Prerequisites
Update the Configuration Manager client on the target device
Update the boot image associated with the task sequence to make sure it has the latest client version
Try it out!
Try to complete the tasks. Then send Feedback with your thoughts on the feature.
In the Configuration Manager console, go to the Software Library workspace, expand Operating Systems, and select Task Sequences.
Select a task sequence. In the Deployment group of the ribbon, select Debug.
Tip
Alternatively, set the variable TSDebugMode to
TRUEon a collection to which the task sequence is deployed. This variable changes the behavior of any task sequence on any device in that collection.
When the task sequence runs on the device in Windows PE, the Task Sequence Debugger window opens similar to the following screenshot:
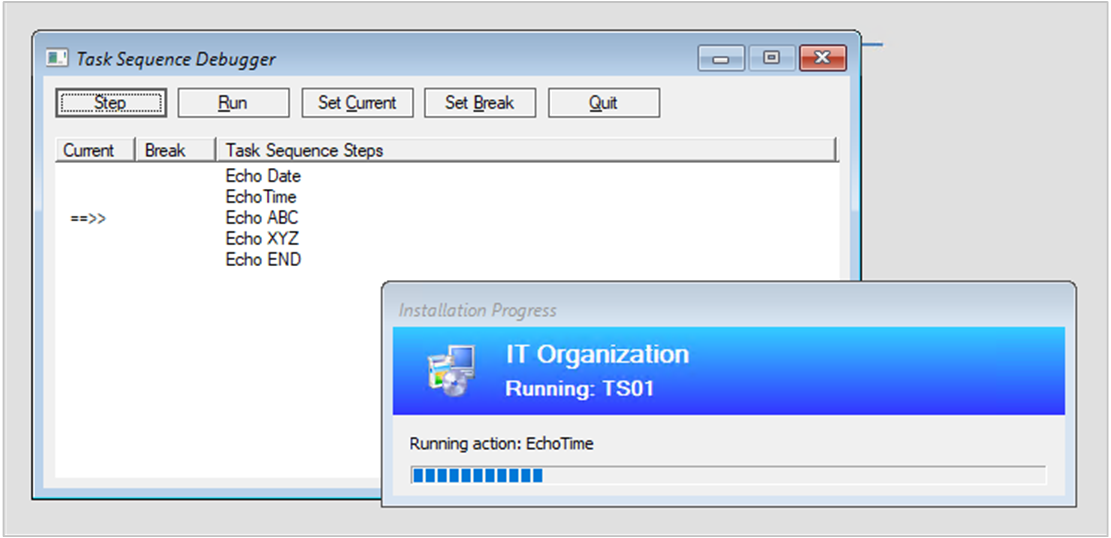
The debugger includes the following controls:
Step: From the current position, run only the next step in the task sequence.
Run: From the current position, run the task sequence normally to the end or the next break point.
Set Current: Select a step in the debugger and then select Set Current. This action moves the current pointer to that step. This action allows you to skip steps or move backwards.
Warning
The debugger doesn't consider the type of step when you change the current position in the sequence. Some steps may fail or cause significant damage to a device if run out of order. Use this option at your own risk.
Set Break: Select a step in the debugger and then select Set Break. This action adds a break point in the debugger. When you Run the task sequence, it stops at a break.
Quit: Quit the debugger and stop the task sequence.
Known issues
The debugger currently only works in Windows PE.
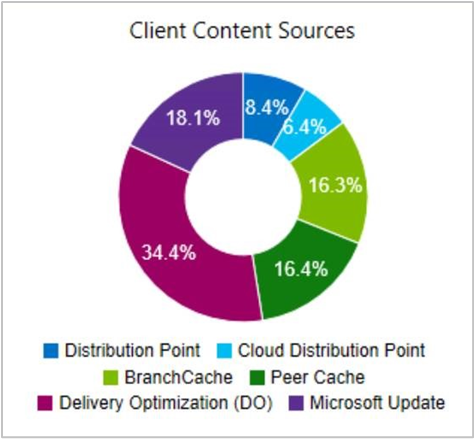
Delivery Optimization in client data sources dashboard
The Client data sources dashboard now includes Delivery Optimization data. This dashboard helps you understand from where clients are getting content in your environment.
For example, the Client Content Sources tile displays the source from which clients got content:
To include Delivery Optimization on this dashboard, do the following actions:
Configure the client setting, Enable installation of Express Updates on clients in the Software Updates group
Deploy Windows 10 express updates
For more information, see Manage Express installation files for Windows 10 updates.
The dashboard also includes the Microsoft Update source. Devices report this source when the Configuration Manager client downloads software updates from Microsoft cloud services. These services include Microsoft Update and Microsoft 365.
Improvements to Community Hub
Aside from the existing support for scripts and reports, the Community Hub now supports the following objects:
- Task sequences
- Applications
- Configuration items
The hub doesn't share any package source content associated with these objects. For example, boot images, OS upgrade packages, or driver packages referenced by a task sequence.
The hub currently doesn't support object dependencies. For example, if you share app A that is dependent upon app B, it only shares app A with the community. Similarly, if a task sequence includes the Install Application step, the referenced apps aren't shared.
It removes any password or other secret from a task sequence before sharing.
For more information on Community Hub, including setup prerequisites and necessary permissions, see Community hub and GitHub.
View SMBIOS GUID in device lists
In both the Devices and Device Collections nodes, you can now add a new column for SMBIOS GUID. This value is the same as the BIOS GUID property of the System Resource class. It's a unique identifier for the device hardware.
OneTrace log viewer
OneTrace is a new log viewer with Support Center. It works similarly to CMTrace, with the following improvements:
- A tabbed view
- Dockable windows
- Improved search capabilities
- Ability to enable filters without leaving the log view
- Scrollbar hints to quickly identify clusters of errors
- Fast log opening for large files
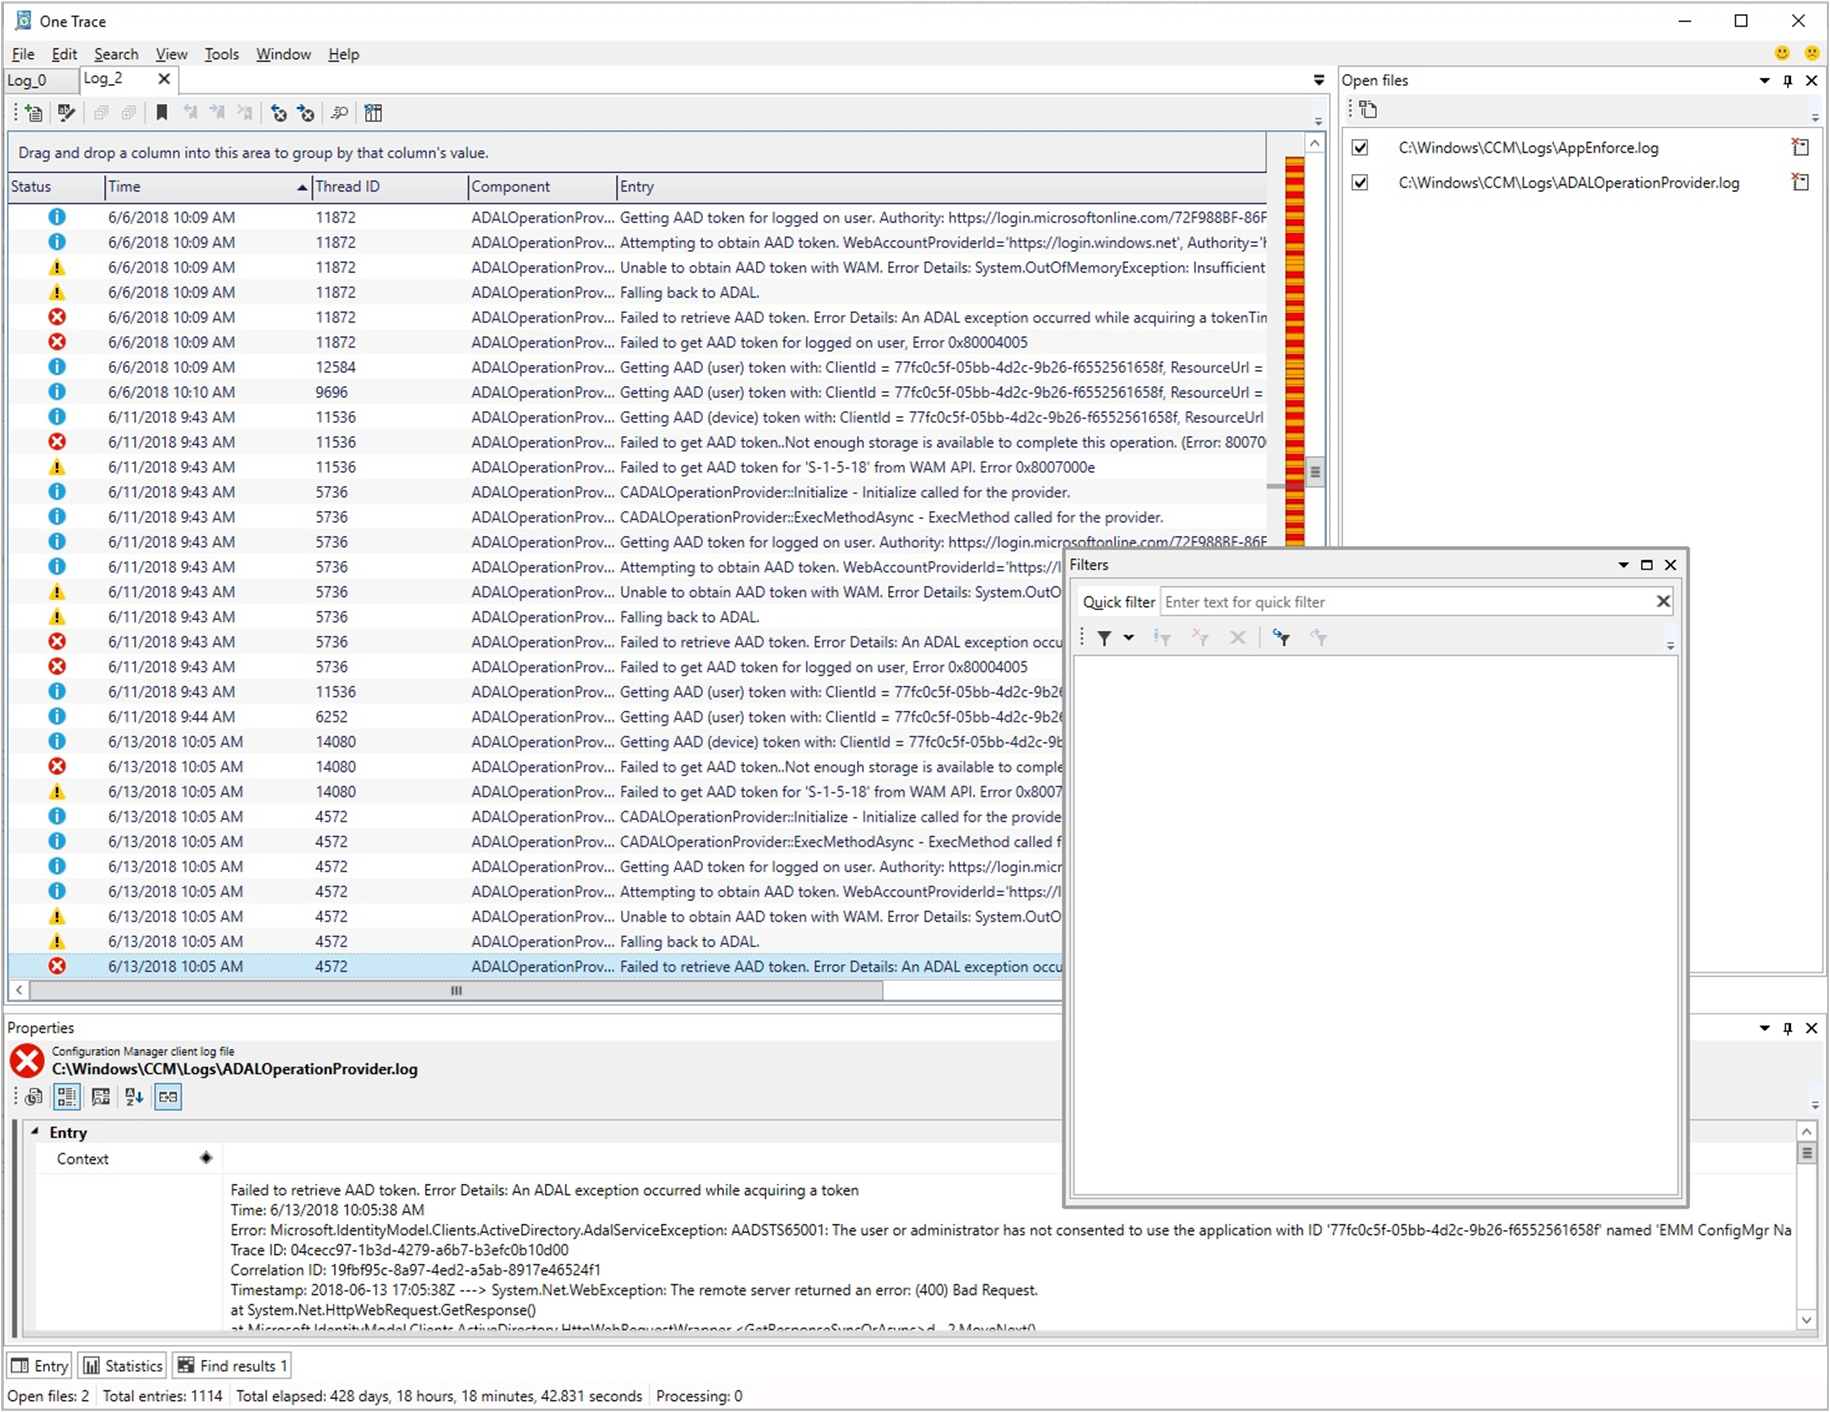
OneTrace works with many types of log files, such as:
- Configuration Manager client logs
- Configuration Manager server logs
- Status messages
- Windows Update ETW log file on Windows 10
- Windows Update log file on Windows 7 & Windows 8.1
Prerequisites
- .NET Framework version 4.6 or later
Install
Find the Support Center installer on the site server at the following path: cd.latest\SMSSETUP\Tools\SupportCenter\SupportCenterInstaller.msi.
Note
Support Center and OneTrace use Windows Presentation Foundation (WPF). This component isn't available in Windows PE. Continue to use CMTrace in boot images with task sequence deployments.
Software Center infrastructure improvements
Software Center communicates with a management point for apps targeted to users as available. It doesn't use the application catalog anymore. This change makes it easier for you to remove the application catalog from the site.
Now in this release, the management point checks the health of its user service every five minutes. It reports any issues via status messages for the SMS_MP_CONTROL_MANAGER site component.
Important
These iterative improvements to Software Center and the management point are to retire the application catalog roles. The Silverlight user experience isn't supported as of current branch version 1806. In the first current branch release after June 30, 2019, updated clients will automatically use the management point for user-available application deployments. You also won't be able to install new application catalog roles. Support ends for the application catalog roles with version 1910.
Improvements to Software Center tab customizations
You can now add up to five custom tabs in Software Center. You can also edit the order in which these tabs appear in Software Center.
Try it out!
Try to complete the tasks. Then send Feedback with your thoughts on the feature.
Add custom tabs
- In the Administration workspace, go to the Client Settings mode.
- Right-click on the Default Client Settings or one of your custom settings, then select Properties.
- Go to the Software Center group and click on Customize to open the Software Center Customization window.
- The Customize button is enabled once Yes is set for Select these new settings to specify company information.
- Select Tabs from the tab control located at the top, then click Add Tab.
- Type in your Tab name (maximum 20 characters), its Content URL, then OK when done.
- Click Add Custom Tab and add a second custom tab.
- Click OK in the Software Center Customization window, then OK on your settings window.
- Observe the changes in Software Center.
Reorder custom tabs
- In Client Settings, go to the *Software Center group and click on Customize.
- Select a tab from the visible tabs list, then click either Move Up or Move Down.
- Click Ok.
- Observe the changes in Software Center.
Improvements to app approvals
This release includes the following improvements to app approvals:
Note
These improvements refer to the optional feature Approve application requests for users per device.
If you approve an app request in the console, and then deny it, you can now approve it again. The app is reinstalled on the client after you approve it.
There's a new WMI method, DeleteInstance to remove an app approval request. This action doesn't uninstall the app on the device. If it's not already installed, the user can't install the app from Software Center. The version 1810 blog post below includes a PowerShell script sample that you can adjust for use with this API.
Call the CreateApprovedRequest API to create a pre-approved request for an app on a device. To prevent automatically installing the app on the client, set the AutoInstall parameter to
FALSE. The user sees the app in Software Center, but it's not automatically installed.
Other app approval resources
- Approve applications
- Application approval improvements in ConfigMgr 1810
- Updates to the application approval process in Configuration Manager
Retry the install of pre-approved applications
You can now retry the installation of an app that you previously approved for a user or device. The approval option is only for available deployments. If the user uninstalls the app, or if the initial install process fails, Configuration Manager doesn't reevaluate its state and reinstall it. This feature allows a support technician to quickly retry the app install for a user that calls for help.
Prerequisites
Enable the optional feature Approve application requests for users per device.
Deploy an app that requires approval, and approve it. For more information, see Approve applications.
Tip
Alternatively, use the other new feature in this technical preview version to Install applications for a device. It creates an approved request for the app on the device.
Your user account needs the Approve permission on the Application object. For example, the Application Administrator or Application Author built-in roles have this permission.
Try it out!
Try to complete the tasks. Then send Feedback with your thoughts on the feature.
To test this feature, manually uninstall the app on the device.
In the Configuration Manager console, go to the Software Library workspace, expand Application Management, and select the Approval Requests node.
Select the previously approved app. In the Approval Request group of the ribbon, select Retry install.
Install applications for a device
From the Configuration Manager console, you can now install applications to a device in real time. This feature can help reduce the need for separate collections for every application.
Prerequisites
Enable the optional feature Approve application requests for users per device.
Deploy the application as available to the All Systems collection.
On the Deployment Settings page of the deployment wizard, select the following option: An administrator must approve a request for this application on the device.
Note
With these deployment settings, the app isn't shown as available in Software Center. A user can't install the app with this deployment. After you use this action to install the app, the user can run it, and see its installation status in Software Center.
Your user account needs the following permissions:
Application: Approve
Collection: View Collected File
For example, the Application Administrator built-in role has these permissions.
Try it out!
Try to complete the tasks. Then send Feedback with your thoughts on the feature.
In the Configuration Manager console, go to the Assets and Compliance workspace, and select the Devices node. Select the target device, and then select the Install application action in the ribbon.
Select one or more applications from the list. The list only shows applications that you already deployed.
This action triggers the installation of the selected pre-deployed applications on the device.
To see status of the approval request, in the Software Library workspace, expand Application Management, and select the Approval Requests node. Monitor the app installation the same as usual in the Deployments node of the Monitoring workspace.
More frequent countdown notifications for restarts
End users will now be reminded more frequently of a pending restart with intermittent countdown notifications. The end user will be reminded about restarting their device every 4 hours until the final countdown notification occurs.
Try it out!
Try to complete the tasks. Then send Feedback with your thoughts on the feature.
- Go to the Client Settings node under the Administration workspace.
- Right-click on the client device settings to modify and select Properties, or create a new set of custom settings.
- On the Computer Restart page, set the following values:
- Display a temporary notification to the user that indicates the interval before the user is logged off or the computer restarts (minutes) - Indicates the total time given to users to restart the device after software enforcement. The value should be greater than 240 minutes (4 hours) and at least 4 hours greater than the setting for the dialog the user can't close.
- If the user closes or clicks Snooze on the restart notification from the dialog window, the snooze interval is 4 hours until the next temporary notification occurs.
- When toast notifications are used and the user didn't click on it or notice it, the same toast notification will reoccur in 4 hours.
- For more information on what a toast notification is, see User notifications
- Display a dialog box that the user cannot close, which displays the countdown interval before the user is logged off or the computer restarts (minutes) - Indicates the time interval for the final countdown notification, which the user can't close.
- For example, if the value is 60, the user will see a notification they can't close an hour before restart enforcement.
- The final countdown notification will always be a dialog window with the Snooze button disabled.
- When a deployment requires a restart, show a dialog window to the user instead of a toast notification
- No - Toast notifications are used to remind users of the time remaining before restart.
- Yes - A more intrusive dialog window is used to remind the user of a pending restart.
- Display a temporary notification to the user that indicates the interval before the user is logged off or the computer restarts (minutes) - Indicates the total time given to users to restart the device after software enforcement. The value should be greater than 240 minutes (4 hours) and at least 4 hours greater than the setting for the dialog the user can't close.
- Observe the restart notification behavior on a client after software enforcement. The settings above apply only when software has been installed at the deadline and requires a restart. If a user proactively installed the software before the deadline, they'll see different toast notifications and a different dialog for the restart.
Synchronize collection membership results to Microsoft Entra groups
You can now enable the synchronization of collection memberships to a Microsoft Entra group. This synchronization allows you to use your existing on premises grouping rules in the cloud. You can synchronize device collections. Only Microsoft Entra joined devices are synchronized to Microsoft Entra ID.
The Microsoft Entra synchronization happens every five minutes. It's a one-way process, from Configuration Manager to Microsoft Entra ID. Changes made in Microsoft Entra ID aren't reflected in Configuration Manager collections, but aren't overwritten by Configuration Manager. For example, if the Configuration Manager collection has two devices, and the Microsoft Entra group has three different devices, after synchronization the Microsoft Entra group has five devices.
Prerequisites
Try it out!
Try to complete the tasks. Then send Feedback with your thoughts on the feature.
Add group write permission to the app
- Go to the Microsoft Entra tenants node, select the web app for Cloud Management, and then select Update Application Settings in the ribbon.
- Select Yes and you'll be given a sign in prompt for Azure.
- Sign in with a user that has group write permission for Microsoft Entra ID.
- Once you successfully sign in, you'll see a dialog box that reads Application settings successfully updated.
Create collection Microsoft Entra group mapping
- Right-click on a collection and select the Cloud Sync tab.
- Select Add to select Microsoft Entra objects.
- If you need to remove a Microsoft Entra group, select it, then choose Remove.
- Select your tenant then choose Search. You'll be prompted to sign in to Azure.
- You can also type in a partial or full group name before clicking Search.
- Once you sign in, select an assigned group from the populated search list, then select OK.
- Select Apply to save the collection properties.
Limitations
Only one Microsoft Entra tenant is supported. If you have more than one tenant, the results for collection membership synchronization to Microsoft Entra ID are unpredictable.
Configure client cache minimum retention period
You can now specify the minimum time for the Configuration Manager client to keep cached content. This client setting controls how long the client stores content in the cache before deleting it.
In the Client Cache settings group of client settings, configure the following setting: Minimum duration before cached content can be removed (minutes). By default this value is 1,440 minutes (24 hours).
This setting gives you greater control over the client cache on different types of devices. You might reduce the value on clients that have small hard drives and don't need to keep existing content before another deployment runs.
Note
In the same client setting group, the existing setting to Enable Configuration Manager client in full OS to share content is now renamed to Enable as peer cache source. The behavior of the setting doesn't change.
Improvements to OS deployment
This release includes the following improvements to OS deployment:
Based on your feedback, the Disable BitLocker task sequence step has a new restart counter. Use this option to specify the number of restarts to keep BitLocker disabled. Instead of adding multiple instances of this step, set a value between 1 (default) and 15. You can also set this behavior with the task sequence variable OSDBitlockerRebootCount.
Note
There is a known issue with the client-side functionality, so the task sequence only disables BitLocker for one restart.
Technical preview version 1904 included a feature to Pre-cache driver packages and OS images. This version improves upon that functionality by also adding packages. Specify the architecture and language of the package on its properties.
Add a SQL Server Always On availability group node
You can now add a new secondary replica node to an existing SQL Server Always On availability group. Instead of a manual process, use Configuration Manager setup to make this change:
Use the hierarchy maintenance tool to stop the site:
preinst.exe /stopsiteModify the availability group using SQL Server procedures:
Create a backup of the site database from the primary replica.
Restore that backup to the new secondary replica server.
Note
This process also works with removing a secondary replica node from an availability group. For more information, see Remove a secondary replica from an availability group.
Run Configuration Manager setup, and select the option to modify the site.
Specify the availability group listener name as the database name. If the listener uses a non-standard network port, specify that as well. This action causes setup to make sure each node is appropriately configured. It also starts a database recovery process.
For more information on Configuration Manager support for availability groups, see the following articles:
Next steps
For more information about installing or updating the technical preview branch, see Technical preview.
For more information about the different branches of Configuration Manager, see Which branch of Configuration Manager should I use?