Features in Configuration Manager technical preview version 2001
Applies to: Configuration Manager (technical preview branch)
This article introduces the features that are available in the technical preview for Configuration Manager, version 2001. Install this version to update and add new features to your technical preview site.
Review the technical preview article before installing this update. That article familiarizes you with the general requirements and limitations for using a technical preview, how to update between versions, and how to provide feedback.
The following sections describe the new features to try out in this version:
Microsoft Edge Management dashboard
The Microsoft Edge Management dashboard provides you insights on the usage of Microsoft Edge and other browsers. In this dashboard, you can:
- See how many of your devices have Microsoft Edge installed
- See how many clients have different versions of Microsoft Edge installed
- Have a view of the installed browsers across devices
Prerequisites
Enable the following properties in the below hardware inventory classes:
Installed Software - Asset Intelligence (SMS_InstalledSoftware)
- Software Code
- Product Name
- Product Version
Default Browser (SMS_DefaultBrowser)
- Browser Program ID
From the Software Library workspace, click Microsoft Edge Management to see the dashboard. Change the collection for the graph data by clicking Browse and choosing another collection. By default your five largest collections are in the drop-down list. When you select a collection that isn't in the list, the newly selected collection takes the bottom spot on your drop-down list.

Improvements to Orchestration Groups
Orchestration Groups are the evolution of the "Server Groups" feature. They were first introduced in the technical preview for Configuration Manager, version 1909. In this technical preview, we've added the following improvements to Orchestration Groups:
You can now specify custom timeout values for:
- The Orchestration Group
- Time limit for all group members to complete update installation
- Orchestration Group members
- Time limit for a single device in the group to complete the update installation
- The Orchestration Group
When selecting group members, you now have a drop-down list to select the site code.
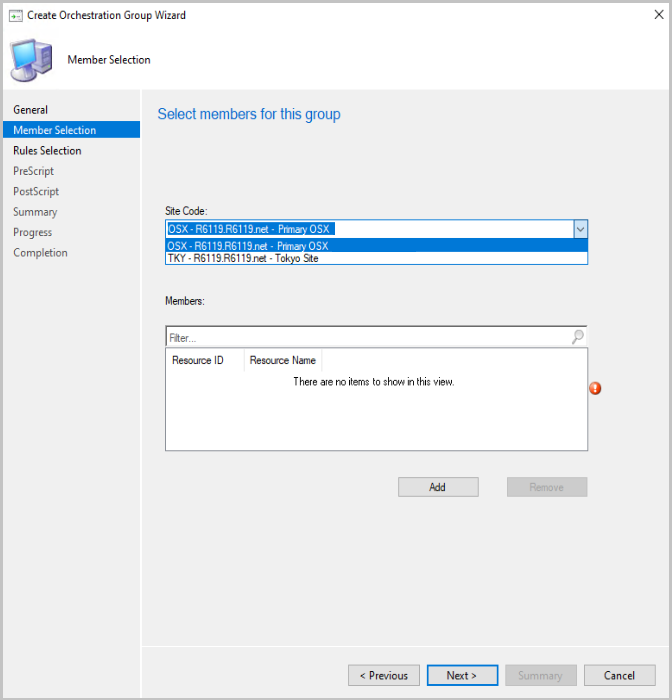
When selecting resources for the group, only valid clients are shown. Checks are made to verify the site code, that the client is installed, and that resources aren't duplicated.
You can now set values for the following items in the Create Orchestration Group Wizard:
- Number of machines to be updated at the same time in the Rules Selection page
- Script timeout in the PreScript page
- Script timeout in the PostScript page
Improvements to Check Readiness task sequence step
Based on your feedback, you can now verify more device properties in the Check Readiness task sequence step. Use this step in a task sequence to verify the target computer meets your prerequisite conditions.
- Architecture of current OS: 32-bit or 64-bit
- Minimum OS version: for example, 10.0.16299
- Maximum OS version: for example, 10.0.18356
- Minimum client version: for example, 5.00.08913.1005
- Language of current OS: select the language name, the step compares the associated language code. This check compares the language that you select to the OSLanguage property of the Win32_OperatingSystem class on the client.
- AC power plugged in
- Network adapter connected
- Network adapter is not wireless
None of these new checks are selected by default in new or existing instances of the step.
The step also now sets read-only variables for whether the check returned true (1) or false (0). If you don't enable a check, the value of the corresponding read-only variable is blank.
- _TS_CRMEMORY
- _TS_CRSPEED
- _TS_CRDISK
- _TS_CROSTYPE
- _TS_CRARCH
- _TS_CRMINOSVER
- _TS_CRMAXOSVER
- _TS_CRCLIENTMINVER
- _TS_CROSLANGUAGE
- _TS_CRACPOWER
- _TS_CRNETWORK
- _TS_CRWIRED
The smsts.log includes the outcome of all checks. If one check fails, the task sequence engine continues to evaluate the other checks. The step doesn't fail until all checks are complete. If at least one check fails, the step fails, and it returns error code 4316. This error code translates to "The resource required for this operation does not exist."
Important
To take advantage of this new Configuration Manager feature, after you update the site, also update clients to the latest version. While new functionality appears in the Configuration Manager console when you update the site and console, the complete scenario isn't functional until the client version is also the latest.
Integrate with Power BI Report Server
You can now integrate Power BI Report Server with Configuration Manager reporting. This integration gives you modern visualization and better performance. It adds console support for Power BI reports similar to what already exists with SQL Server Reporting Services.
Save Power BI Desktop report files (.PBIX) and deploy them to the Power BI Report Server. This process is similar as with SQL Server Reporting Services report files (.RDL). You can also launch the reports in the browser directly from the Configuration Manager console.
Prerequisites and initial setup
Power BI Report Server license. For more information, see Licensing Power BI Report Server.
Download Microsoft Power BI Desktop (Optimized for Power BI Report Server - September 2019).
Important
Only use this version of Power BI Desktop, don't use the version from the Microsoft Store.
Configure the reporting services point
This process varies depending upon whether you already have this role in the site.
If you don't have a reporting services point
Do all steps of this process on the same server:
Install Power BI Report Server.
Add the reporting services point role in Configuration Manager. For more information, see Configure reporting.
If you already have a reporting services point
Do all steps of this process on the same server:
In Reporting Services Configuration Manager, back up the Encryption Keys. For more information, see SSRS Encryption Keys - Back Up and Restore Encryption Keys.
Remove the reporting services point role from the site.
Uninstall SQL Server Reporting Services, but keep the database.
Install Power BI Report Server.
Configure the Power BI Report Server
Use the previous report server database.
Use Reporting Services Configuration Manager to restore the Encryption Keys.
Add the reporting services point role in Configuration Manager.
Configure the Configuration Manager console
On a computer that has the Configuration Manager console, update the Configuration Manager console to the latest version.
Install Power BI Desktop. Make sure the language is the same.
After it installs, launch Power BI Desktop at least once before you open the Configuration Manager console.
Try it out!
Try to complete the tasks. Then send Feedback with your thoughts on the feature.
In the Configuration Manager console, go to the Monitoring workspace, expand Reporting, and select the new Power BI Reports node.
In the ribbon, select Create Report. This action opens Power BI Desktop.
Create a report in Power BI Desktop.
When the report is ready to save, go to the File menu, select Save as, then choose Power BI Report Server.
In the Power BI Report Server Selection window, enter the URL for the reporting services point as the New report server address. For example,
https://rsp.contoso.com/Reports.
In the Configuration Manager console, you see the new report in the list of Power BI Reports.
After you create a report, use the following actions in the Configuration Manager console:
Run in Browser: Opens the Power BI report in the web browser. Share this URL with others, for example:
https://rsp.contoso.com/Reports/POWERBI/ConfigMgr_ABC/Windows%2010/Windows10%20Dashboard?rs:embed=trueEdit: Make changes to the report in Power BI Desktop. For an existing report, use the Save option to save changes back to the report server.
For more information on log files to use for reporting, see Log file reference - Reporting.
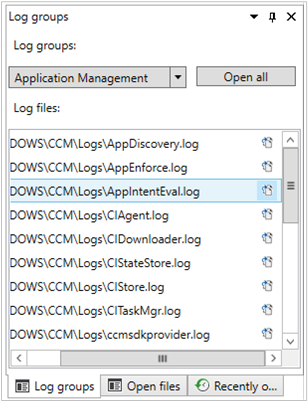
OneTrace log groups
OneTrace now supports customizable log groups, similar to the feature in Support Center. Log groups allow you to open all log files for a single scenario. OneTrace currently includes groups for the following scenarios:
- Application management
- Compliance settings (also referred to as Desired Configuration Management)
- Software updates
Customize OneTrace log groups
You can customize these groups by modifying the configuration XML, which by default is in the following path: C:\Program Files (x86)\Configuration Manager Support Center\LogGroups.xml.
The following example is one portion of the default configuration file:
<LogGroups>
  <LogGroup Name="Desired Configuration Management" GroupType="1" GroupFilePath="">
    <LogFile>CIAgent.log</LogFile>
    <LogFile>CIDownloader.log</LogFile>
    <LogFile>CIStateStore.log</LogFile>
    <LogFile>CIStore.log</LogFile>
    <LogFile>CITaskMgr.log</LogFile>
    <LogFile>ccmsdkprovider.log</LogFile>
    <LogFile>DCMAgent.log</LogFile>
    <LogFile>DCMReporting.log</LogFile>
    <LogFile>DcmWmiProvider.log</LogFile>
  </LogGroup>
</LogGroups>
The GroupType property accepts the following values:
0: Unknown or other1: Configuration Manager client logs2: Configuration Manager server logs
The GroupFilePath property can include an explicit path for the log files. If it's blank, OneTrace relies upon the registry configuration for the group type. For example, if you set GroupType=1, by default OneTrace will automatically look in C:\Windows\CCM\Logs for the logs in the group. In this example, you don't need to specify GroupFilePath.
Improvements to administration service
The administration service is a REST API for the SMS Provider. Previously, you had to implement one of the following dependencies:
- Enable Enhanced HTTP for the entire site
- Manually bind a PKI-based certificate to IIS on the server that hosts the SMS Provider role
Starting in this release, the administration service automatically uses the site's self-signed certificate. This change helps reduce the friction for easier use of the administration service. The site always generates this certificate. The Enhanced HTTP site setting to Use Configuration Manager-generated certificates for HTTP site systems only controls whether site systems use it or not. Now the administration service ignores this site setting, as it always uses the site's certificate even if no other site system is using Enhanced HTTP.
The only exception is if you've already bound a PKI certificate to port 443 on the SMS Provider server. If you added a certificate, the administration service uses that existing certificate.
Note
If in the future you want to switch to a PKI certificate, manually unbind the site's self-signed certificate from port 443 on the SMS Provider. Then you can bind your PKI-based certificate.
Validate this change in the Configuration Manager console. Go to the Administration workspace, expand Security, and select the Console Connections node. This node depends upon the administration service. The existing prerequisites no longer apply, you can view connected consoles by default. For more information, see View recently connected consoles.
Wake up a device from the central administration site
From the central administration site (CAS), in the Devices or Device Collections node, you can now use the client notification action to Wake Up devices. This action was previously only available from a primary site. For more information, see How to configure Wake on LAN.
When you start this action from the CAS, it sends a fast message to the primary site to which the client is assigned. The primary site then processes the action as normal. Once the primary site receives an updated status from the client, it reports that status to the CAS.
Note
You can't complete this scenario with this release due to the technical preview branch limit of a single primary site. Consider the scenario, and try the existing action from the primary site. Then send Feedback from the Home tab of the ribbon, regarding the capabilities of this action.
For more information, see How to configure Wake on LAN.
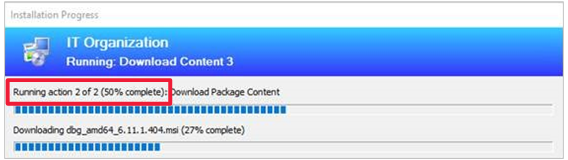
Improvements to task sequence progress
Based on your feedback, the task sequence progress window includes the following improvements:
- Shows the current step number, total number of steps, and percent completion
- Increased the width of the window to give you more space to better show the organization name in a single line
Note
The count and percentage completed are intended for general guidance purposes only. These values are based on the total number of steps in the task sequence. For a more complex task sequence with disabled steps or groups, or steps that run conditionally based on task sequence logic, the progress may be non-linear.
For example, if your task sequence has 10 steps and you disable steps #3 through #7, the task sequence progress initially shows 1 of 10 (10%) and then 2 of 10 (20%), and then it jumps to 8 of 10 (80%).
Next steps
For more information about installing or updating the technical preview branch, see Technical preview.
For more information about the different branches of Configuration Manager, see Which branch of Configuration Manager should I use?.