Features in Configuration Manager technical preview version 2110
Applies to: Configuration Manager (technical preview branch)
This article introduces the features that are available in the technical preview for Configuration Manager, version 2110. Install this version to update and add new features to your technical preview site. When you install a new technical preview site, this release is also available as a baseline version.
Review the technical preview article before installing this update. That article familiarizes you with the general requirements and limitations for using a technical preview, how to update between versions, and how to provide feedback.
The following sections describe the new features to try out in this version:
Simplified cloud attach configuration
We've simplified the process to cloud attach your Configuration Manager environment. You can now choose to use a streamlined set of recommended defaults when cloud attaching your environment. By using the recommended default settings, your eligible devices will be cloud attached and you'll enable capabilities like rich analytics, cloud console, and real-time device querying. The default settings include the following features:
- Enables automatic enrollment of all eligible devices into Intune
- Enrolls your clients into co-management, with all workloads pointed to Configuration Manager
- Enables Endpoint analytics
- Enables automatic upload of all your devices to Microsoft Intune admin center (tenant attach)

Cloud attach using the default settings
Use the following steps to cloud attach your environment with the default settings:
- From the Configuration Manager console, go to Administration > Cloud services > Cloud Attach.
- Select Configure Cloud Attach from the ribbon to open the wizard.
- Select your Azure environment, then select Sign In. Sign into your account when prompted.
- Ensure that Use default settings (recommended) is selected, then choose Next and Yes when the app registration notice appears.
- Review the summary and select Next to cloud attach your environment and complete the wizard.
Improvements to client health dashboard
This release includes improvements to the Client health dashboard.

While you can configure the dashboard to limit the view by collection, previously it would reset to the All Systems collection when you refreshed the node. You can now select the ribbon action to Choose Default Collection, which sets a persistent user preference.
You still use the Client Status Settings action to configure the periods of time to evaluate client health. This action is now available in the ribbon of the Client health dashboard node. This change makes it easier to access this action, without needing to switch to the parent node for Client Status.
The existing options to filter the dashboard are now condensed to a single Filter tile.
The Overall client health tile is on the top row, which makes it easier to see when you select this node. This percentage should be as close to 100% as possible.
The Combined (All) and Combined (Any) scenarios are removed. A new tile, Clients with any failure, shows the percentage of clients that report any health issue. This percentage should be as close to 0% as possible.
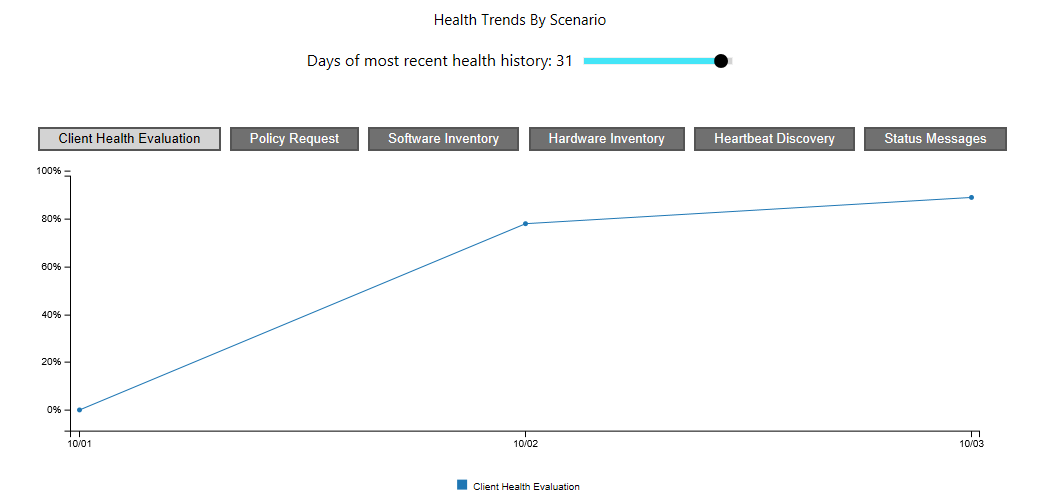
The dashboard includes a new tile for Health trends by scenario. It shows the percentage of healthy clients for the selected scenario. Use the slider control at the top of the tile to adjust the number of days to display in the chart.
Note
This maximum value for the slider control is the same as the Retain client status history for the following number of days in Client Status Settings. It's
31days by default.It's limited by the amount of client health data in the site database. In the following example, while it's configured to display 31 days of history, there's only three days of available data.
The following example shows the trend for client health evaluation:
Enable update notifications from Microsoft 365 Apps
You can now configure the end-user experience for Microsoft 365 Apps updates. This client setting allows you to enable or disable notifications from Microsoft 365 Apps for these updates. The new Enable update notifications from Microsoft 365 Apps option has been added to the Software Updates group of client settings. The following options are available for the setting:
- No: Doesn't display Microsoft 365 Apps updates notifications from Microsoft 365 Apps (default)
- Yes: Displays Microsoft 365 Apps updates notifications from Microsoft 365 Apps
End-user experience for update notifications from Microsoft 365 Apps
Which notifications are displayed to the user about updates for Microsoft 365 Apps is also determined by the settings for per deployment notifications from Software Center. If deployment notifications from Software Center are disabled, then the end user won't receive any notifications from either Software Center or Microsoft 365 Apps, regardless of how notifications from Microsoft 365 Apps are set. If notifications from both Software Center and Microsoft 365 Apps are enabled, then the end user will receive notifications from Software Center and Microsoft 365 Apps. Below is a chart of which notifications for Microsoft 365 Apps updates are displayed to the end user for these settings:
| Display per deployment Software Center notifications | Hide per deployment Software Center notifications | |
|---|---|---|
| Enable update notifications from Microsoft 365 Apps: Yes | User receives notifications from Software Center User receives notifications from Microsoft 365 Apps | No notifications from Software Center No notifications from Microsoft 365 Apps |
| Enable update notifications from Microsoft 365 Apps: No | User receives notifications from Software Center No notifications from Microsoft 365 Apps | No notifications from Software Center No notifications from Microsoft 365 Apps |
Branding in the Windows Update native reboot experience
You can now add branding information when using the native Windows restart experience for software updates. To use this feature, client devices must be running Windows Insider build 21277 or later. From the Computer Restart client device settings, ensure that Windows is selected as the restart experience. For the Specify organization name option, enter the organization name to display in the restart notifications. Branding information will be included in the Windows restart notification for updates that require restart.

Improvements to application groups
This release includes the following improvements to application group:
Now when you deploy an app group as required to a device or user collection, you can specify that it automatically uninstalls when the resource is removed from the collection. For more general information on this feature, see Implicit uninstall.
The following app approval behaviors are now supported with app groups:
Deploy an app group to a user collection and require approval.
- A user can then request the app group in Software Center.
- You can approve or deny the user's request for the app group.
Deploy an app group to a device collection and require approval. The deployment is suspended on the device until you trigger installation via automation. For example, use the Approve-CMApprovalRequest PowerShell cmdlet.
From the Configuration Manager console, when you select a device, there's a new action in the Device group of the ribbon to Install Application Group. For more information, see Install applications for a device.
When you enable tenant attach, you can view status and take actions on app groups from the Microsoft Intune admin center. For more information, see Install an application from the admin center.
Known issues for app groups in this technical preview release
If an app group was previously approved and installed on a device, the Deny action doesn't automatically uninstall it.
To view and manage app groups in the Microsoft Intune admin center, your account needs the Full Administrator role in Configuration Manager.
Improvements to external notifications
Starting in Configuration Manager current branch version 2107, you could enable the site to send notifications to an external system or application. This feature used a PowerShell script to manage the status filter rules and subscriptions. For more information, see External notifications.
This release adds support in the Configuration Manager console to create or edit a subscription for external notifications. It supports events for status filter rules and application approval requests.
Try it out!
Try to complete the tasks. Then send Feedback with your thoughts on the feature.
Create an Azure Logic App and copy the URL. For more information, see Create an Azure logic app and workflow.
In the Configuration Manager console, go to the Monitoring workspace. Expand Alerts, and select the new External service notifications node.
In the ribbon, select Create subscription.
Specify a Name for the subscription to identify it in the Configuration Manager console. Optionally add a Description.
For the External service URL value, paste the URL of the Azure Logic App that you copied in the first step.
Select the gold asterisk
 to add a new event to the subscription.
How to trigger an event depends upon the type of subscription:
- For a status filter rule, trigger an event for the site component. For example, stop or restart the service or thread.
- For an app approval request, use Software Center to request an app that requires approval.
For more information on next steps, see Monitor the workflow.
Approvals for orchestration group scripts
Pre and post-scripts for Orchestration groups now require approval to take effect. If you open, author, or modify a script, approval for the script is required from another admin. When selecting an approved script from the Scripts library, no additional approval is needed. By default, users can't approve a script they've authored. These roles give an additional level of security against running a script without oversight. For ease of testing, you're able to disable script approval for the environment by changing the hierarchy setting.
To assist you with script approval, the following two tabs were added to the details pane for Orchestration Groups:
- Summary: Contains information about the selected orchestration group, including the Approval State of scripts.
- Scripts: Lists information about pre and post-scripts, including the timeout, approver, and approval state for each script.

Approval states for pre and post-scripts
The approval state for each of the scripts is displayed in the Scripts tab. Editing a script after it's approved will reset the approval state. The Approval State for each script is defined below:
- Approved: The script is approved. Approval is granted from either of the following ways:
- Selecting a script from the list of approved PowerShell scripts
- Manual approval of the script by selecting Approve from the ribbon or the right-click menu.
- Waiting for approval: The script is pending approval. Scripts that are written or edited directly in the code editor, or imported from a
.ps1file will start in this approval state. - Declined: The script was denied during the approval process.
Important
Editing a script after it's approved will reset the approval state to Waiting for approval. This also means that the previously approved version of the script will not run if you start orchestration on the group while that script is in the Waiting for approval state.
Permissions
Approving scripts for orchestration groups requires one of the following security roles:
- Full Administrator
- Operations Administrator
Approve or deny a script for an orchestration group
- From the Configuration Manager console, go to the Assets and Compliance workspace > Overview > Orchestration Groups.
- Select an orchestration group and then select the Scripts tab for the group.
- Select one of the scripts and choose Approve/Deny from either the ribbon or the right-click menu.
- Review the script from the Script Details page in the Approve or Deny Script wizard. Select Next when you're finished reviewing the script.
- On the Script Approval page in the wizard, select Approve or Deny. If needed, enter in a comment to be displayed in the Scripts detail pane.
- Complete the wizard to finish the approval process.
Task sequence check for TPM 2.0
To help you better deploy Windows 11, the Check Readiness step in the task sequence now includes checks for TPM 2.0.
- TPM 2.0 or above is enabled: Checks whether the device that's running the task sequence has a TPM 2.0 that's enabled.
- TPM 2.0 or above is activated: If the device has an enabled TPM 2.0, check that it's activated.
The task sequence smsts.log file also shows the TPM version.
Console improvements
Based on your feedback, this release includes the following improvements to the Configuration Manager console:
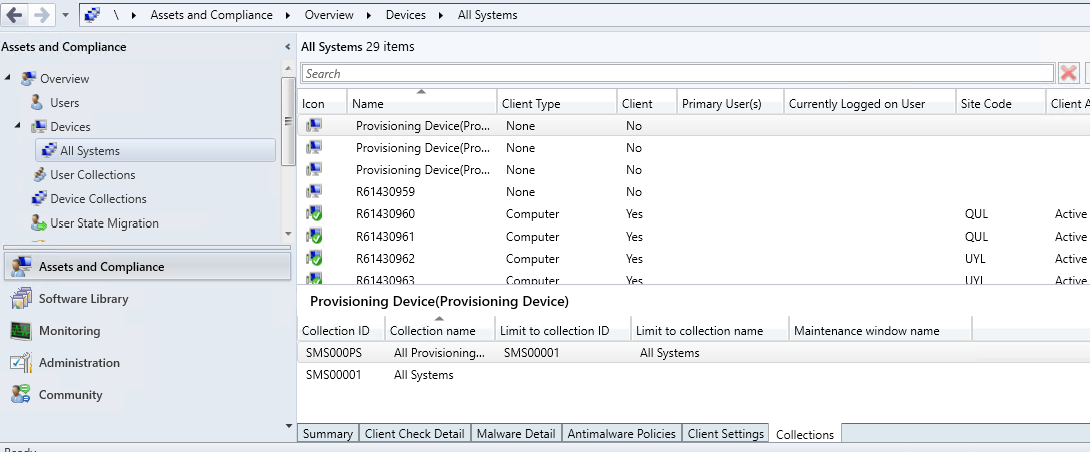
When you show the members of a device collection, and select a device in the list, switch to the Collections tab in the details pane. This new view shows the list of collections of which the selected device is a member. It makes it easier for you to see this information.
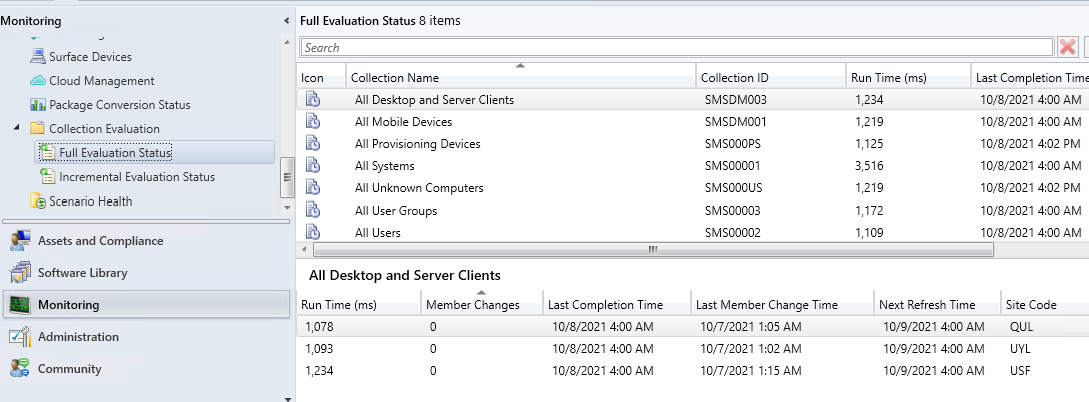
When viewing a collection, you could previously see the amount of time the site took to evaluate the collection membership. This data is now also available in the Monitoring workspace. When you select a collection in either subnode of the Collection Evaluation node, the details pane displays this collection evaluation time data.
Status messages for console extensions
To improve the visibility and transparency of console extensions, the site now creates status messages for related events. These status messages have IDs from 54201 to 54208. They all include the following information:
- The user that made the change
- The ID of the extension
- The version of the extension
There are four categories of message events:
- Required or optional
- Approve or disapprove
- Enable or disable
- Tombstone or untombstone
For example, the description of status message ID 54201 is User "%1" made console extension with ID "%2" and version "%3" required.
Use these status messages to make sure your site uses known and trusted console extensions.
General known issues
Community hub download button is always enabled
The Download button for items in Community hub doesn't disable once an object has been downloaded. The download will fail if you attempt to download the item again.
Next steps
For more information about installing or updating the technical preview branch, see Technical preview.
For more information about the different branches of Configuration Manager, see Which branch of Configuration Manager should I use?.
Feedback
Coming soon: Throughout 2024 we will be phasing out GitHub Issues as the feedback mechanism for content and replacing it with a new feedback system. For more information see: https://aka.ms/ContentUserFeedback.
Submit and view feedback for