Features in Configuration Manager technical preview version 2201
Applies to: Configuration Manager (technical preview branch)
This article introduces the features that are available in the technical preview for Configuration Manager, version 2201. Install this version to update and add new features to your technical preview site.
Review the technical preview article before installing this update. That article familiarizes you with the general requirements and limitations for using a technical preview, how to update between versions, and how to provide feedback.
The following sections describe the new features to try out in this version:
Visualize content distribution status
You can now monitor content distribution path and status in a graphical format. The graph shows distribution point type, distribution state, and associated status messages. This visualization allows you to more easily understand the status of your content package distribution. It helps you answer questions like:
- Has the site successfully distributed the content?
- Is the content distribution in progress?
- Which distribution points have already processed the content?
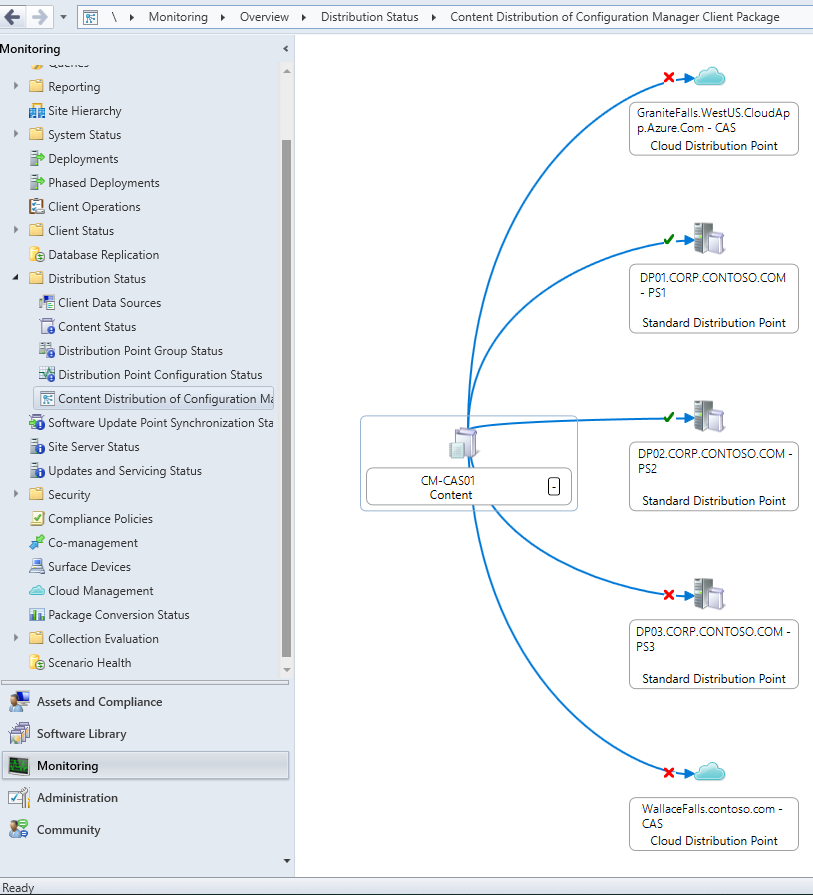
This example shows a graph for the content distribution status of the Configuration Manager client package in an example hierarchy. It lets you easily see the following information:
- The solid blue line from the site server to each distribution point indicates that the rate limit is Unlimited. For more information, see Rate limits.
- The green check mark on
DP01andDP02indicates that the content was successfully distributed to these site systems. - The red
XonDP03and both cloud distribution points indicates that there's an error in distributing the content to these site systems.
Tip
Navigating this graph is similar to the collection relationships graphical view. That article includes tips to navigate the viewer, many of which also apply to this graph for content distribution.
Try it out!
Try to complete the tasks. Then send Feedback with your thoughts on the feature.
In the Configuration Manager console, go to the Monitoring workspace, expand Distribution Status and select the Content Status node.
If this node doesn't show anything, first distribute content.
Select a distributed content item. For example, the Configuration Manager client package.
In the ribbon, select View Content Distribution. This action displays the distribution graph for the selected content.
Hover over the status icon to quickly view more information. Select the path or the status icon to view status messages for the content.
Hover over the title of the site system to quickly view more information. Select it to drill through to the Distribution Points node.
Custom icon support for task sequences and packages
Previously, task sequences and legacy packages would always display a default icon in Software Center. Based on your feedback, you can now add custom icons for task sequences and legacy packages. These icons appear in Software Center when you deploy these objects. Instead of a default icon, a custom icon can improve the user experience to better identify the software.
Try it out!
Try to complete the tasks. Then send Feedback with your thoughts on the feature.
If needed, create a task sequence or create a package and program.
Open the properties of a task sequence or package.
For a task sequence, switch to the More Options tab. For a package, the icon option is on the General tab.
Note
The existing task sequence property page for Performance is now renamed to More Options.
In the section for the icon, select Browse. Select an icon from the default shell library, or browse to another file in a local or network path.
- It supports the following file types:
- Programs (
.exe) - Libraries (
.dll) - Icons (
.ico) - Images (
.png,.jpeg,.jpg)
- Programs (
- The file doesn't need to be on clients that you target with the deployment. Configuration Manager includes the image with the deployment policy.
- The maximum file size for an image is 256 KB.
- Icons can have pixel dimensions of up to 512 x 512.
- It supports the following file types:
After you save the properties, deploy the task sequence or package, if it's not already deployed. For more information, see one of the following articles:
When clients receive the deployment policy, they'll display the icon in Software Center.
Note
To take full advantage of new Configuration Manager features, after you update the site, also update clients to the latest version. While new functionality appears in the Configuration Manager console when you update the site and console, the complete scenario isn't functional until the client version is also the latest.
Known issues with icons for legacy packages
To change the icon on an existing package that's already deployed, change another setting of the package or create a new deployment.
Custom icons only appear for legacy packages that you deploy to device collections. They don't yet support user-based deployments.
Prefer cloud-based software update points on switching
Clients now prefer to scan against a cloud management gateway (CMG) software update point (SUP) over an on-premises SUP when the boundary group uses the Prefer cloud based source over on-premises source option. To reduce the performance impact of this change, clients don't automatically switch their SUP to a cloud-based SUP. The client will stay assigned to their current SUP unless their current SUP fails or the client is manually switched to a new SUP.
Try it out!
Try to complete the tasks. Then send Feedback with your thoughts on the feature.
- Ensure your cloud management gateway is configured and functional
- Verify that your software update points are functional and synchronized.
- Enable the Allow Configuration Manager cloud management gateway traffic option for any SUP you want to use with CMG.
- Go to Administration > Site Configuration > Servers and Site System Roles. Select Properties on the software update point site system role from the site server you want to use.
- On the General tab, enable the Allow Configuration Manager cloud management gateway traffic option.
- Configure the boundary group for this behavior by enabling the Prefer cloud based sources over on-premises sources option and adding the CGM SUP server to the Site system servers list.
- Go to Administration > Hierarchy Configuration > Boundary Groups. Edit the boundary groups where you want clients to prefer a CMG SUP for updates scanning.
- Select Properties for the boundary group.
- In the References tab, select Add... and add the CMG SUP to the Site system servers list.
- In the Options tab, select the Prefer cloud based sources over on-premises sources option.
- Select OK to save the settings and to close the boundary group properties window.
- To manually switch clients to a new SUP, use the Switch to next Software Update Point client notification action for a device or for a collection.
- Clients in the boundary group don't automatically switch to a new SUP unless scanning against their current SUP fails four times over the course of two hours.
- To verify that clients prefer the CMG SUP, start a software update scan cycle on some of the clients that you switched.
- To limit potential performance issues caused by a large number of clients scanning against a new SUP simultaneously, we recommend that if you're immediately calling a scan cycle on a large number of clients that you start with no more than 100 clients every 10-15 minutes. Increase or decrease the number of clients and the frequency once you gauge the performance impact in your environment.
- The client's LocationServices.log will show the CMG SUP listed as the first
LocationRecord WSUSURLin theWSUSLocationReply. The CMG SUP will also be listed as the server for the update scan in the WUAHandler.log.
LEDBAT support for software update points
You can now enable Windows Low Extra Delay Background Transport (LEDBAT) for your software update points. LEDBAT adjusts download speeds during client scans against WSUS to help control network congestion.
If a site system has both the distribution point and software update point roles, you can configure LEDBAT independently on the roles. For example, if you only enable LEDBAT on the distribution point role, the software update point role doesn't inherit the same configuration.
For more general information on Windows LEDBAT, see Fundamental concepts for content management.
Prerequisites for LEDBAT on software update points
To use LEDBAT in this scenario, install the software update point role on a site system running Windows Server 2016 or later.
Try it out!
Try to complete the tasks. Then send Feedback with your thoughts on the feature.
In the Configuration Manager console, go to the Administration workspace, expand Site Configuration, and select the Servers and Site System Roles node.
Select a site system that has the software update point role.
In the details pane of site system roles, select the Software update point role.
In the ribbon, on the Site Role group, select Properties.
On the General tab of the software update point properties, enable the following setting: Adjust the download speed to use the unused network bandwidth (Windows LEDBAT).
Improvements to Power BI Report Server Integration
We've made the following improvements for Power BI Report Server integration:
- You can now use Microsoft Power BI Desktop (Optimized for Power BI Report Server) versions that were released after January 2021
- Configuration Manager now correctly handles Power BI reports saved by Power BI Desktop (optimized for Power BI Report Server) May 2021 or later.
- Reports saved by Power BI Desktop (optimized for Power BI Report Server) May 2021 or later function in earlier versions of Configuration Manager. However, you might experience delays updating the data source on newly updated reports, or receive
The remote server returned an error; (400) Bad Request.errors in the SRSRP.log. For more information about the relevant change to Power BI Desktop (optimized for Power BI Report Server) May 2021, see Change data source connection strings in Power BI reports.
- Reports saved by Power BI Desktop (optimized for Power BI Report Server) May 2021 or later function in earlier versions of Configuration Manager. However, you might experience delays updating the data source on newly updated reports, or receive
Tenant attach features are generally available
The following tenant attach features are now generally available:
- Client details
- Applications
- Device timeline
- Resource explorer
- CMPivot
- Scripts
- Bitlocker Recovery Keys
- Collections
Deployment Status client notification actions
You can now perform client notification actions, including Run Scripts, from the Deployment Status view. To run client notification actions from the Deployment Status view:
- Go to the Deployments node in the Monitoring workspace.
- Select a deployment, then select View Status, or double-click on the deployment.
- Right-click on either a group of clients in a Category or a single client in the Asset details pane to display the client notification actions.
- Currently, any user can perform these actions, but they’ll receive a permissions error if they don't have the correct permissions.
- Currently, when there are no devices associated with the deployment status, the client notification actions display but won't trigger any notifications.

Sort by icon in the console
Based on your feedback, in the Configuration Manager console you can now sort by icon. Any node that uses different icons now sorts properly. This improvement helps you easily group objects of a similar type.
The following example shows the Devices node sorted by icon, which is the device status:
![]()
PowerShell release notes preview
These release notes summarize changes to the Configuration Manager PowerShell cmdlets in this technical preview release.
For more information about PowerShell for Configuration Manager, see Get started with Configuration Manager cmdlets.
New cmdlets
Get-CMAADTenant
Use this cmdlet to get a Microsoft Entra tenant from the site.
Get-CMAADTenant
Get-CMAADTenant -Id $id
Get-CMAADTenant -Name $name
Set-CMCollectionCloudSync
Use this cmdlet to configure the following cloud sync features for a collection:
Make a collection available to assign endpoint security policies from the Microsoft Intune admin center. For more information, see Tenant attach: Onboard Configuration Manager clients to Microsoft Defender for Endpoint from the admin center.
Synchronize collection member results to Microsoft Entra groups. For more information, see Synchronize members to Microsoft Entra groups.
Set-CMCollectionCloudSync -Name $name -EnableAssignEndpointSecurityPolicy $true -TenantId $tenantId -AddGroupName $array  -Verbose
Set-CMCollectionCloudSync -Id $collectionId -TenantName $tenantName -RemoveGroupName $array1  -AddGroupName $array2
$collectionObj | Set-CMCollectionCloudSync TenantObject $tenantObj  -RemoveGroupName $array1  -AddGroupName $array2
Modified cmdlets
Get-CMDeploymentTypeDetectionClause
For more information, see Get-CMDeploymentTypeDetectionClause.
Non-breaking changes
The cmdlet can now get a detection clause from a script deployment type.
Get-CMDeploymentStatusDetails
For more information, see Get-CMDeploymentStatusDetails.
Bugs that were fixed
Updated the cmdlet to avoid a potential null reference error.
Import-CMApplication
For more information, see Import-CMApplication.
Non-breaking changes
Updated the import logic to align with console. Added new warning messages.
New-CMCoManagementPolicy
For more information, see New-CMCoManagementPolicy.
Non-breaking changes
The cmdlet now supports applicability for Windows 11 on ARM64 devices.
New-CMApplication
For more information, see New-CMApplication.
Non-breaking changes
It can now get an application icon from the specified file.
New-CMTaskSequence
For more information, see New-CMTaskSequence.
Non-breaking changes
Added the IconLocationFile parameter to support specifying an icon for the task sequence. For more information, see Support for task sequence and package icons.
New-CMTaskSequenceDeployment
For more information, see New-CMTaskSequenceDeployment.
Bugs that were fixed
Fixed an issue with the AllowSharedContent parameter.
Publish-CMThirdPartySoftwareUpdateContent
For more information, see Publish-CMThirdPartySoftwareUpdateContent.
Non-breaking changes
Added the Force parameter to run the command without asking for confirmation.
Set-CMSoftwareUpdatePointComponent
For more information, see Set-CMSoftwareUpdatePointComponent.
Non-breaking changes
Added the NonWindowsUpdateMaxRuntimeMins parameter to change the default maximum run time for non-Windows software updates.
Set-CMTaskSequence
For more information, see Set-CMTaskSequence.
Non-breaking changes
Added the IconLocationFile parameter to support specifying an icon for the task sequence. For more information, see Support for task sequence and package icons.
Set-CMTaskSequenceDeployment
For more information, see Set-CMTaskSequenceDeployment.
Bugs that were fixed
Fixed an issue with the AllowSharedContent parameter.
Start-CMTaskSequenceDeployment
For more information, see Start-CMTaskSequenceDeployment.
Bugs that were fixed
Fixed an issue with the AllowSharedContent parameter.
Improved notice for content on task sequence media
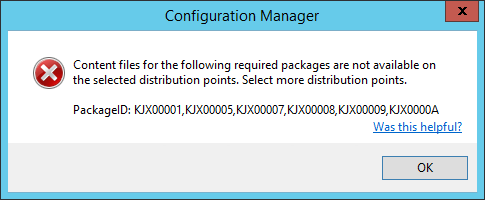
When you create task sequence media in the Configuration Manager console, you have to select distribution points that contain the content required by the task sequence. If some content isn't available on the selected distribution points, the wizard would display an error that simply said some packages aren't available.
Based on your feedback, this message now includes the list of package IDs for the content that's not available. This change makes the notice more actionable, so you can more easily see what content is missing. This information is also listed in the CreateTsMedia.log file.
Next steps
For more information about installing or updating the technical preview branch, see Technical preview.
For more information about the different branches of Configuration Manager, see Which branch of Configuration Manager should I use?.
Feedback
Coming soon: Throughout 2024 we will be phasing out GitHub Issues as the feedback mechanism for content and replacing it with a new feedback system. For more information see: https://aka.ms/ContentUserFeedback.
Submit and view feedback for