Add an Enterprise App Catalog app to Microsoft Intune
The Enterprise App Catalog is a collection of prepackaged Win32 apps that have been designed and prepared by Microsoft to support Intune. The catalog contains both Microsoft apps and third-party apps. An Enterprise App Catalog app is a Windows app that you can add via the Enterprise App Catalog in Intune. This app type leverages the Win32 platform and has support for customizable capabilities.
Important
The Enterprise App Catalog is a feature of Enterprise App Management (EAM) which is an Intune add-on as part of the Intune suite that is available for trial and purchase. For more information, see Use Intune Suite add-on capabilities.
When you add an app to Intune, you'll commonly want to use default installation, requirements, and detection settings. For apps within the Enterprise App Catalog, these default settings have been configured and confirmed by Microsoft. You must be careful if you modify the application properties as unexpected or harmful commands could be passed via the Install command and Uninstall command fields. In addition, changing the install commands might cause installation to fail.
Important
Microsoft does not assert compliance or authorizations for apps distributed via Intune. Customers are responsible for ensuring that apps meet their requirements.
Once you add an Enterprise App Catalog app to Intune, you can assign that app to end-users or devices.
Add a Windows catalog app (Win32) to Intune
The following steps help you add a Windows App Catalog app to Intune:
- Sign in to the Microsoft Intune admin center.
- Select Apps > All apps > Add.
- Select Enterprise App Catalog app on the Select app type pane under the Other app types.
- Click Select to add the app type. The Add app pane appear and shows the steps needed to add the app to Intune.
Step 1: App information
The App information steps allows you to select an app from the Enterprise App Catalog based on name and publisher. Once you select the app, you must choose a specific app package based on package name, language, architecture, and version. When you've completed selecting the app, the app information is displayed. Based on the app that you chose, the values for this step are automatically filled in.
Select the app from the Enterprise App Catalog
Select Search the Enterprise App Catalog from the App information step.
Find and select the app name, then select Next.
Select the app package based on name, language, architecture, and version.
Click Select to update the App information step. Note that app details will be populated into appropriate fields.
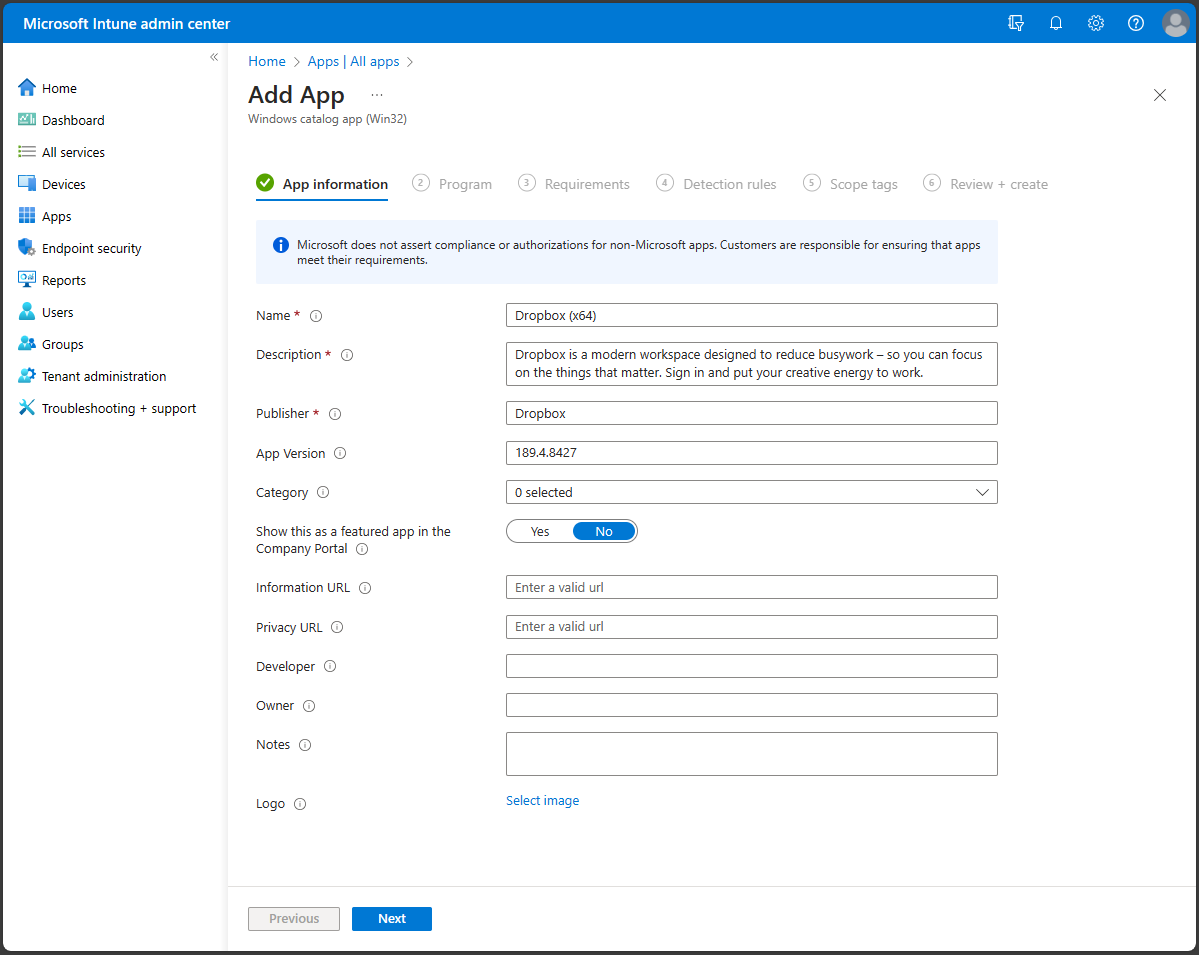
The App information step provides the fields:
- Name: (Required) Add a name for the app. This name will be visible in the Intune apps list and to users in the Company Portal. If the same app name exists twice, only one of the apps appears in the Company Portal.
- Description: (Required) Help your device users understand what the app is and/or what they can do in the app. This description will be visible to them in the Company Portal.
- Publisher: (Required) The name of the developer or company that created the app. This information will be visible to users in the Company Portal.
- App version: The version of the app. This information will be visible to users in the Company Portal.
- Category: Select one or more of the built-in app categories, or select a category that you created. When you categorize the app, end-users will be able to more easily sort and find the app in the Company Portal. You can choose multiple categories.
- Show this as a featured app in the Company Portal: Featured apps are prominently placed in the Company Portal so that users can quickly get to them.
- Information URL: Link end-users to a website or documentation that has more information about the app. The information URL will be visible to users in the Company Portal.
- Privacy URL: Provide a link for people who want to learn more about the app's privacy settings and terms. The privacy URL will be visible to users in the Company Portal.
- Developer: The name of the company or individual that developed the app. This information will be visible to people signed into the Intune admin center.
- Owner: The name of the person in your organization who manages licensing or is the point-of-contact for this app. This name will be visible to people signed in to the Intune admin center.
- Notes: Add additional notes about the app. Notes will be visible to people signed in to the admin center.
- Logo: Upload a logo that's associated with the app. This logo will appear next to the app throughout the Company Portal.
- Select Next to display the Program step.
Step 2: Program
On the Program step, you configure the app installation and removal commands for the app.
Important
Many of the app details are pre-populated and designed to function without change. Changing the install commands might cause the app installation to fail. Unexpected or harmful commands can be passed via the Install command and Uninstall command fields.
The Program step provides the following options:
Install command: Prefilled by Enterprise App Management review the install command line provided.
Uninstall command: Prefilled by Enterprise App Management review the uninstall command line provided.
Installation time required (mins): The number of minutes the system will wait for the install program to finish. Default value is 60 minutes. If the app takes longer to install than the set installation time, the system will initially report the app installation as failed but will not stop it on the device. Max timeout value is 1440 minutes (1 day).
Allow available uninstall: Select 'Yes' to provide the uninstall option for this app for users from the Company Portal. Select 'No' to prevent users from uninstalling the app from the Company Portal.
Install behavior: Enterprise App Management selects the install behavior. This cannot be modified and is determined by the installer.
Device restart behavior: Select the device restart behavior after the app has successfully installed, based on the following options:
- Determine behavior based on return codes: Choose this option to restart the device based on the return codes. This option means that the device will restart based on the configured return code.
- No specific action: Choose this option to suppress device restarts during the app installation of MSI-based apps.
- App install may force a device restart: Choose this option to allow the app installation to finish without suppressing restarts. This option means that the Windows catalog app (Win32) installation is allowed to complete without suppressing restarts. With this configuration, a hard reboot return code will notify the user that a restart of the device will be triggered in 120 minutes and a soft reboot return code will only notify the user that a restart is required to finish the installation.
- Intune will force a mandatory device restart: Choose this option to always restart the device after a successful app installation.
Specify return codes to indicate post-installation behavior: Add the return codes that are used to specify either app installation retry behavior or post-installation behavior. Return code entries are added by default during app creation. However, you can add more return codes or change existing return codes.
- In the Return code column, add the return code.
- In the Code type column, set the Code type to one of the following:
- Failed: The return value that indicates an app installation failure.
- Hard reboot: The hard reboot return code doesn't allow the next Windows catalog app (Win32) to be installed on the client without reboot.
- Soft reboot: The soft reboot return code allows the next Windows catalog app (Win32) to be installed without requiring a client reboot. Reboot is necessary to complete installation of the current application.
- Retry: The agent will attempt to install the app three times. It will wait for five minutes between each attempt.
- Success: The return value that indicates the app was successfully installed.
- If needed, select Add to add more return codes, or modify existing return codes.
Select Next to display the Requirements step.
Step 3: Requirements
Important
EAM only supports managed Windows devices running 64-bit versions of Windows.
Note
If your intention is to install an application on a 32-bit OS, you will need to modify some of the prefilled information.
On the Requirements step, specify the requirements that devices must meet before the app is installed:
The Requirements step provides the following options:
- Operating system architecture: Prefilled by Enterprise App Management.
- Minimum operating system: Prefilled by Enterprise App Management.
- Disk space required (MB): Add the free disk space needed on the system drive to install the app.
- Physical memory required (MB): Add the physical memory (RAM) required to install the app.
- Minimum number of logical processors required: Add the minimum number of logical processors required to install the app.
- Minimum CPU speed required (MHz): Add the minimum CPU speed required to install the app.
- Configure additional requirement rules:
- Select Add to display the Add a Requirement rule pane and create and configure requirement rules.
- Requirement type: (Required) Choose the type of rule that you'll use to determine how a requirement is validated. Requirement rules can be based on file system information, registry values, or PowerShell scripts.
- File: When you choose File as the Requirement type value, the requirement rule must detect a file or folder, date, version, or size.
- Path: (Required) The full path of the folder that contains the file or folder to detect.
- File or folder: (Required) The file or folder to detect.
- Property: (Required) Select the type of rule used to validate the presence of the app.
- Associated with a 32-bit app on 64-bit clients: Select Yes to expand any path environment variables in the 32-bit context on 64-bit clients. Select No (default) to expand any path variables in the 64-bit context on 64-bit clients. 32-bit clients will always use the 32-bit context.
- Registry: When you choose Registry as the Requirement type value, the requirement rule must detect a registry setting based on value, string, integer, or version.
- Key path: (Required) The full path of the registry entry that contains the value to detect.
- Value name: The name of the registry value to detect. If this value is empty, the detection will happen on the key. The (default) value of a key will be used as detection value if the detection method is other than file or folder existence.
- Registry key requirement: (Required) Select the type of registry key comparison that's used to determine how the requirement rule is validated.
- Associated with a 32-bit app on 64-bit clients: Select Yes to search the 32-bit registry on 64-bit clients. Select No (default) to search the 64-bit registry on 64-bit clients. 32-bit clients will always search the 32-bit registry.
- Script: Choose Script as the Requirement type value when you can't create a requirement rule based on file, registry, or any other method available to you in the Microsoft Intune admin center.
- Script name: (Required) Add a script name used to identify the script.
- Script file: For a rule based on a PowerShell script requirement, if the existing code is 0, we'll detect the standard output (STDOUT) in more detail. For example, we can detect STDOUT as an integer that has a value of 1.
- Script content: Add the script to your requirement rule.
- Run script as 32-bit process on 64-bit clients: Select Yes to run the script in a 32-bit process on 64-bit clients. Select No (default) to run the script in a 64-bit process on 64-bit clients. 32-bit clients run the script in a 32-bit process.
- Run this script using the logged on credentials: Select Yes to run the script by using the signed-in device credentials.
- Enforce script signature check: Select Yes to verify that a trusted publisher has signed the script, which will allow the script to run with no warnings or prompts displayed. The script will run unblocked. Select No (default) to run the script with user confirmation without signature verification.
- Select output data type: (Required) Select the data type used for determining a requirement rule match.
- File: When you choose File as the Requirement type value, the requirement rule must detect a file or folder, date, version, or size.
- When you're finished setting the requirement rules, select OK.
Select Next to display the Detection rules step.
Step 4: Detection rules
The Detection rules step allows you to configure the rules to detect the presence of the app. Enterprise App Management automatically prefills this information.
The Detection rules step provides the following options:
Rules format: (Required) Select how the presence of the app will be detected. You can choose to either manually configure the detection rules or use a custom script to detect the presence of the app. You must choose at least one detection rule.
Important
The conditions for all rules must be met to detect the app.
If Intune detects that the app isn't present on the device, Intune will offer the app again within approximately 24 hours. This will occur only for apps targeted with the Required intent.
You can add up to 25 detection rules.
The Rules format provides the following options:
Manually configure detection rules - You must select one of the following required Rule types:
MSI: Verify based on an MSI version check. This option can be added only once. When you choose this rule type, you have two settings:
- MSI product code: (Required) Add a valid MSI product code for the app.
- MSI product version check: Select Yes to verify the MSI product version in addition to the MSI product code.
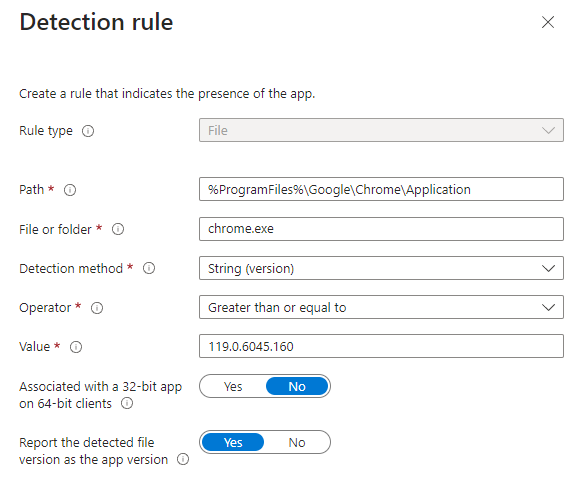
File: Verify based on file or folder detection, date, version, or size.
Path: (Required) Enter the full path of the folder that contains the file or folder to detect. This shouldn't include special characters such as , or ".
File or folder: (Required) Enter the file or folder to detect.
Detection method: (Required) Select the type of detection method used to validate the presence of the app. You can choose options, such as File or folder exists, Date created, String (version), Size in MB, and Size in bytes.
Associated with a 32-bit app on 64-bit clients: Select Yes to expand any path environment variables in the 32-bit context on 64-bit clients. Select No (default) to expand any path variables in the 64-bit context on 64-bit clients. 32-bit clients will always use the 32-bit context.
Report the detected registry value as the app version: Select Yes to indicate that this version found on the client device in this registry location will show as the app version in reporting. This may differ from the version of the app properties. Only one detection rule can have this setting, by adding this to another rule for this app will clear it from the prior rule.
Registry: Verify based on value, string, integer, or version.
Key path: The full path of the registry entry that contains the value to detect. A valid syntax is HKEY_LOCAL_MACHINE\Software\WinRAR or HKLM\Software\WinRAR.
Value name: The name of the registry value to detect. If this value is empty, the detection will happen on the key. The (default) value of a key will be used as detection value if the detection method is other than file or folder existence.
Detection method: Select the type of detection method that's used to validate the presence of the app.
Associated with a 32-bit app on 64-bit clients: Select Yes to search the 32-bit registry on 64-bit clients. Select No (default) to search the 64-bit registry on 64-bit clients. 32-bit clients will always search the 32-bit registry.
Report the detected registry value as the app version: Select Yes to indicate that this version found on the client device in this registry location will show as the app version in reporting. This may differ from the version of the app properties. Only one detection rule can have this setting, by adding this to another rule for this app will clear it from the prior rule.

Use a custom detection script: Specify the PowerShell script that will be used to detect this app.
Script file: Select a PowerShell script that will detect the presence of the app on the client. The app will be detected when the script both returns a 0 value exit code and writes a string value to STDOUT.
Script content: Add the script to your detection rule.
Run script as 32-bit process on 64-bit clients: Select Yes to run the script in a 32-bit process on 64-bit clients. Select No (default) to run the script in a 64-bit process on 64-bit clients. 32-bit clients run the script in a 32-bit process.
Enforce script signature check: Select Yes to verify that a trusted publisher has signed the script, which will allow the script to run with no warnings or prompts displayed. The script will run unblocked. Select No (default) to run the script without signature verification.
The Intune agent checks the results from the script. It reads the values written by the script to the STDOUT stream, the standard error (STDERR) stream, and the exit code. If the script exits with a nonzero value, the script fails and the application detection status isn't installed. If the exit code is zero and STDOUT has data, the application detection status is installed.
Note
We recommend encoding your script as UTF-8 BOM. When the script exits with the value of 0, the script execution was successful. The second output channel indicates that the app was detected. STDOUT data indicates that the app was found on the client. We don't look for a particular string from STDOUT.
When you add the app to Intune, the version of your Windows catalog app (Win32) is displayed in the Microsoft Intune admin center. The app version is provided in the All apps list, where you can filter by Windows catalog app (Win32) and select the optional version column. In the Microsoft Intune admin center, select Apps > All apps > Columns > Version to display the app version in the app list.
After you've added your rules, select Next to display the Scope tags step.
Step 5: Select scope tags (optional)
You can use scope tags to determine who can see client app information in Intune. For full details about scope tags, see Use role-based access control and scope tags for distributed IT.
Click Select scope tags to optionally add scope tags for the app. Then select Next to display the Review + create step.
Step 6: Assignments
You can select the Required, Available for enrolled devices, or Uninstall group assignments for the app. For more information, see Add groups to organize users and devices and Assign apps to groups with Microsoft Intune.
Important
For the scenario when a Win32 app is deployed and assigned based on user targeting, if the Win32 app requires device admin privileges or any other permissions that the standard user of the device doesn't have, the app will fail to install.
- For the specific app, select an assignment type:
- Required: The app is installed on devices in the selected groups.
- Available for enrolled devices: Users install the app from the company portal app or the company portal website.
- Uninstall: The app is uninstalled from devices in the selected groups.
- Select Add group and assign the groups that will use this app.
- On the Select groups pane, select groups to assign based on users or devices.
- After you select your groups, you can also set End user notifications, Availability, and Installation deadline. For more information, see Set Win32 app availability and notifications.
- If you don't want this app assignment to affect groups of users, select Included under the MODE column. In the Edit assignment pane, change the mode value from Included to Excluded. Select OK to close the Edit assignment pane.
- In the App settings section, select the Delivery optimization priority value for the app. This setting will determine how the app content will be downloaded. You can choose to download the app content in background mode or foreground mode based on assignment.
After you finish setting the assignments for the apps, select Next to display the Review + create page.
Step 7: Review and create
Review the values and settings that you entered for the app. Verify that you configured the app information correctly.
Select Create to add the app to Intune.
The Overview pane for the LOB app appears.
At this point, you've completed steps to add a Windows catalog app (Win32) to Intune.