Note
Access to this page requires authorization. You can try signing in or changing directories.
Access to this page requires authorization. You can try changing directories.
Note
Microsoft Intune has discontinued future investments in managing and deploying Windows Information Protection.
Support for the Windows Information Protection without enrollment scenario in Microsoft Intune has been removed.
For more information, see End of support guidance for Windows Information Protection.
For information about Intune MAM on Windows, see MAM for Windows and App protection policy settings for Windows.
You can use Windows Information Protection (WIP) policies with Windows 10 apps to protect apps without device enrollment.
Before you begin
You must understand a few concepts when adding a WIP policy:
List of allowed and exempt apps
Protected apps: These apps are the apps that need to adhere to this policy.
Exempt apps: These apps are exempt from this policy and can access corporate data without restrictions.
Types of apps
- Recommended apps: A pre-populated list of (mostly Microsoft 365 (Office)) apps that allow you to easily import into the policy.
- Store apps: You can add any app from the Windows store to the policy.
- Windows desktop apps: You can add any traditional Windows desktop apps to the policy (for example, .exe, .dll)
Prerequisites
You must configure the MAM provider before you can create a WIP policy. Learn more about how to configure your MAM provider with Intune.
Important
WIP does not support multi-identity, only one managed identity can exist at a time. For more information about the capabilities and limitations of WIP, see Protect your enterprise data using Windows Information Protection (WIP).
Additionally, you need to have the following license and update:
To add a WIP policy
After you set up Intune in your organization, you can create a WIP-specific policy.
Important
Windows Information Protection (WIP) policies without enrollment has been deprecated. You can no longer create WIP policies for unenrolled devices.
Tip
For related information about creating WIP policies for Intune, including available settings and how to configure them, see Create a Windows Information Protection (WIP) policy with MAM using the portal for Microsoft Intune in the Windows Security documentation library.
- Sign in to the Microsoft Intune admin center.
- Select Apps > Protection > Create.
- Add the following values:
- Name: Type a name (required) for your new policy.
- Description: (Optional) Type a description.
- Platform: Choose Windows 10 as the supported platform for your WIP policy.
- Enrollment state: Choose Without enrollment as the enrollment state for your policy.
- Choose Create. The policy is created and appears in the table on the Protection pane.
To add recommended apps to your protected apps list
- Sign in to the Microsoft Intune admin center.
- Select Apps > Protection.
- On the Protection pane, choose the policy you want to modify. The Intune App Protection pane is displayed.
- Choose Protected apps from the Intune App Protection pane. The Protected apps pane opens showing you all apps that are already included in the list for this app protection policy.
- Select Add apps. The Add apps information shows you a filtered list of apps. The list at the top of the pane allows you to change the list filter.
- Select each app that you want to allow access your corporate data.
- Click OK. The Protected apps pane is updated showing all selected apps.
- Click Save.
Add a Store app to your protected apps list
To add a Store app
- Sign in to the Microsoft Intune admin center.
- Select Apps > Protection.
- On the Protection pane, choose the policy you want to modify. The Intune App Protection pane is displayed.
- Choose Protected apps from the Intune App Protection pane. The Protected apps pane opens showing you all apps that are already included in the list for this app protection policy.
- Select Add apps. The Add apps information shows you a filtered list of apps. The list at the top of the pane allows you to change the list filter.
- From the list, select Store apps.
- Enter values for Name, Publisher, Product Name, and Action. Be sure to set the Action value to Allow, so that the app will have access to your corporate data.
- Click OK. The Protected apps pane is updated showing all selected apps.
- Click Save.
Add a desktop app to your protected apps list
To add a desktop app
- Sign in to the Microsoft Intune admin center.
- Select Apps > Protection.
- On the Protection pane, choose the policy you want to modify. The Intune App Protection pane is displayed.
- Choose Protected apps from the Intune App Protection pane. The Protected apps pane opens showing you all apps that are already included in the list for this app protection policy.
- Select Add apps. The Add apps information shows you a filtered list of apps. The list at the top of the pane allows you to change the list filter.
- From the list, select Desktop apps.
- Enter values for Name, Publisher, Product Name, File, Min Version, Max Version, and Action. Be sure to set the Action value to Allow, so that the app will have access to your corporate data.
- Click OK. The Protected apps pane is updated showing all selected apps.
- Click Save.
WIP Learning
After you add the apps you want to protect with WIP, you need to apply a protection mode by using WIP Learning.
Before you begin
WIP Learning is a report that allows you to monitor your WIP-enabled apps and WIP-unknown apps. The unknown apps are the ones not deployed by your organization's IT department. You can export these apps from the report and add them to your WIP policies to avoid productivity disruption before they enforce WIP in "Block" mode.
In addition to viewing information about WIP-enabled apps, you can view a summary of the devices that have shared work data with websites. With this information, you can determine which websites should be added to group and user WIP policies. The summary shows which website URLs are accessed by WIP-enabled apps.
When working with WIP-enabled apps and WIP-unknown apps, we recommend that you start with Silent or Allow Overrides while verifying with a small group that you have the right apps on your protected apps list. After you're done, you can change to your final enforcement policy, Block.
What are the protection modes?
Block
WIP looks for inappropriate data sharing practices and stops the user from completing the action. Blocked actions can include sharing info across non-corporate-protected apps, and sharing corporate data between other people and devices outside of your organization.
Allow Overrides
WIP looks for inappropriate data sharing, warning users when they do something deemed potentially unsafe. However, this mode lets the user override the policy and share the data, logging the action to your audit log.
Silent
WIP runs silently, logging inappropriate data sharing, without blocking anything that would have been prompted for employee interaction while in Allow Override mode. Unallowed actions, like apps inappropriately trying to access a network resource or WIP-protected data, are still stopped.
Off (not recommended)
WIP is turned off and doesn't help to protect or audit your data.
After you turn off WIP, an attempt is made to decrypt any WIP-tagged files on the locally attached drives. Note that previous decryption and policy info isn't automatically reapplied if you turn WIP protection back on.
Add a protection mode
From the App policy pane, choose the name of your policy, then choose Required settings.
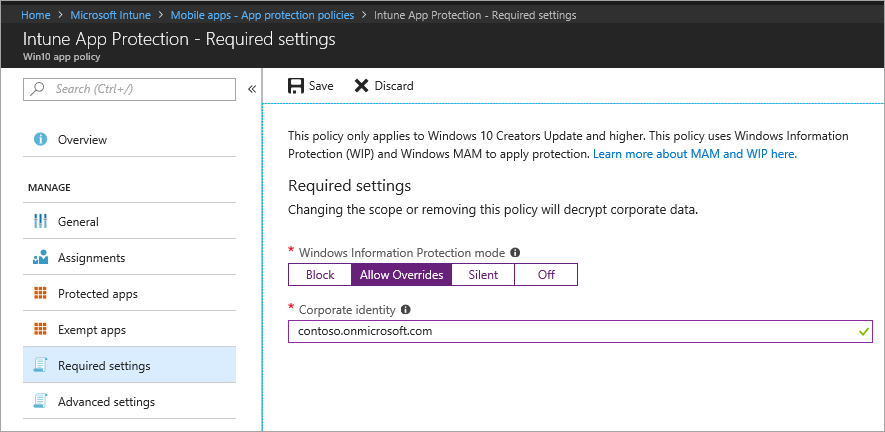
Select a setting and then choose Save.
Allow Windows Search Indexer to search encrypted items
Allows or disallows the indexing of items. This switch is for the Windows Search Indexer, which controls whether it indexes items that are encrypted, such as the Windows Information Protection (WIP) protected files.
This app protection policy option is in the Advanced settings of the Windows Information Protection policy. The app protection policy must be set to the Windows 10 platform and the app policy Enrollment state must be set to With enrollment.
When the policy is enabled, WIP protected items are indexed and the metadata about them are stored in an unencrypted location. The metadata includes things like file path and date modified.
When the policy is disabled, the WIP protected items are not indexed and do not show up in the results in Cortana or file explorer. There may also be a performance impact on photos and Groove apps if there are many WIP protected media files on the device.
Note
Microsoft deprecated the Windows Cortana standalone app. The Cortana productivity assistant is still available. For more information on deprecated features on Windows client, go to Deprecated features for Windows client.
Add encrypted file extensions
In addition to setting the Allow Windows Search Indexer to search encrypted items option, you can specify a list of file extensions. Files with these extensions are encrypted when copying from a Server Message Block (SMB) share within the corporate boundary as defined in the network location list. When this policy is not specified, the existing auto-encryption behavior is applied. When this policy is configured, only files with the extensions in the list will be encrypted.
Deploy your WIP app protection policy
Important
This information applies for WIP without device enrollment.
After you created your WIP app protection policy, you need to deploy it to your organization using MAM.
On the App policy pane, choose your newly created app protection policy, choose User groups > Add user group.
A list of user groups, made up of all the security groups in your Microsoft Entra ID, opens in the Add user group pane.
Choose the group you want your policy to apply to, then choose Select to deploy the policy.
Next steps
Learn more about Windows Information Protection, see Protect your enterprise data using Windows Information Protection (WIP).