Note
Access to this page requires authorization. You can try signing in or changing directories.
Access to this page requires authorization. You can try changing directories.
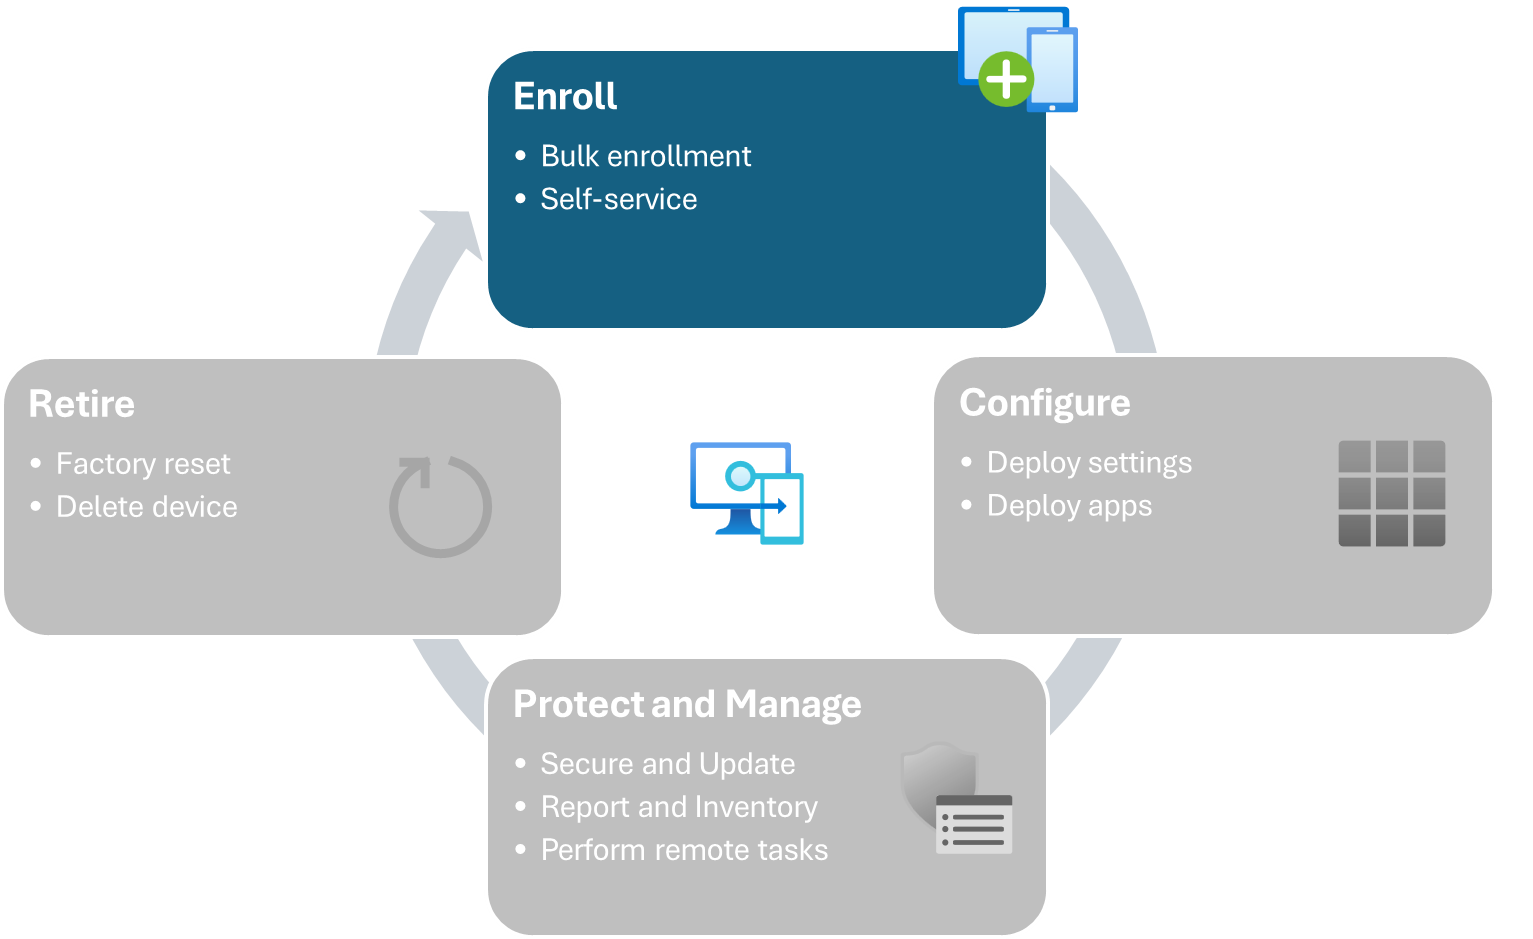
Understanding and deciding how devices are enrolled helps you understand how to create groups to use for targeting profiles and applications.
Overview of enrollment types
There are three main methods for joining Windows devices to Microsoft Entra ID and getting them enrolled and managed by Intune:
- Automatic Intune enrollment via Microsoft Entra join happens when a user first turns on a device that is in out-of-box experience (OOBE), and selects the option to join Microsoft Entra ID. In this scenario, the user can customize certain Windows functionalities before reaching the desktop, and becomes a local administrator of the device. This option isn't an ideal enrollment method for education devices.
- Automatic Intune enrollment with provisioning packages. Provisioning packages are files that can be used to set up Windows devices, and can include information to connect to Wi-Fi networks and to join a Microsoft Entra tenant. Provisioning packages can be created using either Set Up School PCs or Windows Configuration Designer applications. These files can be used from the school device's desktop, or by saving it to a USB flash drive and distributing it to other devices during the out-of-box-experience (OOBE).
- Automatic Intune enrollment with Windows Autopilot. Windows Autopilot is a collection of cloud services to configure the out-of-box experience, enabling light-touch or zero-touch deployment scenarios. You can optionally use Windows Autopilot for pre-provisioned deployment to enroll Windows Autopilot-registered devices with required apps and settings so that they're nearly ready for school use when students receive them. Students just have to connect to Wi-Fi and complete the remaining setup steps.
Tip
For details about bring your own device (BYOD) or enrollment with co-management, see Enrollment guide: Enroll Windows client devices in Microsoft Intune.
Provisioning package overview
A provisioning package (.ppkg) is a file that contains configuration settings, and is used to quickly and efficiently configure Windows client devices without installing a new image. This method ensures that school devices have a standard set of apps and settings when students start using them. For more information, see Provisioning packages overview.
Tip
Even if you're using custom OS images to configure the initial apps and settings, you can use provisioning packages or Windows Autopilot for the sole purpose of enrolling devices in Microsoft Intune.
You can use Windows Configuration Designer or the Set up School PCs app to create provisioning packages. Both tools guide you through how-to to create the package. For more information, see:
After you create the provisioning package (PPKG) you can copy it to one or more USB drives, insert them into devices and power them on to start the provisioning process.
Devices continue to sync in the background after provisioning. Track provisioning progress on the Enrollment Status Page to ensure all required mobile device management policies and apps are delivered before student use. See the following table for more best practices.
| Scenario | Considerations |
|---|---|
| You need to reuse or troubleshoot a device. | To set up and enroll those devices again, you have to reapply the provisioning package. Alternatively, you can use Windows Autopilot Reset, which retains Microsoft Intune enrollment and reapplies existing provisioning packages to the devices. You don't need to register devices with Windows Autopilot to use Windows Autopilot Reset. |
| You want to bulk enroll devices into Microsoft Intune. | Remember that the bulk enrollment token expires 180 days after you create it. To continue using the same provisioning package, update the token before it expires. After the token expires, you must update the token or create a new provisioning package. |
| You want to provision more than one device at a time. | Copy the provisioning package to multiple USB flash drives. |
Windows Autopilot overview
Windows Autopilot is a collection of technologies you can use to simplify the setup and configuration of new school devices. With this method, there's no need for imaging. To set up your devices with Windows Autopilot:
- Register the device with Windows Autopilot in the Microsoft Intune admin center or Partner center.
- Create and assign a Windows Autopilot deployment profile, Enrollment Status Page (ESP) profile, apps, and policies.
For instructions on how to configure Windows Autopilot, see Windows Autopilot.
There are three main methods for joining iOS devices to Microsoft Entra ID and getting them enrolled and managed by Intune:
- Enroll with Company Portal. Enrollment is performed by the user using the Company Portal app. The user downloads and installs the Company Portal app from the App store, then opens Company Portal and follows the instructions to enroll the device. The device is enrolled with personal ownership. This option isn't an ideal enrollment method for education devices.
- Enroll with Automated Device Enrollment. Automated Device Enrollment applies your organization's settings from Apple School Manager and enrolls devices without IT needing to physically interact with the device. iPhones and iPads can be shipped directly to employees and students. When they turn on their devices, Apple Setup Assistant guides them through setup and enrollment. Devices can be configured with user affinity for use with one user or no user affinity for shared device scenarios.
- Enroll with Apple Configurator. Apple Configurator on Mac can be used to apply configuration including enrollment information to one or more iPhones or iPads. This scenario is best suited for when devices aren't registered in Apple School Manager (for example - donated devices) or IT doesn't have physical access to the devices.
Tip
For a more in depth guide about enrollment and choosing the right option, see Enrollment guide: Enroll iOS and iPadOS devices in Microsoft Intune
Choose the enrollment method
Windows Autopilot and provisioning packages are usually the most efficient Windows enrollment methods for school environments.
The following table provides more information about the features supported by each Windows provisioning method. Use the Features column to identify your school's environment and setup needs. A checkmark (✔️) means that the provisioning method supports the feature or capability. An X (❌) means that the provisioning method doesn't support it.
| Configuration need | Provisioning package | Windows Autopilot |
|---|---|---|
| Apply custom OS images. | ✔️ | ✔️ Devices must remain in OOBE mode after you apply the images. |
| Bulk enroll devices. | ✔️ | ✔️ |
| Allow IT department or staff to provision devices. | ✔️ This method requires you or your IT staff to unbox the device, turn on the device, and configure the device. |
✔️ This method is optimized for limited engagement from IT staff, so students and teachers can unbox the device, turn on the device, and complete the initial configuration. |
| An OEM can enroll devices on your behalf. | ❌ | ✔️ The OEM provider must first register device IDs in the Windows Autopilot service. To further reduce IT engagement and end-user provisioning time, they can pre-provision devices. |
| Microsoft Partner or Cloud Service Provider (CSP) partner can enroll devices on your behalf. | ✔️ | ✔️ Partners must first register device IDs in the Windows Autopilot service. To further reduce IT engagement and end-user provisioning time, they can pre-provision devices. |
| Set up a shared device. | ✔️ | ✔️ We recommend using Windows Autopilot self-deploying mode for shared device scenarios. To set up devices for individual users, use Windows Autopilot user-driven mode. |
| Set up a device for a single user. | ✔️ A primary user isn't assigned. |
✔️ Supported with Windows Autopilot user-driven mode. To set up shared devices, use Windows Autopilot self-deploying mode. |
| Add apps. | ✔️ You can add Win32 apps to the provisioning package to reduce deployment time and network load during deployment. Silent installation is required for Win32 apps. |
✔️ Works well with all app types. Silent installation is required for Win32 apps. To further reduce deployment time and network load during deployment, you can pre-provision devices. |
| Devices are ready for sign-in and use on first day of class. | ✔️ | ❌ Students must connect the device to Wi-Fi and complete the remaining setup steps. To further reduce end-user provisioning time, you can pre-provision devices. |
Automated Device Enrollment is usually the most efficient iOS enrollment method for school environments.
The following table provides more information about the features supported by each iOS provisioning method. Use the Features column to identify your school's environment and setup needs. A checkmark (✔️) means that the provisioning method supports the feature or capability. An X (❌) means that the provisioning method doesn't support it.
| Configuration need | Company Portal | Automated Device Enrollment | Apple Configurator |
|---|---|---|---|
| Bulk enroll devices. | ❌ | ✔️ | ✔️ |
| Allow IT department or staff to provision devices. | ✔️ | ✔️ | ❌ |
| Devices are user-less or shared. | ❌ | ✔️ | ✔️ |
| A Partner can enroll devices on your behalf. | ❌ | ✔️ | ✔️ |
| Enroll without Apple School Manager. | ✔️ | ❌ | ✔️ |
| Devices are ready for sign-in and use on first day of class. | ❌ | ✔️ | ✔️ |