Integrate Jamf Mobile Threat Protection with Intune
Complete the following steps to integrate the Jamf Mobile Threat Defense solution with Intune.
Before you begin
Before you start the process to integrate Jamf with Intune, make sure you have the following prerequisites in place:
Microsoft Intune Plan 1 subscription
Microsoft Entra administrator credentials and assigned role that is able to grant the following permissions:
- Sign in and read user profile
- Access the directory as the signed-in user
- Read directory data
- Send device risk information to Intune
A valid Jamf Security Cloud subscription
- An administrator account with super admin privileges
Integration overview
Enabling Mobile Threat Defense integration between Jamf and Intune entails:
- Enabling Jamf's UEM Connect service to synchronize information with Azure and Intune. Synchronization includes user and device Life Cycle Management (LCM) metadata, along with Mobile Threat Defense (MTD) device threat level.
- Create Activation Profiles in Jamf to define device enrollment behavior.
- Deploy the Jamf Trust app to managed iOS and Android devices.
- Configure Jamf for end user self-service using MAM on iOS and Android devices.
Set up Jamf Mobile Threat Defense integration
Setting up integration between Jamf and Intune doesn't require any support from Jamf staff and can be easily accomplished in a matter of minutes.
Enable support for Jamf in Intune
Sign in to the Microsoft Intune admin center.
Select Tenant administration > Connectors and tokens > Mobile Threat Defense > Add.
On the Add Connector page, use the dropdown and select Jamf. And then select Create.
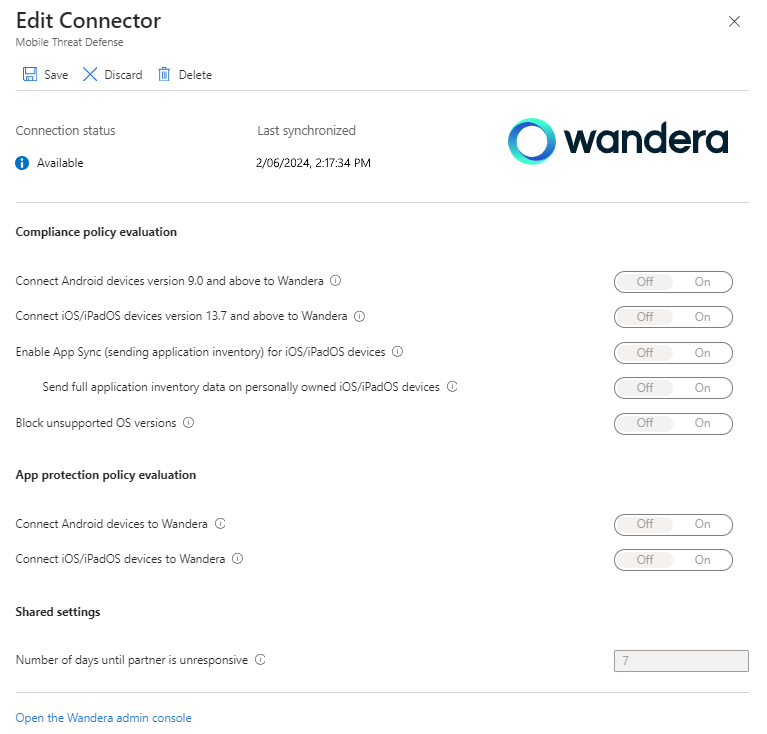
On the Mobile Threat Defense pane, select the Jamf MTD Connector from the list of connectors to open the Edit connector pane. Select Open the Jamf admin console to open Jamf Security Cloud portal, and sign in.
In the Jamf Security Cloud portal, go to Integrations > UEM Integration, and select the UEM Connect tab. Use the EMM Vendor drop-down and select Microsoft Intune.
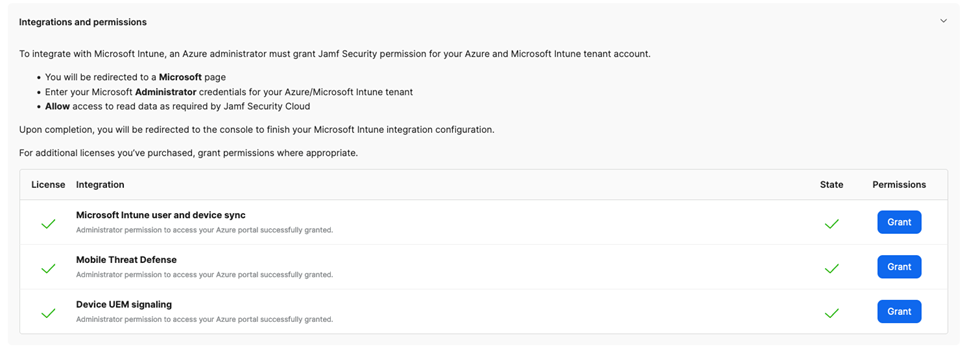
You're presented with a screen similar to the following image, indicating the permission grants required to complete the integration:

Next to Microsoft Intune User and Device Sync, select the Grant button to start the process to provide consent for Jamf to perform Life Cycle Management (LCM) functions with Azure and Intune.
When prompted, select or enter your Azure admin credentials. Review the requested permissions, then select the checkbox to Consent on behalf of your organization. Finally, select Accept to authorize the LCM integration.

You're automatically returned to the Jamf Security Cloud portal. If the authorization was successful, there's a green tick mark next to the Grant button.
Repeat the consent process for the remaining listed integrations by clicking on their corresponding Grant buttons until you have green tick marks next to each.
Return to the Intune admin center, and resume editing the MTD Connector. Set all of the available toggles to On, and then Save the configuration.

Intune and Jamf are now connected.
Create Activation Profiles in Jamf
Intune-based deployments are facilitated using Jamf Activation Profiles defined in Jamf Security Cloud portal. Each Activation Profile defines specific configuration options like authentication requirements, service capabilities, and initial group membership.
After creating an Activation Profile in Jamf, you assign it to users and devices in Intune. While an Activation Profile is universal across device platforms and management strategies, the following steps define how to configure Intune based upon these differences.
The steps from here assume you created an Activation Profile in Jamf that you would like to deploy via Intune to your target devices. For more information about creating and using Jamf Activation Profiles, see Activation Profiles in the Jamf Security Documentation.
Note
When creating Activation Profiles for deployment via Intune, be sure to set Associated User to the Authenticated by Identity Provider > Microsoft Entra option for maximum security, cross-platform compatibility, and a streamlined end user experience.
Deploying Jamf Over-the-Air to MDM-managed devices
For iOS and Android devices that you manage with Intune, Jamf can deploy over-the-air for rapid push-based activations. Be sure you already created the Activation Profiles you need before proceeding with this section. Deploying Jamf to managed devices involves:
- Adding Jamf configuration profiles to Intune and assigning to target devices.
- Adding the Jamf trust app and respective app configurations to Intune and assigning to target devices.
Configure and deploy iOS configuration profiles
In this section, you download required iOS device configuration files and then deliver them over-the-air via MDM to your Intune managed devices.
In Jamf Security Cloud portal, navigate to the Activation Profile you want to deploy (Devices > Activations), then select the Deployment Strategies tab > Managed Devices > Microsoft Intune.
Expand the Apple iOS Supervised or Apple iOS Unsupervised sections based upon your device fleet configuration.
Download the provided configuration profile and prepare to upload them in a later step.
Open Microsoft Intune admin center and navigate to Devices > iOS/iPadOS > Configuration profiles. Select Create > New Policy.
In the panel that appears, for Platform select iOS/iPadOS, and for Profile type select Template and then Custom. Then select Create.
In the Name field, provide a descriptive title for the configuration, ideally matching what you named the Activation Profile in Jamf Security Cloud portal. A matching name will help ease cross-referencing in the future. Alternatively, provide the Activation Profile code if desired. We recommend indicating if the configuration is for Supervised or Unsupervised devices by suffixing the name as such.
Optionally provide a Description providing more details for other administrators about the purpose/use of the configuration. Select Next.
On the Configuration settings page, for Configuration profile file, specify or browse to downloaded configuration profile that corresponds to the Activation Profile downloaded in step 3. Take care to select the appropriate Supervised or Unsupervised profile if you downloaded both. Select Next.
Assign the configuration profile to groups of users or devices that should have Jamf installed. We recommend starting with a test group then expanding after validating activations work correctly. Select Next.
Review the configuration for correctness editing as needed, then select Create to create and deploy the configuration profile.
Note
Jamf offers an enhanced deployment profile for supervised iOS devices. If you have a mixed fleet of supervised and unsupervised devices, repeat the above steps for the other profile type as needed. These same steps need to be followed for any future Activation Profiles that are to be deployed via Intune. Please contact Jamf support if you have a mixed fleet of supervised and unsupervised iOS devices and need assistance with supervised mode-based policy assignments.
Deploying Jamf to unenrolled devices with MAM managed applications
For unenrolled devices with MAM managed applications, Jamf utilizes an integrated authentication-based onboarding experience to activate and protect company data within MAM managed apps.
The following sections describe how to configure Jamf and Intune to enable end users to seamlessly activate Jamf before being able to access company data.
Configure Azure Device Provisioning in a Jamf Activation Profile
Activation Profiles to be used with MAM must have Associated User set to the Authenticated by Identity Provider > Microsoft Entra option.
In the Jamf Security Cloud portal, select an existing, or create a new, Activation Profile that unenrolled devices with MAM managed applications use during enrollment in Devices > Activations.
Select the Identity-based provisioning tab, and then scroll to the Microsoft section.
Select toggle for the Activation profile you want to use, which opens the Add auto-provisioning to activation profile window.
Choose to confirm the current selection of the Everyone (any group) option, or select Specific groups and then add group IDs to limit user activations to only those groups.
- If one or more group IDs are defined, a user activating MAM must be a member of at least one of the specified groups to activate using this Activation Profile.
- You can set up multiple Activation Profiles for the same Azure Tenant ID, with each using a different group ID. Use of different group IDs allows you to enroll devices into Jamf based upon Azure group membership, enabling differentiated capabilities by group at activation time.
- You can configure a single "default" Activation Profile that doesn't specify any Group IDs. This group serves as a catch-all for all activations in which the authenticated user isn't a member of a group with an association to another Activation Profile.
Select Save in the upper-right corner of the page.
Next Steps
- With Jamf Activation Profiles loaded in the Jamf Security Cloud portal, create client apps in Intune to deploy the Jamf Trust app to Android and iOS/iPadOS devices. The Jamf app config provides essential functionality to complement device configuration profiles that are pushed to devices, and is recommended for all deployments. See Add MTD apps for the procedures and custom details specific to the Jamf apps.
- With Jamf integrated with Intune, you can tune your configuration, view reports, and deploy more broadly across your fleet of mobile devices. For detailed configuration guides, see the Support Center Getting Started Guide in the Jamf documentation.