Note
Access to this page requires authorization. You can try signing in or changing directories.
Access to this page requires authorization. You can try changing directories.
What are Office add-ins?
Microsoft partnered with leading companies to build programs that help you get things done right from your Microsoft applications. These programs are called Office Add-ins and they bring powerful web services directly into Office. For more information, see Start using your Office Add-in.
Before you begin
Management and deployment via Integrated Apps require that the users are using Microsoft 365 Business licenses (Business Basic, Business Standard, Business Premium), Office 365 Enterprise licenses (E1/E3/E5/F3), or Microsoft 365 Enterprise licenses (E3/E5/F3). The users also need to be signed into Office using their organizational ID and have Exchange Online and active Exchange Online mailboxes. Your subscription directory must either be in or federated to Microsoft Entra ID.
Office Requirements
Deployment via Integrated Apps is supported for Outlook, Excel, Word, and PowerPoint add-ins. They run across multiple platforms, including Windows, Mac, iPad, and in a browser. Outlook add-ins are also supported on mobile (iOS and Android).
For Word, Excel, and PowerPoint add-ins, Integrated Apps deployment is only supported on Windows, Mac, and the web (not iPad). Additionally, your users must meet these version requirements.
- On a Windows device, Version 1704 or later of Microsoft 365 Business licenses (Business Basic, Business Standard, Business Premium), Office 365 Enterprise licenses (E1/E3/E5/F3), or Microsoft 365 Enterprise licenses (E3/E5/F3).
- On a Mac, Version 15.34 or later.
For Outlook, your users must meet these version requirements.
- Version 1701 or later of Microsoft 365 Business licenses (Business Basic, Business Standard, Business Premium), Office 365 Enterprise licenses (E1/E3/E5/F3), or Microsoft 365 Enterprise licenses (E3/E5/F3).
- Version 1808 or later of Office Professional Plus 2019 or Office Standard 2019.
- Version 16.0.4494.1000 or later of Office Professional Plus 2016 (MSI) or Office Standard 2016 (MSI).
- Version 15.0.4937.1000 or later of Office Professional Plus 2013 (MSI) or Office Standard 2013 (MSI).
- Version 16.0.9318.1000 or later of Office 2016 for Mac.
- Version 2.75.0 or later of Outlook mobile for iOS.
- Version 2.2.145 or later of Outlook mobile for Android.
Note
MSI versions of Outlook show admin-installed or deployed add-ins in the appropriate Outlook ribbon, not the My add-ins" section.
Exchange Online Requirements
Microsoft Exchange stores the add-in manifests within your organization's tenant. The admin deploying add-ins and the users receiving those add-ins must be on a version of Exchange Online that supports OAuth authentication. OAuth connectivity per user is verified by using the Test-OAuthConnectivity PowerShell cmdlet.
Deployment doesn't support the following scenarios.
- Add-ins that target Word, Excel, or PowerPoint in Office 2013.
- An on-premises directory service.
- Add-in deployment to an Exchange on-premises Mailbox.
- Deployment of Component Object Model (COM) or Visual Studio Tools for Office (VSTO) add-ins.
- Deployments of Microsoft 365 that don't include Exchange Online such as Microsoft 365 Apps for Business and Microsoft 365 Apps for Enterprise.
Controls for managing Office add-ins
As an admin, you can manage Office add-ins in your organization as follows.
- Deploy an Office Add-in for users in your organization.
- Manage how users can install and use Office Add-ins.
- Upload custom Office add-ins for your organization.
Prepare to deploy and manage Office Add-ins via Integrated Apps
When the relevant Office application starts, the add-in automatically downloads. If the add-in supports add-in commands, the add-in automatically appears in the ribbon within the Office application.
Add-ins no longer appear for users if the admin turns off or deletes the add-in. They'll also stop appearing if the user is removed from Microsoft Entra ID or from a group that the add-in is assigned to. Learn how to perform these actions in the following section, Deploy your Office Add-ins.
Add-in deployment is supported on three platforms: Windows, Mac, and on the web. It's also supported on iOS and Android for Outlook add-ins.
Currently, Exchange admins and Global admins can deploy add-ins from Integrated apps.
Deploy your Office Add-ins
Deploying an add-in means you're preinstalling the add-in for a specific set of users in your organization. The admin fully controls all management actions taken on a deployed add-in. You can find, test, and fully deploy apps published by Microsoft and other partners. By purchasing and licensing the apps from the admin center, you add Microsoft and Microsoft partner apps to your list from a single location.
- In the admin center, in the left nav, choose Settings, and then choose Integrated apps.
- In the Deployed Apps list, select Get apps to get a view of the apps.
- On the Microsoft 365 Apps published apps page, select the app you want to deploy by choosing Get it now. Accept the permissions and select Continue.
- Select Deploy at the top of the page next to the message that refers to waiting to be deployed. If the app selected is linked to a SaaS offer by an independent software vendor (ISV), all the other apps that are part of this linked offer appear on the Configuration page. If you choose to deploy all of the apps, select Next. Otherwise, select Edit, and choose which apps you want to deploy. Some apps require you to add users before you can select Deploy.
- Select Add users, choose Is this a test deployment, and then select either Entire organization, Specific users/groups, or Just me. Specific users/groups can be a Microsoft 365 group, a security group, or a distributed group. You can also choose Test deployment if you prefer to wait to deploy the app to the entire organization.
- Select Next to get to the Accept permission request page. The app capabilities and permissions of each of the apps are listed. If the app needs consent, select Accept permissions. Only a global administrator can give consent.
- Select Next to review the deployment and choose Finish deployment. You can view the deployment from the Overview tab by choosing View this deployment. In the Microsoft 365 admin center, you can see the status of each deployed app and the date you deployed the app.
It can take up to 24 hours for an add-in to show up for client for all users.
Considerations when deploying an add-in to users and groups
Admins can deploy an add-in to everyone or to specific users and groups. Each option has implications.
- Everyone: This option assigns the add-in to every user in the organization. Use this option sparingly and only for add-ins that are truly universal to your organization.
- Users: If you assign an add-in to an individual user, and then deploy the add-in to a new user, you must first add the new user.
- Groups: If you assign an add-in to a group, users who are added to the group are automatically assigned the add-in. When a user is removed from a group, the user loses access to the add-in. In either case, no other action is required from the admin.
- Just me: If you assign an add-in to just yourself, the add-in is assigned to only your account, which is ideal for testing the add-in.
The right option for your organization depends on your configuration. However, we recommend making assignments by using groups. As an admin, you might find it easier to manage add-ins by using groups and controlling the membership of those groups rather than assigning individual users each time. In some situations, you might want to restrict access to a small set of users by making assignments to specific users by assigning users manually.
Recommended approach for deploying Office Add-ins
To roll out add-ins by using a phased approach, we recommend the following actions.
- Roll out the add-in to a small set of business stakeholders and members of the IT department. If the deployment is successful, move to step 2.
- Roll out the add-in to more individuals within the business. Again, evaluate the results and, if successful, continue with full deployment.
- Perform a full rollout to all users.
Depending on the size of the target audience, you can add or remove roll-out steps.
Scenarios where Exchange admin can't deploy an add-in
There are two cases in which an Exchange Admin isn't able to deploy an add-in.
- If an add-in needs permission for Microsoft Graph APIs and needs consent from a global admin.
- If an add-in is linked to two or more apps, another admin (Exchange or global) deployed at least one of those linked apps, and the user assignment isn't uniform. We only allow deployment of add-ins when the user assignment is the same for all the already deployed apps.
Edit users for deployed add-ins
Post deployment, admins can also edit the deployed to add-ins.
- In the admin center, select Settings, then select Integrated apps.
- On the Integrated apps page, it displays a list of apps that are either single add-ins or add-ins that are linked with other apps.
- Select an app and then scroll down to select Edit Users or select the User tab in the overview pane.
- Select the user group you want to deploy the add-in to.
- Review the app information, and then select Update.
Note
Only the admin who deployed the add-in or a global admin can manage that add-in.
Update deployed add-ins
Post deployment, admins can also approve updates for the deployed add-ins.
- In the admin center, select Settings then select Integrated apps.
- On the Integrated apps page, it displays a list of apps that are either single add-ins or add-ins that are linked with other apps.
- Select an app with Status of More apps available to open the Manage pane. The status of More apps available lets you know that there are more integrations from the ISVs that aren't yet deployed.
- On the Overview tab, select Deploy. Some apps require you to add users before you can select Deploy.
- Select Users, select Is this a test deployment, and then select either Entire organization, Specific users/groups or Just me. You can also select Test deployment if you prefer to wait to deploy the app to the entire organization. Specific users or groups can be a Microsoft 365 group, a security group, or a distribution group.
- Select Update and then select Done. You can now select Deploy on the Overview tab.
- Review the app information, and then select Deploy.
- Select Done on the Deployment completed page, and review the details of the test or full deployment on the Overview tab.
- If the app has a status of Update pending, you can select the app to open the Manage pane and update the app.
- To just update users, select the Users tab and make the appropriate change. Select Update after making your changes.
Delete a deployed add-in
You can also delete an add-in that was deployed.
- In the admin center, select Settings, then select Integrated apps.
- Select any row to display the management pane.
- Select the Configuration tab.
- Select the add-in that you want to delete and then select Remove.
Note
If another admin deployed the add-in, then the Remove button will be disabled. Only the admin who deployed the app or a global admin can delete the add-in.
Manage how users can install and use Office add-ins
Managing how users can install and use Office add-ins means that you decide who can or can't install and use add-ins in your organization. Unlike deploying an add-in that preinstalls for selected users, managing an add-in allows you to decide which users can self-install Office add-ins from the stores on the Microsoft applications.
Word, Outlook, and PowerPoint
- To manage users’ ability to self-install and use Office add-ins from the Word, Excel, and PowerPoint stores, visit the Microsoft 365 Admin Center.
- Choose Settings and the select Org Settings.
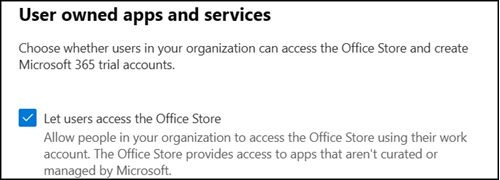
- Scroll down and select User owned apps and services.
- Check or clear the option to allow or prevent users to access all Word, Excel, and PowerPoint add-ins.
Options available in non-educational tenants:
Options available in educational tenants:
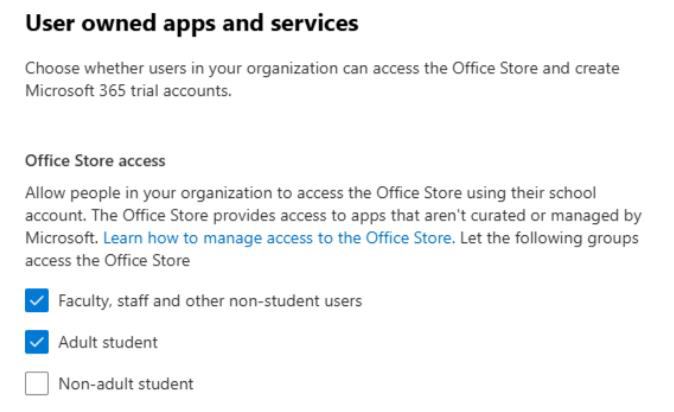
The user's license information is used to define whether a user is a faculty, staff, or a student along with the Age Group property to check whether the student is an adult or not.
Note
For more information, see the following articles.
Note
This setting doesn't affect any deployed Office add-ins on Word, Excel, and PowerPoint. You can continue to deploy Office add-ins to users in your organization, even if the setting is turned off.
Outlook
- To manage users' ability to self-install and use Office add-ins from Outlook store, sign in to the classic Exchange admin center as a global administrator.
- Go to Permissions and then select User Roles.
- Select an existing role assignment policy or create a new policy.
- Type a name for the policy if you're creating a new policy.
- Select the following roles: My Custom Apps, My MarketPlaceApps, and My ReadWriteMailbox Apps.
- Select Save.
- Once the policy is created, you can assign it to users in your organization.
- You can also create multiple policies and assign it to different users within your organization.
- Activating these checkboxes turns on access to Outlook add-ins for the users assigned to the policy.
- Deactivating these checkboxes turns off access to Outlook add-ins for users assigned to the policy.
Note
This setting doesn't affect any deployed Office add-ins on Outlook. You can continue to deploy Office add-ins on Outlook to users in your organization, even if the setting is turned off.
Microsoft is now partnering with leading developers to create unified apps that work across Outlook, Word, Excel, PowerPoint, Teams, and the Microsoft 365 App (formerly known as Office.com). Any settings made for Office Add-ins continue to be honored as long as they stay as add-ins. When Office add-ins upgrade to work across different Microsoft applications, you can learn to manage them from here. For more information, see Controls for managing Teams apps that work on Outlook and Microsoft 365.
Upload Custom Office Add-ins in your organization
You can also upload custom line-of-business add-ins and deploy it to users in your organization.
- In the admin center, in the left nav, choose Settings and then Integrated apps.
- Select Upload custom apps. Custom line-of-business add-ins for Word, PowerPoint, Excel, and Outlook are supported.
- Upload the manifest file from your device or add a URL link. Some apps require you to add users before you can select Deploy.
- Select Add users, choose Is this a test Deployment, and choose either Entire organization, Specific users/groups, or Just me. Specific users/groups can be a Microsoft 365 group, a security group, or a distributed group. You can also choose Test deployment if you want to wait to deploy the app to the entire organization.
- Select Next to view the Accept permission request page. The app capabilities and permissions of the apps are listed. If the app needs consent, select Accept permissions. Only a global administrator can give consent.
- Select Next to review the deployment and choose Finish deployment. You can view the deployment from the Overview tab by choosing View this deployment.
Note
The uploaded manifest size can't exceed 512 KB.
More about Office Add-ins security
Office Add-ins combine an XML manifest file that contains some metadata about the add-in, but most importantly points to a web application that contains all the code and logic. Add-ins can range in their capabilities, but usually read and write data to and from the user's documents.
For more information about the types and capabilities of Office Add-ins, see Office Add-ins platform overview, especially the section Components of an Office Add-in.
To interact with the user's document, the add-in needs to declare what permission it needs in the manifest. A five-level JavaScript API access-permissions model provides the basis for privacy and security for users of task pane add-ins. Most of the add-ins in the Office Store are level ReadWriteDocument with almost all add-ins supporting at least the ReadDocument level. For more information about the permission levels, see Requesting permissions for API use in content and task pane add-ins.
When a manifest is updated, the typical changes are to an add-in's icon and text. Occasionally, add-in commands change. However, the permissions of the add-in don't change. The web application where all the code and logic for the add-in runs can change at any time, which is the nature of web applications.
Updates for add-ins happen as follows.
- Line-of-business add-in: In this case, where an admin explicitly uploaded a manifest, the add-in requires that the admin upload a new manifest file to support metadata changes. The next time the relevant Microsoft 365 productivity apps start, the add-in will update. The web application can change at any time.
- Office Store add-in: When an admin selected an add-in from the Office Store, if an add-in updates in the Office Store, the next time the relevant Microsoft 365 productivity apps start, the add-in will update. The web application can change at any time.
Note
For Word, Excel, and PowerPoint use a SharePoint App Catalog to deploy add-ins to users in an on-premises environment with no connection to Microsoft 365 and/or support for SharePoint add-ins required. For Outlook, use the Exchange control panel to deploy in an on-premises environment without a connection to Microsoft 365.