Note
Access to this page requires authorization. You can try signing in or changing directories.
Access to this page requires authorization. You can try changing directories.
If you have a conference room, company car, or equipment that everyone needs to use, then you need to come up with a way to make those resources reservable to everyone. The best way to do that is to create a room or equipment mailbox in Microsoft 365 for each resource. You might create one for your first floor conference room, media equipment, or a moving truck.
Once you create a room or equipment mailbox, everyone in the company can reserve it for meetings or events using Outlook. Learn how to use it and how to set it up on the next two tabs. Here are some other common questions about room and equipment mailboxes.
Use room and equipment mailboxes
To use room or equipment mailboxes, open Outlook from your computer or sign in to Outlook on the web. Schedule a new meeting and add the room or equipment to the meeting like you would when inviting other employees or customers. You've now reserved it.
Open Outlook on your computer.
On the Home tab, choose New items, and then select Meeting from the drop-down list.
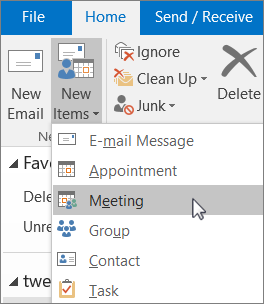
Or, from your Calendar, just select New Meeting.
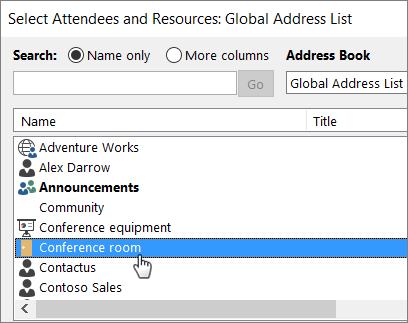
In the Required field, type the name of the conference room or equipment you want to reserve, in addition to any attendees you'd like to invite.
Or, select Required, then double-click the conference room or equipment from the list. Then select OK.
In the Title line, type the purpose of the reservation or meeting.
Change the Location value or leave as is.
Change the Start time and End time. Or, select All day. To make the meeting or reservation repeat, select Recurrence at the top.

Type a message describing the purpose and attach any files if needed.
To allow others to join online or call in to the meeting, select Teams Meeting at the top.
To make sure the room, equipment, and people you've invited are available, select Scheduling Assistant from the menu bar. Then select an available time in the calendar.

Tip
In the scheduling calendar, blue means the room or equipment is reserved, or busy. Select the white, or free, area on the calendar.
When finished, select Send.
Set up room and equipment mailboxes
To set up a room or equipment mailbox, go to the Microsoft 365 admin center. (You'll need to have admin permission to do this.) Create the mailbox and let everyone know they can start reserving it for meetings and events.
In the admin center, go to the Resources > Rooms & equipment page.
Select + Add resource.
Fill out the room or equipment fields:
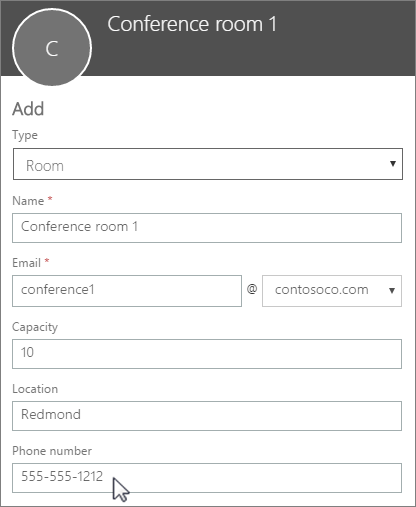
Room or Equipment: the type of mailbox you'd like to create.
Name: a friendly name or even short description.
Email: the email alias of the room or equipment. This is necessary to send a meeting request to the room or equipment.
Capacity: the number of people who can fit in the room or use the equipment at the same time.
Location: the room number or location of the room in a building or region.
Phone number: the number of the room itself. This is different from the meeting phone number generated when using Microsoft Teams.
Select Save.
Note
To keep your room and equipment mailboxes secure, block sign-in to these mailboxes. For more information, see Block sign-in for the shared mailbox account.
Common questions about room and equipment mailboxes
How can you tell when the room or equipment is available?
Open Outlook and create a new meeting. Add the room or equipment to the meeting as if it were a person and select Scheduling Assistant to see a live calendar view of the room or equipment's availability. If the hour slot is clear, it's available; if it's blue, it's reserved.
How do you cancel a room or equipment request?
Open the meeting you scheduled in Outlook and then remove the room or equipment from the meeting like you would an attendee. This will free up the room for others to reserve.
Does someone have to accept or decline every room or equipment request?
No, you don't need someone to accept or decline requests. You can decide whether you want to let the room or equipment be automatically booked or managed by someone in your company.
Does a room mailbox or equipment mailbox need a product license?
No. While most people in your organization need a license to use Microsoft 365, you don't need to assign a license to a room mailbox or equipment mailbox, in case the resource mailbox doesn't need to have a size bigger than 50 GB, or, in case some features aren't needed (Retention policies from Security and Compliance, or, Hold from Exchange Online), or, in case the resource mailbox doesn't need an Online Archive attached to it.
Do I need an owner in charge of booking the rooms or equipment?
No, you don't need someone in charge of the room mailbox or equipment mailbox.