Document fingerprinting
Information workers in your organization handle many kinds of sensitive information during a typical day. In the Microsoft Purview compliance portal, document fingerprinting makes it easier for you to protect this information by identifying standard forms that are used throughout your organization. This article describes the concepts behind document fingerprinting and how to create a document fingerprint using the compliance portal or using PowerShell.
Document fingerprinting includes the following features:
- DLP can use document fingerprinting as a detection method in Exchange, SharePoint, OneDrive, Teams, and Devices.
- Document fingerprint features can be managed through the Microsoft Purview compliance portal.
- Partial matching is supported.
- Exact matching is supported.
- Improved detection accuracy
- Support for detection in multiple languages, including dual-byte languages such as Chinese, Japanese, and Korean.
Important
If you are an E5 customer, we recommend updating your existing fingerprints to take advantage of the full document fingerprint feature set. If you are an E3 customer, we recommend upgrading to an E5 license. If you choose not to, you won't be able to modify existing fingerprints or create new ones after April, 2023.
Basic scenario for document fingerprinting
Document fingerprinting is a Microsoft Purview Data Loss Prevention (DLP) feature that converts a standard form into a sensitive information type (SIT), which you can use in the rules of your DLP policies. For example, you can create a document fingerprint based on a blank patent template and then create a DLP policy that detects and blocks all outgoing patent templates with sensitive content filled in. Optionally, you can set up policy tips to notify senders that they might be sending sensitive information, and that the sender should verify that the recipients are qualified to receive the patents. This process works with any text-based forms used in your organization. Other examples of forms that you can upload include:
- Government forms
- Health Insurance Portability and Accountability Act (HIPAA) compliance forms
- Employee information forms for Human Resources departments
- Custom forms created specifically for your organization
Ideally, your organization already has an established business practice of using certain forms to transmit sensitive information. To enable detection, upload an empty form to be converted to a document fingerprint. Next, set up a corresponding policy. Once you complete these steps, DLP detects any documents in outbound mail that match that fingerprint.
How document fingerprinting works
You have probably already guessed that documents don't have actual fingerprints, but the name helps explain the feature. In the same way that a person's fingerprints have unique patterns, documents have unique word patterns. When you upload a file, DLP identifies the unique word pattern in the document, creates a document fingerprint based on that pattern, and uses that document fingerprint to detect outbound documents containing the same pattern. That's why uploading a form or template creates the most effective type of document fingerprint. Everyone who fills out a form uses the same original set of words and then adds their own words to the document. If the outbound document isn't password protected and contains all the text from the original form, DLP can determine whether the document matches the document fingerprint.
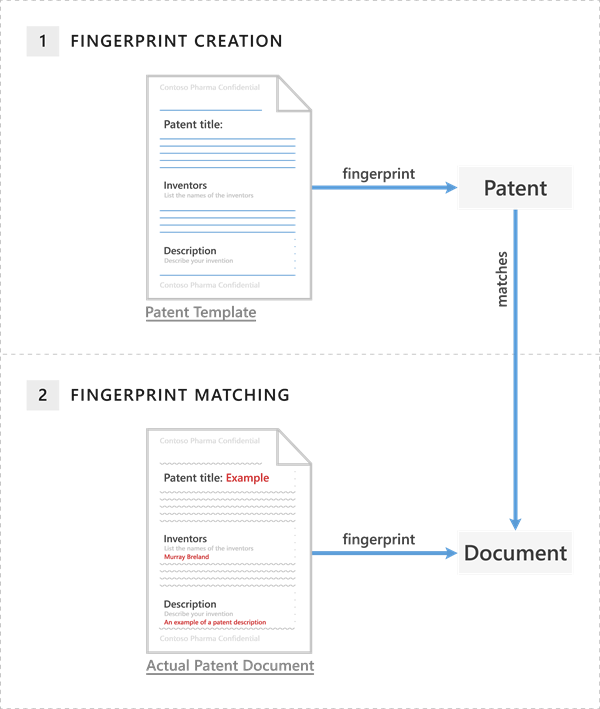
The patent template contains the blank fields "Patent title," "Inventors," and "Description", along with descriptions for each of those fields—that's the word pattern. When you upload the original patent template, it's in one of the supported file types and in plain text. DLP converts this word pattern into a document fingerprint, which is a small Unicode XML file containing a unique hash value that represents the original text. The fingerprint is saved as a data classification in Active Directory. (As a security measure, the original document itself isn't stored on the service; only the hash value is stored. The original document can't be reconstructed from the hash value.) The patent fingerprint then becomes a SIT that you can associate with a DLP policy. After you associate the fingerprint with a DLP policy, DLP detects any outbound emails containing content that matches the patent fingerprint and deals with it according to your organization's policy.
For example, if you set up a DLP policy that prevents regular employees from sending outgoing messages containing patents, DLP uses the patent fingerprint to detect patents and block those emails. Alternatively, you might want to let your legal department be able to send patents to other organizations because it has a business need for doing so. To allow specific departments to send sensitive information, create exceptions for those departments in your DLP policy. Alternatively, you can allow them to override a policy tip with a business justification.
Important
Text in embedded documents is not considered for fingerprint creation. You need to provide sample template files that don't contain embedded documents.
Supported file types
Document fingerprinting supports the same file types that are supported in mail flow rules (also known as transport rules). For a list of supported file types, see Supported file types for mail flow rule content inspection. One quick note about file types: neither mail flow rules nor document fingerprinting supports the .dotx file type, which is a template file in Microsoft Word. When you see the word "template" in this and other document fingerprinting articles, it refers to a document that you've established as a standard form, not the template file type.
Limitations of document fingerprinting
Document fingerprinting doesn't detect sensitive information in the following cases:
- Password protected files
- Files that contain images only
- Documents that don't contain all the text from the original form used to create the document fingerprint
- Files larger than 4 MB
Note
To use document fingerprinting with devices, Advanced classification scanning and protection must be turned on.
Fingerprints are stored in a separate rule pack. This rule pack has a maximum size limit 1of 150 KB. Given this limit, you can create approximately 50 fingerprints per tenant.
The following examples show what happens if you create a document fingerprint based on a patent template. However, you can use any form as a basis for creating a document fingerprint.
Compliance portal example of a patent document matching a document fingerprint of a patent template
- In the Microsoft Purview compliance portal, select Data classification and then choose Classifiers.
- On the Classifiers page, choose Sensitive info types > Create Fingerprint based SIT.
- Enter a name and description for your new SIT.
- Upload the file you wish to use as the fingerprint template.
- OPTIONAL: Adjust the requirements for each confidence level and then choose Next. For more information, see Partial matching and Exact matching.
- Review your settings > Create.
- When the confirmation page displays, choose Done.
PowerShell example of a patent document matching a document fingerprint of a patent template
>> $Patent_Form = ([System.IO.File]::ReadAllBytes('C:\My Documents\patent.docx'))

>> New-DlpSensitiveInformationType -Name "Patent SIT" -FileData $Patent_Form  -ThresholdConfig @{low=40;medium=60;high=80} -IsExact $false -Description "Contoso Patent Template"
Partial matching
To configure partial matching of a document fingerprint, when configuring the confidence level, choose Low, Medium or High and designate how much of the text in the file must match the fingerprint in terms of a percentage between 30% - 90%.
A high confidence level returns the fewest false positives but might result in more false negatives. Low or medium confidence levels return more false positives but few to zero false negatives.
- low confidence: Matched items will contain the fewest false negatives but the most false positives. Low confidence returns all low, medium, and high confidence matches.
- medium confidence: Matched items will contain an average number of false positives and false negatives. Medium confidence returns all medium, and high confidence matches.
- high confidence: Matched items will contain the fewest false positives but the most false negatives.
Exact matching
To configure exact matching of a document fingerprint, select Exact as the value for the high confidence level. When you set the high confidence level to Exact, only files that have exactly the same text as the fingerprint will be detected. If the file has even a small deviation from the fingerprint, it will not be detected.
Already using fingerprint SITs?
Your existing fingerprints and policies/rules for those fingerprints should continue to work. If you don't want to use the latest fingerprint features, you don't have to do anything.
If you have an E5 license and want to use the latest fingerprint features, you can either create a new fingerprint or migrate a policy to the newer version.
Note
Creating new fingerprints using the templates on which a fingerprint already exists is not supported.
Create a new policy using your fingerprint SIT using the compliance portal
- In the Microsoft Purview compliance portal, select Data loss prevention > Policies > Sensitive info types > + Create policy > Custom to create a new policy.
- Select your region or country > Next.
- Name your policy and provide a description > Next.
- On the Assign admin units page, choose between these two options:
- Apply the policy to all users and groups > Next. or
- Add specific users and groups that you want to be subject to the policy > Next.
- Select the locations where you want the policy applied > Next.
- On the Define policy settings page, choose Create customize advanced DLP rules > Next.
- On the Customize advanced DLP rules page, choose Create rule.
- Enter a name and description for your rule.
- Under Conditions choose Add condition > Content contains.
- Give your new set of DLP rules a Group name > Add > Sensitive info types.
- Search for and select the name of your fingerprint SIT > Add.
- Select your confidence level > Add an action.
- Select the action to take when the rule is triggered, and then specify the action details > Save > Next.
- Choose between these two options:
- Test your policy > Next. or
- turn on your policy right away > Next.
- Review your settings > Submit > Done.
Create a custom sensitive information type based on document fingerprinting using PowerShell
Currently, you can create a document fingerprint only in Security & Compliance PowerShell.
DLP uses Sensitive information types(SIT) to detect sensitive content. To create a custom SIT based on a document fingerprint, use the New-DlpSensitiveInformationType cmdlet. The following example creates a new document fingerprint named “Contoso Customer Confidential” based on the file C:\My Documents\Contoso Customer Form.docx.
$Employee_Form = ([System.IO.File]::ReadAllBytes('C:\My Documents\Contoso Customer Form.docx'))

New-DlpSensitiveInformationType -Name "Contoso Customer Confidential" -FileData $Employee_Form -ThresholdConfig @{low=40;medium=60;high=80} -IsExact $false -Description "Message contains Contoso customer information."
Finally, add the "Contoso Customer Confidential" sensitive information type to a DLP policy in the Microsoft Purview compliance portal. This example adds a rule to an existing DLP policy, named "ConfidentialPolicy".
New-DlpComplianceRule -Name "ContosoConfidentialRule" -Policy "ConfidentialPolicy" -ContentContainsSensitiveInformation @{Name="Contoso Customer Confidential"} -BlockAccess $True
You can also use the Fingerprint SIT in mail flow rules in Exchange, as shown in the following example. To run this command, you first need to Connect to Exchange PowerShell. Also note that it takes time for the SITs to sync from the Microsoft Purview compliance portal to the Exchange admin center.
New-TransportRule -Name "Notify :External Recipient Contoso confidential" -NotifySender NotifyOnly -Mode Enforce -SentToScope NotInOrganization -MessageContainsDataClassification @{Name=" Contoso Customer Confidential"}
DLP now detects documents that match the Contoso Customer Form.docx document fingerprint.
For syntax and parameter information, see:
- New-DlpFingerprint
- New-DlpSensitiveInformationType
- Remove-DlpSensitiveInformationType
- Set-DlpSensitiveInformationType
- Get-DlpSensitiveInformationType
Edit, test, or delete a document fingerprint
To do this via the user interface, open the fingerprint SIT you want to edit, test, or delete and choose the appropriate icon.
To do this via PowerShell, run the following command(s).
Edit a document fingerprint
>> Set-DlpSensitiveInformationType -Name "Fingerprint SIT" -FileData ([System.IO.File]::ReadAllBytes('C:\My Documents\file1.docx')) -ThresholdConfig @{low=30;medium=50;high=80} -IsExact $false-Description "A friendly Description"
Test a document fingerprint
>> $r = Test-DataClassification -TextToClassify "Credit card information Visa: 4485 3647 3952 7352. Patient Identifier or SSN: 452-12-1232"
>> $r.ClassificationResults
Delete a document fingerprint
>> Remove-DlpSensitiveInformationType "Fingerprint SIT"
Migrate a new policy using your fingerprint SIT using the compliance portal
- In the Microsoft Purview compliance portal, select Data loss prevention > Policies > Sensitive info types.
- Open the SIT containing the fingerprint that you want to migrate.
- Choose Edit.
- Upload the same fingerprint file again.
- Review the fingerprint settings > Done.
Migrate a fingerprint using PowerShell
Enter the following command:
Set-DlpSensitiveInformationType -Name "Old Fingerprint" -FileData ([System.IO.File]::ReadAllBytes('C:\My Documents\file1.docx')) -ThresholdConfig @{low=30;medium=50;high=80} -IsExact $false-Description "A friendly Description"
Feedback
Coming soon: Throughout 2024 we will be phasing out GitHub Issues as the feedback mechanism for content and replacing it with a new feedback system. For more information see: https://aka.ms/ContentUserFeedback.
Submit and view feedback for