Note
Access to this page requires authorization. You can try signing in or changing directories.
Access to this page requires authorization. You can try changing directories.
Beginning at a school’s next contract renewal, but no sooner than August 1, 2024, all school tenants will receive 100 TB of free pooled storage across OneDrive, SharePoint, and Exchange, with additional pooled storage per paid user, depending on your subscription.
This article focuses on how admins can effectively manage storage in your tenant across OneDrive, SharePoint, and Exchange products by:
- Viewing existing storage usage in the tenant against predefined limits
- Modifying limits across products to ensure optimized usage
- Cleaning up unwanted storage used by inactive users
View pooled storage usage and limit
Pooled Storage for Education provides a single pool of storage for each tenant that spans OneDrive, SharePoint Online, and Exchange Online. The storage pool represents the maximum amount of storage collectively for these three services and is shared across and consumed by all users within the tenant. All SharePoint sites and OneDrive accounts contribute towards pooled storage. In Exchange Online, pooled storage contributions include user mailboxes, shared mailboxes, and group mailboxes. All other mailbox types, including archive mailboxes, don't count towards pooled storage.
Learn more about education pooled storage limits
View pooled storage usage and entitlement
To see and access the Storage Page in Microsoft 365 Admin Center, you must be logged in with at least a SharePoint Admin role. For more information on pooled storage, visit the Office 365 Education service description page.
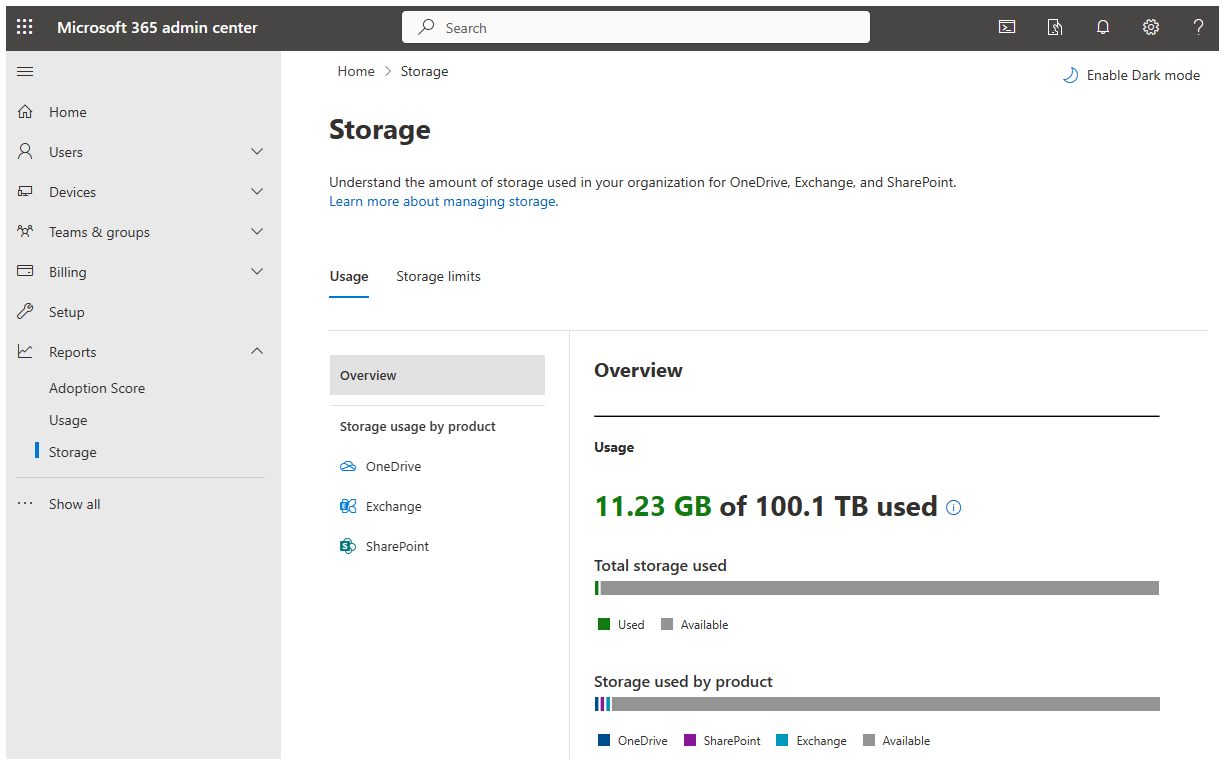
In the Microsoft 365 Admin Center, navigate to Reports > Storage.
On the Overview page, review pooled storage usage and entitlement.

Overall storage usage is updated once every 24 hours. It can take up to 24 hours for the recent usage changes to reflect. Any changes made to the tenant’s storage limit or licenses take up to 48 hours to reflect.
Other usage reports in the Microsoft 365 Admin Center can be helpful for targeted purposes such as reviewing object level consumption, but reports may measure total storage per service differently than the pooled storage page. Only the totals shown on the pooled storage page will be utilized for pooled storage enforcement.
Note
Tenants that only use the Exchange Online for Alumni licenses should reference the mailbox usage report.
View the top usage within each product
- In the Microsoft 365 Admin Center, navigate to Reports > Storage.
- Under storage usage by product, review the top usage within OneDrive, Exchange, and SharePoint. The report currently shows up to 5,000 entities.
- Download the entire csv report for each of the products for offline analysis.
All reports are refreshed automatically within 48 hours. To refresh SharePoint and OneDrive reports on demand, select Generate latest report. It takes up to 90 minutes to process the request and load the latest report based on the number of records in your tenant.
User details may be hidden by default. Learn more about revealing user details.
View all usage in OneDrive and SharePoint
In the Microsoft 365 Admin Center, navigate to Reports > Storage.
Under Advanced report, request Advanced report. It takes between 24-48 hours for the report to be returned.
When the report is available, download the report from the banner or the previously requested report section. The previously requested report section stores the most recent report and the previous three reports.
Note
This report can only be requested once every 24 hours, and a new report can't be requested when there's one in progress.
Report columns and description:
| Column | Description |
|---|---|
| TenantId | ID of tenant |
| Id | ID of site |
| Name | Name of site |
| URL | URL of site |
| TemplateId | The type of site, also known as the site template or the root web template. Examples include: - 1: Classic team site - 21: OneDrive (personal site) - 64: Office 365 group-connected team site - 68: Communication site - 69: Channel site |
| OwnerName | Name of site owner |
| OwnerEmail | Email of site owner |
| IsOwnerInAad | Indicates if site owner is in Microsoft Entra ID |
| OwnerAadObjectId | Microsoft Entra ID of site owner |
| OwnerLastLoginDateUTC | Date and time when site owner last logged in |
| TotalStorageUsedInBytes | Total storage used by site owner in bytes |
| StorageQuotaInBytes | Site storage quota in bytes |
| SiteStorageUsedInBytes | Site storage usage in bytes |
| TotalFileCount | Number of files in site |
| CreatedTimeUTC | Site creation time |
| LastContentChangeUTC | Date and time when an item in the site was last modified |
| ReportDateUTC | Date and time when storage report was requested |
Here are some common errors to troubleshoot:
| Error | Troubleshoot |
|---|---|
| Requesting a report too soon | Wait 24 hours between requesting report |
| API error | Try again later |
| Report not generating past SLA of 24-48 hours | Request a new report |
View the storage states of OneDrive
There are four different storage states for OneDrive based on the usage against warning limits.
- Under limit: If the storage usage of OneDrive account is below the warning limit.
- Almost full: If storage usage has exceeded the warning limit and is close to the OneDrive account limits.
- Full: If storage usage is equal to the OneDrive account limits. In this state, user can't edit existing or add new files to their OneDrive account.
- Over limit: If storage has exceeded the OneDrive account limits. In this state, user can't edit existing or add new files to their OneDrive account.
Learn more:
- How to view the current OneDrive storage limits of any active user in Microsoft 365 admin center
- How to set OneDrive storage limits of an active user
To view the storage states in OneDrive:
- In the Microsoft 365 Admin Center, navigate to Reports > Storage.
- Under storage usage by product, select OneDrive.
- Review storage state column to understand whether OneDrive is below, near, or exceeding quota.
If the OneDrive account has used 90% or more of the storage limit, the user receives an email notification. The storage bar updates to a warning icon if you're approaching the limit and a cross mark icon if you are at or over the limit.

Manage product level storage limits
To align with storage requirements in your organization, you can modify storage limits across OneDrive, SharePoint, and Exchange and ensure that available storage is distributed effectively. This step helps you stay under the total storage capacity.
Navigate to the Microsoft 365 Admin Center > Reports > Storage > Storage Limits to find details on setting storage limits.
Set OneDrive storage limits
Before setting the OneDrive storage limits, consider the hierarchy and recommendations.
Hierarchy of OneDrive storage limits
| Hierarchy of OneDrive storage limits ordered by precedence |
|---|
| 1. Assigned license limit |
| 2. User specific limit |
| 3. Tenant default limit or security group limit |
The license limit is determined by the license assigned to the owner of the OneDrive account. If the user has multiple licenses assigned, the highest license limit is taken. The license limit reflects the OneDrive account’s maximum storage limit. Other limits (that is, user specific limit, tenant default limit, security group limit) can be used to set a custom limit lower than the license limit.
- Example for license limit: If the tenant default limit is 150 GB and the user has an Office 365 A1 license that has a 100-GB license limit, the user would receive the 100-GB limit.
The user specific limit must be less than or equal to the license limit and overrides both the tenant default limit and the security group limit.
- Example for user specific limit: If the tenant default limit is 50 GB and license limit is 100 GB, the user specific limit could be set to 30 GB (lower than tenant limit) or 80 GB (higher than tenant limit).
The user's security group limit is the highest limit of all the security groups that they're part of. Between tenant default limit and security group limit, the lower limit takes precedence. If the security group limit is set higher than the tenant default limit, the tenant default limit applies to the OneDrive accounts.
- Example for tenant limit and security group limit: If the tenant default limit is 50 GB and security group A limit is 40 GB while security group B limit is 60 GB, the users in security group A would receive 40-GB limit while the users in security group B would receive 50-GB limit.
- Example for multiple security groups: If a user was in both security group X with 10-GB limit and security group Y with 20-GB limit, they would receive 20 GB – the higher limit.
Recommendations:
- Set the tenant default limit to the most storage you want most of your users to have.
- If there are a few users who need more storage than the tenant limit, give them a user specific limit.
- If there are groups of users who should have less than the tenant limit, use one or more security group limits.
- If there are a few users who should have less than the tenant limit, give them a user specific limit.
- If any user needs more than their license entitles them, assign a higher license.
Set default OneDrive storage limits
Default OneDrive limits set through this step apply to every new and existing user with a qualifying license in the tenant. However, if a user’s setting has been customized either through security group storage limits or individual user limits, this setting doesn't affect their storage limits.
To set the default limits:
- Navigate to the settings in the SharePoint admin center.
- Select OneDrive storage limit setting.
- In the default storage limit box, enter the default storage amount (in GB), and then select Save.
To learn more and check if a user has default storage limits, refer to Set the default storage space for OneDrive users
Set OneDrive storage limit using security groups
Customize storage limits at scale for every user belonging to security groups, up to what the license permits. Limits applied through a security group may override the limits set through default OneDrive storage limit or any limits set for an individual user previously.
- Navigate to Microsoft 365 Admin Center > Reports > Storage > Storage Limits.
- Select edit limits.
- Select the security group. Option to search for the security group.
- In the limit per user box, enter a storage amount (in GB) and then select save.
The following list describes how some assignments work:
- If a user is assigned to multiple security groups with different OneDrive limits, the user receives the highest limit.
- If the user is assigned to a security group with a limit higher than the license allows, then the license limit takes precedence.
- If the user is assigned to a security group with a limit less than the tenant default, the user receives the security group limit.
- If the user is assigned to a security group with a limit higher than the tenant default, the user receives the tenant default.
- If the user is assigned to a security group, individual limits configured for the user previously are overridden. To set different limits for a user belonging to a security group, change their individual storage limit.
Note
Limits set through security groups are applied within 24-48 hours after the user logs in, or up to two weeks if the user does not log in.
Set OneDrive storage limit for an individual user
- Navigate to Microsoft 365 Admin Center > Users > Active Users.
- Select the user.
- Select the OneDrive tab.
- Under storage used, select Edit.
- Select maximum storage for this user option and enter the storage limit.
- Select Save.
Note
The user specific OneDrive limit cannot exceed the assigned license limit. The user specific limit can exceed the tenant default storage limit and the security group limit if the tenant and group limits are within the assigned license limit.
Learn more: Change a specific user's OneDrive storage space
Set Exchange storage limits
Change the Exchange mailbox limit using Exchange Online PowerShell. For details, see Increase or customize Exchange Online mailbox size.
Set SharePoint storage limits
Set SharePoint storage limit for all sites
- Navigate to the settings in the SharePoint admin center.
- Select Site storage limits.
- Select Manual to set specific limits for each site or Automatic to use as much of the organization’s storage as needed.
Learn more: Manage site storage limits in SharePoint in Microsoft 365
Set SharePoint storage limit for individual sites
Set the storage limit for individual sites when the tenant’s SharePoint site storage limits is set to manual.
- Navigate to SharePoint Admin Center > active sites.
- Select the site.
- On the General tab, under Storage limit, select Edit to open the edit storage limit panel.
- Enter maximum storage in GB for the sites.
- Allow notifications to notify site admins when site approaches storage limit.
- Select Save.
Cleanup storage
Taking steps to reduce your storage consumption before your organization has reached its limit is crucial when managing your storage efficiently and effectively. We recommend deleting inactive users in bulk, limiting Teams recording retention, enabling archive mailboxes, and implementing a deleted item retention policy to reduce your overall storage profile.
Clean up storage of inactive users
View inactive users
- Navigate to the Microsoft 365 Admin Center > Reports > Storage > Storage usage by inactive users.
- View up to 5,000 of the least active users in the tenant. Minimum inactivity period is 90 days.
- Export report to CSV with all the columns shown or export to the CSV template used for bulk deleting in Entra ID.
The report is automatically refreshed within 72 hours. To check if any of the documents of inactive users are still being used by others in the tenant, refer to their last activity date from OneDrive storage report.
Troubleshooting:
- An empty value in the Last Entra ID sign in column indicates that the users last accessed their account before April 2020. Microsoft Entra ID maintains interactive sign-ins going back to April 2020. Learn more about signInActivity resource type
- If the tenant has user level data hidden, Exchange usage can't be retrieved for the tenant. Reveal user level data to see Exchange usage information in inactive reports.
- If the system fails to retrieve inactive user details, it automatically retries the operation and initiates a new request to fetch the latest report. It will take up to 72 hours to generate the report again.
- If a user doesn't use SharePoint and OneDrive products, the user information isn't shown in the inactive users report.
Bulk delete users
- Sign in to Microsoft Entra admin center.
- Select Users > All users > Bulk operations > Bulk delete.
For details, see:
Set group expiration policies
Microsoft 365 group expiration policies will automatically remove inactive groups from your system. When a group expires and is deleted, its associated storage in SharePoint and Exchange is also deleted.
Learn more about how expiration policy works.
Clean up unlicensed OneDrive accounts
A common education scenario for unlicensed OneDrive accounts is reassigning student users to the free Exchange Online for Alumni license. After reassigning to the alumni license, a user’s OneDrive is not automatically deleted. These unlicensed OneDrive accounts count toward the tenant's pooled storage consumption.
You can identify unlicensed OneDrive accounts using the SharePoint admin center to generate reports on unlicensed accounts. The following steps show how to use the SharePoint admin center to generate a report of unlicensed OneDrive accounts:
- Sign in to the SharePoint admin center with your work or school account.
- Navigate to Reports and select User reports.
- Under OneDrive usage, select Unlicensed users.
- You can download the report as a CSV file.
The report shows the username, email address, account type, and last activity date of each unlicensed OneDrive account.
To clean up these OneDrive accounts and recover the space within the storage pool, admins need to remove the OneDrive using the Remove-SPOSite and Remove-SPODeletedSite cmdlets in PowerShell.
Learn more about managing graduating student licenses.
When a tenant is out of pooled storage
When 80% of the pooled storage is used, the technical contact receives email notifications. When 90% of the pooled storage is used, banner notifications also appear in the Microsoft 365 admin center and the SharePoint admin center. At 100% capacity, the tenant has 30 days to take action before OneDrive and SharePoint sites transition to read-only mode.
During read-only mode, users can't add new content or modify existing content on OneDrive and SharePoint. Users can still view, download, or delete content and empty their recycle bin. Exchange remains unaffected, and users can continue to send and receive mail.
Once enforcement begins and OneDrive and SharePoint enter read-only mode, you must either reduce storage usage beneath the limit (content deletion, archival, etc.) or increase storage capacity above the usage level (add or upgrade licenses, purchase storage packs, etc.) to exit read-only mode. For more information on the paid license contributions, see how pooled storage is calculated.
Note
Pooled storage usage can take up to 24 hours to update and the pooled storage limit can take up to 48 hours to reflect new purchases.
Useful links
- Microsoft 365 Storage Guidance for Education - https://aka.ms/M365_storageguidance
- Storage Changes FAQs - https://aka.ms/M365_storageFAQ
- Storage Changes for Microsoft 365 Education