High availability federated authentication Phase 2: Configure domain controllers
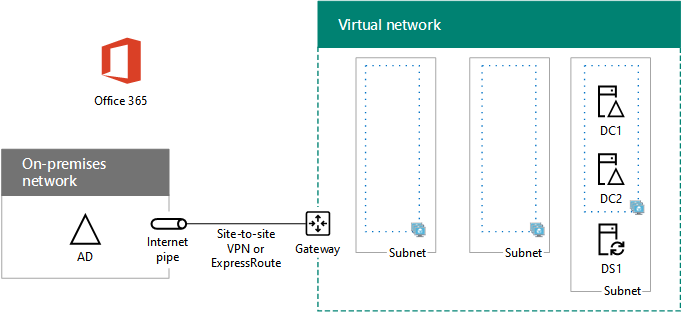
In this phase of deploying high availability for Microsoft 365 federated authentication in Azure infrastructure services, you configure two domain controllers and the directory synchronization server in the Azure virtual network. Client web requests for authentication can then be authenticated in the Azure virtual network, rather than sending that authentication traffic across the site-to-site VPN connection to your on-premises network.
Note
Active Directory Federation Services (AD FS) cannot use Microsoft Entra ID as a substitute for Active Directory Domain Services (AD DS) domain controllers.
You must complete this phase before moving on to Phase 3: Configure AD FS servers. See Deploy high availability federated authentication for Microsoft 365 in Azure for all of the phases.
Create the domain controller virtual machines in Azure
First, you need to fill out the Virtual machine name column of Table M and modify virtual machine sizes as needed in the Minimum size column.
| Item | Virtual machine name | Gallery image | Storage type | Minimum size |
|---|---|---|---|---|
| 1. |
 (first domain controller, example DC1) (first domain controller, example DC1) |
Windows Server 2016 Datacenter |
Standard_LRS |
Standard_D2 |
| 2. |
(second domain controller, example DC2) |
Windows Server 2016 Datacenter |
Standard_LRS |
Standard_D2 |
| 3. |
(directory synchronization server, example DS1) |
Windows Server 2016 Datacenter |
Standard_LRS |
Standard_D2 |
| 4. |
(first AD FS server, example ADFS1) |
Windows Server 2016 Datacenter |
Standard_LRS |
Standard_D2 |
| 5. |
(second AD FS server, example ADFS2) |
Windows Server 2016 Datacenter |
Standard_LRS |
Standard_D2 |
| 6. |
(first web application proxy server, example WEB1) |
Windows Server 2016 Datacenter |
Standard_LRS |
Standard_D2 |
| 7. |
(second web application proxy server, example WEB2) |
Windows Server 2016 Datacenter |
Standard_LRS |
Standard_D2 |
Table M - Virtual machines for the high availability federated authentication for Microsoft 365 in Azure
For the complete list of virtual machine sizes, see Sizes for virtual machines.
The following Azure PowerShell command block creates the virtual machines for the two domain controllers. Specify the values for the variables, removing the < and > characters. Note that this Azure PowerShell command block uses values from the following tables:
Table M, for your virtual machines
Table R, for your resource groups
Table V, for your virtual network settings
Table S, for your subnets
Table I, for your static IP addresses
Table A, for your availability sets
Recall that you defined Tables R, V, S, I, and A in Phase 1: Configure Azure.
Note
The following command sets use the latest version of Azure PowerShell. See Get started with Azure PowerShell.
When you have supplied all the correct values, run the resulting block at the Azure PowerShell prompt or in the PowerShell Integrated Script Environment (ISE) on your local computer.
Tip
To generate ready-to-run PowerShell command blocks based on your custom settings, use this Microsoft Excel configuration workbook.
# Set up variables common to both virtual machines
$locName="<your Azure location>"
$vnetName="<Table V - Item 1 - Value column>"
$subnetName="<Table S - Item 1 - Value column>"
$avName="<Table A - Item 1 - Availability set name column>"
$rgNameTier="<Table R - Item 1 - Resource group name column>"
$rgNameInfra="<Table R - Item 4 - Resource group name column>"

$rgName=$rgNameInfra
$vnet=Get-AzVirtualNetwork -Name $vnetName -ResourceGroupName $rgName
$subnet=Get-AzVirtualNetworkSubnetConfig -VirtualNetwork $vnet -Name $subnetName

$rgName=$rgNameTier
$avSet=Get-AzAvailabilitySet -Name $avName -ResourceGroupName $rgName

# Create the first domain controller
$vmName="<Table M - Item 1 - Virtual machine name column>"
$vmSize="<Table M - Item 1 - Minimum size column>"
$staticIP="<Table I - Item 1 - Value column>"
$diskStorageType="<Table M - Item 1 - Storage type column>"
$diskSize=<size of the extra disk for Active Directory Domain Services (AD DS) data in GB>

$nic=New-AzNetworkInterface -Name ($vmName +"-NIC") -ResourceGroupName $rgName -Location $locName -Subnet $subnet -PrivateIpAddress $staticIP
$vm=New-AzVMConfig -VMName $vmName -VMSize $vmSize -AvailabilitySetId $avset.Id
$vm=Set-AzVMOSDisk -VM $vm -Name ($vmName +"-OS") -DiskSizeInGB 128 -CreateOption FromImage -StorageAccountType $diskStorageType
$diskConfig=New-AzDiskConfig -AccountType $diskStorageType -Location $locName -CreateOption Empty -DiskSizeGB $diskSize
$dataDisk1=New-AzDisk -DiskName ($vmName + "-DataDisk1") -Disk $diskConfig -ResourceGroupName $rgName
$vm=Add-AzVMDataDisk -VM $vm -Name ($vmName + "-DataDisk1") -CreateOption Attach -ManagedDiskId $dataDisk1.Id -Lun 1
$cred=Get-Credential -Message "Type the name and password of the local administrator account for the first domain controller."
$vm=Set-AzVMOperatingSystem -VM $vm -Windows -ComputerName $vmName -Credential $cred -ProvisionVMAgent -EnableAutoUpdate
$vm=Set-AzVMSourceImage -VM $vm -PublisherName MicrosoftWindowsServer -Offer WindowsServer -Skus 2016-Datacenter -Version "latest"
$vm=Add-AzVMNetworkInterface -VM $vm -Id $nic.Id
New-AzVM -ResourceGroupName $rgName -Location $locName -VM $vm

# Create the second domain controller
$vmName="<Table M - Item 2 - Virtual machine name column>"
$vmSize="<Table M - Item 2 - Minimum size column>"
$staticIP="<Table I - Item 2 - Value column>"
$diskStorageType="<Table M - Item 2 - Storage type column>"
$diskSize=<size of the extra disk for AD DS data in GB>

$nic=New-AzNetworkInterface -Name ($vmName +"-NIC") -ResourceGroupName $rgName -Location $locName -Subnet $subnet -PrivateIpAddress $staticIP
$vm=New-AzVMConfig -VMName $vmName -VMSize $vmSize -AvailabilitySetId $avset.Id
$vm=Set-AzVMOSDisk -VM $vm -Name ($vmName +"-OS") -DiskSizeInGB 128 -CreateOption FromImage -StorageAccountType $diskStorageType
$diskConfig=New-AzDiskConfig -AccountType $diskStorageType -Location $locName -CreateOption Empty -DiskSizeGB $diskSize
$dataDisk1=New-AzDisk -DiskName ($vmName + "-DataDisk1") -Disk $diskConfig -ResourceGroupName $rgName
$vm=Add-AzVMDataDisk -VM $vm -Name ($vmName + "-DataDisk1") -CreateOption Attach -ManagedDiskId $dataDisk1.Id -Lun 1
$cred=Get-Credential -Message "Type the name and password of the local administrator account for the second domain controller."
$vm=Set-AzVMOperatingSystem -VM $vm -Windows -ComputerName $vmName -Credential $cred -ProvisionVMAgent -EnableAutoUpdate
$vm=Set-AzVMSourceImage -VM $vm -PublisherName MicrosoftWindowsServer -Offer WindowsServer -Skus 2016-Datacenter -Version "latest"
$vm=Add-AzVMNetworkInterface -VM $vm -Id $nic.Id
New-AzVM -ResourceGroupName $rgName -Location $locName -VM $vm

# Create the directory synchronization server
$vmName="<Table M - Item 3 - Virtual machine name column>"
$vmSize="<Table M - Item 3 - Minimum size column>"
$staticIP="<Table I - Item 3 - Value column>"
$diskStorageType="<Table M - Item 3 - Storage type column>"

$nic=New-AzNetworkInterface -Name ($vmName +"-NIC") -ResourceGroupName $rgName -Location $locName -Subnet $subnet -PrivateIpAddress $staticIP
$vm=New-AzVMConfig -VMName $vmName -VMSize $vmSize

$cred=Get-Credential -Message "Type the name and password of the local administrator account for the directory synchronization server."
$vm=Set-AzVMOperatingSystem -VM $vm -Windows -ComputerName $vmName -Credential $cred -ProvisionVMAgent -EnableAutoUpdate
$vm=Set-AzVMSourceImage -VM $vm -PublisherName MicrosoftWindowsServer -Offer WindowsServer -Skus 2016-Datacenter -Version "latest"
$vm=Add-AzVMNetworkInterface -VM $vm -Id $nic.Id
$vm=Set-AzVMOSDisk -VM $vm -Name ($vmName +"-OS") -DiskSizeInGB 128 -CreateOption FromImage -StorageAccountType $diskStorageType
New-AzVM -ResourceGroupName $rgName -Location $locName -VM $vm
Note
Because these virtual machines are for an intranet application, they are not assigned a public IP address or a DNS domain name label and exposed to the Internet. However, this also means that you cannot connect to them from the Azure portal. The Connect option is unavailable when you view the properties of the virtual machine. Use the Remote Desktop Connection accessory or another Remote Desktop tool to connect to the virtual machine using its private IP address or intranet DNS name.
Configure the first domain controller
Use the remote desktop client of your choice and create a remote desktop connection to the first domain controller virtual machine. Use its intranet DNS or computer name and the credentials of the local administrator account.
Next, add the extra data disk to the first domain controller with this command from a Windows PowerShell command prompt on the first domain controller virtual machine:
Get-Disk | Where PartitionStyle -eq "RAW" | Initialize-Disk -PartitionStyle MBR -PassThru | New-Partition -AssignDriveLetter -UseMaximumSize | Format-Volume -FileSystem NTFS -NewFileSystemLabel "WSAD Data"
Next, test the first domain controller's connectivity to locations on your organization network by using the ping command to ping names and IP addresses of resources on your organization network.
This procedure ensures that DNS name resolution is working correctly (that the virtual machine is correctly configured with on-premises DNS servers) and that packets can be sent to and from the cross-premises virtual network. If this basic test fails, contact your IT department to troubleshoot the DNS name resolution and packet delivery issues.
Next, from the Windows PowerShell command prompt on the first domain controller, run the following commands:
$domname="<DNS domain name of the domain for which this computer will be a domain controller, such as corp.contoso.com>"
$cred = Get-Credential -Message "Enter credentials of an account with permission to join a new domain controller to the domain"
Install-WindowsFeature AD-Domain-Services -IncludeManagementTools
Install-ADDSDomainController -InstallDns -DomainName $domname  -DatabasePath "F:\NTDS" -SysvolPath "F:\SYSVOL" -LogPath "F:\Logs" -Credential $cred
You will be prompted to supply the credentials of a domain administrator account. The computer will restart.
Configure the second domain controller
Use the remote desktop client of your choice and create a remote desktop connection to the second domain controller virtual machine. Use its intranet DNS or computer name and the credentials of the local administrator account.
Next, you need to add the extra data disk to the second domain controller with this command from a Windows PowerShell command prompt on the second domain controller virtual machine:
Get-Disk | Where PartitionStyle -eq "RAW" | Initialize-Disk -PartitionStyle MBR -PassThru | New-Partition -AssignDriveLetter -UseMaximumSize | Format-Volume -FileSystem NTFS -NewFileSystemLabel "WSAD Data"
Next, run the following commands:
$domname="<DNS domain name of the domain for which this computer will be a domain controller, such as corp.contoso.com>"
$cred = Get-Credential -Message "Enter credentials of an account with permission to join a new domain controller to the domain"
Install-WindowsFeature AD-Domain-Services -IncludeManagementTools
Install-ADDSDomainController -InstallDns -DomainName $domname  -DatabasePath "F:\NTDS" -SysvolPath "F:\SYSVOL" -LogPath "F:\Logs" -Credential $cred
You will be prompted to supply the credentials of a domain administrator account. The computer will restart.
Next, you need to update the DNS servers for your virtual network so that Azure assigns virtual machines the IP addresses of the two new domain controllers to use as their DNS servers. Fill in the variables and then run these commands from a Windows PowerShell command prompt on your local computer:
$rgName="<Table R - Item 4 - Resource group name column>"
$adrgName="<Table R - Item 1 - Resource group name column>"
$locName="<your Azure location>"
$vnetName="<Table V - Item 1 - Value column>"
$onpremDNSIP1="<Table D - Item 1 - DNS server IP address column>"
$onpremDNSIP2="<Table D - Item 2 - DNS server IP address column>"
$staticIP1="<Table I - Item 1 - Value column>"
$staticIP2="<Table I - Item 2 - Value column>"
$firstDCName="<Table M - Item 1 - Virtual machine name column>"
$secondDCName="<Table M - Item 2 - Virtual machine name column>"

$vnet=Get-AzVirtualNetwork -ResourceGroupName $rgName -Name $vnetName
$vnet.DhcpOptions.DnsServers.Add($staticIP1)
$vnet.DhcpOptions.DnsServers.Add($staticIP2)
$vnet.DhcpOptions.DnsServers.Remove($onpremDNSIP1)
$vnet.DhcpOptions.DnsServers.Remove($onpremDNSIP2)
Set-AzVirtualNetwork -VirtualNetwork $vnet
Restart-AzVM -ResourceGroupName $adrgName -Name $firstDCName
Restart-AzVM -ResourceGroupName $adrgName -Name $secondDCName
Note that we restart the two domain controllers so that they are not configured with the on-premises DNS servers as DNS servers. Because they are both DNS servers themselves, they were automatically configured with the on-premises DNS servers as DNS forwarders when they were promoted to domain controllers.
Next, we need to create an Active Directory replication site to ensure that servers in the Azure virtual network use the local domain controllers. Connect to either domain controller with a domain administrator account and run the following commands from an administrator-level Windows PowerShell prompt:
$vnet="<Table V - Item 1 - Value column>"
$vnetSpace="<Table V - Item 4 - Value column>"
New-ADReplicationSite -Name $vnet
New-ADReplicationSubnet -Name $vnetSpace -Site $vnet
Configure the directory synchronization server
Use the remote desktop client of your choice and create a remote desktop connection to the directory synchronization server virtual machine. Use its intranet DNS or computer name and the credentials of the local administrator account.
Next, join it to the appropriate AD DS domain with these commands at the Windows PowerShell prompt.
$domName="<AD DS domain name to join, such as corp.contoso.com>"
$cred=Get-Credential -Message "Type the name and password of a domain account."
Add-Computer -DomainName $domName -Credential $cred
Restart-Computer
Here is the configuration resulting from the successful completion of this phase, with placeholder computer names.
Phase 2: The domain controllers and directory synchronization server for your high availability federated authentication infrastructure in Azure
Next step
Use Phase 3: Configure AD FS servers to continue configuring this workload.
See Also
Deploy high availability federated authentication for Microsoft 365 in Azure
Federated identity for your Microsoft 365 dev/test environment
Feedback
Coming soon: Throughout 2024 we will be phasing out GitHub Issues as the feedback mechanism for content and replacing it with a new feedback system. For more information see: https://aka.ms/ContentUserFeedback.
Submit and view feedback for