Deploy Shifts to your frontline teams at scale
Overview
The Shifts app in Microsoft Teams is a schedule management tool that helps you create, update, and manage schedules for your team to keep frontline workers connected and in sync.
To start using Shifts, frontline managers are responsible for configuring Shifts settings like enabling requests for open shifts, swap shifts, and offer shifts, time-off requests, and time clock for their respective teams. Frontline managers must also create schedule groups to start creating and assigning shifts.
As an admin, you can now standardize these Shifts settings across all your frontline teams and manage them centrally by deploying Shifts to your frontline teams at scale in the Teams admin center. You can select which capabilities to turn on or off and create schedule groups and time-off reasons that will be set uniformly across all your frontline teams. Your frontline managers can start using Shifts straight out-of-the-box with minimal setup required.
Prerequisites
- You created your organization’s frontline teams through the deploy frontline dynamic teams experience in the Teams admin center.
- The admin running the deployment process must be a Global admin.
Set up Shifts for your frontline teams
In the left navigation of the Teams admin center, choose Frontline deployment > Manage frontline apps.
On the Manage frontline apps page, next to Deploy Shifts to your teams in the table, select Set up.

Review the setup and prerequisites information, and then select Next.

Configure Shifts settings
Choose the Shifts capabilities that you want enabled for your frontline teams. Capabilities include the ability to create and request open shifts, swap shifts and offer shifts, time-off requests, and time clock. Learn more about Shifts settings.
Important
The settings you choose are applied to every team that you deploy Shifts to. Your frontline managers won't be able to change these settings in Shifts.

Under Shift requests, set the types of shift requests you want to allow:
- Open shifts: Turn on to allow frontline managers to publish unfilled shifts and frontline workers to view and request those shifts.
- Swap shift requests: Turn on to allow frontline workers to swap shifts with other employees and frontline managers to approve or reject the requests.
- Offer shift requests: Turn on to allow frontline workers to offer shifts to other employees and frontline managers to approve or reject the requests.
Choose whether to allow Time-off requests. When this setting is on, frontline workers can request time off, and frontline managers can approve or reject the requests.
Keep in mind that if you turn off this setting, frontline managers can still assign time off to employees.
Add time-off reasons.

Under Time-off reasons, select Add, and then for each time-off reason that you create:
- Give it a unique name. It can’t be longer than 40 characters.
- Choose an icon.
- Enter a unique code. The code is a mandatory field and can be up to 100 alphanumeric characters long. For example, A01. These codes can't be changed after Shifts is deployed. Codes ensure uniformity across all your HR systems and streamlined experiences across your frontline teams and apps.
Make sure the time-off reasons reflect what’s supported across your frontline organization. Frontline managers use these time-off reasons when they assign time off to frontline workers. And, if you turned on Time-off requests, your frontline workers choose from these time-off reasons when they request time off.
Under Time clock, turn on or turn off Clock in/clock out. When this setting is on, frontline workers can clock in and out of their shifts and record breaks, and frontline managers can export their team’s time report.
When you’re done choosing your settings, select Next.

Create schedule groups
In this step, you identify the schedule owners in your organization and define how schedule groups are created and managed across your frontline teams.
- Schedule owners, similar to team owners, are frontline managers who create and manage schedules for their teams. Learn more about schedule owners.
- Schedule groups are used to further group employees based on common characteristics within a team. For example, schedule groups can be departments or job types.
You can choose to allow schedule owners to create and manage schedule groups or you can do so centrally in the Teams admin center.
In the Group ID box, enter the Group ID of the group that contains the schedule owners in your organization.
Note
To find the Group ID of a group, sign in to the Azure portal, select Microsoft Entra ID, and then choose Groups. Select the group you want, and then copy the value in the Object Id field.
Choose one of the following options to define how schedule groups are managed:
Important
You won't be able to change your selection after you submit it for setup.
- Schedule groups are created and managed by schedule owners: Your schedule owners create and manage schedule groups for their teams. They can add, rename, and delete schedule groups in Shifts.
- Schedule groups are created and managed in the Teams admin center: You create and manage the schedule group structure for Shifts. Your schedule owners won't be able to add, rename, or delete schedule groups in Shifts. With this option, you can standardize schedule groups across teams, which allows for automating workflows in Shifts across different teams.
If you chose the option to create and manage schedule groups in the Teams admin center, select Add to add schedule groups.
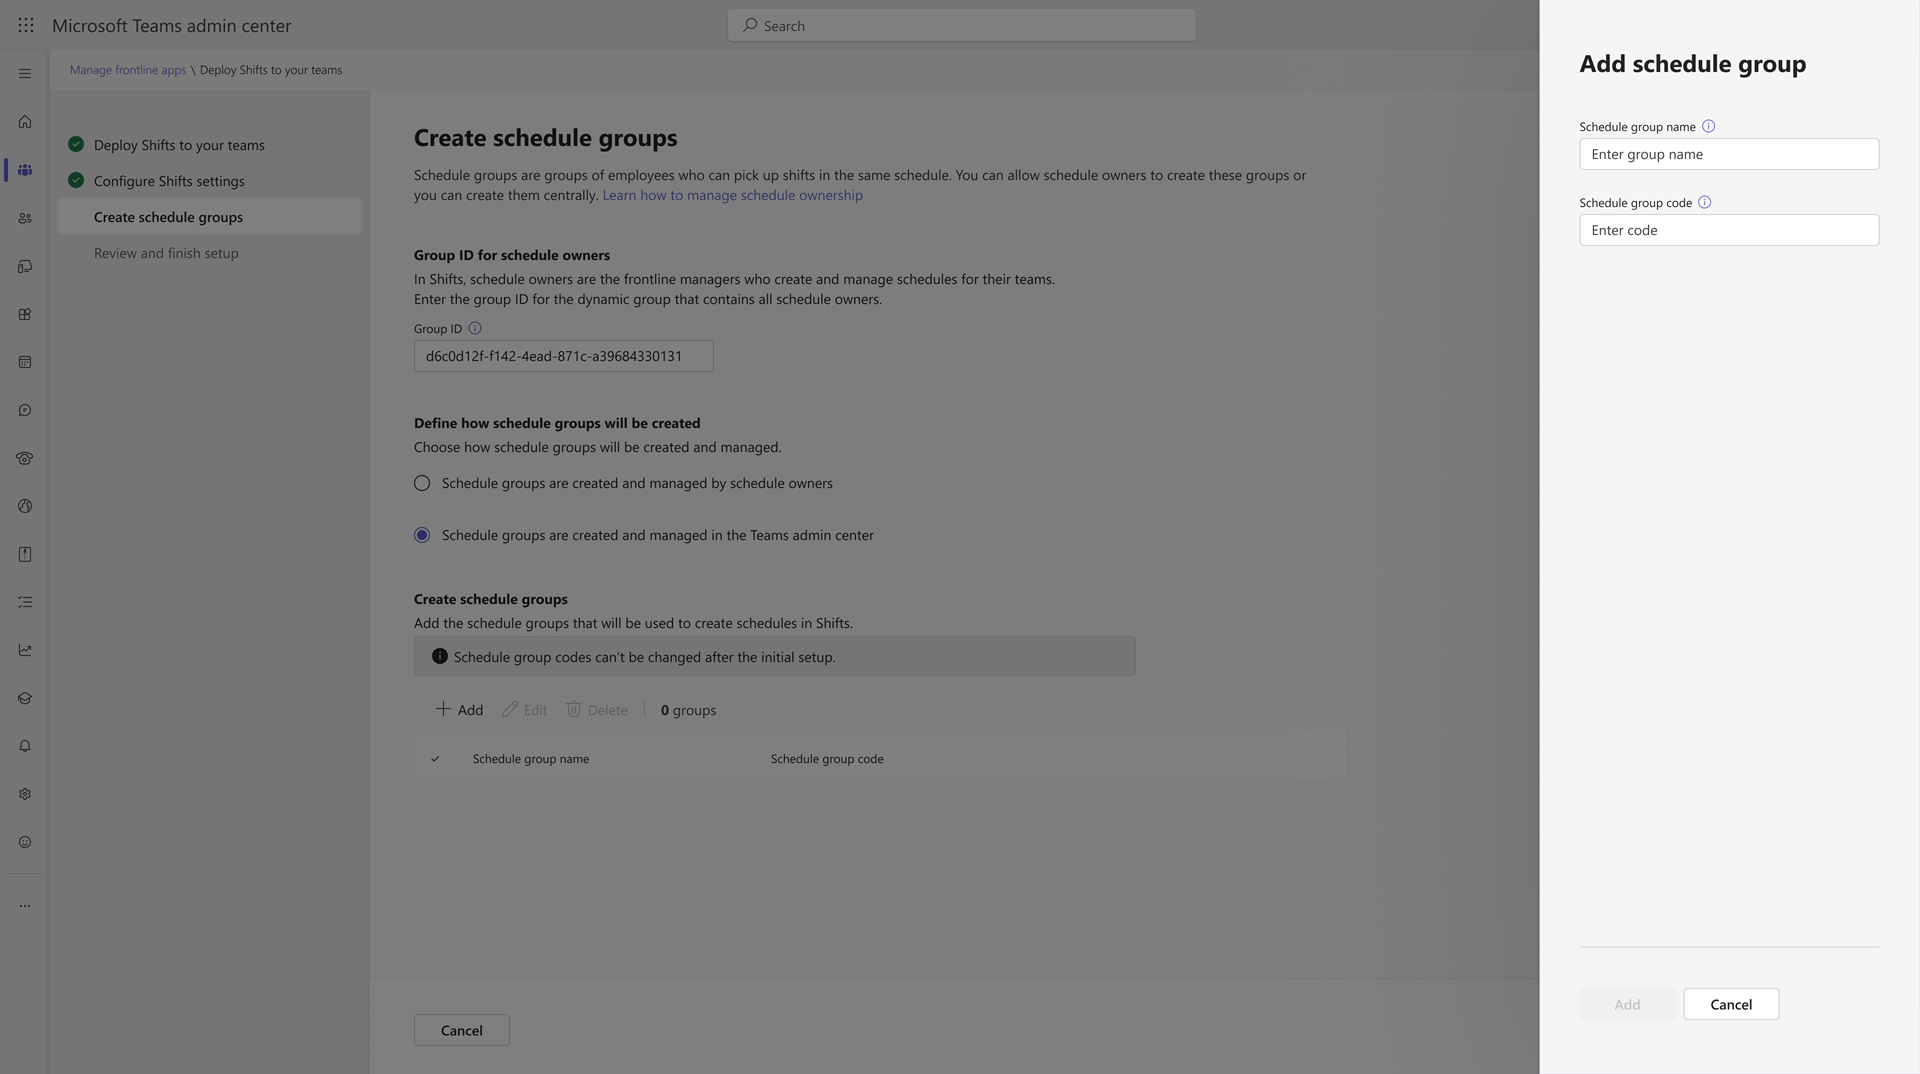
For each schedule group that you create:
- Give it a unique name. It can’t be longer than 40 characters. This name is what frontline managers and workers see in the Shifts schedule.
- Enter a unique code. The code is a mandatory field and can be up to 100 alphanumeric characters long. These codes can't be changed after Shifts is deployed. Codes ensure uniformity across all your HR systems and streamlined experiences across your frontline teams and apps.
When you're done, select Next.

Review and finish setup
Review your settings. If you need to make changes, select Back, and change the settings that you want. When you're ready, select Finish setup.
Note
If you haven’t deployed through the deploy frontline dynamic teams experience in the Teams admin center, there may be an error after you finish the setup wizard. If an error occurs, wait 15 minutes and try again.

The setup status in the table changes to Completed when setup is finished.
Deploy Shifts to your frontline teams
When setup is completed, you’re ready to deploy Shifts to your frontline teams.
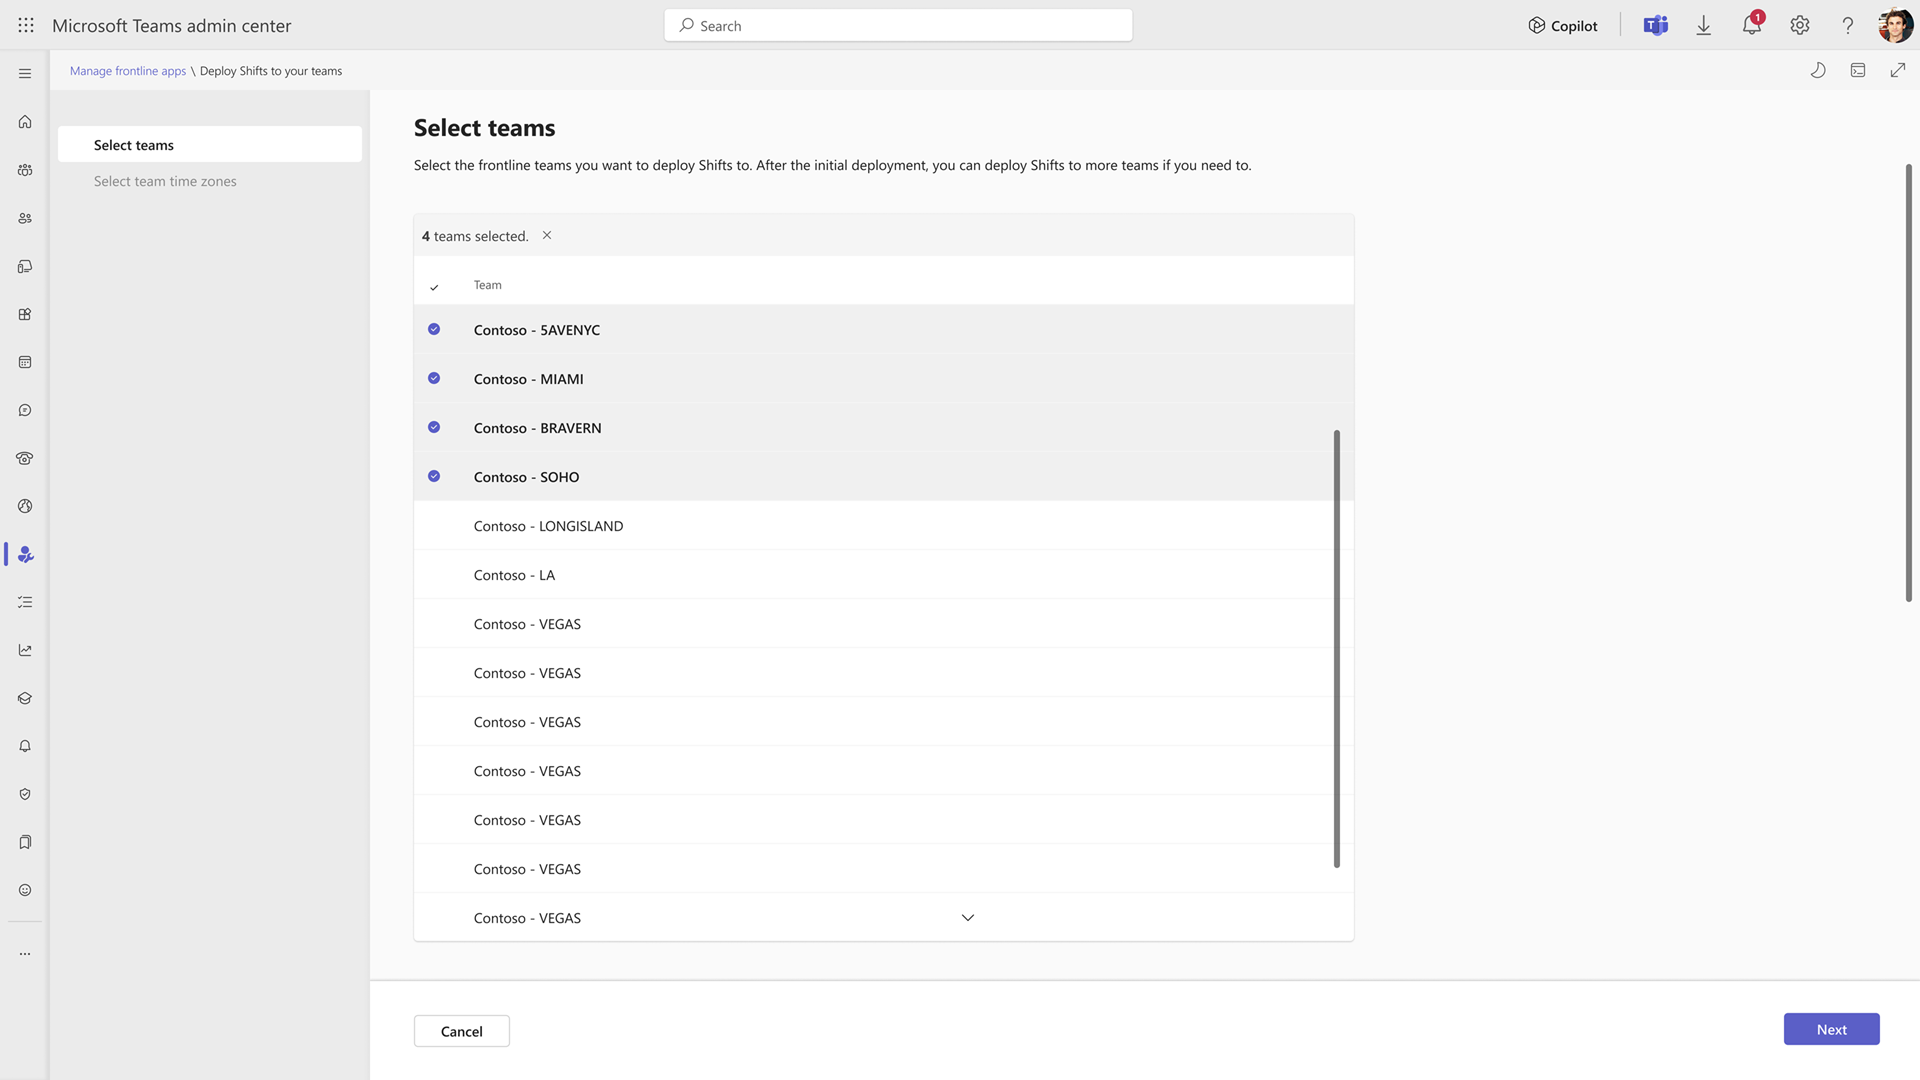
On the Manage frontline apps page, next to Deploy Shifts to your teams in the table, choose Deploy.

Select the teams that you want to deploy Shifts to, and then choose Next.
Note
If you haven't deployed your teams through the deploy frontline dynamic teams experience in the Teams admin center, no teams will show up. You can only deploy Shifts at scale to frontline dynamic teams.
For each team that you selected, set the time zone for the team’s schedule in Shifts. The time zone should reflect the team's location.
You can also set a default time zone, which is automatically applied to all teams. If you choose to set a default time zone, you can still select different time zones for specific teams.

Note
Frontline managers can change the time zone setting for their teams in Shifts. You might want to ask your frontline managers to verify the time zone and adjust it if needed before they start using Shifts.
When you’re done, select Deploy. This process can take some time, depending on how many teams you're deploying Shifts to. Refresh the Manage frontline apps page to get the latest status.
When deployment is completed, the deployment status shows as Deployed in the table. On the Shifts card, you’ll see the number of frontline teams that Shifts is deployed to. You can also download a CSV file with a list of those teams.

You can repeat this process to deploy Shifts to any of your frontline teams that don't already have it deployed. Keep in mind that you can't redeploy Shifts to teams that already have Shifts enabled.


Edit Shifts settings
If you want to edit the Shifts settings that you set previously, select Deploy Shifts to your teams. This allows you to edit Shifts settings for teams you already deployed Shifts to and for teams you deploy Shifts to in the future.
You'll see all your Shifts settings including shift request settings, time-off reasons, schedule owner group ID, and schedule group settings.

You can turn on or turn off shift request settings, time-off requests, and clock in/clock out by switching the toggles to On or Off.
You can add, edit, and delete time-off reasons as you did during initial setup. However, you can't edit the time-off codes for the time-off reasons that you set previously.
You can change the schedule owner group ID that identifies the group that contains all schedule owners.
You won’t be able to change your schedule group management selection from Schedule groups are created and managed by schedule owners to Schedule groups are created and managed in the Teams admin center or vice versa. If you previously chose the option to create and manage schedule groups in the Teams admin center, you can add, edit, and delete schedule groups as you did during initial setup. However, you can't edit the schedule group codes for any of the schedule groups that you set previously.
After you make your edits, choose Apply. This action applies the changes to all teams that you already deployed Shifts to. These Shifts settings are also applied to any new teams you deploy Shifts to.

Troubleshoot errors
If an error occurred during the deployment process, the status in the table shows as Error after you refresh the Manage frontline apps page.
Select the link to download an error CSV file and use the information in it to help resolve the errors. If any errors occurred during setup of your Shifts settings, choose Deploy Shifts to your teams to resubmit or edit your Shifts settings. Then, rerun the deployment experience.
Related articles
Feedback
Coming soon: Throughout 2024 we will be phasing out GitHub Issues as the feedback mechanism for content and replacing it with a new feedback system. For more information see: https://aka.ms/ContentUserFeedback.
Submit and view feedback for