Microsoft Defender Antivirus production ring deployment using Group Policy and network share
Applies to:
- Microsoft Defender for Endpoint Plan 2
- Microsoft Defender XDR
- Microsoft Defender Antivirus
Platforms
- Windows
- Windows Server
Want to experience Microsoft Defender for Endpoint? Sign up for a free trial.
Microsoft Defender for Endpoint is an enterprise endpoint security platform designed to help enterprise networks prevent, detect, investigate, and respond to advanced threats.
Tip
Microsoft Defender for Endpoint is available in two plans, Defender for Endpoint Plan 1 and Plan 2. A new Microsoft Defender Vulnerability Management add-on is now available for Plan 2.
Introduction
This article describes how to deploy Microsoft Defender Antivirus in rings using Group Policy and Network share (also known as UNC path, SMB, CIFS).
Prerequisites
Review the read me article at Readme
Download the latest Windows Defender .admx and .adml.
Copy the latest .admx and .adml to the Domain Controller Central Store.
Create a UNC share for security intelligence and platform updates
Setting up the pilot environment
This section describes the process for setting up the pilot UAT / Test / QA environment. On about 10-500* Windows and/or Windows Server systems, depending on how many total systems that you all have.

Note
Security intelligence update (SIU) is equivalent to signature updates, which is the same as definition updates.
Create a UNC share for security intelligence and platform updates
Set up a network file share (UNC/mapped drive) to download security intelligence and platform updates from the MMPC site by using a scheduled task.
On the system on which you want to provision the share and download the updates, create a folder to which you will save the script.
Start, CMD (Run as admin)
MD C:\Tool\PS-Scripts\
Create the folder to which you will save the signature updates.
MD C:\Temp\TempSigs\x64
MD C:\Temp\TempSigs\x86
Set up a PowerShell script,
CopySignatures.ps1Copy-Item -Path "\SourceServer\Sourcefolder" -Destination "\TargetServer\Targetfolder"
Use the command line to set up the scheduled task.
Note
There are two types of updates: full and delta.
For x64 delta:
Powershell (Run as admin)

C:\Tool\PS-Scripts\

".\SignatureDownloadCustomTask.ps1 -action create -arch x64 -isDelta $true -destDir C:\Temp\TempSigs\x64 -scriptPath C:\Tool\PS-Scripts\SignatureDownloadCustomTask.ps1 -daysInterval 1"
For x64 full:
Powershell (Run as admin)

C:\Tool\PS-Scripts\

".\SignatureDownloadCustomTask.ps1 -action create -arch x64 -isDelta $false -destDir C:\Temp\TempSigs\x64 -scriptPath C:\Tool\PS-Scripts\SignatureDownloadCustomTask.ps1 -daysInterval 1"
For x86 delta:
Powershell (Run as admin)

C:\Tool\PS-Scripts\

".\SignatureDownloadCustomTask.ps1 -action create -arch x86 -isDelta $true -destDir C:\Temp\TempSigs\x86 -scriptPath C:\Tool\PS-Scripts\SignatureDownloadCustomTask.ps1 -daysInterval 1"
For x86 full:
Powershell (Run as admin)

C:\Tool\PS-Scripts\

".\SignatureDownloadCustomTask.ps1 -action create -arch x86 -isDelta $false -destDir C:\Temp\TempSigs\x86 -scriptPath C:\Tool\PS-Scripts\SignatureDownloadCustomTask.ps1 -daysInterval 1"
Note
When the scheduled tasks are created, you can find these in the Task Scheduler under
Microsoft\Windows\Windows Defender.Run each task manually and verify that you have data (
mpam-d.exe,mpam-fe.exe, andnis_full.exe) in the following folders (you might have chosen different locations):C:\Temp\TempSigs\x86C:\Temp\TempSigs\x64
If the scheduled task fails, run the following commands:
C:\windows\system32\windowspowershell\v1.0\powershell.exe -NoProfile -executionpolicy allsigned -command "&\"C:\Tool\PS-Scripts\SignatureDownloadCustomTask.ps1\" -action run -arch x64 -isDelta $False -destDir C:\Temp\TempSigs\x64"

C:\windows\system32\windowspowershell\v1.0\powershell.exe -NoProfile -executionpolicy allsigned -command "&\"C:\Tool\PS-Scripts\SignatureDownloadCustomTask.ps1\" -action run -arch x64 -isDelta $True -destDir C:\Temp\TempSigs\x64"

C:\windows\system32\windowspowershell\v1.0\powershell.exe -NoProfile -executionpolicy allsigned -command "&\"C:\Tool\PS-Scripts\SignatureDownloadCustomTask.ps1\" -action run -arch x86 -isDelta $False -destDir C:\Temp\TempSigs\x86"

C:\windows\system32\windowspowershell\v1.0\powershell.exe -NoProfile -executionpolicy allsigned -command "&\"C:\Tool\PS-Scripts\SignatureDownloadCustomTask.ps1\" -action run -arch x86 -isDelta $True -destDir C:\Temp\TempSigs\x86"
Note
Issues could also be due to execution policy.
Create a share pointing to
C:\Temp\TempSigs(e.g.,\\server\updates).Note
At a minimum, authenticated users must have "Read" access. This requirement also applies to domain computers, the share, and NTFS (security).
Set the share location in the policy to the share.
Note
Do not add the x64 (or x86) folder in the path. The mpcmdrun.exe process adds it automatically.
Setting up the Pilot (UAT/Test/QA) environment
This section describes the process for setting up the pilot UAT / Test / QA environment, on about 10-500 Windows and/or Windows Server systems, depending on how many total systems that you all have.
Note
If you have a Citrix environment, include at least 1 Citrix VM (non-persistent) and/or (persistent)
In Group Policy Management Console (GPMC, GPMC.msc), create or append to your Microsoft Defender Antivirus policy.
Edit your Microsoft Defender Antivirus policy. For example, edit MDAV_Settings_Pilot. Go to Computer Configuration > Policies > Administrative Templates > Windows Components > Microsoft Defender Antivirus. There are three related options:
Feature Recommendation for the pilot systems Select the channel for Microsoft Defender daily Security Intelligence updates Current Channel (Staged) Select the channel for Microsoft Defender monthly Engine updates Beta Channel Select the channel for Microsoft Defender monthly Platform updates Beta Channel The three options are shown in the following figure.
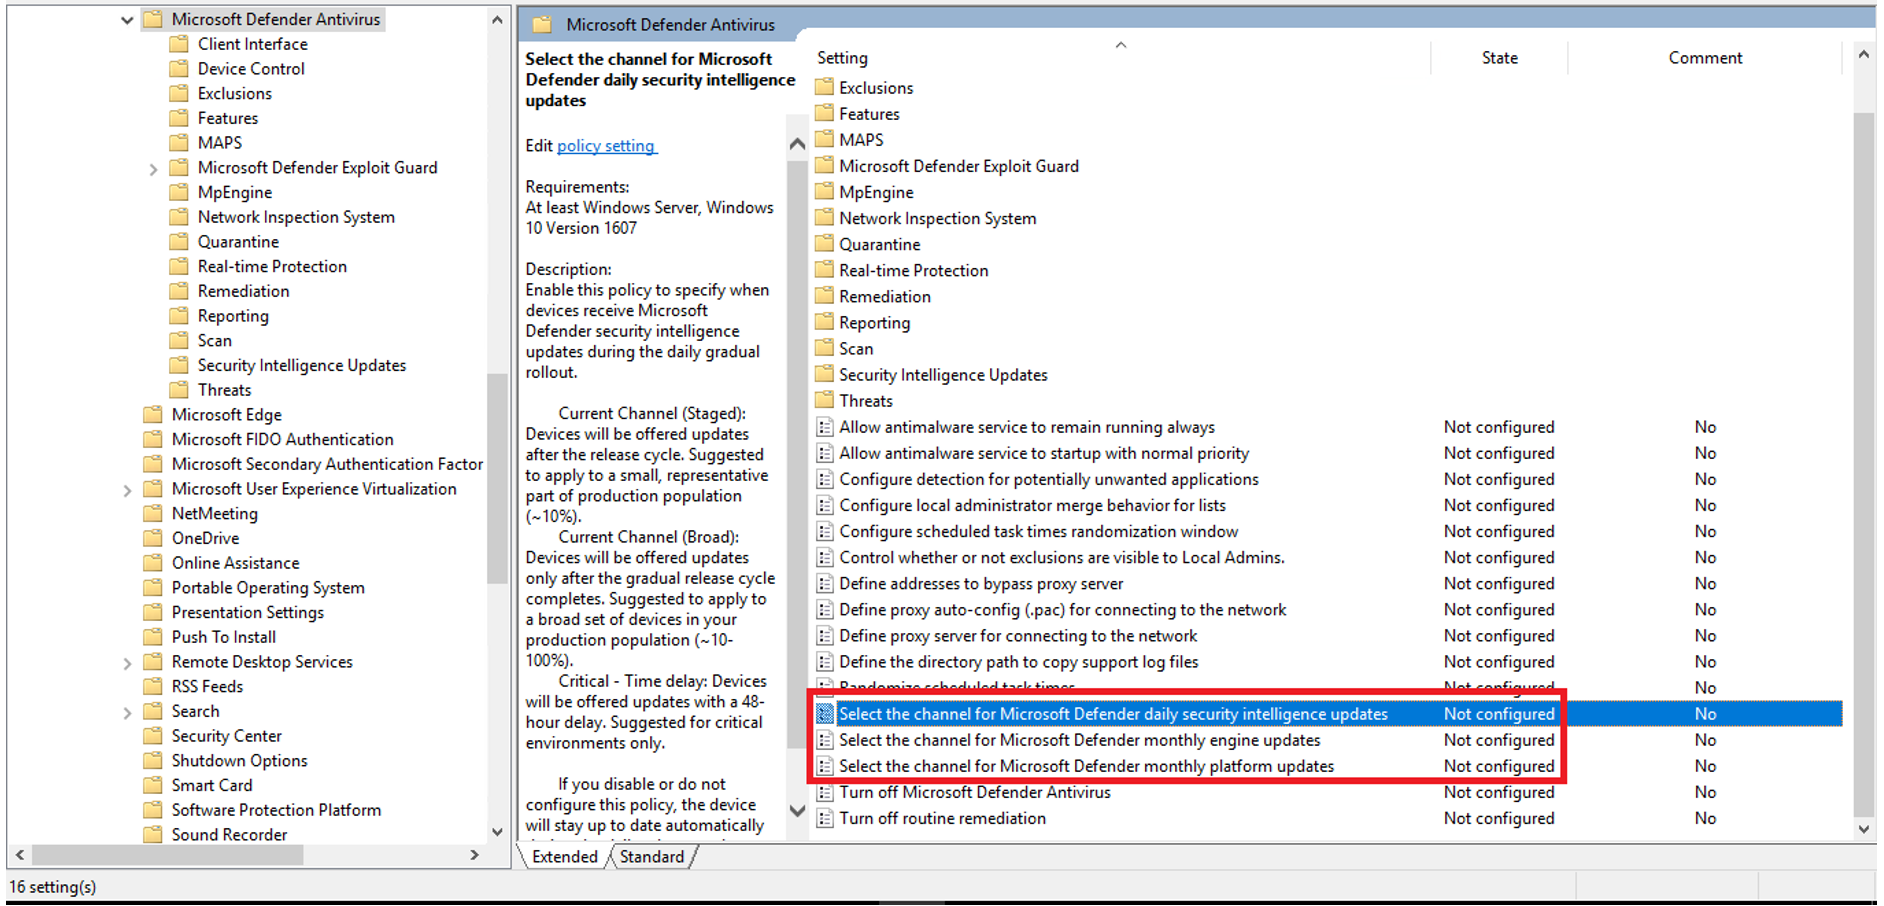
For more information, see Manage the gradual rollout process for Microsoft Defender updates
Go to Computer Configuration > Policies > Administrative Templates > Windows Components > Microsoft Defender Antivirus.
For intelligence updates, double-click Select the channel for Microsoft Defender monthly intelligence updates.

On the Select the channel for Microsoft Defender monthly intelligence updates page, select Enabled, and in Options, select Current Channel (Staged).
Select Apply, and then select OK.
Go to Computer Configuration > Policies > Administrative Templates > Windows Components > Microsoft Defender Antivirus.
For engine updates, double-click Select the channel for Microsoft Defender monthly engine updates.
On the Select the channel for Microsoft Defender monthly Platform updates page, select Enabled, and in Options, select Beta Channel.
Select Apply, and then select OK.
For platform updates, double-click Select the channel for Microsoft Defender monthly Platform updates.
On the Select the channel for Microsoft Defender monthly Platform updates page, select Enabled, and in Options, select Beta Channel. These two settings are shown in the following figure:
Select Apply, and then select OK.


Related articles
- Antivirus profiles - Devices managed by Microsoft Intune
- Use Endpoint security Antivirus policy to manage Microsoft Defender update behavior (Preview)
- Manage the gradual rollout process for Microsoft Defender updates
Setting up the production environment
In Group Policy Management Console (GPMC, GPMC.msc), go to Computer Configuration > Policies > Administrative Templates > Windows Components > Microsoft Defender Antivirus.
Set the three policies as follows:
Feature Recommendation for the production systems Remarks Select the channel for Microsoft Defender daily Security Intelligence updates Current Channel (Broad) This setting provides you with 3 hours of time to find an FP and prevent the production systems from getting an incompatible signature update. Select the channel for Microsoft Defender monthly Engine updates Critical – Time delay Updates are delayed by two days. Select the channel for Microsoft Defender monthly Platform updates Critical – Time delay Updates are delayed by two days. For intelligence updates, double-click Select the channel for Microsoft Defender monthly intelligence updates.
On the Select the channel for Microsoft Defender monthly intelligence updates page, select Enabled, and in Options, select Current Channel (Broad).
Select Apply, and then select OK.
For engine updates, double-click Select the channel for Microsoft Defender monthly engine updates.
On the Select the channel for Microsoft Defender monthly Platform updates page, select Enabled, and in Options, select Critical – Time delay.
Select Apply, and then select OK.
For platform updates, double-click Select the channel for Microsoft Defender monthly Platform updates.
On the Select the channel for Microsoft Defender monthly Platform updates page, select Enabled, and in Options, select Critical – Time delay.
Select Apply, and then select OK.
If you encounter problems
If you encounter problems with your deployment, create or append your Microsoft Defender Antivirus policy:
In Group Policy Management Console (GPMC, GPMC.msc), create or append to your Microsoft Defender Antivirus policy using the following setting:
Go to Computer Configuration > Policies > Administrative Templates > Windows Components > Microsoft Defender Antivirus > (administrator-defined) PolicySettingName. For example, MDAV_Settings_Production, right-click, and then select Edit. Edit for MDAV_Settings_Production is shown in the following figure:

Select Define the order of sources for downloading security intelligence updates.
Select the radio button named Enabled.
Under Options:, change the entry to FileShares, select Apply, and then select OK. This change is shown in the following figure:

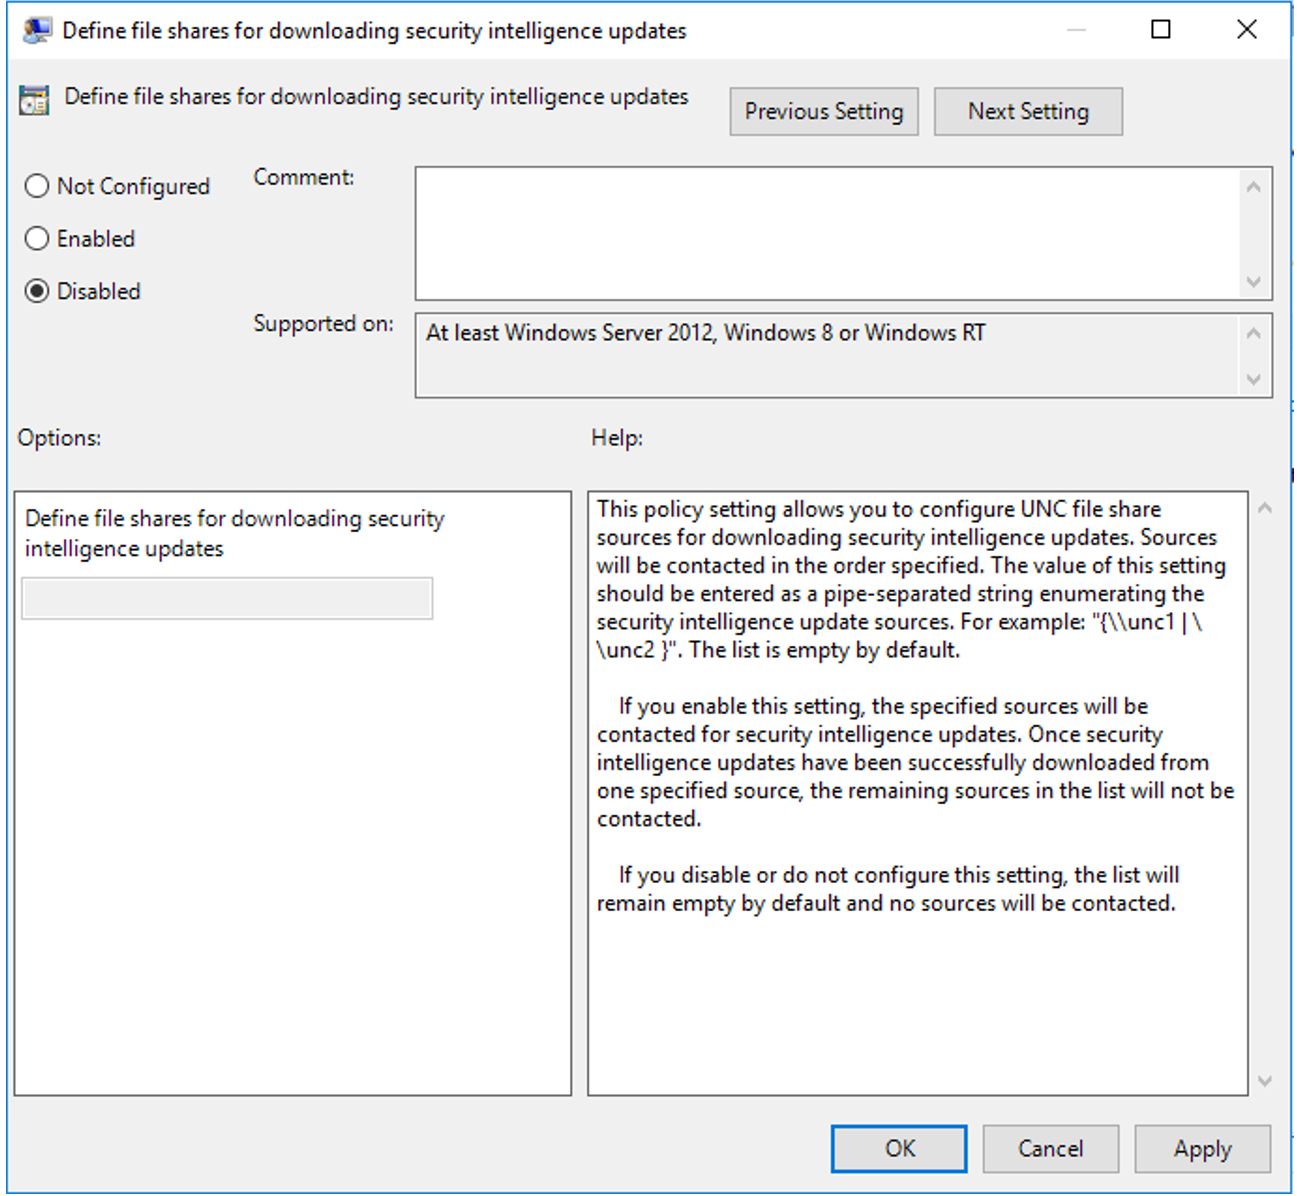
Select Define the order of sources for downloading security intelligence updates.
Select the radio button named Disabled, select Apply, and then select OK. The disabled option is shown in the following figure:
The change is active when Group Policy updates. There are two methods to refresh Group Policy:
- From the command line, run the Group Policy update command. For example, run
gpupdate / force. For more information, see gpupdate - Wait for Group Policy to automatically refresh. Group Policy refreshes every 90 minutes +/- 30 minutes.
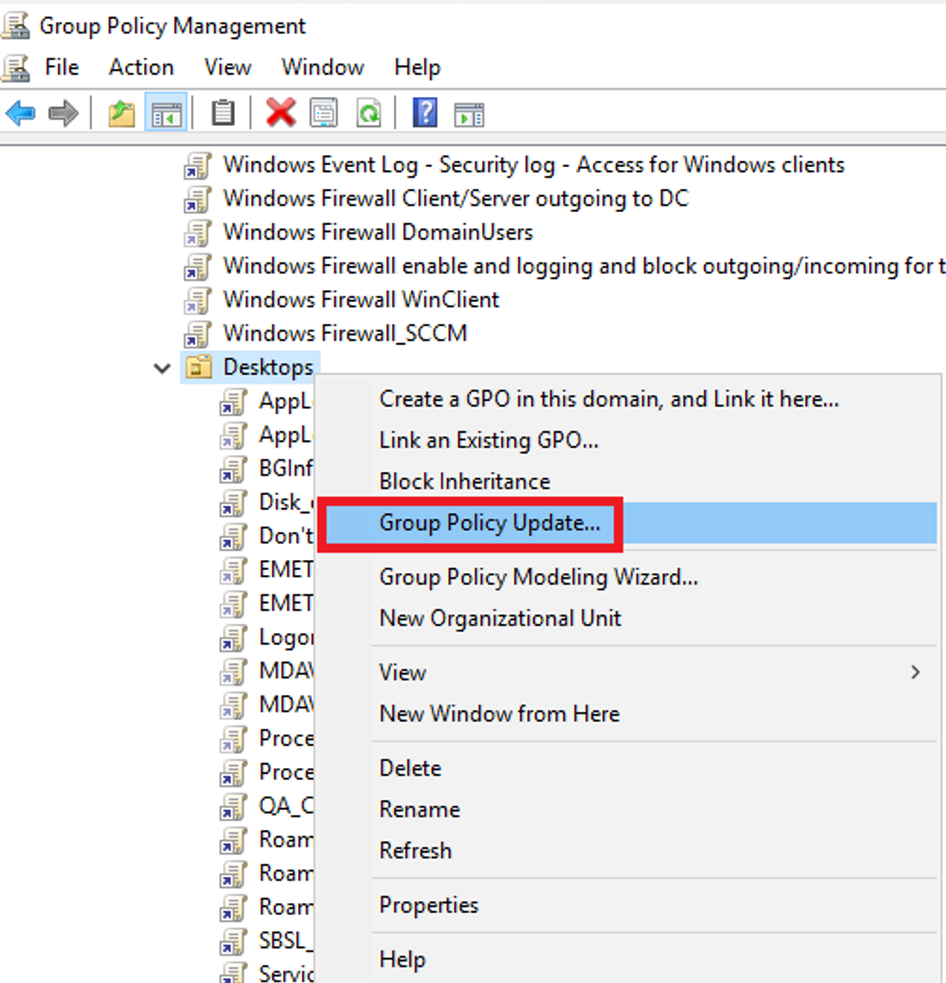
If you have multiple forests/domains, force replication or wait 10-15 minutes. Then force a Group Policy Update from the Group Policy Management Console.
Right-click on an organizational unit (OU) that contains the machines (for example, Desktops), select Group Policy Update. This UI command is the equivalent of doing a gpupdate.exe /force on every machine in that OU. The feature to force Group Policy to refresh is shown in the following figure:
- From the command line, run the Group Policy update command. For example, run
After the issue is resolved, set the Signature Update Fallback Order back to the original setting.
InternalDefinitionUpdateServder|MicrosoftUpdateServer|MMPC|FileShare.


See also
Feedback
Coming soon: Throughout 2024 we will be phasing out GitHub Issues as the feedback mechanism for content and replacing it with a new feedback system. For more information see: https://aka.ms/ContentUserFeedback.
Submit and view feedback for