Review and sign a signature request using SharePoint eSignature
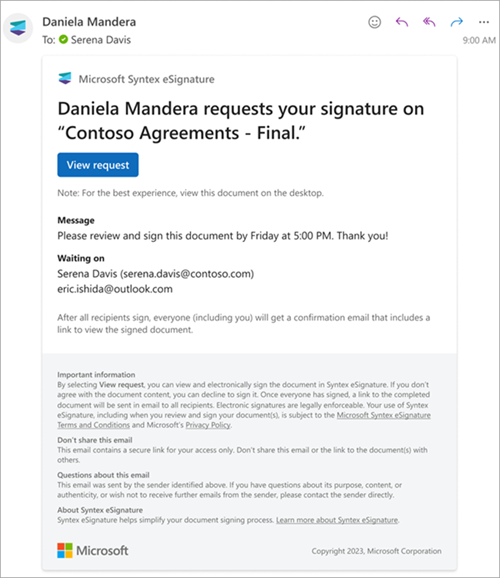
When a signature request is created, an email notification is sent to the recipients. (In some cases, recipients might also receive notifications in Teams via the Approvals app.) The notification contains details of the request, including all recipients who are required to sign, and any signing instructions. A recipient doesn't need to have a SharePoint license or a Microsoft account to sign the request.
Access the document to be signed
When you receive the email notification, select View request in the email to begin the signing process.
Consent to use your electronic signature
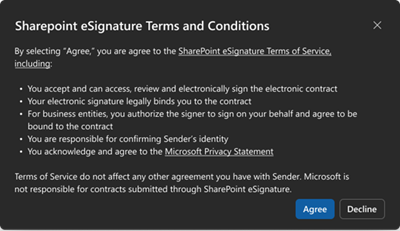
To continue the electronic signing process, you must consent to the terms and conditions and agree to use your electronic signature for signing. On the SharePoint eSignature Terms and Conditions screen:
Select Agree to use your electronic signature and continue with the signing process.
Or select Decline if you'd prefer not to use your digital signature, and contact the person who requested your signature to complete the signature by using a different method.
If you close the SharePoint eSignature Terms and Conditions screen without selecting the Agree button, you can reopen the dialog by selecting the View disclosure button on the top-left area of the document.
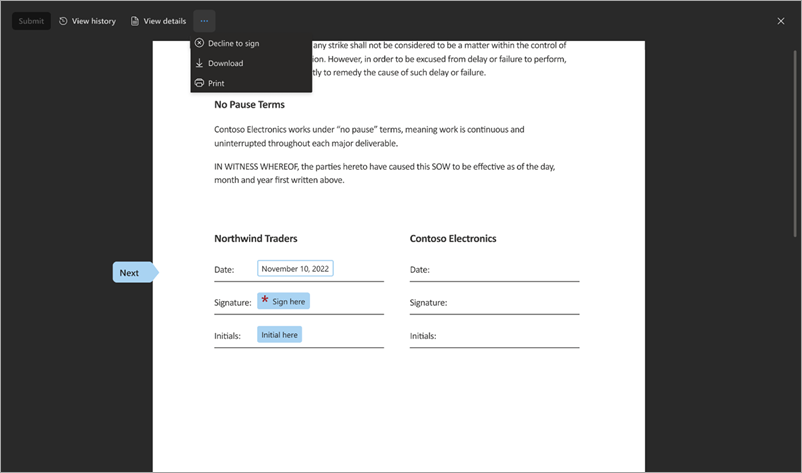
Sign the document
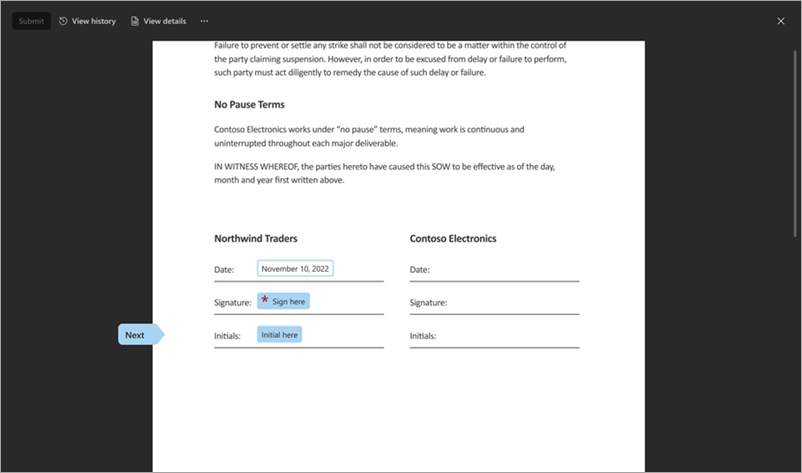
Once you accept the eSignature terms and conditions, the document viewer opens in a new browser tab. Here you can navigate and read the document, and review the content. When you’re ready to sign, select Start. This action brings you to the first location where your input is needed.

There are three different types of input you can be asked for:
Signature
Electronic signatures let you digitally sign a document by enabling you to add a representation of your physical signature.
To add your signature, type your name. If you want to choose a different font style for your signature, select Change font and choose the font you want to use.

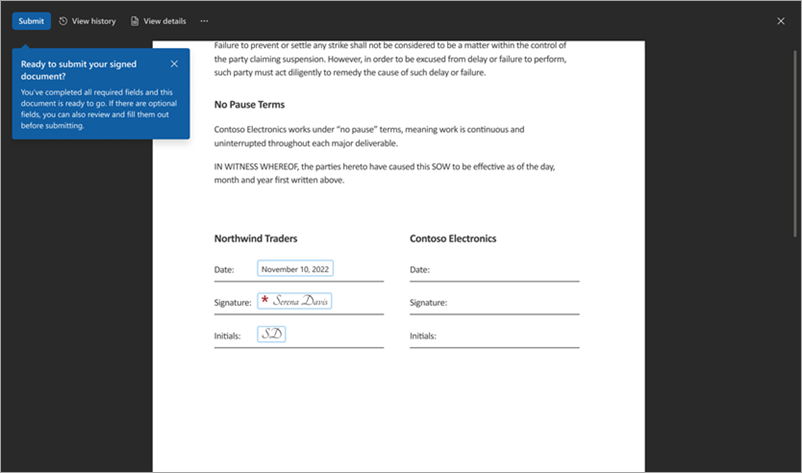
Select Done to add your signature to the document.
Select Next to go to the next location in the document that requires your input.

Initials
In some locations within the document, you might be asked to add your initials to acknowledge a particular clause.
Select Initial here, and enter your initials. This action is prepopulated if you've already entered your signature.
Select Next to go to the next location in the document that requires your input.
Date
The date is prepopulated with the current day’s date.
Submit the signed document
When you have entered all of the required input, select Submit to complete the signing process.
The status of the request changes from In progress to Completed. The document becomes read-only. You'll receive an email notification saying that your signature has been received and the requester will be notified.
Once everyone has signed the document, you'll receive an email notification saying where you can view the document and request details. The document is available via the View request button in the email for 30 days, so make sure you download it for your own records.
Decline to sign the document
If you review the document and don’t want to sign it, you can decline to sign.
In the document viewer, select More options (...), and then select Decline to sign.
On the You're declining to sign screen, enter a reason for not signing the document, and then select Decline. Or if you change your mind, select Cancel.
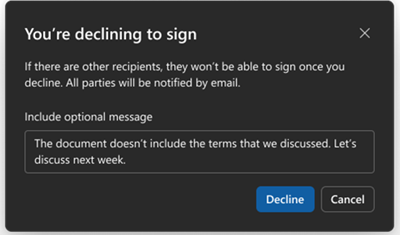
Once you decline, you won't be able to add your signature, but you'll be able to see the document in read-only mode.
Once you decline, an email notification is sent to the requester saying that you don’t want to sign the document. Declining to sign will complete the signing process and change the status of the request from In progress to Declined.
If there are more recipients, they'll also receive a notification saying that the request has been declined.
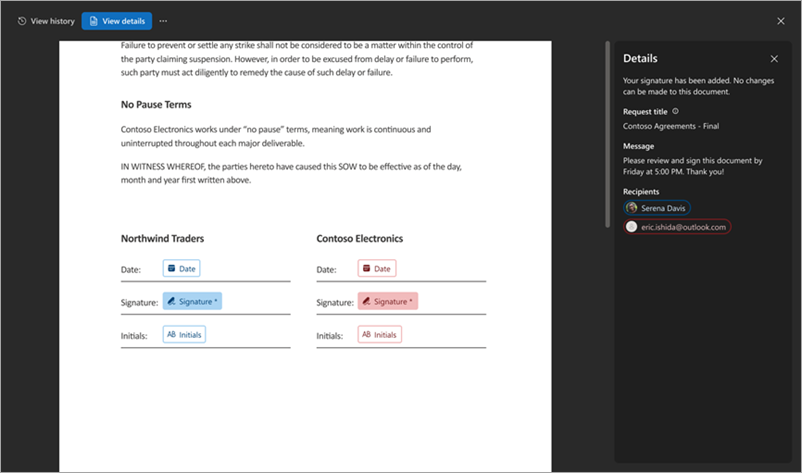
View request history and details
Whether you're a requester or a recipient, you can select View request from any of your email notifications to view the document and find out more about the request.
In the document viewer, select the View history tab to see the status of the request. On the History panel, you can see the recipients who haven't signed yet and the activities that have happened so far, such as when the request was created and who the recipients are.

Select the View details tab to see the details of the request. On the Details panel, you can see the title of the request, any instructions the requester added when sending the request, and who the request was sent to.
Monitor the status of a request
When you create a signature request with SharePoint eSignature, it goes through different stages that are reflected in the request statuses. You can view the status of a request by selecting View request in any of the email notifications you received about the signature request. The following table shows the request statuses and their meaning.
| Status | Description |
|---|---|
| In progress | The request is in progress as soon as it's created. The status remains at this state until the request has been reviewed by all recipients or canceled by the sender of the request. |
| Completed | The request is completed when all recipients have signed the document. |
| Canceled | The request has been canceled by the sender. |
| Declined | One of the recipients has declined to sign. |
When the status of a request is Completed, Canceled, or Declined, the request can no longer be acted on by either the sender or the recipients. As an example, if a recipient declines a request, the sender would need to send a new request after the reason for declining has been addressed. The original declined request can't be edited.
Note
For requests sent via other electronic signature providers, the status reflected is determined by the signature provider and might differ from the status described above.
Access the signed document
Documents signed with Microsoft SharePoint eSignature
All parties involved in the request receive an email notification saying that the request has been completed and the status of the request is Completed. In the email, you can select View signed document to access the signed document and the request history. Signers can continue to access and download the signed document from the email notification for 30 days after receiving the email. Additionally, request senders will be able to access the originating folder in which the signed document was saved directly from the email.
Note
When you open a PDF document on a SharePoint site, you won't see the details of the request if your default PDF viewer is set to Adobe. You'll need to set PDF viewer as your default viewer.
Security of the signed document
After all recipients have signed the document, the signatures are added and an audit trail is appended to the signed PDF. Details of the request, including activities and timestamps of when they occurred throughout the signing process, are included. The details include the date and time the request created, date and time when the recipients signed, and so on. These details provide evidence of the integrity of the signing process. The signed document is then digitally signed by a Microsoft certificate to ensure that it can't be tampered with.
Documents signed with other signature providers
All parties will receive an email notification from the provider when document signing is complete. The email typically contains a link to the signed document or as an attachment. Additionally, a copy of the signed document is automatically stored in SharePoint. Once stored, the creator of the request receives an email from SharePoint eSignature with a link to the SharePoint location. The signed document is stored in a provider specific folder within the SharePoint document library of the original document (the original document is the PDF with which the request was initiated from). The signed document can be found using this folder path: [Document library] > Apps\Signed documents\provider (for example, Contoso Documents > Apps > Signed documents > Docusign. The retention policy of the saved document will inherit the retention policy set up by the SharePoint or tenant admin.
Note
A copy of the signed document will not be saved if the request is declined or canceled. Any additional document uploaded via the third party platform (i.e. outside of sharePoint) while creating a request will also not be saved back to sharePoint. Only documents initiated from SharePoint are saved back to SharePoint.