Note
Access to this page requires authorization. You can try signing in or changing directories.
Access to this page requires authorization. You can try changing directories.
Use the Connected platforms page to connect supported third-party agent platforms to Microsoft Agent 365. After you create a connection, Agent 365 can discover supported agents and add them to the Microsoft 365 agent registry. Synchronization, management, and observability capabilities vary by platform.
Setting up a connection is a shared task:
- The Agent 365 AI administrator creates and manages the connection in the Microsoft 365 admin center.
- The platform administrator creates the source-platform credentials, grants the required permissions, and enables platform-side telemetry when applicable.
Security model
Connected platform connections are read-only by design:
- Agent 365 never invokes, executes, or interacts with agents in the source platform.
- Agent 365 doesn't write to, modify, or delete resources in the source platform. The only exception is an explicit administrator action to remove a synchronized agent, which requires a separate, optional delete permission that you can choose not to grant.
- Observability data is read from the telemetry destination that the source platform already writes to on its own, such as an activity bucket or a managed logging service. Agent 365 doesn't write to that destination.
For platform-specific permissions, see the relevant guide in Supported platforms.
Manage external platform connections
Create and manage external platform connections from the Connected platforms page in the Microsoft 365 admin center.
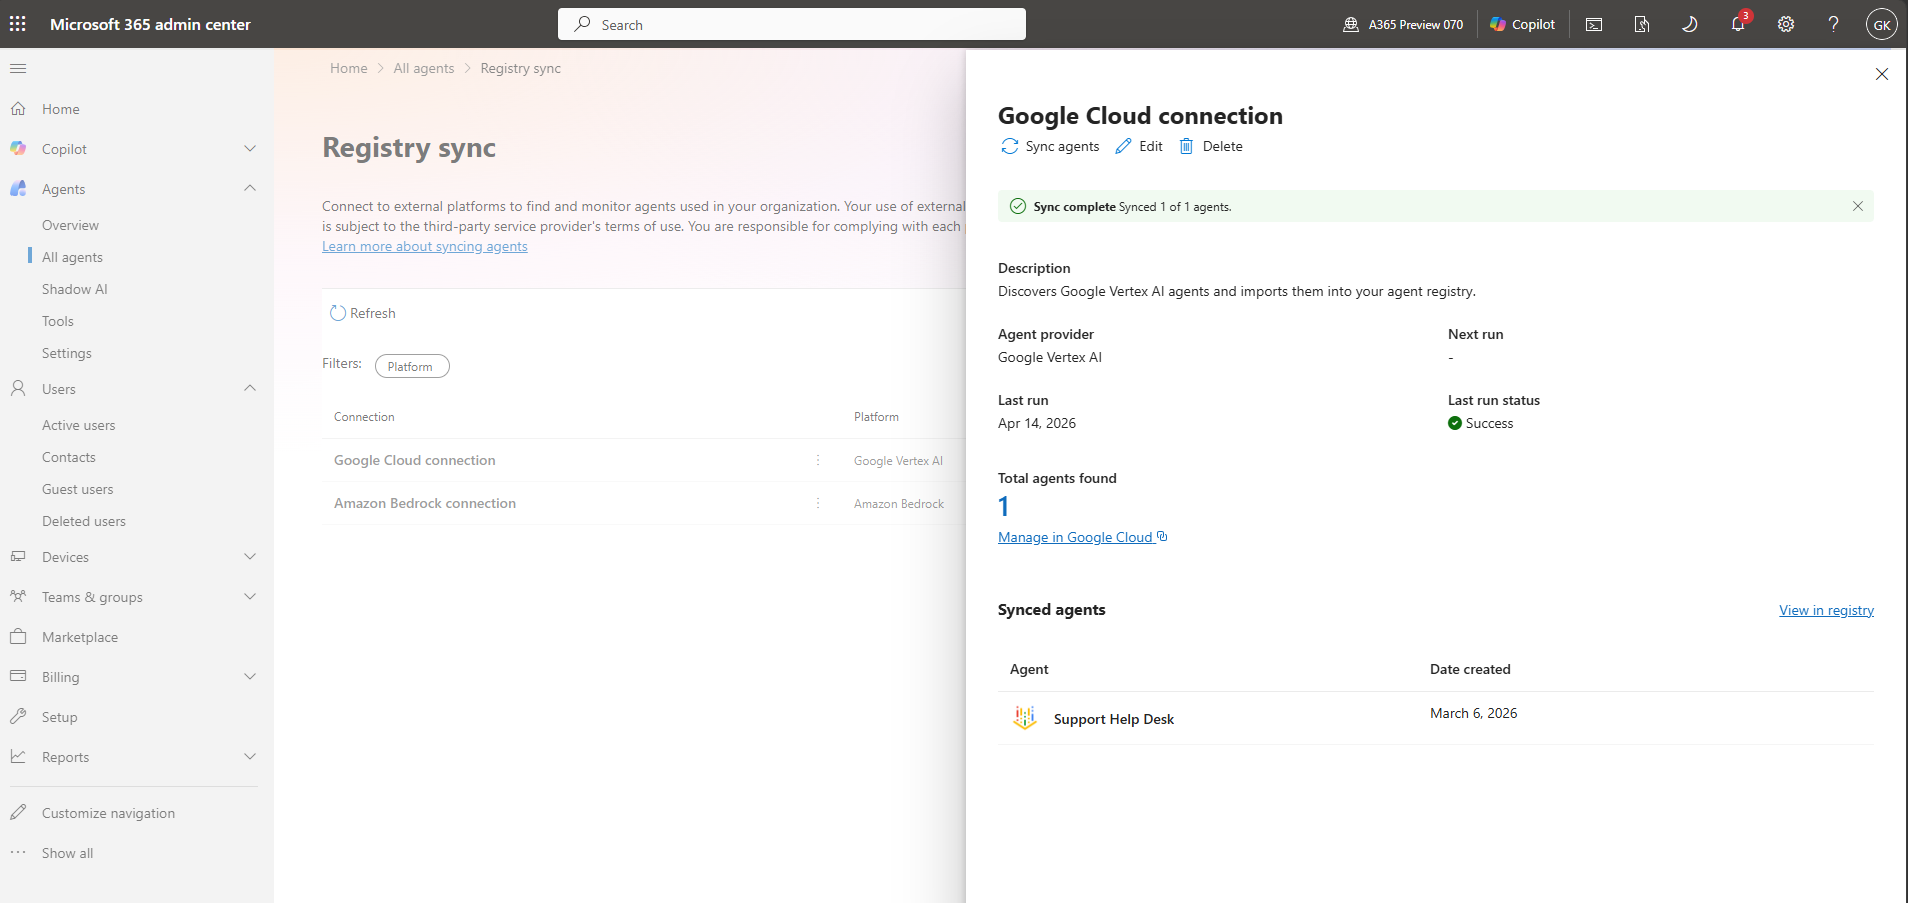
From this page, you can:
- Create platform connections.
- View connection synchronization status.
- Monitor the latest synchronization activity.
- Review errors associated with synchronization attempts.
- Delete existing connections.
Supported platforms
| Platform | Supported environment | Agent synchronization | Observability | Configuration guide |
|---|---|---|---|---|
| Amazon Bedrock | Agents Classic and AgentCore | Yes | Yes | Connect Amazon Bedrock |
| Google Vertex AI | Vertex AI agents | Yes | Yes | Connect Google Vertex AI |
| Salesforce Agentforce | Agentforce | Yes | Yes | Connect Salesforce Agentforce |
| Databricks Genie | Genie | Yes | Yes | Connect Databricks Genie |
| Anthropic Claude | Managed Agents | Yes | Yes | Connect Anthropic Claude Managed Agents |
| Oracle Generative AI Agents | Generative AI Agents | Yes | Coming soon | Connect Oracle Generative AI Agents |
| Snowflake Cortex | Cortex Agents | Yes | Coming soon | Connect Snowflake Cortex |
Where supported, observability provides session, exception, runtime, and tool-call metrics on the agent's Activity tab. Coverage varies by platform. For metric definitions and platform coverage, see Third-party agent observability (Frontier).
Note
Databricks Genie observability is available through the Frontier program.
Current limitations
- Manual synchronization only. Agent 365 doesn't currently sync on a schedule, and Microsoft doesn't prescribe a fixed synchronization interval. Choose a cadence based on how often agents change in the source platform and your organization's governance requirements. Re-run Sync agents after you add, update, or remove agents in the source platform, and before reviews that depend on current registry data.
- Deletion reconciliation isn't guaranteed. Synchronization doesn't currently guarantee that an agent removed from the source platform is automatically removed from the Microsoft 365 agent registry. Confirm the current behavior with your platform administrator, and remove the agent from the registry manually if it's no longer needed.
- Observability coverage varies by platform. Some platforms in the supported platforms table are marked Coming soon for observability and don't yet return activity data.
- Registry sync doesn't add code-level capabilities. It provides visibility and governance for agents you don't build or host yourself. If you build and host your own agent, or need code-level Agent 365 capabilities, use the Agent 365 SDK instead. See Connected platforms and the Agent 365 SDK.
Connection lifecycle
- Prepare: Work with your platform administrator to select the account, project, workspace, compartment, or region and prepare the required credentials and permissions.
- Connect: Create and validate the connection in the Microsoft 365 admin center.
- Synchronize: Start synchronization so that Agent 365 discovers supported agents and adds them to the agent registry.
- Verify: Confirm the expected agents, metadata, and capabilities with your platform administrator.
- Operate: Re-run synchronization at the cadence your organization chooses and after known source-platform changes. Rotate credentials, review errors, and remove connections when they're no longer needed.
Agent 365 stores the credentials that you enter for a connection as encrypted connection data within Microsoft 365. Microsoft encrypts the credentials at rest and in transit. Agent 365 doesn't prescribe a universal rotation interval. Use the shorter interval required by the source platform or your organization's security policy, and rotate credentials immediately if you suspect exposure. For broader Agent 365 data-protection commitments, see Data handling, data residency, and compliance in Agent 365 observability.
Every currently supported platform requires a key-based credential, such as an API key, secret, or private key. Keyless authentication options, such as workload identity federation or role assumption, aren't currently supported for Connected platforms.
Administrator responsibilities
| Task | Agent 365 AI administrator | Platform administrator |
|---|---|---|
| Confirm Agent 365 access and role | Owns | Informed |
| Select the source account, project, workspace, or region | Consulted | Owns |
| Create credentials | Informed | Owns |
| Grant source-platform permissions | Informed | Owns |
| Create and validate the Agent 365 connection | Owns | Supports |
| Verify synchronized agents | Owns | Supports |
| Enable source telemetry | Consulted | Owns |
| Rotate or revoke credentials | Coordinates | Owns |
Create a platform connection
- Open the Microsoft 365 admin center.
- In the navigation pane, select Agents > All Agents.
- In the Connected platforms web part, select Manage.
- Select + Connect a platform.
- Enter a connection name and description.
- Select the platform.
- Enter the provider-specific values described in the provider guide.
- Validate the credentials.
- Save the connection.
After you save the connection, select Sync agents to start synchronization. Manual synchronization is required.
Agent observability data collection (preview)
Important
This feature is part of Frontier preview program. Frontier connects you directly with Microsoft’s latest AI innovations. Frontier previews are subject to the existing preview terms of your customer agreements. As these features are still in development, their availability and capabilities may change over time.
When you create or edit a connection to a supported platform, you can control whether Microsoft 365 collects observability data for the agents synchronized from that platform. This setting appears as Collect agent observability data in the connection dialog.
To check whether observability data collection is available for a platform, see the Observability column in Supported platforms.
When you enable this setting, Microsoft 365 retrieves agent activity telemetry—such as agent sessions, usage, and related operational signals—from the connected platform by using the connection's stored credentials. This telemetry powers the agent Activity experience in the Microsoft 365 admin center and Defender Alerts & insights, giving you centralized visibility into how your synchronized agents are used.
New connections have this setting enabled by default. Existing connections that you created before the setting was available continue to collect observability data until you change it.
To change the setting:
- Open the Connected platforms page in the Microsoft 365 admin center.
- Create a new connection, or select an existing connection and edit it.
- Select or clear Collect agent observability data.
- Save the connection.
Note
Retrieving agent telemetry from the connected platform might query the provider's own logging or data services (for example, Google BigQuery or Amazon S3) and can incur data access or query charges that the provider bills. Review your provider's pricing before you enable collection.
When you clear this setting, Microsoft 365 stops collecting new observability data for that connection's agents. The agent registry retains telemetry collected earlier according to its existing retention and management behavior.
Manage an existing connection
Select an existing connection to review:
- Identify the platform provider.
- Confirm the connected account, project, workspace, compartment, or region.
- Review the last run date.
- Review the latest synchronization status.
- Confirm the total number of synchronized agents.
- Review the synchronization results.
- Investigate any synchronization errors.
- Turn Collect agent observability data on or off.
Follow the relevant provider guide when you need to rotate credentials, change the source scope, revoke access, or remove the connection.
Connected platforms and the Agent 365 SDK
Registry sync (the connected platforms feature described in this article) gives you visibility and governance for agents that you don't build or host yourself. It doesn't require code changes.
Use the Agent 365 SDK instead of, or in addition to, registry sync when:
- You build and deploy the agent yourself, rather than connecting an externally hosted platform.
- Your agent needs code-level Agent 365 capabilities, such as identity, observability, tooling, or notifications, that registry sync doesn't provide.
Known considerations when you rely on registry sync alone:
- Synchronization is manual and doesn't run on a schedule.
- Observability coverage depends on what the source platform exposes, and some platforms don't yet support it.
- Registry sync is read-only. It can't add capabilities that the source platform doesn't already support.
For a full comparison of integration options and when to choose the SDK, see Choose an Agent 365 integration option.
Related content
- Connect Amazon Bedrock
- Connect Google Vertex AI
- Connect Salesforce Agentforce
- Connect Databricks Genie
- Connect Anthropic Claude Managed Agents
- Connect Oracle Generative AI Agents
- Connect Snowflake Cortex
- Third-party agent observability (Frontier)
- Troubleshoot connected platforms
- Choose an Agent 365 integration option
- Data handling, data residency, and compliance in Agent 365 observability