Note
Access to this page requires authorization. You can try signing in or changing directories.
Access to this page requires authorization. You can try changing directories.
In this exercise, you'll automate the process of creating a Microsoft Teams meeting link and passing to the ACS by using Azure Functions and Microsoft Graph.
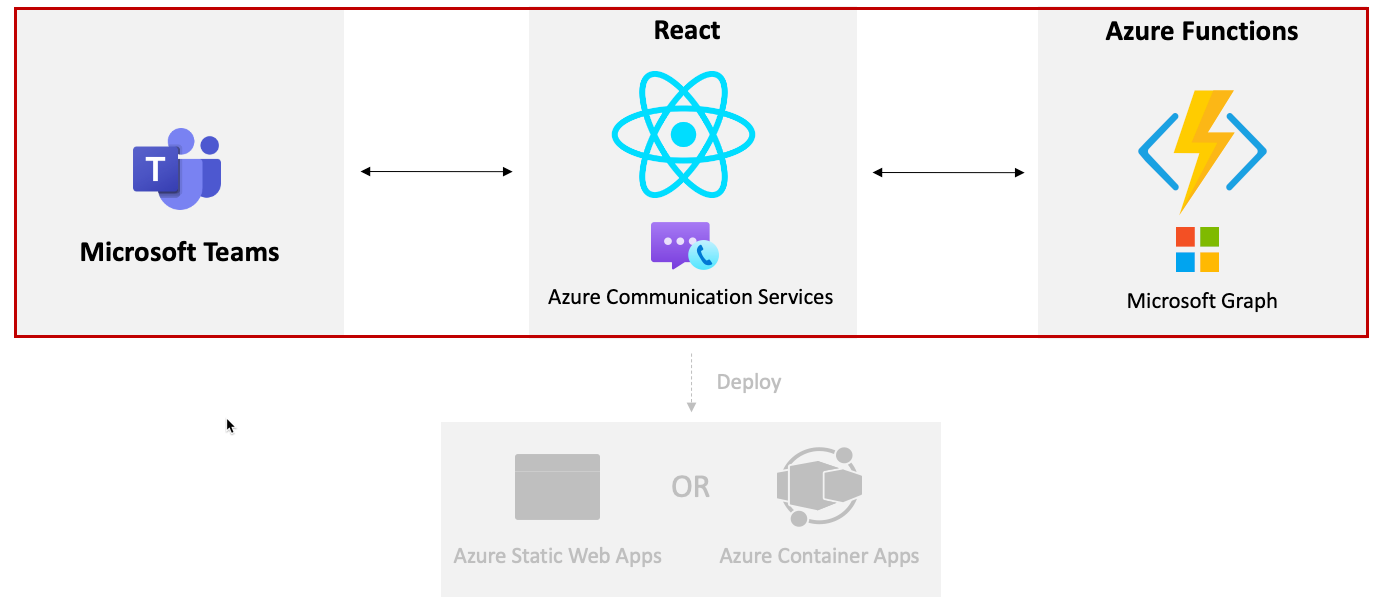
You'll need to create a Microsoft Entra ID app for Daemon app authentication. In this step, authentication will be handled in the background with app credentials, and a Microsoft Entra ID app will use Application Permissions to make Microsoft Graph API calls. Microsoft Graph will be used to dynamically create a Microsoft Teams meeting and return the Teams meeting URL.
Perform the following steps to create a Microsoft Entra ID app:
- Go to Azure portal and select Microsoft Entra ID.
- Select the App registration tab followed by + New registration.
- Fill in the new app registration form details as shown below and select Register:
- Name: ACS Teams Interop App
- Supported account types: Accounts in any organizational directory (Any Microsoft Entra ID directory - Multitenant) and personal Microsoft accounts (e.g. Skype, Xbox)
- Redirect URI: leave this blank
- After the app is registered, go to API permissions and select + Add a permission.
- Select Microsoft Graph followed by Application permissions.
- Select the
Calendars.ReadWritepermission and then select Add. - After adding the permissions, select Grant admin consent for <YOUR_ORGANIZATION_NAME>.
- Go to the Certificates & secrets tab, select + New client secret, and then select Add.
- Copy the value of the secret into a local file. You'll use the value later in this exercise.
- Go to the Overview tab and copy the
Application (client) IDandDirectory (tenant) IDvalues into the same local file that you used in the previous step.
Creating a local.settings.json File
Open the
samples/acs-to-teams-meeting/server/csharp/GraphACSFunctions.slnin Visual Studio or open the GraphACSFunctions folder in Visual Studio Code.Go to the
GraphACSFunctionsproject and create alocal.settings.jsonfile with the following values:{ "IsEncrypted": false, "Values": { "FUNCTIONS_WORKER_RUNTIME": "dotnet-isolated", "TENANT_ID": "", "CLIENT_ID": "", "CLIENT_SECRET": "", "USER_ID": "", "ACS_CONNECTION_STRING": "" }, "Host": { "LocalHttpPort": 7071, "CORS": "*", "CORSCredentials": false }, "watchDirectories": [ "Shared" ] }- Use the values you copied into the local file in an earlier exercise to update the
TENANT_ID,CLIENT_IDandCLIENT_SECRETvalues. - Define
USER_IDwith the user id that you'd like to create a Microsoft Teams Meeting.
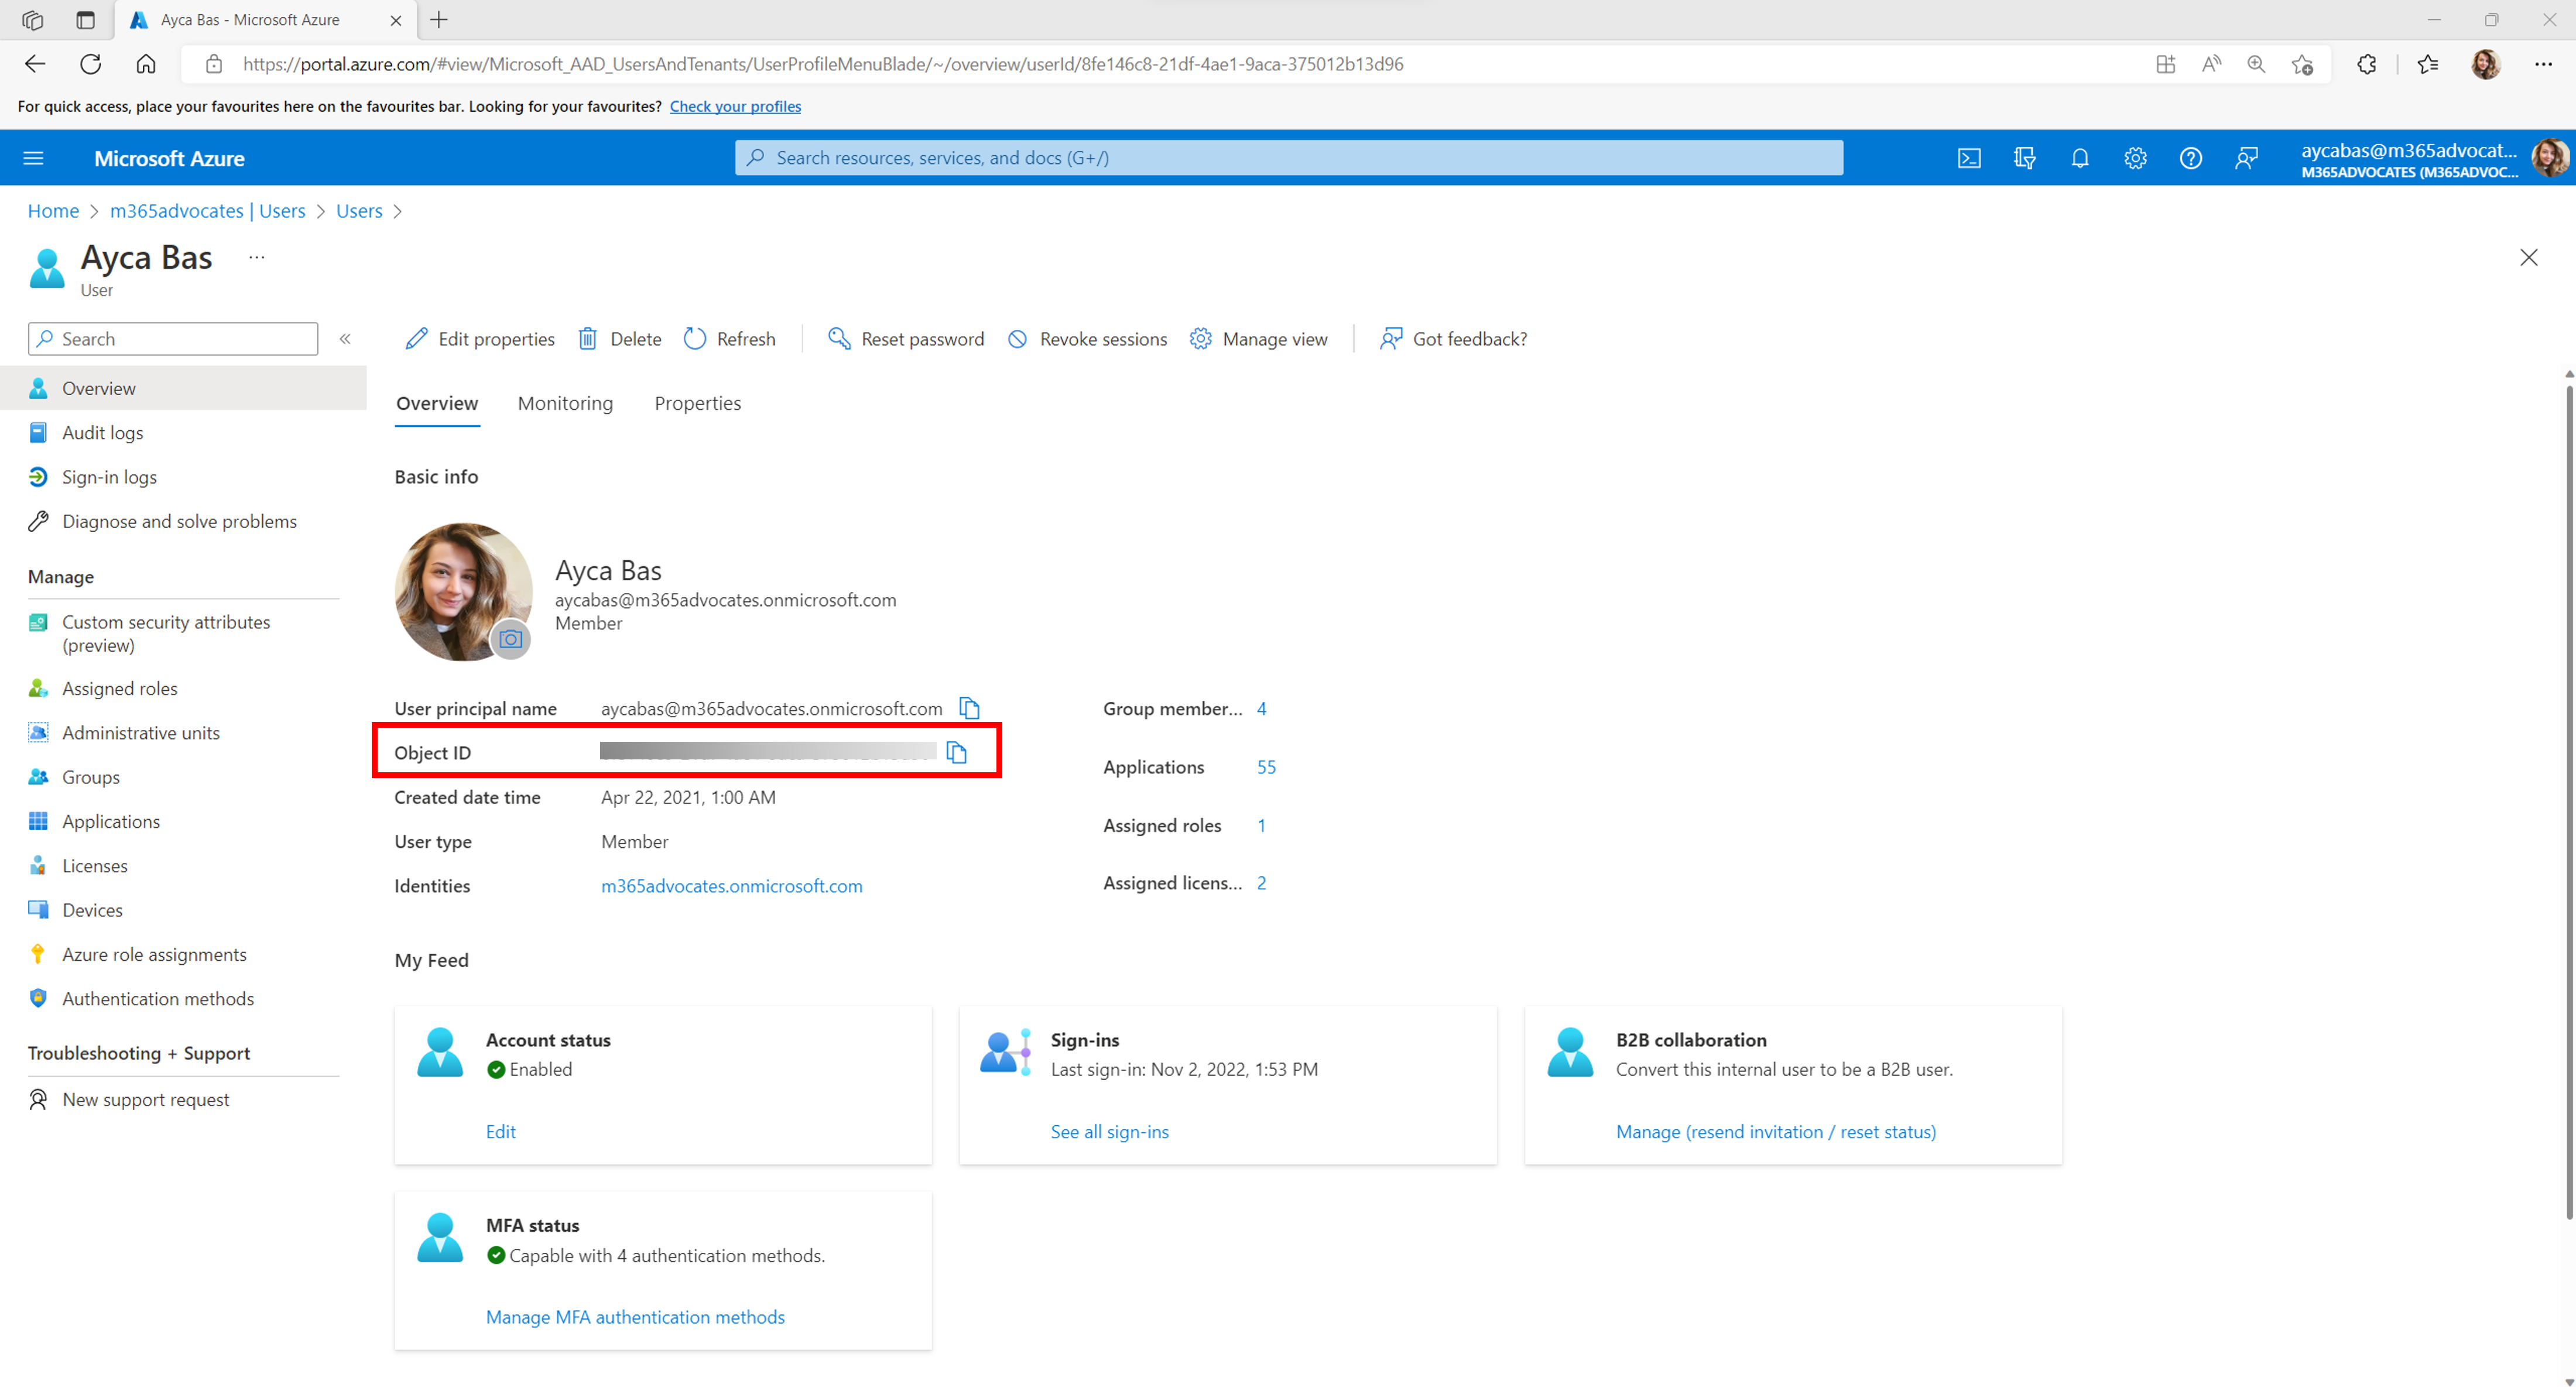
You can get the User ID from the Azure portal.
- Login using your Microsoft 365 developer tenant admin account.
- Select Microsoft Entra ID
- Navigate to the Users tab on the side bar.
- Search for your user name and select it to see the user details.
- Inside the user details,
Object IDrepresents theUser ID. Copy theObject IDvalue and use it for theUSER_IDvalue in local.settings.json.
Note
ACS_CONNECTION_STRINGwill be used in the next exercise so you don't need to update it yet.- Use the values you copied into the local file in an earlier exercise to update the
Open
GraphACSFunctions.slnlocated in the acs-to-teams-meeting/server/csharp folder and note that it includes the following Microsoft Graph and Identity packages:<PackageReference Include="Azure.Communication.Identity" Version="1.3.1" /> <PackageReference Include="Azure.Identity" Version="1.11.2" /> <PackageReference Include="Microsoft.Graph" Version="5.51.0" />Go to Program.cs and note the following code in the
ConfigureServicesmethod:var host = new HostBuilder() .ConfigureFunctionsWebApplication() .ConfigureServices(services => { services.AddApplicationInsightsTelemetryWorkerService(); services.ConfigureFunctionsApplicationInsights(); services.AddSingleton(static p => { var config = p.GetRequiredService<IConfiguration>(); var clientSecretCredential = new ClientSecretCredential( config.GetValue<string>("TENANT_ID"), config.GetValue<string>("CLIENT_ID"), config.GetValue<string>("CLIENT_SECRET") ); return new GraphServiceClient( clientSecretCredential, ["https://graph.microsoft.com/.default"] ); }); ... services.AddSingleton<IGraphService, GraphService>(); }) .Build(); }- This code creates a
GraphServiceClientobject that can be used to call Microsoft Graph from Azure Functions. It's a singleton and can be injected into other classes. - You can make Microsoft Graph API calls with app-only permissions (such as Calendars.ReadWrite) by passing a
ClientSecretCredentialvalue to theGraphServiceClientconstructor. TheClientSecretCredentialuses theTenant Id,Client IdandClient Secretvalues from the Microsoft Entra ID app.
- This code creates a
Open Services/GraphService.cs.
Take a moment to explore the
CreateMeetingEventAsyncmethod:using System; using System.Threading.Tasks; using Microsoft.Graph; using Microsoft.Extensions.Configuration; namespace GraphACSFunctions.Services; public class GraphService : IGraphService { private readonly GraphServiceClient _graphServiceClient; private readonly IConfiguration _configuration; public GraphService(GraphServiceClient graphServiceClient, IConfiguration configuration) { _graphServiceClient = graphServiceClient; _configuration = configuration; } public async Task<string> CreateMeetingAsync() { var userId = _configuration.GetValue<string>("USER_ID"); var newMeeting = await _graphServiceClient .Users[userId] .Calendar .Events .PostAsync(new() { Subject = "Customer Service Meeting", Start = new() { DateTime = DateTime.UtcNow.ToString("yyyy-MM-ddTHH:mm:ss"), TimeZone = "UTC" }, End = new() { DateTime = DateTime.UtcNow.AddHours(1).ToString("yyyy-MM-ddTHH:mm:ss"), TimeZone = "UTC" }, IsOnlineMeeting = true }); return newMeeting.OnlineMeeting.JoinUrl; } }GraphServiceClientandIConfigurationobjects are injected into the constructor and assigned to fields.- The
CreateMeetingAsync()function posts data to the Microsoft Graph Calendar Events API, which dynamically creates an event in a user's calendar and returns the join URL.
Open TeamsMeetingFunctions.cs and take a moment to examine it's constructor. The
GraphServiceClientyou looked at earlier is injected and assigned to the_graphServicefield.private readonly IGraphService _graphService; public TeamsMeetingFunction(IGraphService graphService) => _graphService = graphService;Locate the
Runmethod:[Function("HttpTriggerTeamsUrl")] public async Task<HttpResponseData> Run( [HttpTrigger(AuthorizationLevel.Anonymous, "get", Route = null)] HttpRequestData req, ILogger log) { var response = req.CreateResponse(HttpStatusCode.OK); await response.WriteStringAsync(await _graphService.CreateMeetingAsync()); return response; }- It defines a function name of
HttpTriggerTeamsUrlthat can be called with an HTTP GET request. - It calls
_graphService.CreateMeetingAsync(), which creates a new event and returns the join URL.
- It defines a function name of
Run the program by pressing F5 in Visual Studio or by selecting Debug --> Start Debugging from the menu. This action starts the Azure Functions project and make the
ACSTokenFunctionavailable to call.
Note
If you're using VS Code you can open a terminal window in the GraphACSFunctions folder and run func start. This assumes that you have the Azure Functions Core Tools installed on your machine.
Calling the Azure Function from React
Now that the
httpTriggerTeamsUrlfunction is ready to use, let's call it from the React app.Expand the client/react folder.
Add an .env file into the folder with the following values:
REACT_APP_TEAMS_MEETING_FUNCTION=http://localhost:7071/api/httpTriggerTeamsUrl
REACT_APP_ACS_USER_FUNCTION=http://localhost:7071/api/httpTriggerAcsToken
These values will be passed into React as it builds so that you can easily change them as needed during the build process.
Open client/react/App.tsx file in VS Code.
Locate the
teamsMeetingLinkstate variable in the component. Remove the hardcoded teams link and replace it with empty quotes:const [teamsMeetingLink, setTeamsMeetingLink] = useState<string>('');Locate the
useEffectfunction and change it to look like the following. This handles calling the Azure Function you looked at earlier which creates a Teams meeting and returns the meeting join link:useEffect(() => { const init = async () => { /* Commenting out for now setMessage('Getting ACS user'); //Call Azure Function to get the ACS user identity and token const res = await fetch(process.env.REACT_APP_ACS_USER_FUNCTION as string); const user = await res.json(); setUserId(user.userId); setToken(user.token); */ setMessage('Getting Teams meeting link...'); //Call Azure Function to get the meeting link const resTeams = await fetch(process.env.REACT_APP_TEAMS_MEETING_FUNCTION as string); const link = await resTeams.text(); setTeamsMeetingLink(link); setMessage(''); console.log('Teams meeting link', link); } init(); }, []);Save the file before continuing.
Open a terminal window,
cdinto the *react folder, and runnpm startto build and run the application.After the application builds and loads, you should see the ACS calling UI displayed and can then call into the Teams meeting that was dynamically created by Microsoft Graph.
Stop the terminal process by entering Ctrl + C in the terminal window.
Stop the Azure Functions project.
Next Step
Note
Visit the Azure Communication Services documentation to learn more about extending Microsoft Teams meetings in other ways.