Note
Access to this page requires authorization. You can try signing in or changing directories.
Access to this page requires authorization. You can try changing directories.
You can customize the CRM data that appears in Service in Microsoft 365 Copilot to give your customer service representatives a streamlined experience.
The customization of CRM forms and fields is environment specific. When you customize your record types, the changes affect the Service pane across Outlook and Teams. You can also link Outlook activities, such as emails and meetings, to the records of the added record types when you save them from Service to your CRM system.
Important
The term record type used in this article refers to a Salesforce object in Service in Microsoft 365 Copilot. The term displayed on the UI depends on the CRM system you're connected to. If you're connected to Dynamics 365, you see record type. If you're connected to Salesforce, you see object.
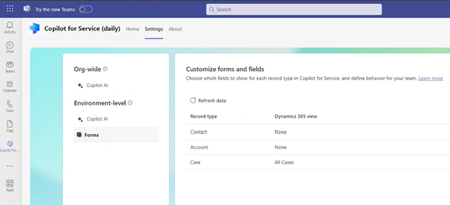
Customization options
To customize the forms and fields, select Forms in the Teams admin settings. You can do these actions:
Add a record type.
View and manage the default record types—Contact, Case, and Account.
Change the order in which record types are displayed. You see the record types based on the order they're added to Service. To change the order, remove and add the record types in the required order. The default is contact, case, and account.
Hover over the record type to delete the record.
Refresh data to get the latest changes from CRM in Service.

Add new record type
You can add up to 10 new custom or out-of-the-box record types to Service. For example, you can add a custom record type called "Customers" to track customers. Depending on the CRM you're using, you see record type or object.
To add a new record type, follow these steps:
In Forms, select Add a record type or Add an object.
In the Add a record type or Add an object window, select a record type to add, and then select Next. The following points are applicable:
- You can see only those record types that are related to an existing record type. Contact, account, and case record types are available by default. You can add other out-of-the-box and custom record types that are related to these record types.
- You can add one record type only at a time.
- You see the logical names of record types and fields.
In Select the relationship for (record type), select how the new record type relates to the existing record types or fields in Service, and then select Next. Remember these points:
- 1:N and N:1 relationships only are supported.
- You see the logical names of record types and fields
- If the new record type relates to one record type or field only, the relationship is set automatically.
In the Select the view for (record type) window, select how you want to display a list of records for the new record type, and then select Add.
Note
- You can see all public and personal views in the list.
- For Dynamics 365, the Service solution includes the fields that belong to the new record type only and not to any related record types.
Publish the changes.
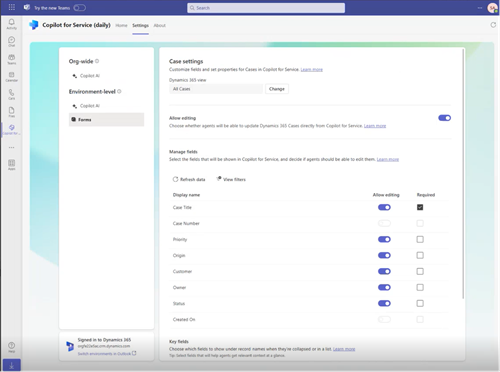
Manage record types
When you select a record type in Form, you can do the following actions:
Change views: Service forms and lists are based on CRM views. When you change the view for a record type, the following actions occur:
- The existing key fields are replaced with new defaults.
- The edit behavior for the record type stays the same.
- The edit behavior for the fields is reset. If the record type is editable, and you select a new view, the fields become editable too.
You don't have to select a view for Account and Case record types. For other record types, you must select a view.
Note
You can't select a view for the Contact record type.
Enable editing: This option lets representatives make changes to the fields in the record and save them to the CRM. By default, contacts are editable. For other record types, you must turn on this option.
Add, remove, or reorder fields: If a record type isn't based on a CRM view, you can choose the fields and the order in which they appear in the form. You can add up to 40 out-of-the-box and custom fields. Do these actions:
- To add a field, select Add fields in Manage fields section.
- To reorder or remove a field, hover over it and select an option.
Note
If you connected Service in Microsoft 365 Copilot to Salesforce, add the fields that all users of Service have access to. If a user doesn't have access to some of the added fields, they can't see the CRM record.
View filters: Select View filters to see the source query that filters records in a view. For example, you can see the source query for the view that shows only active accounts. You can also copy the query XML.
Specify required fields: Select the fields in Manage fields section that representatives must fill in. If a field is marked as Required in the CRM, you can't make it optional in the Service solution.
Key fields: Select two fields that show when a record is collapsed or displayed in a list view. You can select fields that are available in the detailed view only. Make sure that the fields you select are also in the quick find view of the record type because the search behavior depends on the view configuration.
Add contact: In the Contacts record type, select Allow new contacts to be created directly for Service to let representatives save email addresses to the CRM.

Related information
Roles and privileges required to Service in Microsoft 365 Copilot
Delete Service in Microsoft 365 Copilot