Note
Access to this page requires authorization. You can try signing in or changing directories.
Access to this page requires authorization. You can try changing directories.
The Copilot Studio extension for Visual Studio Code is designed to enhance the development experience of Copilot Studio agents. It provides language support, IntelliSense code completion and suggestions, and authoring capabilities for Copilot Studio agent components.
After installation, the extension prompts you to sign in to Copilot Studio. It can then show you a list of the agents associated with your environment. Clone an agent to see its editable components, including knowledge sources, actions, topics, and triggers.
Important
The Copilot Studio extension for Visual Studio Code is a technology preview release, only available for Windows/x64 versions of Visual Studio Code.
Install the Copilot Studio extension for Visual Studio Code
Go to the Extensions panel in Visual Studio Code. Alternatively, go to the Visual Studio Marketplace.
Search for Copilot Studio.
Select Install.
Select the Copilot Studio
 icon in the primary side bar of Visual Studio Code. The extension asks for your permission to sign in.
Select Allow, and sign in with the appropriate credentials for your Copilot Studio environment.
Clone an agent
(Optional) Open the desired agent in Copilot Studio and copy its URL from your browser's address bar.
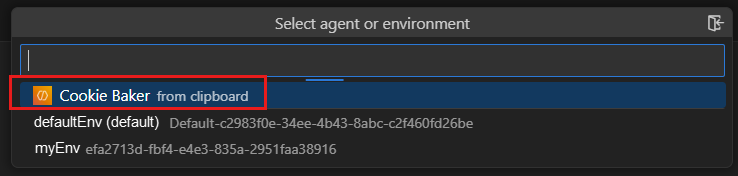
In the Copilot Studio panel of Visual Studio Code, select Clone agent.
Select your agent (marked with from clipboard if you already copied the URL); otherwise, select the desired environment and then select the desired agent.
The extension prompts you to select a folder to hold your agent's files (similar to a local repository).
Select the desired folder.
Edit your agent
To edit any component, open the corresponding file and make the desired changes. Since Visual Studio Code natively supports YAML files, the Copilot Studio extension supports IntelliSense code completion and guided tips.

Sync your changes
The Copilot Studio extension uses the same source control features as Visual Studio Code. Fetch changes, Pull changes, and Push changes icons are available in both the Explorer panel and the Source Control panel of Visual Studio Code.
- To preview any remote changes from Copilot Studio, use Fetch changes.
- To get all remote changes from Copilot Studio, use Pull changes.
- To push your local changes from Visual Studio Code to Copilot Studio, use Push changes.
When you push changes, they're saved directly to Copilot Studio. This behavior is different than having a local instance of the agent, which you would then deploy to Copilot Studio. The extension provides a live editing experience of a cloud resource.
Connect to another Copilot Studio account
In the Copilot Studio panel of Visual Studio Code, select Clone agent. The environment selector shows all the environments for the account you're already signed in to.
Select the Switch account
 icon. The extension asks for your permission to sign in.
Select Allow. The extension shows the accounts you already used.
- If the desired account appears in the list, select it.
- Otherwise, select Sign in to another account, and sign in with the appropriate credentials.
Now you can clone the desired agent.