Note
Access to this page requires authorization. You can try signing in or changing directories.
Access to this page requires authorization. You can try changing directories.
Note
Features in this article are used by agents or workflows powered by the GitHub Copilot harness.
Usage-based billing applies to using, building, testing, and evaluating agents. These actions might consume Copilot Credits. Learn more in Manage costs for agents powered by the GitHub Copilot harness.
The extract node processes documents and returns the values and tables that you define. It supports many document types, including invoices, contracts, reports, receipts, bank statements, and financial statements, across file formats such as PDF, Word, Excel, and PowerPoint. The extracted information becomes dynamic content that later workflow steps can use.
The extract node provides a document-focused authoring experience with easy configuration, inline testing, and AI-tailored tools. You can define an extraction schema from a sample document, a template, or fields that you add manually.
Use the extract node when a workflow needs to turn documents into a predictable structure before it creates a record, sends a message, makes a decision, or calls another action.
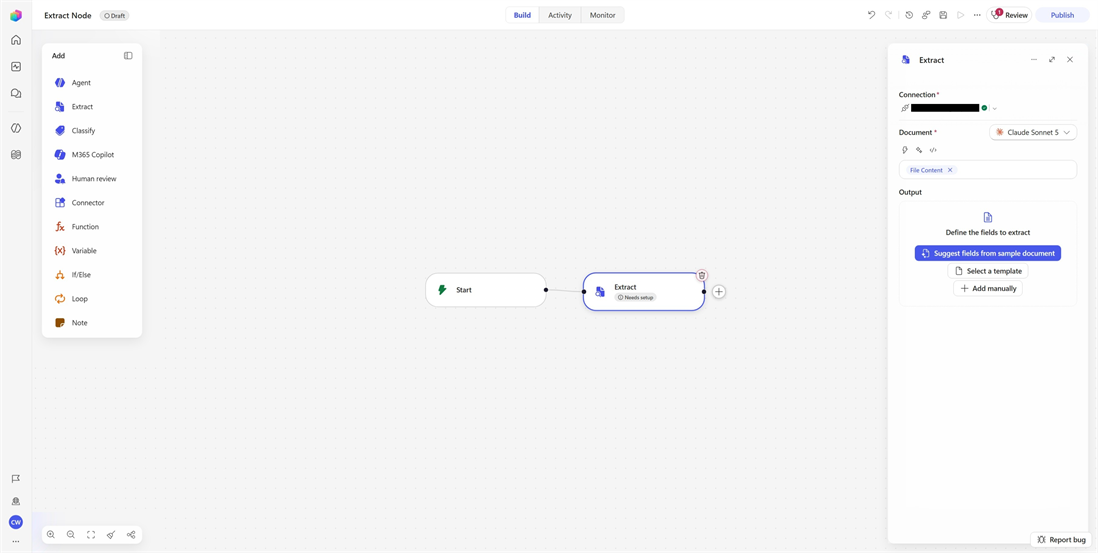
By using the extract node, you can:
- Extract named values and tables from documents.
- Create fields from a representative sample document.
- Start with a template for a common document type.
- Test an extract node with an uploaded test document.
- Preview the document within the node.
Add an extract node
In Copilot Studio, go to Flows and open an existing workflow, or create a new one.
- New workflow: You land on the designer to configure a trigger.
- Existing workflow: Open the workflow and go to the Build tab.
Select the Extract icon on the Add panel.
The configuration panel opens for the extract node.
Provide the input to extract
In the document field, enter the document that you want to process. Use the dynamic content picker to select a file or file content from an earlier trigger, action, or workflow node.
For example, in a workflow that triggers when an email arrives with an attachment, set the input to the attachment's file content. In a manually triggered workflow, use the trigger's file content.
Choose the model
Use the model dropdown in the Document field to select the model that powers extraction. Consider the tradeoff between capability and speed:
- Select a more capable model when documents are long, contain complex tables, or have ambiguous values.
- Select a faster model when documents have a consistent format and the workflow runs at high volume.
Test the selected model with representative documents before publishing the workflow.
Extract from a sample document
Use a sample document when you want the extract node to propose fields and tables based on the document's content.
- In the extract node, select Suggest fields from a sample document.
- Upload a representative document.
- Wait for the node to analyze the document and suggest fields.
- Review the suggested field names, descriptions, types, and tables.
- Add, remove, rename, or edit fields as needed.
Select a template
Use a template when your document follows a common business format and you want to begin with predefined fields.
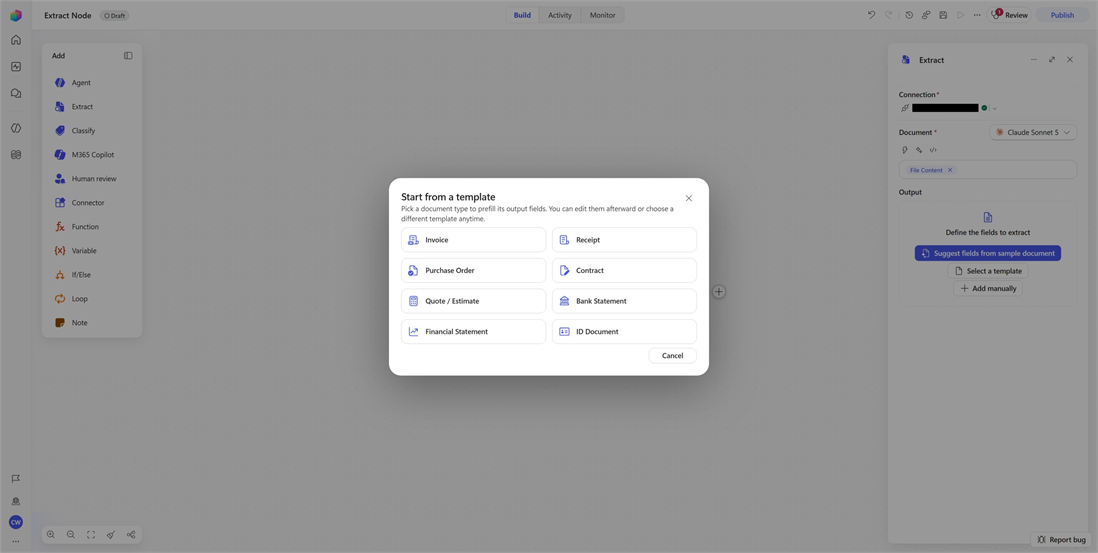
- In the extract node, select Select a template.
- Select the template that best matches your document type.
- Review the suggested field names, descriptions, types, and tables.
- Add, remove, rename, or edit fields as needed.
Add fields manually
Use manual configuration when you know exactly which information the workflow needs, or when a sample document or template doesn't match your scenario.
- In the extract node, select Add manually.
- Enter a clear, unique Name. The name becomes the dynamic-content token that later steps use.
- Select a type that matches the value or table you need to extract.
- Optionally, add a Description that explains the information to identify in the document.
- Repeat for each field or table that the node should return.
Use a List field type for repeating information, such as invoice line items, products, or attendees.
For example, an invoice extraction schema might include invoiceNumber, vendorName, invoiceDate, totalAmount, and a lineItems list.
Use extracted values in your workflow
When the extract node runs, each field that you configure becomes dynamic content that you can use in subsequent steps.
- Select the action where you want to use an extracted value.
- Open the dynamic content picker in the field that you want to fill.
- Select the field from the Extract step.
Test an extract node
After you add a valid output field, the Test pane appears. Use the Test pane in the agent's side panel to run the extract node and inspect its output.
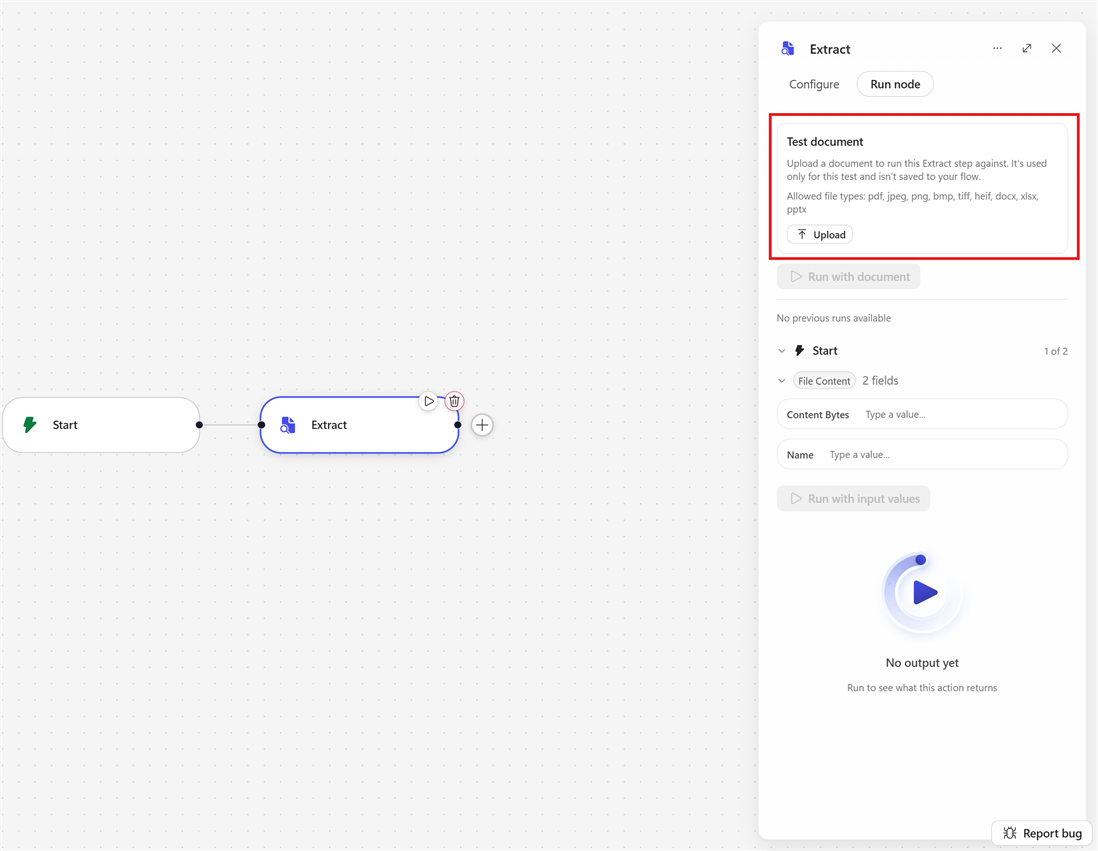
Select the node to open its property side panel.
Add at least one valid field to enable the panes.
Select the Test tab.
Upload a test document, enter inputs manually, or use inputs from a previous workflow run.
Select Run test.
The test run executes the node by using an uploaded test document or previously used workflow run document to display the generated output. Testing helps verify that the extract node runs successfully and produces the type of response you expect. After generating a test result, assess the quality of that response and determine how well it meets your expectations and requirements.
Automation scenarios
The extract node works best as a transformation step: an earlier step provides a document, the extract node turns it into named values, and later steps act on those values.
Process invoices
A workflow receives an invoice through a file upload, shared mailbox, or SharePoint folder. The extract node returns the invoice number, vendor details, dates, total amount, tax information, and line items.
A later action creates a Dataverse record, routes the invoice for approval, or sends a notification when the total exceeds a threshold.
Process email attachments
A workflow triggers when an email arrives with a document attachment. The extract node retrieves customer or account information from the attachment, and later steps create or update records in a business system.
Route documents for review
A workflow receives a contract or report from SharePoint. The extract node identifies key details, such as a contract date, party name, or amount. A condition routes the document to the appropriate approver and updates its metadata.
Extract information from reports
A workflow receives recurring reports in a consistent format. The extract node returns the values needed for downstream actions, such as creating tasks, updating records, or sending a summary to a Teams channel.
Frequently asked questions
When should I use the extract node instead of an agent node?
Use the extract node for document-focused extraction into a defined structure. Use an agent node when the workflow needs broader reasoning, tools, knowledge, or multistep task execution.
Can I edit fields generated from a sample document or template?
Yes. You can add, remove, rename, and refine fields and tables before saving the extract node configuration.
Can I extract repeating data?
Yes. Use a table field for repeating information, such as invoice line items, products, or other rows in a document.
Does the extract node replace the agent node?
No. The extract node is a specialized document-processing experience built on the agent node foundation. Use the extract node when your primary goal is structured document extraction.