Note
Access to this page requires authorization. You can try signing in or changing directories.
Access to this page requires authorization. You can try changing directories.
This sample uses JavaScript code to insert the stars.jpeg image at the top of the current webpage, inside the <body> element. The extension's pop-up contains a title and an HTML button that's labelled Insert picture. When you click the Insert picture button, the extension's JavaScript code sends a message from the extension icon's pop-up, and dynamically inserts JavaScript that runs in the browser tab.
This sample demonstrates the following extension features:
- Injecting JavaScript libraries into an extension.
- Exposing extension assets to browser tabs.
- Including content webpages in existing browser tabs.
- Having content webpages listen for messages from pop-ups and respond.
Preview of the sample
You'll install the extension sample by using the browser's Manage Extensions tab, click the Extensions (![]() ) button to show the list of installed extensions, and then click this sample extension:
) button to show the list of installed extensions, and then click this sample extension:

The extension displays a small HTML webpage in a pop-up, containing a title, an Insert picture button, and instructions:

When you click the Insert picture button, JavaScript code temporarily inserts stars.jpeg at the top of the current webpage, pushing down the content of the webpage to below the image. The injected content sets the image element to display the static image stars.jpeg in the top of the current webpage:
When you click the image, the injected JavaScript removes the image from the DOM tree and webpage.
Obtain, install, and run the sample as follows.
Clone the MicrosoftEdge-Extensions repo
You can use various tools to clone a GitHub repo. You can download a selected directory, or clone the entire repo.
Clone the MicrosoftEdge-Extensions repo to your local drive, and then switch to a working branch, as follows.
In a command prompt, enter
gitto check whether git is installed.If not done yet, download git and install it.
If not done yet, start a command prompt where git is installed.
Change to the directory where you want to clone the MicrosoftEdge-Extensions repo to. For example:
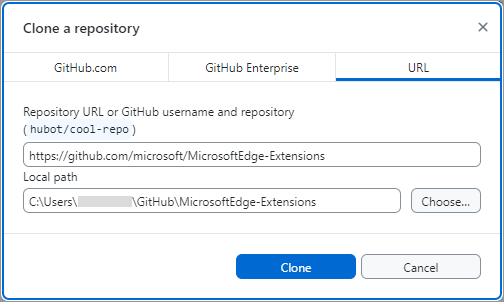
cd C:/Users/localAccount/GitHub/In Microsoft Edge, go to the MicrosoftEdge-Extensions repo.
Click the down-arrow on the right side of the green Code button, and then in the Clone using the web URL section, click the Copy url to clipboard button next to
https://github.com/microsoft/MicrosoftEdge-Extensions.git.In the command prompt window, enter the command:
git clone https://github.com/microsoft/MicrosoftEdge-Extensions.gitThe
/MicrosoftEdge-Extensions/directory is added within the directory that you specified.
Create a working branch and switch to it
Check the list of directories:
lsThe
/MicrosoftEdge-Extensions/directory is listed.Switch to the new directory:
cd MicrosoftEdge-ExtensionsCreate a working branch:
git branch testSwitch to the working branch:
git switch testReturns:
Switched to branch 'test'
You are now free to modify the code in your working branch, without altering the code that's in the "main" branch of the repo. Later you might want to switch back to the "main" branch, or create a different branch based off the "main" branch.
Install the sample locally
Instead of installing the sample from Microsoft Edge Add-ons, you'll install the sample locally, so that you can possibly modify it and quickly test the changes. Installing locally is sometimes called sideloading an extension.
In Microsoft Edge, click the Extensions (
 ) button, next to the Address bar, if this icon is displayed. Or, select Settings and more (
 ) > Extensions. The Extensions pop-up opens:
Click Manage extensions. The Extensions management page opens in a new tab:

Turn on the Developer mode toggle.
When installing the sample extension for the first time, click the Load unpacked (
 ) button. The Select the extension directory dialog opens.
Select the directory that contains the extension's source files, such as
manifest.json.Example path:
C:\Users\localAccount\GitHub\MicrosoftEdge-Extensions\Extension-samples\picture-inserter-content-scriptClick the Select Folder button.
The Select the extension directory dialog closes.
The extension is installed in the browser, similar to an extension that's installed from Microsoft Edge Add-ons:

Run the sample
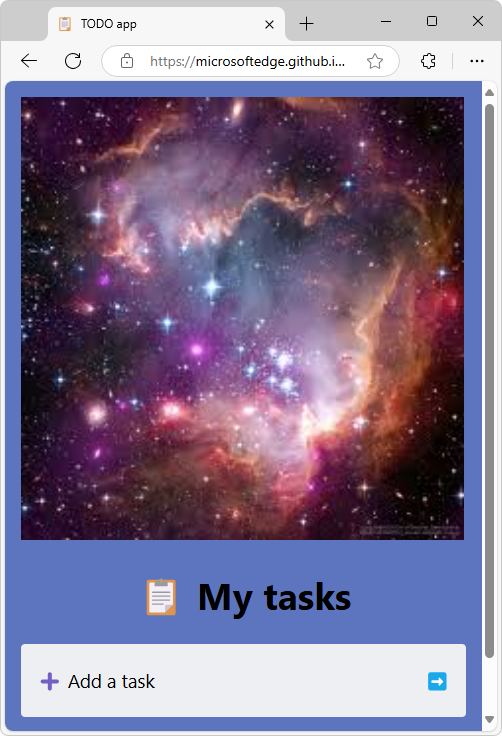
Go to a webpage, such as TODO app, in a new window or tab. The tab must not be empty, and must not be the Manage Extensions page, because this sample inserts content into the current webpage.
Refresh the webpage. This is sometimes required after reloading an extension.
In Microsoft Edge to the right of the Address bar, if this icon is displayed, click the Extensions (
) button. Or, select Settings and more () > Extensions.The Extensions pop-up opens:
Click the extension's icon or name (Picture inserter using content script).
The extension opens, and the extension's icon is added next to the Address bar and Extensions (
) icon.A pop-up opens, containing a small HTML webpage with a title, an Insert picture button, and instructions:
Click the Insert picture button.
stars.jpegis inserted into the top of the current webpage in the current tab, pushing the webpage's content down below the image:Click the
stars.jpegimage that's filling the top of the webpage. That image element is removed from the DOM tree and webpage, and the current webpage is restored, shifting its content back up to the top of the tab.
The extension sends a message from the extension icon's pop-up, and dynamically inserts JavaScript running as content in the browser tab. The injected content sets the image element to display stars.jpeg in the top of the current webpage, and then removes the image when you click the image.
See also:
Study the sample
In the following sections, you study the sample. After that, to develop your own Microsoft Edge extension, you can copy and modify the sample's directory, and install and test the resulting extension.
Files and directories
The sample has the following directory structure and files.
Example path for the sample:
C:\Users\localAccount\GitHub\MicrosoftEdge-Extensions\Extension-samples\picture-inserter-content-script
Directories and files in the /picture-inserter-content-script/ directory:
/content-scripts/
   content.js
/icons/
   extension-icon16x16.png
   extension-icon32x32.png
   extension-icon48x48.png
   extension-icon128x128.png
/images/
   stars.jpeg
/popup/
   popup.html
   popup.js
manifest.json
- The
/content-scripts/directory containscontent.js, which is the script that's injected into the current webpage. - The
/icons/directory contains versions of a.pngfile that's used to represent the extension near the browser's Address bar, in the Extensions pop-up, and in the Extensions management page. - The
/images/directory containsstars.jpeg, which is displayed in the extension's pop-up. - The
/popup/directory contains the files:popup.htmldefines the content in the extension's initial pop-up webpage (a title, button, and instructions).popup.jsfor the initial pop-up webpage sends a message to the content script (content.js) that's running on the tab page, specifying which image file to display.
manifest.jsoncontains basic information about the extension.
Strategy to update the webpage to insert the image at the top (stars.jpeg)
This sample includes a content script that's injected into the webpage that's loaded in the current browser tab.
When you run the extension sample, the initial pop-up HTML page is displayed (
popup.html), showing a title, instructions, and the Insert picture button.When you click the Insert picture button, the JavaScript (
popup.js) for the initial pop-up page sends a message to the content script (content.js) that's running on the tab page. The message specifies which image file to display.The content script (
content.js) running on the tab page receives the message, and displays the specified image file (stars.jpeg).
The initial pop-up webpage (popup.html)
/popup/popup.html is specified in the manifest file as the webpage to display in the extension's initial pop-up. The manifest file contains the key field "default_popup": "popup/popup.html". This sample's popup.html file is a small webpage that contains a title, an Insert picture button, and instructions.
popup.html:
<!DOCTYPE html>
<html>
    <head>
        <meta charset="utf-8" />
        <style>
            body {
                width: 500px;
            }
            button {
                background-color: #336dab;
                border: none;
                color: white;
                padding: 15px 32px;
                text-align: center;
                font-size: 16px;
            }
        </style>
    </head>
    <body>
        <h1>Picture inserter using a content script</h1>
        <button id="sendmessageid">Insert picture</button>
        <script src="popup.js"></script>
        <p>Click the displayed image to remove it from the webpage.</p>
    </body>
</html>
JavaScript (popup.js) for the initial pop-up page, to send a message to the injected JavaScript
/popup/popup.js sends a message to the content script (content.js) that's temporarily injected into the browser tab. To do that, popup.js adds an onclick event to the pop-up webpage's Insert picture button, which has the ID sendmessageid:
popup.js (portion):
const sendMessageId = document.getElementById("sendmessageid");
if (sendMessageId) {
    sendMessageId.onclick = function() {
        ...
    };
}
In popup.js, chrome.tabs.query finds the current browser tab, and then chrome.tabs.sendMessage sends a message to that tab. The sample passes in the current tab's ID. The message must include the URL for the image that will be displayed.
You must send a unique ID to assign to the inserted image, in order to find the image element again later and delete it. To send a unique ID to assign to the inserted image, the unique ID is generated in popup.js and passed to the content script.
popup.js (complete):
const sendMessageId = document.getElementById("sendmessageid");
if (sendMessageId) {
    sendMessageId.onclick = function() {
        chrome.tabs.query({ active: true, currentWindow: true }, function(tabs) {
            chrome.tabs.sendMessage(
                tabs[0].id,
                {
                    url: chrome.runtime.getURL("images/stars.jpeg"),
                    imageDivId: crypto.randomUUID(),
                    tabId: tabs[0].id
                },
                function(response) {
                    window.close();
                }
            );
        });
    };
}
The content script message listener (content.js)
Here's the content-scripts\content.js file that gets injected into every browser tab page. This file is listed in the content-scripts section in manifest.json.
content.js (complete):
chrome.runtime.onMessage.addListener(function(request, sender, sendResponse) {
  const img = document.createElement("img");
  img.id = request.imageDivId;
  img.src = request.url;
  img.style = "height: auto; width: 90vw;";
  document.body.prepend(img);

  img.addEventListener("click", () => {
      img.remove();
  }, { once: true });

  sendResponse({ fromcontent: "This message is from content.js" });
});
content.js registers a listener by using the chrome.runtime.onMessage.addListener Extension API method. This listener waits for the message that's sent when popup.js calls chrome.tabs.sendMessage.
In content.js, the addListener method takes a single parameter that's a function. That function's first parameter, request, contains the details of the message that's being passed in.
In content.js, when an event is processed by the listener, the listener function that's passed into addListener is run. The first parameter of the passed-in listener function is a request object that has attributes as assigned by sendMessage.
In popup.js, for the chrome.tabs.sendMessage method call, the attributes of the second parameter for sendMessage are url, imageDivId, and tabId.
Here's the isolated listener function that's passed into addListener:
content.js (portion)
function(request, sender, sendResponse) {
  const img = document.createElement("img");
  img.id = request.imageDivId;
  img.src = request.url;
  img.style = "height: auto; width: 90vw;";
  document.body.prepend(img);

  img.addEventListener("click", () => {
      img.remove();
  }, { once: true });

  sendResponse({ fromcontent: "This message is from content.js" });
}
The first five lines in the listener function append an img element immediately below the body element in the browser tab.
The second line in the listener function, img.id = request.imageDivId;, sets the ID of the img element to the imageDivId of the passed-in request.
In the listener function, the addEventListener call adds a click event listener function that covers the entire image, allowing the user to click anywhere on the image. When you click the inserted image, the image is removed from the current webpage by the line img.remove();, and the event listener is also removed, by specifying { once: true }.
How stars.jpeg is made available from any browser tab
To make images/stars.jpeg available from any browser tab:
popup.js(above) uses thechrome.runtime.getURLAPI.- The manifest (below) specifies that
web_accessible_resourcesof type.jpegmatch all URLs.
The sample injects the image by using the src attribute of the img element into the content page. The content page is running on a unique thread that isn't the same as the thread running the extension. The static image file must be exposed as a web asset, for it to work correctly.
Another entry is added in the manifest.json file to declare that the image is available to all browser tabs:
/manifest.json (portion):
"web_accessible_resources": [
    {
      "resources": ["images/*.jpeg"],
      "matches": ["<all_urls>"]
    }
  ]
The code in the popup.js file sends a message to the content page that's embedded in the current active tab page.
How resources are listed in the manifest (manifest.json)
The sample creates and inject the content page that's embedded on the current active tab page. manifest.json includes the content-scripts and web_accessible_resources, as follows:
/manifest.json (complete):
{
    "name": "Picture inserter using content script",
    "version": "0.0.0.1",
    "manifest_version": 3,
    "description": "A browser extension that uses JavaScript to insert an image at the top of the current webpage.",
    "icons": {
        "16": "icons/extension-icon16x16.png",
        "32": "icons/extension-icon32x32.png",
        "48": "icons/extension-icon48x48.png",
        "128": "icons/extension-icon128x128.png"
    },
    "action": {
        "default_popup": "popup/popup.html"
    },
    "content_scripts": [
        {
            "matches": [
              "<all_urls>"
            ],
            "js": ["content-scripts/content.js"]
        }
    ],
    "web_accessible_resources": [
        {
            "resources": ["images/*.jpeg"],
            "matches": ["<all_urls>"]
        }
    ]
}
The manifest's content_scripts section injects JavaScript into all browser tabs
In the content_scripts key section of the manifest file, the matches attribute is set to <all_urls>, which means that .js (or .css) files that are specified in the content_scripts key section are injected into all browser tab pages when each tab is loaded. The allowed files types that can be injected are JavaScript (.js) and CSS (.css).
This sample's manifest specifies a single content script, content-scripts/content.js.
Each content script runs in its own thread, sandboxed
Each tab page (and extension) runs in its own thread. Even if the browser tab contains a webpage that runs JavaScript code, the content.js script that's injected in that browser tab by the extension doesn't have access to that JavaScript code. The injected content script only has access to the DOM of the webpage.
Next steps
To develop your own Microsoft Edge extension, you can copy and modify the sample's directory, and install and test the resulting extension.
See also
- Sample: Picture viewer pop-up webpage
- Sideload an extension to install and test it locally
- Samples for Microsoft Edge extensions
GitHub:
- MicrosoftEdge-Extensions repo.
- /picture-inserter-content-script/ - source code of this sample.