Events
Nov 18, 11 PM - Nov 22, 11 PM
Gain the competitive edge you need with powerful AI and Cloud solutions at Microsoft Ignite.
Register nowThis browser is no longer supported.
Upgrade to Microsoft Edge to take advantage of the latest features, security updates, and technical support.
A UWP WebView2 app is a Universal Windows Platform (UWP) app that hosts the WebView2 control. To make a UWP WebView2 app widely available, you can publish it to the Microsoft Store, by following the steps below.
For general background information about publishing to the Windows Store, see Publish Windows apps and games, at Windows App Development documentation > UWP. The steps below provide the specific details about how to publish a UWP WebView2 app.
Make sure you have a Microsoft Store account configured in Microsoft Visual Studio.
If needed, see Get registered, about developer accounts for the Microsoft Store. Then continue with the steps below.
Test for these common basic issues before submitting your app to the Microsoft Store. This will help prevent Store certification failures, which would delay your app from becoming available.
Make sure the app runs correctly on startup.
Make sure the app works correctly during shutdown sleep.
The Microsoft Store requires submitting a packaged app. Package your app as follows:
Update the package.appxmanifest with all needed content, such as Visual Assets, Packaging name, and Application information. If you don't do this, the Microsoft Store validation step will fail. Then continue with the steps below.
At Partner Center, select Project > Publish and then reserve an application name.
Associate the application with the reserved name, by selecting Project > Publish > Associate App with the Store.
Create the app package, by selecting Project > Publish > Create App Packages. Select the target configurations:
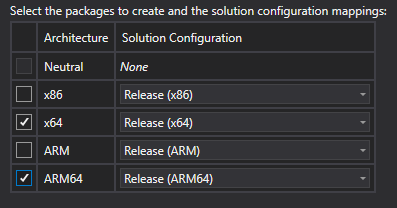
32-bit and 64-bit versions of the WebView2 Runtime will work in UWP on non-ARM platforms. 32-bit is not supported for ARM, due to dependencies on Microsoft Edge. 64-Bit is supported on ARM.
Once the app package has been created for your configurations, the Create App Packages window displays the Finished creating package dialog:
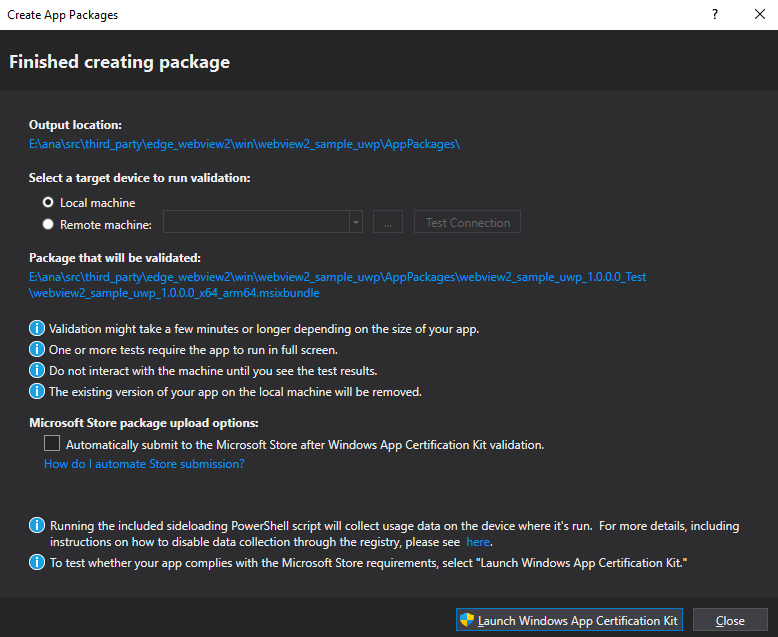
In the dialog, note where the package bundle was placed. This information is also shown in the build window.
Click the Close button.
To make sure that all required content files are present in the package, and to make sure the files have correct permissions, test your packaged app, as follows:
Use the generated app package to install the app on your machine. Look for any oddities regarding required packages and functionality.
If possible, install your app on other machines also. Look for any oddities regarding required packages and functionality.
Windows App Certification Kit (WACK) is an app that's a certification tool. This tool evaluates your host app against the Microsoft Store's requirements.
Once you're satisfied that your packaged app works, run the Windows App Certification Kit (WACK):
Generate the app package again, as above. That's the easiest way to get to the Windows App Certification Kit (WACK) process.
Once the package creation is complete, select Launch Windows App Certification Kit.
You must approve the User Access Control (UAC) dialog, for the Windows App Certification Kit (WACK) to run correctly.
Select All for the test suite, and then click Next.
After a few minutes, the Windows App Certification Kit (WACK) shows a results page. If the app failed, click the link to review the results.
The results page of the Windows App Certification Kit (WACK) app shows any tests that need to be resolved.
If your app failed the Restricted name-space check, edit the package.appxmanifest file and remove the restrictedcapabilities line and any capabilities that use rescap.
WebView2 shouldn't require any restricted capabilities, to operate. If your app needs restricted capabilities, you'll need to either ask for a store exception through Partner Center, or only distribute the app through non-Store avenues.
If your app failed the Branding checks, update all the Visual Assets in the manifest as described above.
If your app failed the App Capabilities tests, turn off any unneeded capabilities. If you need a special use capability you will need to get Microsoft Store approval or use non-Store distribution methods.
If your app failed the General metadata correctness tests with an error in IPopup4, update the microsoft.UI.xaml NuGet package to version Microsoft.UI.Xaml.2.8.0-prerelease.220118001 or higher. There was a bug in the manifests, prior to that version.
In this test, WACK checks the Windows APIs that your host app is calling, to make sure they're supported.
If your app failed the Supported API test, update the Windows SDK to version 22000 or higher, to get the latest version of the allowed-APIs list. There should be no blocking APIs for WebView2 in the current Windows SDK.
After all of the Windows App Certification Kit (WACK) tests have passed, upload your app package to the Windows Store, by using either of the following approaches:
Approach 1: In Windows App Certification Kit (WACK), select Project > Publish > Upload App Packages.
Approach 2: Go to Partner Center and upload your app package to the Windows Store through Partner Center.
Events
Nov 18, 11 PM - Nov 22, 11 PM
Gain the competitive edge you need with powerful AI and Cloud solutions at Microsoft Ignite.
Register nowTraining
Module
Test and publish Progressive Web Apps (PWAs) for Microsoft Store - Training
Learn to test and publish Progressive Web Apps (PWAs) on various devices and platforms, ensuring seamless user experiences. Acquire test packages, test on different browsers and devices, and comply with guidelines. Utilize PWABuilder to package and submit PWAs to the Microsoft Store, reserve app names, and navigate the Microsoft Partner Center for successful publication. Enhance PWA development skills and boost app performance and reach with this informative guide.
Certification
Microsoft Certified: Azure Virtual Desktop Specialty - Certifications
Plan, deliver, manage, and monitor virtual desktop experiences and remote apps on Microsoft Azure for any device.