Note
Access to this page requires authorization. You can try signing in or changing directories.
Access to this page requires authorization. You can try changing directories.
The CSV Microsoft 365 Copilot connector enables your organization to ingest content from CSV files stored in SharePoint libraries and Azure Data Lake Storage (ADLS). After you configure the connector and index content from these sources, end users can find CSV files in Microsoft Search and Microsoft 365 Copilot.
This article is for anyone who configures, runs, and monitors a CSV Microsoft 365 Copilot connector. It supplements the general setup process and shows instructions that apply only to this connector.
Capabilities
- Retain ACLs defined by your organization
- Customize your crawl frequency
- Create agents and workflows using this connection and plugins from Microsoft Copilot Studio
Limitations
- Profile enrichment scenarios aren't supported at this time
- Spaces in CSV column headers are not supported
Prerequisites
Make sure there's no whitespace in the CSV headers
You can index your CSV files from either of the two data source options: SharePoint or ADLS
For a SharePoint data source, you can authenticate using either of the two OAuth providers: Microsoft Entra ID or SharePoint provider (retiring soon).
- For authenticating using Microsoft Entra ID you'll need to create and register an app on Microsoft Entra ID.
- For authenticating using SharePoint provider you'll need to create a SharePoint app with OAuth configuration.
Tip
You will be able to switch the OAuth provider for your published connection from SharePoint to Microsoft Entra ID, once available
For an ADLS data source, you'll need to create an ADLS storage account.
SharePoint data source
Upload your CSV files
Verify the .csv files you want to index have been uploaded to a SharePoint document library. You can use an existing SharePoint site or create a new one.
Create an app on Microsoft Entra ID
Go to the Azure portal and sign in with admin credentials for the tenant.
Navigate to Microsoft Entra ID -> Manage -> App registrations from the navigation pane and select New registration.
Provide a name for the app and select Register.
Make a note of the application (client) ID.
Open API permissions from the navigation pane and select Add a permission.
Select SharePoint and then Delegated permissions.
Search for the AllSites.Read permission and select Add permissions.
Select Grant admin consent for [TenantName] and confirm by selecting Yes.
Check that the permissions are in the "granted" state.
Open Authentication from the navigation pane and select Add a platform. Select Web under Web applications and add the following under Redirect URIs (Authorization callback URIs):
- For M365 Enterprise:
https://gcs.office.com/v1.0/admin/oauth/callback - For M365 Government:
https://gcsgcc.office.com/v1.0/admin/oauth/callback
- For M365 Enterprise:
Configuring the client secret for authentication
Go to the Azure portal and sign in with admin credentials for the tenant.
Open App Registration from the navigation pane and go to the appropriate App. Under Manage, select Certificates and Secrets.
Select New Client Secret and select an expiry period for the secret. Copy the generated secret and save it because it is not shown again.
Use this Client secret and the application ID to configure the connector.
Create a SharePoint app with OAuth configuration (retiring soon)
- Go to
https://Org-Name.sharepoint.com/sites/mysite/_layouts/15/appregnew.aspx. - On the Client ID and Client Secret fields, select Generate.
- For Title, enter an app name.
- In the App Domain field, enter
www.gcs.com. - In the Redirect URL field, enter
https://www.gcs.com. - Select Create.
- Copy the app configuration information, including the Client ID and Client Secret. You'll need it when you set up the CSV Microsoft 365 Copilot connector.
Enable app permissions to allow customAppAuthentication
In PowerShell (SharePoint Online Management Shell), run these commands in administrative mode. Use the email address of the admin configuring the connector and your organization's name. When the password pop-up appears, the admin should enter their password.
Install-Module -Name Microsoft.Online.SharePoint.PowerShell
# Enter a work or school account that has only the permissions required for this procedure.
$userUpn = Read-Host -Prompt "Enter the UPN"
$orgName="<contoso>"
$userCredential = Get-Credential -UserName $adminUPN -Message "Enter your password."
Connect-SPOService -Url https://$orgName-admin.sharepoint.com -Credential $userCredential
Set-spotenant –DisableCustomAppAuthentication $false
Note
- If you're using PowerShell 7, use this command first
Import-Module microsoft.online.sharepoint.powershell -UseWindowsPowerShell. - If you're using multifactor authentication, use
Connect-SPOService -Url https://$orgName-admin.sharepoint.com.
Complete the app configuration
Go to
https://Org-Name.sharepoint.com/sites/mysite/_layouts/15/appinv.aspx.In the App ID field, paste the client ID of the SharePoint app and select Lookup.
In the permission Request XML field, paste this code and select Create.
<AppPermissionRequests AllowAppOnlyPolicy="true">
    <AppPermissionRequest Scope="http://sharepoint/content/sitecollection/web" Right="Read" />
</AppPermissionRequests>
Select Trust it.
ADLS data source
Create an ADLS storage account
For step-by-step guidance, see Create a storage account. To allow file storage capabilities, on the Advanced tab, select Enable hierarchical namespace and Create a container for this site.
When you set up the CSV Microsoft 365 Copilot connector, you'll need to provide a primary storage connection string. To find it, open the storage account you created and select Access keys. Select Show keys and copy the connection string for Key1.
Get Started
Step 1: Add a CSV Microsoft 365 Copilot connector in the Microsoft 365 admin center
Add CSV Microsoft 365 Copilot connector
Follow the general setup instructions.
Step 2: Name the connection
Follow the general setup instructions.
Step 3: Configure connection settings
The data source settings are different for SharePoint and ADLS.
Note
Ensure that your csv file does not have any formatting or spaces (‘ ‘) present in header rows.
For a SharePoint source
In the Data Source settings, select SharePoint as your datasource.
In SharePoint site, enter the site URL,
https://Org-Name.sharepoint.com/Site-Name, for example.In Document Library, enter the name of the library where the .csv files are stored.
In OAuth provider, you can either select SharePoint Provider (retiring soon) or Microsoft Entra ID
a. For Microsoft Entra ID:
1. Authentication Type, select Oauth2.0(authorization code).
2. Enter the Client ID and Client Secret you copied when you created the Microsoft Entra ID app.
3. Select Sign In. You should get a Connection successful message.b. For SharePoint Provider (retiring soon):
1. In Authentication Type, select Oauth2.0(client credentials).
2. Enter the Client ID and Client Secret you copied when you created the SharePoint app.
3. Select Test Connection. You should get a Connection successful message.
To control access on a file level, enter Microsoft Entra users or groups.

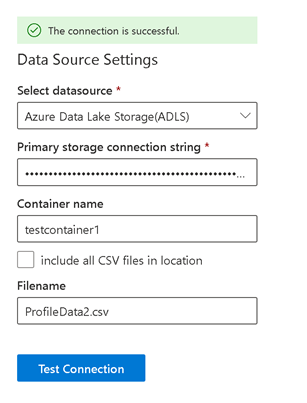
For an ADLS source
In the Data Source settings, select Azure Data Lake Storage(ADLS) as your datasource.
In Primary storage connection string, enter the connection string you copied.
Enter the Container name and Filename.
Select Test Connection. You should get a The connection is successful message.

Note
If your datasource contains multiple .csv files with the same headers, select include all CSV files in location.
To control access on a file level, enter Microsoft Entra users or groups.
Step 4: Multi-items delimiter (Optional)
If your source columns can take multiple values, enter a multi-item delimiter, a semicolon (;) for example.
Step 5: Parsed properties settings
This page returns the first row from your .csv file as Source Properties. To modify the datatype, in the Unique identifier list select at least one option.
To control access on an item level, select columns mapped to allowed users and allowed groups. You should include two columns, AllowedUsers and AllowedGroups, in the .csv file. Each row should contain the Microsoft Entra IDs.

Note
The CSV Microsoft 365 Copilot connector supports file- or item-level access control. If both are enabled, only the file-level access control is applied.
Step 6: Assign property labels
Follow the general setup instructions.
Note
IconURL label is populated by default, and the mapping cannot be changed.
Step 7: Manage schema
Follow the general setup instructions.
Step 8: Manage search permissions
- For file- or item-level access control, select Only people with access to this data source.
- Selecting Everyone allows everyone in your organization to see search results from this data source.

Step 9: Choose refresh settings
Follow the general setup instructions.
Step 10: Review connection
Follow the general setup instructions.
Troubleshooting
After publishing your connection, you can review the status in the Connectors section of the admin center. To learn how to make updates and deletions, see Manage your connector.
For more information, see troubleshooting.
If you have issues or want to provide feedback, contact Microsoft Graph | Support.