Note
Access to this page requires authorization. You can try signing in or changing directories.
Access to this page requires authorization. You can try changing directories.
 Some features described in this article require Teams Premium.
For the sensitive level of protection, we restrict who can bypass the lobby, who can present, and who can record. You can restrict other actions as well if your organization requires it.
The following table describes which actions we restrict for sensitive meetings and where those options are configured.
| Feature | Option | Location | Enforced |
|---|---|---|---|
| Allow camera for attendees | On | Template | No |
| Allow mic for attendees | On | Template | No |
| Apply a watermark to everyone's video feed | Off | Template | No |
| Apply a watermark to shared content | Off | Template | No |
| End-to-end encryption | Off | Template | No |
| Manage what attendees see | On | Template | Yes |
| Meeting chat | On | Template | No |
| People dialing in can bypass the lobby | Off | Label | Yes |
| Prevent copying chat content to clipboard | Off | Label | No |
| Record automatically | Off | Template | No |
| Who can bypass the lobby? | People who were invited | Label | Yes |
| Who can present | People in my org and guests | Label | Yes |
| Who can record | Organizer and co-organizers | Label | Yes |
Note
You can also automatically apply or recommend that the meeting is labeled with the highest priority sensitivity label from files shared for the meeting.
The sensitivity label or meeting template enforces options that are listed as enforced. The meeting organizer can change Options that aren't enforced. To learn more about how your users can apply sensitivity labels to their meetings, see Sensitivity labels for Teams meetings.
Note
Meeting options in sensitivity labels and custom meeting templates require Teams Premium.
Video demonstration
Watch this video for a walkthrough of the procedures described in this article.
Presentation options for sensitive meetings
For the sensitive level of protection, we enforce specific options for who can present, and how content is shared.
By turning on Manage what attendees can see, we ensure that meeting organizers can vet shared content before it's brought on screen for participants. In this example, we're using a template to turn this on by default, but you can also use the template to enforce the value if you need to.
By setting Who can present to People in my organization and guests in the sensitivity label, we remove the chance of anonymous participants presenting in the meeting. You can further restrict this to Only organizers and co-organizers if you need to. (We do that for the highly sensitive level of protection.)
We also restrict recording to organizer and co-organizers by using the sensitivity label.
Lobby options for sensitive meetings
We use the sensitivity label to prevent anyone other than invited attendees (people directly invited by the organizer, or to whom an invitation was forwarded) from bypassing the lobby. This gives an extra level of protection by letting the organizer vet anyone not directly sent an invite before admitting them to the meeting. You can further restrict this option by choosing Only organizers and co-organizers. (We do that for the highly sensitive level of protection.)
Sensitivity labels
For the sensitive level of protection, we use a sensitivity label that you can use directly in a meeting or as part of a meeting template. Depending on the configuration you choose, this label can also be used to classify teams and individual files.
If you already have sensitivity labels deployed in your organization, consider how this label fits with your overall label strategy. You can change the name or settings if needed to meet the needs of your organization. If you already have a label that you use for sensitive information, you can edit the label and add Teams meetings to it.
Open the Microsoft Purview portal.
Under Solutions, expand Information protection, and then select Labels.
Select Create a label.
Give the label a name. We suggest Sensitive, but you can choose a different name if Sensitive is already taken.
Add a display name and description, and then select Next.
On the Define the scope for this label page, make sure Files & other data assets, Emails, and Meetings are selected. You can select other options if you want to use this label for other purposes.
Select Next.
On the Choose protection settings for types of items you selected page, select Protect Teams meetings and chats, and then select Next.
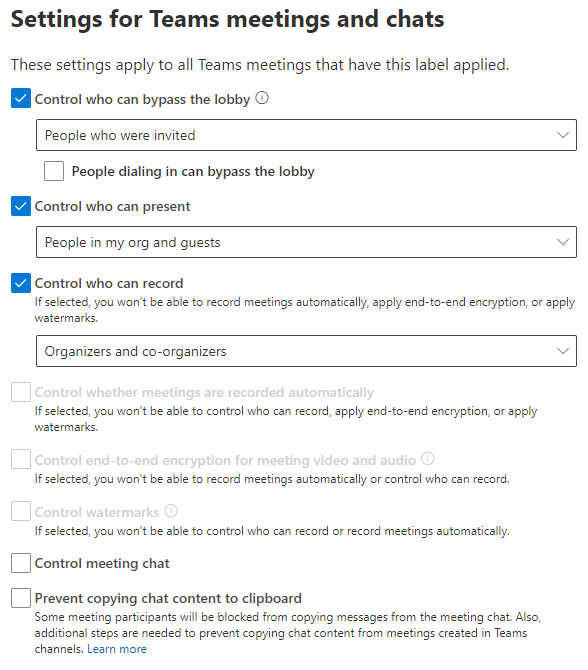
On the Settings for Teams meetings and chats page, choose the following values:
Select Control who can bypass the lobby and choose People who were invited from the dropdown list.
Clear the People dialing in can bypass the lobby check box.
Select Control who can present and choose People in my org and guests from the dropdown list.
Select Control who can record and transcribe and choose Organizers and co-organizers from the dropdown list.
Configure any other settings that you need for your organization.
Select Next.
Complete the wizard with any other settings you want to use, select Create label, and then select Done.
Once you create the label, you need to publish it to the users who will use it. For sensitive protection, we make the label available to all users. You publish the label in the Microsoft Purview portal, on the Label policies page under Information protection. If you have an existing policy that applies to all users, add this label to that policy. If you need to create a new policy, see Publish sensitivity labels by creating a label policy.
For more information about using sensitivity labels with meetings, see Use sensitivity labels to protect calendar items, Teams meetings, and chat.
Meeting templates
An advantage of using templates is that you can create multiple templates that use the same sensitivity label but which lock different options. For example, for sensitive presentations with minimal attendee interaction, create a template that turns off attendee video and chat, and another template that lets the meeting organizer decide on these options. Both templates would use the Sensitive label.
In the sensitive level of protection, we use the template to set Manage what attendees see to On and enforce that value. (This option isn't available in sensitivity labels.) This allows the meeting organizer to manage how content is shown to meeting participants. If there are certain types of meetings where you want to allow the organizer to change this option, consider using a separate template with the same label for those meetings.
To create a custom meeting template
- In the Teams admin center, expand Meetings and select Meeting templates.
- Select Add
- Type a name and description for the template.
- In the Apply sensitivity label section, choose the label you created above.
- Select Apply sensitivity label, and then select Lock.
- Under Meeting engagement, set Manage what attendees see to On, then select it and select Lock.
- Change any other options if desired.
- To prevent the meeting organizer from changing an option, select the option and then select lock.
- To prevent the meeting organizer from seeing an option, select the option and then select Hide.
- Select Save.
Related topics
Configure Teams meetings with three tiers of protection
Overview of custom meeting templates in Microsoft Teams
Use Teams meeting templates, sensitivity labels, and admin policies together for sensitive meetings