Note
Access to this page requires authorization. You can try signing in or changing directories.
Access to this page requires authorization. You can try changing directories.
This article describes the requirements and limitations of using the new Microsoft Teams client in a virtualized environment.
Important announcement for classic Teams for VDI
The classic Teams for VDI reached end of support on October 1, 2024, and end of availability on July 1, 2025. For more information, see: End of availability for classic Teams client
After that date, users won't be able to use classic Teams but instead be prompted to switch to new Teams. We recommend you update to new Teams today.
Note
New Teams for VDI is now generally available for customers in public clouds, GCC, GCC High, and DoD government cloud.
Requirements
For new Teams to be successfully installed, you need version 23306.3314.2555.9628 or higher. In addition, virtual machines must meet the minimum requirements listed here:
| Requirement | Version |
|---|---|
| Windows | - Windows 10.0.19041 or higher (excluding Windows 10 LTSC for Teams desktop app) - Windows Server 2019 (10.0.17763) - Windows Server 2022 (20348.2402) or higher - -Windows Server 2025 (26100.2886) or higher - Windows Server 2016 is NOT supported. Plan upgrades. - WebView2 framework required in Windows Server and Windows 10/11 Multi-User environments |
| Webview2 | Update to the most current version. Learn more: Enterprise management of WebView2 Runtimes |
| Classic Teams app | Version 1.6.00.4472 or later to see the Try the new Teams toggle. Important: Classic Teams is only a requirement if you want users to be able to switch between classic Teams and new Teams. This prerequisite is optional if you only want your users to see the new Teams client. |
| Settings | Turn on the Show Notification Banners setting in System > Notifications > Microsoft Teams to receive Teams Notifications. |
| Exclude antivirus and DLP | Add new Teams to antivirus and DLP applications so Teams can start correctly. Learn more: Exclude antivirus and DLP applications from blocking Teams |
Note
Support for Microsoft Teams and Microsoft 365 Apps is defined by the Modern Lifecycle Policy, which requires customers maintain an up-to-date configuration to stay supported. End-of-support dates for Windows Server 2019 and Windows Server 2022 are October 2025 and October 2026 respectively. For further information, check this link.
Virtualization provider requirements
Currently, new Teams on VDI with audio/video (AV) optimization is certified with Azure Virtual Desktops, Windows 365, Citrix, and VMware.
Review the information in this section to ensure that you meet all requirements for proper functionality.
Azure Virtual Desktop
Azure Virtual Desktop provides AV optimization for Teams on VDI. To learn more on requirements and installation, see Use Teams on Azure Virtual Desktop.
The following minimum versions are necessary to support the new Teams client:
- Remote Desktop Client for Windows 1.2.2606
- Remote Desktop Client for Mac 10.7.7
- WebRTC Redirector Service 1.1.2110.16001
Microsoft recommends using the latest available versions.
In addition, you must deploy the following registry key on the virtual desktop for the new Teams client to be optimized:
HKLM\SOFTWARE\Microsoft\Teams:
- Name: IsWVDEnvironment
- Type: DWORD
- Value: 1
RemoteApp
You can publish new Teams using the Windows shell:appsFolder location in the format: shell:appsFolder\MSTeams_8wekyb3d8bbwe!MSTeams.
See this article for more details on RemoteApp.
Windows 365
Windows 365 uses AV optimization provided by Azure Virtual Desktop to ensure optimal Teams experiences from Cloud PCs. To learn more on requirements and installation, see Use Teams on Cloud PC.
The Windows 10/11 images in the gallery are preconfigured with required optimization components. When you install and use Microsoft Teams in your Cloud PC, you get an optimized experience. A new image with the new Teams client will be added to the gallery in a few weeks.
If you want to create custom images that include optimizations for Microsoft Teams, you need to perform the steps described in Create a custom Cloud PC image to support Microsoft Teams.
The following minimum versions are necessary to support the new Teams client:
- Remote Desktop Client for Windows 1.2.2606
- Remote Desktop Client for Mac 10.7.7
- Windows 365 app for Windows via the Microsoft Store
- Web browsers do not support Microsoft Teams optimization
In addition, you must deploy the following registry key on the virtual desktop for the new Teams client to be optimized:
HKLM\SOFTWARE\Microsoft\Teams:
- Name: IsWVDEnvironment
- Type: DWORD
- Value: 1
Citrix Virtual Apps and Desktops and Citrix DaaS requirements
The following minimum versions are necessary to support the new Teams client:
Citrix Workspace app:
- Windows 2203 LTSR (and any CU)
- Windows 2302 CR
- Linux 2207
- Mac 2302
- Chrome/HTML5 2301
Citrix Virtual Delivery Agent (VDA):
- 2203 LTSR (and any CU)
- 2212 CR
- 1912 CU6 (but latest CU recommended - App Sharing is not supported on 1912)
In addition, you must deploy the following registry key on the VDA for the new Teams client to be optimized:
- Location: HKLM\SOFTWARE\WOW6432Node\Citrix\WebSocketService
- Key (REG_Multi_SZ): ProcessWhitelist
- Value: msedgewebview2.exe
If this registry key is missing, the new Teams client operates in nonoptimized mode (server-side rendering). This regkey is not needed anymore if you are using VDA 2402 (check here for more details).
Note
Citrix Virtual Apps (also known as published apps) is currently supported with VDA 2402 LTSR.
For additional information, learn more at Optimization for Microsoft Teams.
VMware Horizon and Workspace ONE requirements
The following minimum versions are necessary to support the new Teams client:
- Horizon 8 2111 ESB (8.4)
To learn more on the latest requirements and instructions, including how to configure media optimization for Teams, see Configuring Media Optimization for Microsoft Teams.
Deploy the new Microsoft Teams client
To deploy the new Microsoft Teams client to your organization, select one of the following options.
Important
You must use the latest version of the bootstrapper.exe. If .exe was already downloaded, check Properties > Details > Product version for your version and compare it to the properties on the latest download.
Note
Make sure you have these KBs in your system, as they address many policy settings restricting download and installation of new Teams.
- If using Windows 10 or 11, make sure you're installing the appropriate KB patch Windows 10: October 26, 2023 - KB5031445 (OS Build 19045.3636) or Windows 11: October 26, 2023 - KB5031445 (OS Build 22621.2506). Otherwise, when GPO AllowAllTrustedApps is set to false and the issue mentioned in the Features currently not available and known issues in VDI with the new Teams section of this article can occur (New Teams fails to launch for users logging into non-persistent virtual desktops, or the app is not visible in the Start Menu.).
- If GPO BlockNonAdminUserInstall is set to true, users might face the issue mentioned in the Features currently not available and known issues in VDI with the new Teams section can occur (New Teams fails to launch for users logging into non-persistent virtual desktops, or the app is NOT visible in the Start Menu). Make sure you have the respective KB for your OS:
- KB5035942 (Windows 11 version 22H2 and 23H2, all editions)
- KB5035941 (Windows 10 any version, all editions)
- KB5036909 (Windows Server 2022)
Option 1: Uninstall the classic Teams client and install the new one
Recommended way to deploy new Teams in VDI. The direct or 'bulk deployment' method is used for this option. Learn more at Bulk deploy the new Microsoft Teams desktop client.
Using the teamsbootstrapper.exe -p command always guarantees the latest new Teams client is installed.
A phased and controlled rollout can then be achieved by selectively expanding the new computer catalogue/delivery group assignments to more users.
Admins can also use a local teams MSIX to provision new Teams. This option minimizes the amount of bandwidth used for the initial installation. The MSIX can exist in a local path or UNC.
- Download the .exe installer..
- Download the MSIX:
- MSIX x86
- MSIX x64
- ARM64. - Open the Command Prompt as an Admin.
- Depending on where your MSIX is located, do the following steps:
For local path, enter: .\teamsbootstrapper.exe -p -o "c:\path\to\teams.msix"
Example:

For UNC, enter: .\teamsbootstrapper.exe -p -o "\unc\path\to\teams.msix"
Example:

Note
Teamsbootstrapper.exe logs are located in C:\WINDOWS\Temp\teamsprovision.log.xxxxxxxx.
Option 2: Install both apps 'side by side'
Let the user switch between them by using the toggle on the top left of the Teams UI. You can control who sees the toggle by configuring the Teams Admin Center policy Teams update policy.
If the toggle is being used for the new Teams client rollout, admins must make sure that the VDI environments meet the minimum requirements described here: Troubleshooting installation issues in the new Teams client.
If IT administrators set restrictions for MSIX or deploy GPOs, it could prevent users from downloading and installing the app. If restrictions are in place, the user could see errors like this:
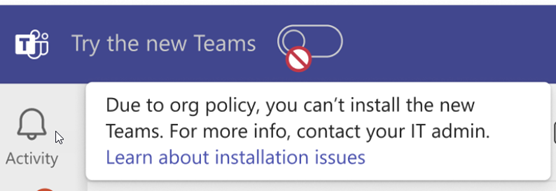
Important
The 'side by side' method is only supported in persistent environments. Classic Teams 1.7.00.7956 or higher suppresses the app switcher toggle irrespective of the Teams Admin Center policy value when classic Teams is running in a non-persistent environment, where non-persistent is detected based on the installation folder of classic Teams MSI, C:\Program Files (x86).
Classic Teams versus new Teams installers in VDI environments
The classic Teams client and the new Teams client have different install locations and profile management requirements. It's important to understand the differences and plan accordingly.
| Installer format | Install location | Auto update |
|---|---|---|
| Classic Teams MSI with the ALLUSERS=1 flag | C:\Program Files (x86)\Microsoft\Teams | Disabled |
| Classic Teams .EXE | %localappdata%\Microsoft\Teams | Enabled |
| New Teams .EXE bootstrapper | Teamsbootstrapper.exe is a lightweight wrapper online installer with a headless command-line interface. It allows admins to 'provision' (install) the app for all users on a given target computer/. It installs the Teams MSIX package on a target computer, making sure that Teams can interoperate correctly with Office and other Microsoft software. C:\Program Files\WindowsApps\PublisherName.AppName_AppVersion_architecture_PublisherID Example C:\Program Files\WindowsApps\MSTeams.23306.3314.2555.9628_x64_8wekyb3d8bbwe |
Enabled. It can be disabled via regkey. Learn more: Disable new Teams autoupdate |
Troubleshooting new Teams deployment errors
Administrators can rely on the teamsbootstrapper.exe error code that describes the problem. If the error code doesn't provide enough information, more diagnostic information can be found in the detailed event logs.
- Go the Event Viewer (Local) > Applications and Services Logs > Microsoft > Windows.
- Check for available logs under these categories:
- AppxPackagingOM > Microsoft-Windows-AppxPackaging/Operational
- AppXDeployment-Server > Microsoft-Windows-AppXDeploymentServer/Operational
- Review logs under AppXDeployment-Server
Learn more here: Common error codes
| Teamsbootstrapper.exe common error codes | Further information |
|---|---|
| 0x80070057 | The bootstrapper command doesn't have the full path (avoid URIs using .). Try the full path instead (for example, c:\temp\MSTeams-x64.msix). |
| 0x80070032 | A probable error on the UNC path. Try copying the MSIX to a local folder instead. |
| 0x80004004 | There might be a regkey 'maglevInstallationSource' left behind in regkey HKLM\Software\WoW6432Node\Microsoft\Office\Teams. Try deleting it and reattempting the install. |
Installation instructions for Windows Server 2019
For Windows Server 2019, the only supported installation method is:
Dism /Online /Add-ProvisionedAppxPackage /PackagePath:<MSIX package path> /SkipLicense
Make sure sideloading is enabled, and that WebView2 is installed. See the Requirements section.
The /SkipLicense command is needed because the MSIX package isn't considered a "Store Package" (since it wasn't downloaded from the store). Therefore, for the Dism installation command to succeed, you need to enable this policy as well during installation time: Computer Configuration > Administrative Templates > Windows Components > App Package Deployment > Allow all trusted apps to install.
Important
AllowAllTrustedApps must be enabled after the new Teams package is successfully staged in the golden image. Otherwise, the registration of the package to each user (which happens only on login) fails and users aren't able to launch the app.
Known limitations:
- Classic Teams on Windows Server 2019 isn't displaying the app switcher toggle if Classic Teams version is lower than 1.6.00.33567
- If you are using FSLogix as the Profile Manager solution, New Teams on Windows Server 2019 needs FSLogix 2210 HotFix 4 or higher (Microsoft recommends the latest available version).
Outlook presence integration with New Teams in Windows Server 2019
For Outlook to properly display presence status, the following steps are required on the golden image:
- Install machine-wide (ALLUSERS=1) the 'Windows 10 1809 and Windows Server 2019 KB5035849 240209_02051 Feature Preview.msi'.
- Open your Group Policy Editor. Navigate to Computer Configuration\Administrative Templates\KB5035849 240209_02051 Feature Preview\Windows 10, version 1809 and Windows Server 2019. Change the value of that Setting to Enabled.
- Install KB5035849 March 2024 cumulative update from the Microsoft Update Catalog or WSUS for Enterprises.
- Install machine-wide (ALLUSERS=1) the 'MSTeamsNativeUtility.msi'.
- Reboot the virtual machine.
- Install new Teams 24033.811.2738.2546 or higher, using Dism as described previously.
Note
Steps 1, 2, 3, 4, and 5 are only required once. Subsequent golden image maintenance don't need these steps repeated.
Important
Outlook must be started after new Teams is launched for presence to be shown correctly.
Remove new Teams for all users
To uninstall and deprovision the new Teams for all users, use the following command:
./teamsbootstrapper -x
This command unregisters and deprovisions the new Teams for all users. Teams user profile/cache is deleted.
Disable new Teams autoupdate in non-persistent VDI
To prevent new Teams from autoupdating, use the following registry key on the virtual machine. Only new Teams builds higher than 23306.3314.2555.9628 in VDI can process this registry key.
Location: Computer\HKEY_LOCAL_MACHINE\SOFTWARE\Microsoft\Teams
Name: disableAutoUpdate
Type: DWORD
Value: 1
Important
If this regkey is present in the virtual machine, Teams MSIX installer will not attempt to install or upgrade the Teams Meeting add-In (TMA). Administrators must provision TMA using scripts or other deployment tools. See the Teams Meeting add-In section for more details.
New Teams auto-start
The auto-start behavior of Teams is controlled by three components:
By default, MSIX-based applications doesn't auto-start until there is a first launch, because the Windows OS doesn't auto-start packages in a provisioned state. An AppX registration is needed with user consent. After the first launch, users can go to Settings > General and fill the Auto-start Teams checkbox, or enable auto-start from the Windows Setting menu.
If the "Auto-start Teams" checkbox is greyed out, it means a system-wide GPO is disabling this option for UWP apps:
[HKEY_LOCAL_MACHINE\SOFTWARE\Microsoft\Windows\CurrentVersion\Policies\System]
"EnableFullTrustStartupTasks"=dword:00000000
"EnableUwpStartupTasks"=dword:00000000
"SupportFullTrustStartupTasks"=dword:00000000
"SupportUwpStartupTasks"=dword:00000000
This registry setting causes the option to be unavailable in the operation systems under Settings > Apps > Installed Apps. In order to change this setting, create the regkeys with the values as shown in this example:
[HKEY_LOCAL_MACHINE\SOFTWARE\Microsoft\Windows\CurrentVersion\Policies\System]
"EnableFullTrustStartupTasks"=dword:00000002
"EnableUwpStartupTasks"=dword:00000002
"SupportFullTrustStartupTasks"=dword:00000001
"SupportUwpStartupTasks"=dword:00000001
Restart the virtual machine to see the startup options active in the operative system’s settings menu.
- This registry key controls the Teams auto-start behavior, so you can enable or disable it programmatically.
[HKEY_CURRENT_USER\Software\Classes\Local Settings\Software\Microsoft\Windows\CurrentVersion\AppModel\SystemAppData\MSTeams_8wekyb3d8bbwe\TeamsTfwStartupTask]
"State"=dword:00000002
"UserEnabledStartupOnce"=dword:00000001
| State | Number | Information |
|---|---|---|
| Disabled | 0 | The task is disabled. |
| DisabledByUser | 1 | The task was disabled by the user. It can only be re-enabled by the user. |
| EnabledByUser | 2 | The task is enabled. |
| DisabledByPolicy | 3 | The task is disabled by the administrator or group policy. Platforms that don't support startup tasks also report DisabledByPolicy. |
| EnabledByPolicy | 4 | The task is enabled by the administrator or group policy. |
You can learn more at this link.
Important
If you're using non-persistent VDI, you must make sure the TeamsTfwStartupTask registry key is roamed. FSLogix ODFC containers don't roam this registry key, so you must rely on your other profile management tools (VMWare DEM, AppSense, Citrix UPM) to persist this key.
Profile and cache location for new Teams Client
All the user settings and configurations are now stored in:
- C:\Users<username>\AppData\Local\Packages\MSTeams_8wekyb3d8bbwe\
- C:\Users<username>\AppData\Local\Packages\MSTeams_8wekyb3d8bbwe\Settings\settings.dat
- C:\Users<username>\AppData\Local\Publishers\8wekyb3d8bbwe\TeamsSharedConfig\app_switcher_settings.json
- C:\Users<username>\AppData\Local\Publishers\8wekyb3d8bbwe\TeamsSharedConfig\tma_settings.json
Make sure these folders and files are persisted for proper Teams functioning.
Note
It's critical that all the necessary directories and top folder structure under AppData\Local\Packages\MSTeams_8wekyb3d8bbwe are correctly set up as directories, not as files or reparse points, and roam with the user's profile:
AppData\Local\Packages\MSTeams_8wekyb3d8bbwe\AC AppData\Local\Packages\MSTeams_8wekyb3d8bbwe\AppData AppData\Local\Packages\MSTeams_8wekyb3d8bbwe\LocalCache AppData\Local\Packages\MSTeams_8wekyb3d8bbwe\LocalState AppData\Local\Packages\MSTeams_8wekyb3d8bbwe\RoamingState AppData\Local\Packages\MSTeams_8wekyb3d8bbwe\Settings AppData\Local\Packages\MSTeams_8wekyb3d8bbwe\SystemAppData AppData\Local\Packages\MSTeams_8wekyb3d8bbwe\TempState
TeamsSharedConfig stores user configurations for the Teams app switcher toggle (and what should be the default app, the Classic or New Teams), and the Teams Meeting Add In for Outlook.
The folder "meeting-addin" under TeamsSharedConfig shouldn't be persisted, as persisting could cause issues with the default meeting coordinates in the meeting templates inserted into Outlook.
Important
Microsoft recommends FSLogix 2210 HotFix 4 (2.9.8884.27471) in order to guarantee proper integration with the new Teams client in VDI. The following issues have been addressed on that release:
- Windows Server 2019 would sometimes fail to query the provisioned AppX applications for the user during sign-out.
- MSIX folders that should not be backed up would be removed during sign-out instead of only removing the contents of those folders.
- New Microsoft Teams crashes or fails to start in Windows Server 2019.
- New Microsoft Teams would display an error during launch with The parameter is incorrect.
- New Microsoft Teams would display an error during launch with Invalid function.
- New Microsoft Teams wouldn't on-demand register during sign-in when using the ODFC container.
- New Microsoft Teams wouldn't on-demand register during profile creation and wouldn't register during future sign-ins, despite being installed.
- User-based Group Policy settings would persist in the user's profile after the policy setting was removed or set to disabled.
Note: Customers using Profile and ODFC, or just ODFC containers, still need to add the setting ‘IncludeTeams’ for the new Teams user data/cache to be preserved.
Note
Folder Redirection or Roaming User Profiles aren't supported with the new Teams client in VDI environments since they can't roam folders in AppData\Local\Packages\MSTeams_8wekyb3d8bbwe\LocalCache\Microsoft\MSTeams. Customers can continue to use Folder Redirection or Roaming User Profiles with a complementary product, such as FSLogix, Citrix Profile Manager, and VMware DEM, that can roam the Appdata\Local folders.
Important
Citrix recommends Citrix Profile Manager version 2402 or 2203 CU5, as those address new Teams registrations errors and "the parameter is incorrect" error when trying to launch the application.
If customers still experience Teams related issues, reach out to Citrix for a private build for 2402 CU1 or 2203 CU6.
Folder exclusions
Disk storage usage
The new Teams app takes up about 50% less disk space than the classic version. To make it easier to distribute our client to Windows devices, support is added for MSIX, which improves the dependability of installations and app updates, as well as reduces network bandwidth and disk space consumption. This packaging technology also shows the accurate disk space usage. Users may see larger disk usage than classic Teams in Windows settings, but the difference is mainly because the disk space related to Electron-based classic Teams is not fully and correctly shown.
Disk Footprint - Key folders and location
- App installer: C:\Program Files\WindowsApps\MSTeams_[version]_[arch]__8wekyb3d8bbwe Includes the installation package, supports the ability to reset the app, and allows single instancing.
- User and app data: C:\Users<alias>\AppData\Local\Packages\MSTeams_8wekyb3d8bbwe Includes code (Javascript bundles), code cache, browser caches, databases for user data (like conversations which scales based on usage), and web storage (from domains hosted within Teams, such as Sharepoint, Viva learning, Apps, and so on).
The underlying folder structure is logically similar to Electron-based classic Teams. For non-persistent setups where storage footprint is a consideration, the following guidance applies:
Recommended for exclusion
| Folder | Folder path | Role | Exclusion impact |
|---|---|---|---|
| Logs | LocalCache\Microsoft\MSTeams\Logs LocalCache\Microsoft\MSTeams\PerfLog |
Diagnostics, perf logs, and so on. | No impact. |
| WebStorage | LocalCache\Microsoft\MSTeams\EBWebView\WV2Profile_tfw\WebStorage | Storage used and managed by the browser when accessing other web apps inside a web app using iframes. For example, loading Sharepoint, OneDrive and office apps within Teams. | Loading these apps again could be slower after clearing this cache. |
| GPU Cache | LocalCache\Microsoft\MSTeams\EBWebView\WV2Profile_tfw\GPUCache | GPU cache. | No impact. |
| StartMenuExperienceHost | AppData\Local\Packages\Microsoft.Windows.StartMenuExperienceHost_cw5n1h2txyewy\TempState | Responsible for the Start Menu button and the tiles within it. | No impact. The exclusion is recommended to solve a missing Teams icon in the Start menu issue. |
| ShellExperienceHost (For Windows Server 2019 only) | AppData\Local\Packages\Microsoft.Windows.ShellExperienceHost_cw5n1h2txyewy\TempState | Responsible for the Start Menu button and the tiles within it. | No impact. The exclusion is recommended to solve a missing Teams icon in the Start menu issue. |
Review tradeoff considerations, requiring evaluation and testing for these environments
| Folder | Folder path | Role | Exclusion impact |
|---|---|---|---|
| Service worker | LocalCache\Microsoft\MSTeams\EBWebView\WV2Profile_tfw\ Service Worker\CacheStorage LocalCache\Microsoft\MSTeams\EBWebView\WV2Profile_tfw\Code Cache |
Code and caching of Web/JS Scripts for the app to run. | - Reduced performance to download and load scripts on every app launch - No offline access to app |
| IndexedDB | LocalCache\Microsoft\MSTeams\EBWebView\WV2Profile_tfw\IndexedDB | Holds app and user data and is the recommended way to cache data at scale in a web app to improve responsiveness. | - Significantly higher app launch times as data (such as chat or channel conversations) must be pulled down, along with network usage as data needing to be downloaded and cached every time. - The size of the data varies based on the user profile. - Users might see We’re setting things up for you in the launch splash-screen. |
| Cache | LocalCache\Microsoft\MSTeams\EBWebView\WV2Profile_tfw\Cache | Cache used and managed by the browser for the contents of all network calls that leave the app. Also known as Disk Cache. | For example, profile pictures in Teams are mostly cached in this storage by the browser. These pictures need to be downloaded again. |
Other than the folders in this section, we don't recommend excluding additional directories.
New Teams and Outlook integration
When the "Register the new Teams as the chat app for Microsoft 365" checkbox is selected under Settings > General > System, this selection lets the new Teams client integrate with all the Microsoft 365 apps that have instant message capabilities (presence, chat, VOIP, etc.).
For example, Outlook goes through the discovery process outlined here to integrate with the default IM client application: Integrating IM applications with Office
Note
If the new Teams is installed on a virtual machine where the classic Teams is not installed, you must make sure you are using new Teams version 23320.3021.2567.4799 or higher in order to guarantee proper integration with Outlook and presence.
Teams Meeting add-in
Additionally, the new Teams MSIX package bundles the Teams Meeting add-in (or TMA) MSI ("MicrosoftTeamsMeetingAddinInstaller.msi"). TMA lets you schedule a Teams meeting from Outlook.
For Security articles related to TMA integration with the Outlook client, learn more at Teams meeting add-in security when using your Outlook client.
All new Teams files that are installed on the computer are signed, so IT admins can use AppLocker / Code Integrity / Windows Defender Application Guard policies configured to enforce that.
- For New Teams per-user installations of TMA, the install folder is in AppData\Local\Microsoft\TeamsMeetingAddin
- Starting from new Teams version 24060.2623.2790.8046, the TMA per-user install folder is changed to AppData\Local\Microsoft\TeamsMeetingAdd-in (an additional '-')
- Installation logs for TMA MSI are stored here: AppData\Local\Packages\MSTeams_8wekyb3d8bbwe\LocalCache\Microsoft\MSTeams\Logs \tma_addin_msi.txt
Note
In non-persistent environments (e.g Windows Server or Windows 10/11 Single or Multiuser), installation of MicrosoftTeamsMeetingAddinInstaller.msi can fail with the error "Installation success or error status: 1625.".
This error is caused by GPOs affecting Windows Installer, and includes DisableUserInstalls, DisableMSI, or AppLocker policies based on Publisher rule conditions, or a RuleCollection for MSI installs. In this case you must create an exception such as:
- FilePathCondition Path="%PROGRAMFILES%\WINDOWSAPPS*\MICROSOFTTEAMSMEETINGADDININSTALLER.MSI"
Deployment method for non-persistent environments where Teams auto-update is disabled
Note
teamsbootstrapper.exe (Product version 1.0.2508703) now supports an additional parameter that installs Teams Meeting Add In (TMA) for Outlook automatically, in a machine-wide installation fashion (i.e msiexec /ALLUSERS=1).
-Fresh install (will provision Teams and install TMA machine-wide): teamsbootstrapper.exe -p --installTMA
-If Teams was already provisioned and you want to install TMA only: teamsbootstrapper.exe --installTMA
-Uninstall TMA (Outlook Classic must be closed): teamsbootstrapper.exe --uninstallTMA
-Uninstall Teams and TMA (Outlook Classic must be closed): teamsbootstrapper.exe -x
-If Teams is not provisioned (is not present or failed to provision), TMA will not be installed
-Running teamsbootstrapper.exe -p or teamsbootstrapper.exe -p -o "full path to msix" alone will not install TMA machine-wide
-Outlook Classic must be closed when trying to uninstall TMA using the bootstrapper
If Administrators don't want to use the new --installTMA flag, they can still install the TMA MSI that is located in the new Teams installation directory from an Admin Command prompt using:
msiexec.exe /i "C:\Program Files\WindowsApps\MSTeams_X.X.X.X_x64__8wekyb3d8bbwe\MicrosoftTeamsMeetingAddinInstaller.msi" ALLUSERS=1 /qn /norestart TARGETDIR="C:\Program Files (x86)\Microsoft\TeamsMeetingAdd-in\<version>\"
TARGETDIR must be kept consistent across installs so that the Teams Meeting Add-in MSI can easily detect and clean up older versions. If multiple directories are used, then the installation may not behave as expected.
X.X.X.X needs to be replaced by the New Teams version. Make sure there's a double underscore between the CPU architecture (x64) and the PublisherID (8wekyb3d8bbwe). The exact version number can be extracted by running this command in PowerShell:
Get-AppXPackage -Name "*msteams*" | Select-Object -ExpandProperty Versionversion must be replaced with the MSI file version, for example, 1.24.2203.0. The exact version number can be extracted by running this command in PowerShell:
PS C:\WINDOWS\system32> Get-AppLockerFileInformation -Path "C:\PROGRAM FILES\WINDOWSAPPS\MSTEAMS_24026.1000.2656.1710_X64__8WEKYB3D8BBWE\MICROSOFTTEAMSMEETINGADDININSTALLER.MSI" | Select -ExpandProperty Publisher | select BinaryVersion

BinaryVersion

1.24.2203.0
Example: The following are examples of the final command:
msiexec.exe /i "C:\Program Files\WindowsApps\MSTeams_23320.3021.2567.4799_x64__8wekyb3d8bbwe\MicrosoftTeamsMeetingAddinInstaller.msi" ALLUSERS=1 /qn /norestart TARGETDIR="C:\Program Files (x86)\Microsoft\TeamsMeetingAdd-in\1.24.2203.0\"
The following powershell script can be used as a reference for deployment. Customers should validate in their QA/TEST environments:
If (-not ([Security.Principal.WindowsPrincipal][Security.Principal.WindowsIdentity]::GetCurrent()).IsInRole([Security.Principal.WindowsBuiltInRole] 'Administrator') ){
    Write-Error "Need to run as administrator. Exiting.."
    exit 1
}

# Get Version of currently installed new Teams Package
if (-not ($NewTeamsPackageVersion = (Get-AppxPackage -Name MSTeams).Version)) {
    Write-Host "New Teams Package not found. Please install new Teams from https://aka.ms/GetTeams ."
    exit 1
}
Write-Host "Found new Teams Version: $NewTeamsPackageVersion"

# Get Teams Meeting Addin Version
$TMAPath = "{0}\WINDOWSAPPS\MSTEAMS_{1}_X64__8WEKYB3D8BBWE\MICROSOFTTEAMSMEETINGADDININSTALLER.MSI" -f $env:programfiles,$NewTeamsPackageVersion
if (-not ($TMAVersion = (Get-AppLockerFileInformation -Path $TMAPath | Select-Object -ExpandProperty Publisher).BinaryVersion))
{
    Write-Host "Teams Meeting Addin not found in $TMAPath."
    exit 1
}
Write-Host "Found Teams Meeting Addin Version: $TMAVersion"

# Install parameters
$TargetDir = "{0}\Microsoft\TeamsMeetingAdd-in\{1}\" -f ${env:ProgramFiles(x86)},$TMAVersion
$params = '/i "{0}" TARGETDIR="{1}" /qn ALLUSERS=1' -f $TMAPath, $TargetDir

# Start the install process
write-host "executing msiexec.exe $params"
Start-Process msiexec.exe -ArgumentList $params
write-host "Please confirm install result in Windows Eventlog"
After installation, restart Outlook and verify TMA is loading. Logs are located on %localappdata%\Temp\Microsoft\Teams\meeting-addin.
For Teams Meeting add-in troubleshooting articles, learn more at: Resolve issues with Teams Meeting add-in for Outlook.
If classic Teams is removed and only new Teams is being installed, the Teams Meeting Add-in MSI could fail to create three registry keys under HKCU that prevent the Meeting Add In from loading properly.
These keys should be then deployed via additional sign in scripts or similar methods:
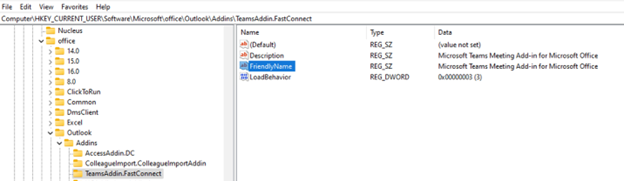
Note
These HKCU regkeys aren't needed anymore if you're installing TeamsMeetingAddIn.msi version 1.0.24054.1 (which is bundled with new Teams 24060.2623.2790.8046 or higher) using the msiexec command previously mentioned in this article, with the ALLUSERS=1 parameter. Version 1.0.24054.1 has a fix for equivalent regkeys creation, but under HKLM\SOFTWARE\Microsoft\Office\Outlook\Addins\TeamsAddin.FastConnect.
Troubleshooting new Teams and Outlook integration
Symptoms
You see any of the following issues when you check the presence status for a user in Outlook:
- The presence indicator isn't visible.
- The displayed presence is incorrect.
- The presence status is Status unknown.
Troubleshooting steps
- Make sure new Teams is running. Then launch Outlook.
- Check the registry settings on your computer to verify that new Teams is registered as the default instant messaging (IM) app.
a. Start Registry Editor. b. Locate the following subkey:
- HKEY_CURRENT_USER\Software\IM Providers
c. Verify the following values:
- **Name:** DefaultIMApp
- **Type:** REG_SZ
- **Data:** MsTeams (If you see Teams, it means classic Teams is still the default IM app)
- Locate the following subkey:
- HKEY_CURRENT_USER\Software\IM Providers\MsTeams (Outlook monitors this registry key for value changes)
- Verify the following values:
-Name: UpAndRunning -Type: REG_DWORD -Data: 2 (0—Not running, 1—Starting, 2—Running)
- If the issues persist, contact Microsoft Support.
Control fallback mode in Teams
When users connect from an unsupported endpoint, the users are in fallback mode, in which Audio/Video isn't optimized. You can disable or enable fallback mode by setting one of the following registry DWORD values:
HKEY_LOCAL_MACHINE\SOFTWARE\Microsoft\Teams\DisableFallback
HKEY_CURRENT_USER\SOFTWARE\Microsoft\Office\Teams\DisableFallback
- This registry key can only be processed by new Teams 24257.x.x.x or higher.
- To disable fallback mode, set the value to 1.
- To enable audio only, set the value to 2.
- If the value isn't present or is set to 0 (zero), fallback mode is enabled.
- On Fallback, screen sharing functionality is supported with a different screen picker UI (similar to the experience a user would see on Teams for Web).
Multitenant and Multi-account in VDI
The new version of Teams in VDI allows you to sign in quickly and easily, and allowing you to switch between multiple accounts and organizations from the same Microsoft 365 cloud environment.
Note
Cross cloud guests and Cross cloud meetings are not supported on VDI. See Collaborate with guests from other Microsoft 365 cloud environments and Manage accounts and organizations in Microsoft Teams for more information.
If any of your accounts have guest access to other organizations, you don’t need to add them--they appear automatically. A guest is someone from outside an organization that a team owner invites to join the team, such as a partner or consultant. Guests have fewer capabilities than team members or team owners.
Learn more: Manage accounts and organizations in Microsoft Teams
Features currently not available and known issues in VDI with the new Teams
- Teams version 24335.208.3315.1951 fails to install on Windows Server 2019 with DISM error 15606 (0x3CF6) due to a change in the AppxManifest.xml. This issue is fixed on 25007.607.3371.8436.
- In some scenarios, Citrix RemotePC users might experience a Teams crash and restart loop when using VDA 2411 and accessing Teams locally (not via HDX). Check CTX585013 for more details.
- New Microsoft Teams doesn't on-demand register during FSLogix profile creation (even with HotFix 4), and doesn't register during future signins, despite being installed. The issue is caused by a race condition between Process Lifetime Manager (PLM) service and AppxSvc causing a transient failure when updating the package with error 0x80004001 (E_NOTIMPL). If the PLM service is not running, the new Teams registration fails.
- (In MSIX, Registration occurs on a per-user basis and begins when a user logs on. The OS then loads the preinstalled packaged app, creating user-specific app data, FTAs, and app tiles in the Start menu. This action is done by the AppReadiness Service, which is aware of all preinstalled apps and requests the Appx Deployment Service (AppxSvc) deploy those packages.)
- Customers hitting this error, even with FSLogix Hotfix 4, must deploy these KBs:
- This bug is addressed with KB5037849 for Windows 10 (May 2024). The issue isn't present on Windows 11 22H2 or higher.
- New Teams fails to launch for users logging into single-user non-persistent Windows 10 virtual desktops, or the app isn't visible in the Start Menu, but the app might become visible and launches successfully fifteen minutes after logging in.
- This issue is addressed in KB5041582/KB5041587 for Windows 10/11, and Teams 24215.1007.3082.1590 (or higher) - both components are needed.
- You might also need to exclude the following location from your roaming profile solution (for FSLogix customers, as an example, via redirections.xml):
AppData\Local\Packages\Microsoft.Windows.StartMenuExperienceHost_cw5n1h2txyewy\TempState - NOTE - The issue isn't seen in multi-user Windows 10 or 11. For Windows 2019, the StartMenuExperienceHost exclusion (
AppData\Local\Packages\Microsoft.Windows.ShellExperienceHost_cw5n1h2txyewy\TempState) should be a workaround until a KB for that OS is published on Microsoft's October patch Tuesday (KB 5044277).
- Customers installing new Teams on a golden image which later undergoes a sysprep to generalize it are failing to launch the app. This circumstance includes templates from Azure Image Gallery.
- Users logging in to the provisioned virtual machines see the Teams icon greyed out in the start menu and clicking on it has no effect.
- The AppX log in the Event Viewer has the error 0x80073CF1.
- Running
Get-AppxPackage -name MsTeams -allusersfrom an elevated PowerShell window shows that PackageUserInformation is in a Paused state for SID S-1-15-18 (LocalSystem). This error is not seen on W11 22H2 or higher. Install KB5039299 for Windows 10 KB5040437 for WS2022, and KB5040431 for W11 21H2.
- Screen sharing from chat for Azure Virtual Desktops/Windows 365 (This issue is now fixed on RD Client 1.2.5105 and Redirector Service 1.50.2402.29001).
- Screen sharing from chat for Citrix when using Workspace app 2311 only.
- msteams_autostart.exe "The parameter is incorrect": In non-persistent environments that use FSLogix (any version before 2210 HotFix 4) or Citrix Profile Manager profile containers, when new Teams attempts to autostart or a user tries to launch Teams from the Start menu, it throws the error: "The parameter is incorrect." The frequency and reproducibility of the error varies depending on the environment and especially the antivirus software being used (SentinelOne, Palo Alto, Trend Micro, Bitdefender, CrowdStrike, and so on.) and exclusions in place. This issue is now fixed on FSLogix 2210 HotFix 4. Customers facing this issue with Citrix Profile Manager are must upgrade to CPM 2402 or 2203 CU5.
- "The parameter is incorrect" error can be caused by other file system drivers. Running fltmc from an elevated command window lists the drivers. Two Citrix drivers (UPMAction and upmjit) can cause the error, even if you're only using FSLogix HotFix 4 and don't have Citrix Profile Manager. This is because Citrix VDA installers typically install profilemgt_x64.msi by default for Citrix Director monitoring of logon time counters. Removing that MSI can fix "the parameter is incorrect" error.
- New Teams fails to launch for users logging into non-persistent virtual desktops, or the app is not visible in the Start Menu.
- Admins don't experience this issue - after installing new Teams on the golden image they can launch it successfully.
- After sealing the golden image and deploying it at scale (with provisioning tools like Citrix MCS/PVS or VMware Instant-Clones), users log in to the virtual machines and click on the new Teams icon, but aren't able to launch the app. The issue is caused by a failed registration of the MSIX package at the user level with different profile management software (FSLogix before 2210 HotFix 4, Citrix CPM 2308 or 2311 but not on 2402, Ivanti UEM, and so on), even though the staging of the package was successful (the OS stored the package’s contents on the disk in the %ProgramFiles%\WindowsApps directory). This issue can be confirmed by running Get-AppxPackage -name MsTeams for the affected users. Running this code returns an empty output.
- If Get-AppxPackage -name MsTeams -allusers is now run from an elevated powershell command window, the output shows that Teams is registered (see line PackageFullName) and the Status is OK.
- This issue is fixed in FSLogix 2210 HotFix 4.
- When using Azure Virtual Desktops or Windows 365, and the MAC Remote Desktop Client or Windows app, Microsoft Teams UI doesn't enumerate all the peripherals connected to the device. Instead, only the device selected at the macOS-level is shown in the Devices' drop-down menu of Microsoft Teams. The peripheral is labeled. An example of this labeling is "MAC device name" + "Speakers".
- Teams meetings can't be launched when selecting a link from Outlook. There's an authentication prompt (Access to '{tenant}' tenant is denied) when users attempt to join an external meeting. This is fixed in new Teams 24091.214.2846.1452.
- The PowerShell window shows after new Teams is provisioned. If the virtual machine's OS has the right KB fixes (see Deploy the new Microsoft Teams client, the second bullet in the Notes section), then admins can delete this registry key and the Powershell window won't show anymore:
Location: "HKEY_LOCAL_MACHINE\Software\Microsoft\Windows\CurrentVersion\Run"
Name: TeamsProvisionRunKey
The regkey was added by the teamsbootstrapper.exe version 1.0.2407104 as a workaround for environments lacking those KB fixes.
Note
Microsoft is working on a solution and plan to remove these limitations soon.
Enhancements in new Teams
Issues from classic Teams are now fixed in new Teams:
- Multitenant Multi-Account.
- Performance improvements in hardware resource consumptions.
- Channels 2.0.
- Multi-window is enabled by default, without prompting for a Restart.
- Sharing toolbar improvements (including pinning/unpinning).
VDI Feature comparison between classic Teams and new Teams
All the multimedia features that work on the classic Teams client are expected to work in the new Teams client. For specific feature matrix, check your VDI Provider website.
| Provider | Details |
|---|---|
| Azure Virtual Desktops and Windows 365 | Supported features for Microsoft Teams on Azure Virtual Desktop |
| Citrix | Optimization for Microsoft Teams |
| VMware | MS Teams Optimization Feature Compatibility Matrix for Horizon 7 and Horizon 8 Recent Releases. (86475) (vmware.com) |
New Teams for web in VDI
New Teams for Web isn't supported in VDI environments, so performance and reliability may be negatively impacted if used in VDI.
Features not supported in VDI
The following features aren't supported in either classic Teams or new Teams when using the WebRTC-based optimization. Most of these limitations are addressed with the new SlimCore-based optimization. Check out the Feature list with the new optimization section of our VDI 2.0 article for more information.
- QoS.
- 1080p.
- Custom Backgrounds uploaded by users.
- Teams Premium features (End to End Encryption, Watermark, Premium Events aren't optimized, Custom meeting backgrounds for organizations).
- Avatars.
- Gallery View 3x3 and 7x7.
- Noise Suppression (except for Azure Virtual Desktop/W365, where noise suppression is on by default, but confirmation isn't shown in Teams client UI. This behavior is by design).
- Zoom In / Out.
- Location Based Routing.
- Media Bypass.
- HID (Citrix only).
- Share System Audio (VMware only).
- Broadcast and live event producer and presenter roles.
- Cross cloud anonymous join in Government Clouds (GCC, GCC High, and DoD).
- Record video clip doesn't capture screen share.
- The call monitor (the small floating window after you minimize the main Teams window) doesn't display video or screen share.
- Teams calls drop on a local machine that has an HID peripheral connected if a user launches a virtual desktop from that local machine and logs into Teams (Azure Virtual Desktop/W365 and VMware only).
- Organizers and presenters can't join town halls.