Interactive notification bot in Teams
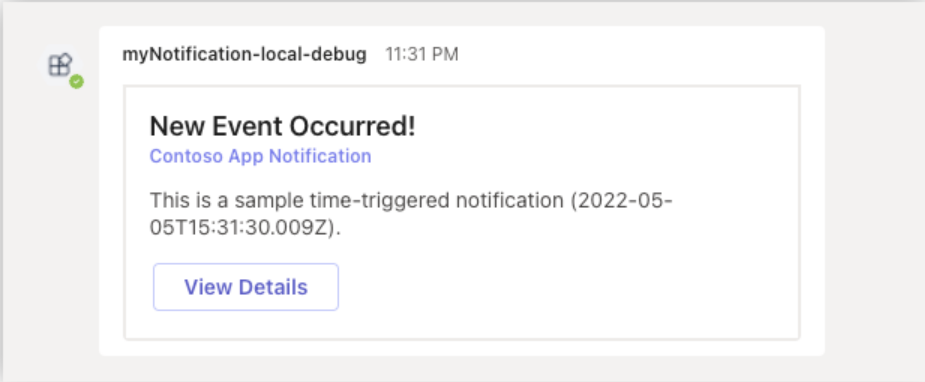
Microsoft Teams Toolkit enables you to build applications that capture events and send them as interactive notifications to a personal, group chat, or a channel in Microsoft Teams. You can send notifications as plain text or Adaptive Cards. The notification bot template creates an app that sends a message to Teams with Adaptive Cards triggered by HTTP post request.
The app template is built using the TeamsFx SDK, which provides a simple set of functions over Microsoft Bot Framework to implement your requirement. For example, a travel agency builds an app in Teams for their users to keep them up-to-date with the weather forecast. In the following flowchart, a Teams app notifies about the weather forecast to the users using an Adaptive Card:

You can send a bot notification in the following scenarios:
You want to notify everyone in a channel or chat about the same or related content.
Highly customizable UI in a Card
Need quick response, include media content, or action buttons.
Send scheduled notifications
Light up double badges on both Activity and Chat, Channel or App
Add template in source code.
Handling localization manually.
Advantages
Facilitates notifications to a personal, group chat, and in a channel, using APIs from TeamsFx SDK.
Enhances user experience by customizing notification with an Adaptive Card.
Provides multiple mechanisms to trigger notifications such as HTTP and schedule timer trigger with Azure Functions.
A notification card easily integrates with a bot and provides a consistent user experience within the Bot app.
Note
Bot application needs to be installed with the corresponding scope before sending notification.
Notification based on events
Bot Framework SDK provides the functionality to proactively message in Teams. TeamsFx SDK provides the functionality to manage bot's conversation references when a bot event is triggered. TeamsFx SDK recognizes the following bot events:
| Event | Behavior |
|---|---|
| The first time you install a bot to a person, group, or Team. | Add the target conversation reference to the storage. |
| When the bot is uninstalled from a person, group, or Team. | Remove the target conversation reference from the storage. |
| When the team installed by bot is deleted. | Remove the target conversation reference from the storage. |
| When the team installed by bot is restored. | Add the target conversation reference to the storage. |
| When the bot sends messages. | When the target conversation reference doesn't exist, add it to the storage. |
When you send notifications, TeamsFx SDK creates a new conversation from the selected conversation reference, and then sends a message. For advanced usage, you can directly access the conversation reference to execute your own bot logic:
// list all installation targets
for (const target of await notificationApp.notification.installations()) {
    // call Bot Framework's adapter.continueConversationAsync()
    await target.adapter.continueConversationAsync(
        target.botAppId,
        target.conversationReference,
        async (context) => {
            // your own bot logic
            await context...
        }
    );
}
Notification bot installation
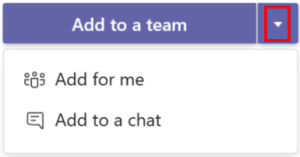
A notification bot needs to be installed into a team or a group chat or as a personal app, depending on the required scope. During installation, you can select the scope where you want to add and use the bot:
To open the bot in personal scope, select Open.
To open the bot in a shared scope, select the required channel, chat, or meeting from the list, and move through the dialog to select Go.
For more install options, see configure default install options. For uninstalling, see remove an app from Teams.
Customize notification
You can make the following customizations to extend the notification template to fit your business need:
- Customize the trigger point from event source
- Customize the notification content
- Customize where notifications are sent
Customize the trigger point from event source
You can customize the following triggers:
Expressbased notification:When an HTTP request is sent to
src/index.jsentry point, the default implementation sends an Adaptive Card to Teams. You can customize this event by modifyingsrc/index.js. A typical implementation can call an API to retrieve events, data, or both that can send an Adaptive Card as required. You can perform the following to add more triggers:- Create a new routing:
server.post("/api/new-trigger", ...). - Add timer trigger(s) from widely used npm packages, such as cron, node-schedule, or from other packages.
Note
By default Teams Toolkit scaffolds a single
expressentry point insrc/index.js.- Create a new routing:
Azure Functions based notification:
When you select
timertrigger, the default implemented Azure Function timer triggersrc/timerTrigger.tssends an Adaptive Card every 30 seconds. You can edit the file*Trigger/function.jsonto customize thescheduleproperty. For more information, see Azure Function documentation.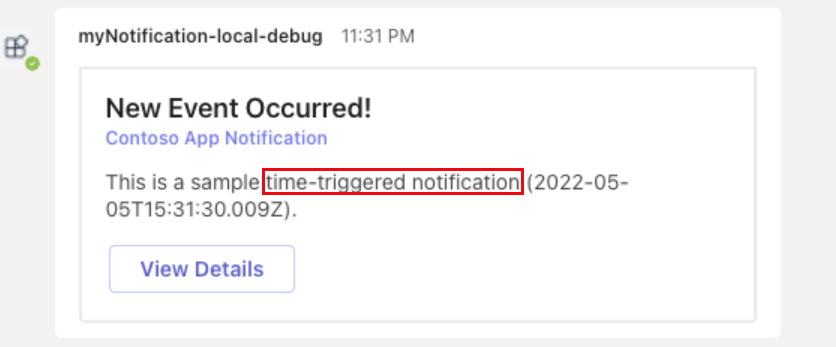
When you select
httptrigger, the HTTP request triggers the notification, and the default implementation sends an Adaptive Card to Teams. You can change this event by customizingsrc/*Trigger.ts. This implementation can call an API to retrieve events, data, or both, which can send an Adaptive Card as required.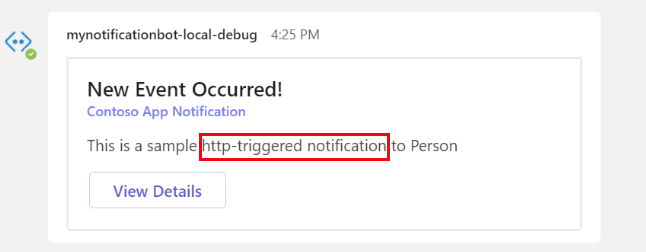
Azure Function triggers:
Event Hubtrigger to send notifications when an event is pushed to Azure Event Hub.Cosmos DBtrigger to send notifications when a Cosmos document is created or updated.
For more information on support triggers, see Azure Functions support triggers.
Customize the notification content
The file src/adaptiveCards/notification-default.json defines the default Adaptive Card. You can use the Adaptive Card designer to help visually design your Adaptive Card UI. The src/cardModels.ts defines a data structure that is used to load data for the Adaptive Card. The binding between the card model and the Adaptive Card is done by matching name such as CardData.title maps to ${title} in the Adaptive Card. You can add, edit, or remove properties and their bindings to customize the Adaptive Card as required.
You can also add new cards if needed. For more information on how to build different types of Adaptive Cards with a list or table of dynamic contents using ColumnSet and FactSet, see Adaptive Card notification sample.
Customize where notifications are sent
You can customize sending the notification to the following targets:
Notifications to a personal chat:
// list all installation targets
for (const target of await notificationApp.notification.installations()) {
    // "Person" means this bot is installed as Personal app
    if (target.type === "Person") {
        // Directly notify the individual person
        await target.sendAdaptiveCard(...);
    }
}
Notifications to a group chat:
// list all installation targets
for (const target of await notificationApp.notification.installations()) {
    // "Group" means this bot is installed to a Group Chat
    if (target.type === "Group") {
        // Directly notify the Group Chat
        await target.sendAdaptiveCard(...);

            // List all members in the Group Chat then notify each member
            const members = await target.members();
            for (const member of members) {
                await member.sendAdaptiveCard(...);
            }
        }

}
Notifications to a channel:
// list all installation targets
for (const target of await notificationApp.notification.installations()) {
    // "Channel" means this bot is installed to a Team (default to notify General channel)
    if (target.type === "Channel") {
        // Directly notify the Team (to the default General channel)
        await target.sendAdaptiveCard(...);

        // List all members in the Team then notify each member
        const members = await target.members();
        for (const member of members) {
            await member.sendAdaptiveCard(...);
        }

        // List all channels in the Team then notify each channel
        const channels = await target.channels();
        for (const channel of channels) {
            await channel.sendAdaptiveCard(...);
        }
    }
}
Notifications to a specific channel:
// find the first channel when the predicate is true.
const channel = await notificationApp.notification.findChannel(c => Promise.resolve(c.info.name === "MyChannelName"));

// send adaptive card to the specific channel.
await channel?.sendAdaptiveCard(...);
Note
To prevent an undefined output, ensure that you install the bot app in the General channel of a Team.
Notifications to a specific person:
// find the first person when the predicate is true.
const member = await notificationApp.notification.findMember(m => Promise.resolve(m.account.name === "Bob"));

// send adaptive card to the specific person.
await member?.sendAdaptiveCard(...);
Note
To prevent an undefined output and a missing notification, you need to include the specific person in notification installation scope.
Customize initialization
You need to create ConversationBot to send notification.
Note
The code is generated in project.
/** Javascript/Typescript: src/internal/initialize.*s **/
const notificationApp = new ConversationBot({
    // The bot id and password to create CloudAdapter.
    // See https://aka.ms/about-bot-adapter to learn more about adapters.
    adapterConfig: {
        MicrosoftAppId: config.botId,
        MicrosoftAppPassword: config.botPassword,
        MicrosoftAppType: "MultiTenant",
    },
    // Enable notification
    notification: {
        enabled: true,
    },
});
Customize adapter
You can customize by creating your own adapter, or customize the adapter after initialization. Following is the code sample for creating your adapter:
// Create your own adapter
const adapter = new CloudAdapter(...);

// Customize your adapter, e.g., error handling
adapter.onTurnError = ...

const notificationApp = new ConversationBot({
    // use your own adapter
    adapter: adapter;
    ...
});

// Or, customize later
notificationApp.adapter.onTurnError = ...
Add storage
Storage can be used to implement notification connections. You can add your own storage with the help of following code sample:
// implement your own storage
class MyStorage implements NotificationTargetStorage {...}
const myStorage = new MyStorage(...);

// initialize ConversationBot with notification enabled and customized storage
const notificationApp = new ConversationBot({
    // The bot id and password to create CloudAdapter.
    // See https://aka.ms/about-bot-adapter to learn more about adapters.
    adapterConfig: {
        MicrosoftAppId: config.botId,
        MicrosoftAppPassword: config.botPassword,
        MicrosoftAppType: "MultiTenant",
    },
    // Enable notification
    notification: {
        enabled: true,
        storage: myStorage,
    },
});
If storage isn't provided, you can use a default local file storage, which stores notification connections into:
.notification.localstore.jsonif running locally.${process.env.TEMP}/.notification.localstore.json, ifprocess.env.RUNNING_ON_AZUREis set to 1.
If you're using the default local file storage, Azure web app and Azure Functions clean up the local file during a restart or redeploy. You can also uninstall the bot from Teams, then install it to again add connections to the storage.
The NotificationTargetStorage is different from Bot Framework SDK's custom storage. The notification storage requires read, write, delete, and list functionalities but Bot Framework SDK's storage has read, write, and delete functionalities and doesn’t have the list functionality.
For more information about Azure blob storage, see the notification storage implementation sample.
Note
- It's recommended to use your own shared storage for production environment.
- If you implement your own Bot Framework SDK's storage, for example,
botbuilder-azure-blobs.BlobsStorage, you need to implement another storage for notification. You can share the same Blob Connection String with different containers.
Add authentication for notification API
If you select HTTP trigger, the scaffolded notification API doesn't have authentication or authorization enabled. Ensure that you add authentication or authorization for the API before using it for production. You can perform one of the following actions:
Use an API key. You can use function access keys, if you select Azure Functions to host your notification bot.
Use an access token issued by Microsoft Entra ID. For more information, see Configure SSO for your bot in Microsoft Entra ID.
There can be more authentication or authorization solutions for an API, you can select as required.
Connect to existing APIs
If you don't have the required SDK and want to invoke external APIs in your code, the Teams: Connect to an API command in Microsoft Visual Studio Code Teams Toolkit extension, or the teamsfx add api-connection command in TeamsFx CLI can be used to bootstrap code to call target APIs. For more information, see Integrate existing third-party APIs.
Teams bot application or Teams Incoming Webhook
TeamsFx supports two ways to help you send notifications from your system to Teams:
- Create a Teams bot app.
- Create Teams Incoming Webhook.
In the following table, you can see the comparison of the two different ways:
| Teams bot app | Teams Incoming Webhook | |
|---|---|---|
| Message individual person | ✔️ | ❌ |
| Message group chat | ✔️ | ❌ |
| Message public channel | ✔️ | ✔️ |
| Message private channel | ❌ | ✔️ |
| Send card message | ✔️ | ✔️ |
| Send welcome message | ✔️ | ❌ |
| Retrieve Teams context | ✔️ | ❌ |
| Require installation steps in Teams | ✔️ | ❌ |
| Require Azure resource | Azure Bot Service | ❌ |
Incoming Webhook notification
Important
Microsoft 365 Connectors (previously called Office 365 Connectors) are nearing deprecation, and the creation of new Microsoft 365 Connectors will soon be blocked. For more information on the schedule and how the Workflows app provides a more flexible and secure experience, see retirement of Microsoft 365 connectors within Microsoft Teams.
How can you create a webhook in Teams?
To automatically post to a chat or channel when a webhook request is received, use the predefined workflow templates or create a workflow from scratch using the When a Teams webhook request is received trigger. For more information, see post a workflow when a webhook request is received in Microsoft Teams.
For more information about the When a Teams webhook request is received trigger, see Microsoft Teams - Webhook.
If you've already built Office 365 Connectors:
Create a Power Automate connector: Power Automate enhances the widely used Workflows apps in Teams. It's the scalable and secure approach to transmit data programmatically into and out of Teams. If you adopt this method, you can create workflow templates for posting alerts from your product to Teams channels. This approach simplifies user adoption of the new method. For more information, see Power Automate for enterprise developers, ISVs, and partners.
Update your Teams app: You can enhance your current Teams app. For example, you can enable users to set up proactive messages based on trigger events within your system. For more information, see how bots can post to channels through proactive messages.
Known issues
- Workflows app can't post in private channels as a flow bot. However, it can post on behalf of a user.
- Workflows support Adaptive Cards only. It doesn't support the older message card format that Office 365 Connectors use. Workflows don't support using the message card format. For more information, see how to convert connector message card format to Adaptive Card.
- Workflows don't offer third-party connectors such as DataDog and Jenkins.
- Workflows can only be created in your default environment.
Limitations
Workflows are linked only to specific users (referred to as owners of the workflow) and not to a Teams team or channel. Workflows can become orphan flows in the absence of an owner if no co-owners assigned. To maintain continuity in the business process automated by the flow, admins can add one or more co-owners and grant them full control over the workflow. They can also add authentication for connections, if any, and enable the flow if it has been disabled. For more information, see manage orphan flows.
Incoming Webhooks help in posting messages from apps to Teams. If Incoming Webhooks are enabled for a Team in any channel, it exposes the HTTPS endpoint, which accepts correctly formatted JSON and inserts the messages into that channel. For example, you can create an Incoming Webhook in your DevOps channel, configure your build, and simultaneously deploy and monitor services to send alerts. TeamsFx provides you with an Incoming Webhook notification sample that helps you to:
- Create an Incoming Webhook in Teams.
- Send notifications using Incoming Webhooks with Adaptive Cards.
Send activity feed notifications
If you want to send activity feed notifications for your app, you can use the activity feed notification APIs in Microsoft Graph. For more information, see Send activity feed notifications to users in Microsoft Teams.
FAQ
Why is the notification installations empty even though the bot app is installed in Teams?
Teams sends an event only at the first installation. If the bot app is already installed before your notification bot service is launched, either the installation event didn't reach the bot service or is omitted.
You can resolve this issue in the following ways:
- Send a message to your personal bot or mention your bot in group chat or channel, which helps you to reach the bot service again with correct installation information.
- Uninstall the bot app from Teams then redebug or relaunch it. You can resend the installation event to bot service.
Notification target connections are stored in the persistence storage. If you're using the default local file storage, all installations are stored under .notification.localstore.json.
Note
For more information to add your own storage, see add storage.
Why Bad Request or Bad Argument error occurs when sending notification?
If the notification installation doesn't match the bot ID or password, you can get a Failed to decrypt conversation ID error. One possible cause for this error is that the bot ID or password is changed due to cleaning local state or reprovisioning.
You can resolve this issue by cleaning your notification storage. After cleaning, notify in Teams to reinstall your bot, and ensure that the new installation is up to date. Each stored notification installation is bound with one bot. If you're able to check your notification storage, its bot field should match the bot you're running such as the bot ID with the same GUID.
Note
In case of local storage the default location is .notification.localstore.json.
Why notification target is lost after restarting or redeploying the bot app?
Notification target connections are stored in the persistence storage. If you're using the default local file storage, Azure web app and Azure Functions clean up the local file during a restart or redeploy. You can also uninstall the bot from Teams, then install it to again add connections to the storage. It's recommended to use your own shared storage for production environment.
Why is undefined error returned when using the API `findChannel`()?
You can encounter an undefined error, when the bot app is installed into other channels instead of the General channel. To fix this error, you can uninstall the bot app from Teams and redebug and relaunch it. After you've redebug and relaunched, ensure that the bot app is installed into the General channel.
Can I know all the targets where my bot is installed in and out of the notification project?
There are Microsoft Graph APIs to list apps installed in a team, group, or chat. If necessary, iterate your team, group, or chat into an installed app to be targeted. In the notification project, it uses persistence storage to store installation targets. For more information, see notification based on events.
How to customize the Azurite listening ports?
If Azurite exits due to port in use, you can specify another listening port and update the connection string of AzureWebJobsStorage in local.settings.json.
How to extend my notification bot to support command and response?
Go to
bot\src\internal\initialize.ts(js)and update yourconversationBotinitialization to enable the notification feature: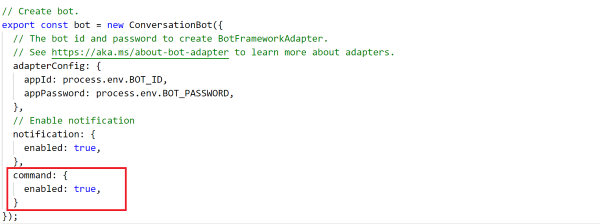
To add command to your bot, follow the instructions in Command bot in Teams.

How to extend my notification bot by adding workflow bot Adaptive Card actions?
The Adaptive Card action handler feature enables the app to respond to Adaptive Card actions that are triggered by end users to complete a sequential workflow. An Adaptive Card provides one or more buttons in the card to ask for user's input such as calling some APIs. The Adaptive Card then sends another Adaptive Card in the conversation to respond to the card action.
For more information on how to add adaptive card actions to command bot, see Workflow bot in Teams.
Step-by-step guide
Follow the step-by-step guide to build Teams notification bot.
See also
Platform Docs