Note
Access to this page requires authorization. You can try signing in or changing directories.
Access to this page requires authorization. You can try changing directories.
Note
We’ve enhanced the command menu experience as prompt starters. We recommend you to refer to prompt starters.
To define a set of core commands that your bot can respond to, you can add a command menu with a dropdown list of commands for your bot. The list of commands is presented to the users in the compose message area when they are in conversation with your bot. Select a command from the list to insert the command string into the compose message box and select Send.

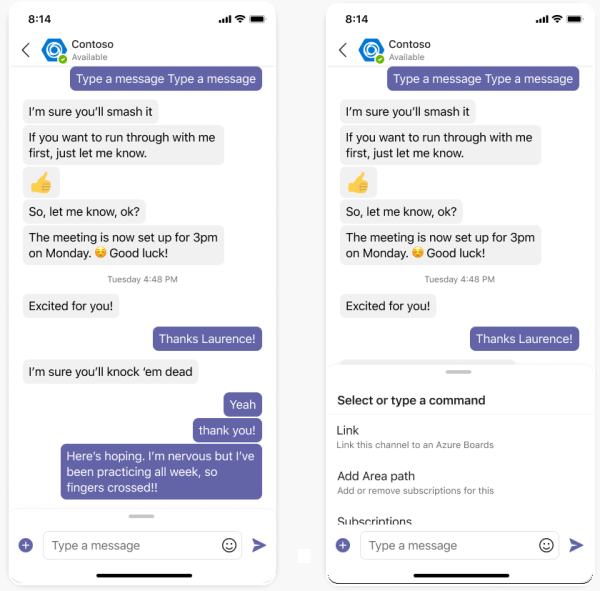
Create a command menu for your bot
Note
It's recommended that you'd create a command bot by following the step-by-step guide to build command bot with JavaScript using the new generation development tool for Teams. For more information about Microsoft 365 Agents Toolkit (previously known as Teams Toolkit), see Agents Toolkit overview for Visual Studio Code and Agents Toolkit overview for Visual Studio.
Important
The code samples in this section are based on version 4.6 and later versions of the Bot Framework SDK. If you are looking for documentation for earlier versions, see the bots - v3 SDK section in the Legacy SDKs folder of the documentation.
Command menus are defined in your app manifest. You can either use Developer Portal to create them or add them manually in the app manifest.
Create a command menu for your bot using Developer Portal
A prerequisite to create a command menu for your bot is that you must edit an existing app manifest. The steps to add a command menu are the same, whether you create a new manifest or edit an existing one.
To create a command menu for your bot using Developer Portal:
Open Teams and select Apps from the left pane. In the Apps page, search for Developer Portal, and then select Open.
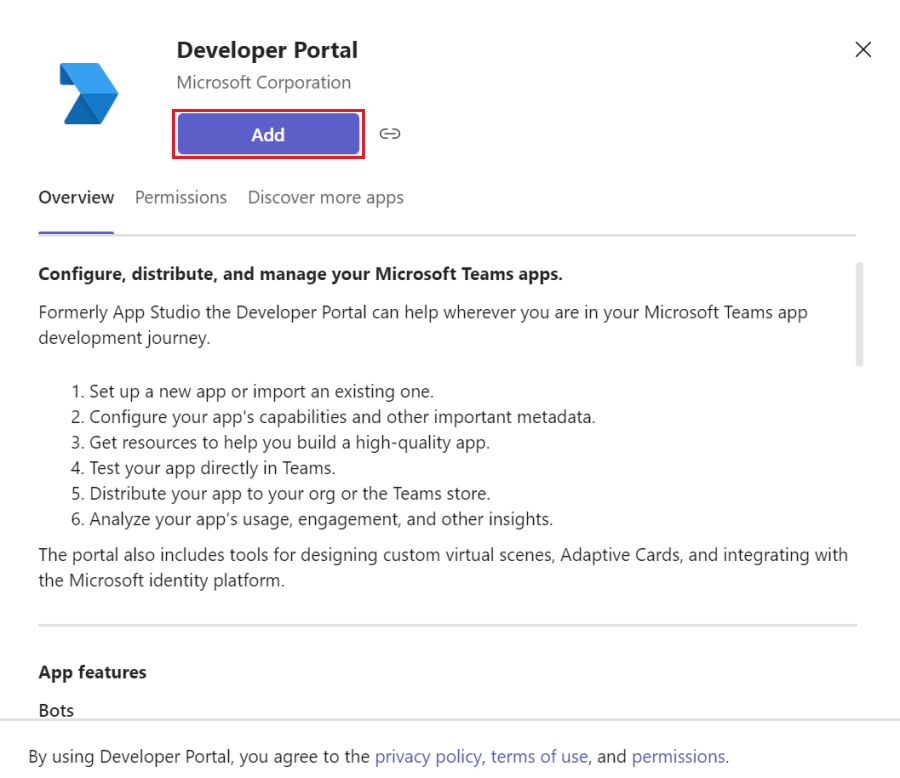
In Developer Portal, select the Apps tab. If you don't have an existing app package, you can create or import an existing app. For more information, see Developer Portal for Teams.
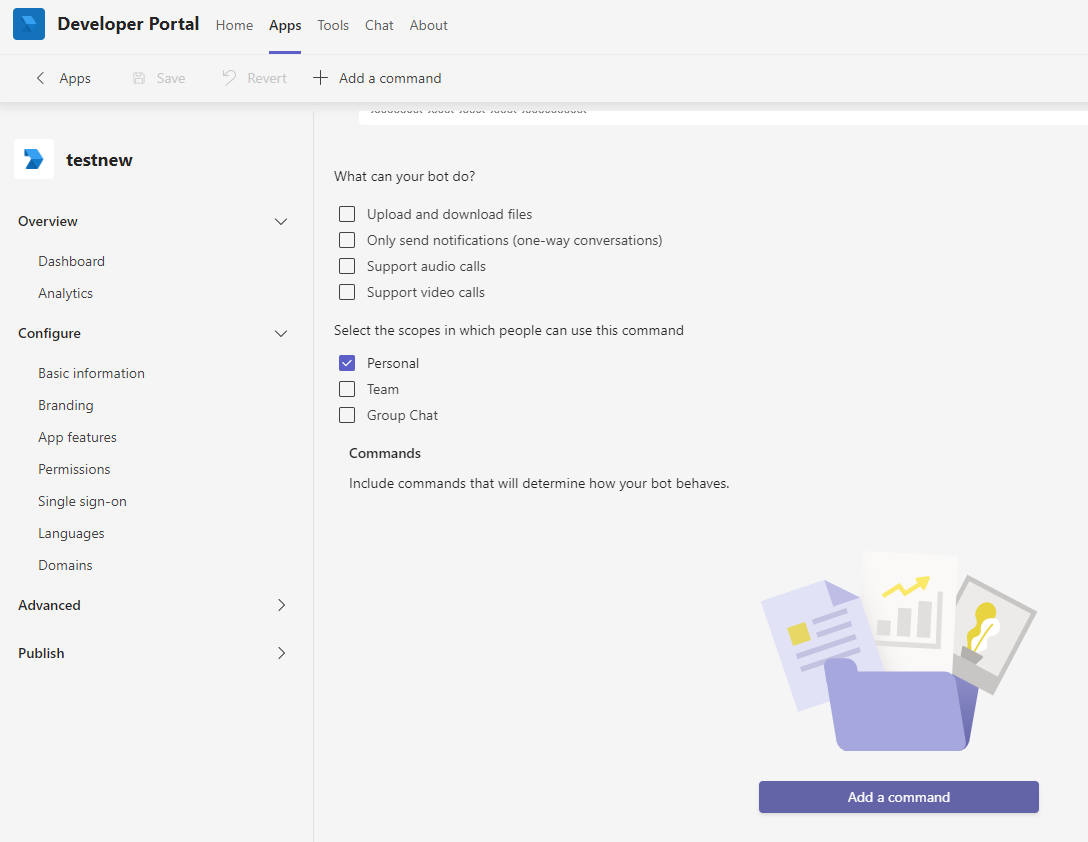
Select Apps tab, select App features from the left pane, and then select Bots.
Select Add a command under Commands section.
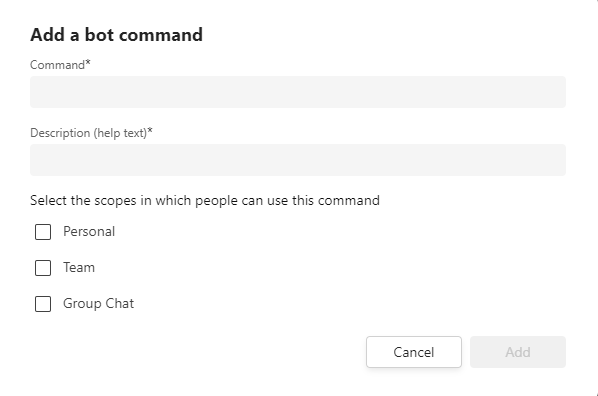
Enter the Command that appears as the command menu for your bot.
Enter the Description that appears under the command text in the menu. Description must be a brief explanation of the purpose of the command.
Select the Scope check box and then select Add. This defines where the command menu must appear.
Create a command menu for your bot by editing Manifest.json
Another way to create a command menu is to create it directly in the manifest file while developing your bot source code. To use this method, follow these points:
- Each menu supports up to 10 commands.
- Create a single command menu that works in all scopes.
- Create a different command menu for each scope.
Manifest example for single menu for both scopes
The manifest example code for single menu for both scopes is as follows:
{
  ⋮
  "bots":[
    {
      "botId":"[Microsoft App ID for your bot]",
      "scopes": [
        "personal",
        "team"
      ],
      "commandLists":[
        {
          "scopes":[
            "team",
            "personal"
          ],
          "commands":[
            {
              "title":"Help",
              "description":"Displays this help message"
            },
            {
              "title":"Search Flights",
              "description":"Search flights from Seattle to Phoenix May 2-5 departing after 3pm"
            },
            {
              "title":"Search Hotels",
              "description":"Search hotels in Portland tonight"
            },
            {
              "title":"Best Time to Fly",
              "description":"Best time to fly to London for a 5 day trip this summer"
            }
          ]
        }
      ]
    }
  ],
  ...
}
Manifest example for the menu for each scope
The manifest example code for the menu for each scope is as follows:
{
  ...
  "bots":[
    {
      "botId":"<Microsoft app ID for your bot>",
      "scopes": [
        "groupChat",
        "team"
      ],
      "commandLists":[
        {
          "scopes":[
            "team"
          ],
          "commands":[
            {
            "title":"help",
            "description":"Displays this help message for channels"
            }
          ]
        },
        {
          "scopes":[
            "groupChat"
          ],
          "commands":[
            {
            "title":"help",
            "description":"Displays this help message for group chat"
            }
          ]
        }
      ]
    }
  ],
  ...
}
You must handle menu commands in your bot code as you handle any message from users. You can handle menu commands in your bot code by parsing out the @Mention portion of the message text.
Handle menu commands in your bot code
Bots in a group or channel respond only when they're mentioned @botname in a message. Every message received by a bot when in a group or channel scope contains its name in the message text. Before handling the command being returned, your message parsing must handle the message received by a bot with its name.
Note
To handle the commands in code, they are sent to your bot as a regular message. You must handle them as you would handle any other message from your users. The commands in code insert pre-configured text into the text box. The user must then send that text as they do for any other message.
You can parse out the @Mention portion of the message text using a static method provided with the Microsoft Bot Framework. It's a method of the Activity class named RemoveRecipientMention.
The C# code to parse out the @Mention portion of the message text is as follows:
// Remove recipient mention text from Text property.
// Use with caution because this function is altering the text on the Activity.
var modifiedText = turnContext.Activity.RemoveRecipientMention();
To enable smooth functioning of your bot code, there are few best practices that you must follow.
Command menu best practices
Following are the command menu best practices:
- Keep it simple: The bot menu is meant to present the key capabilities of your bot.
- Keep it short: Menu options must not be long and must not be complex natural language statements. They must be simple commands.
- Keep it invokable: Bot menu actions or commands must always be available, regardless of the state of the conversation or the dialog the bot is in.
Note
If you remove any commands from your manifest, you must redeploy your app to implement the changes. In general, any changes to the manifest require you to redeploy your app.
Next step
See also
Collaborate with us on GitHub
The source for this content can be found on GitHub, where you can also create and review issues and pull requests. For more information, see our contributor guide.
Platform Docs