Note
Access to this page requires authorization. You can try signing in or changing directories.
Access to this page requires authorization. You can try changing directories.
Note
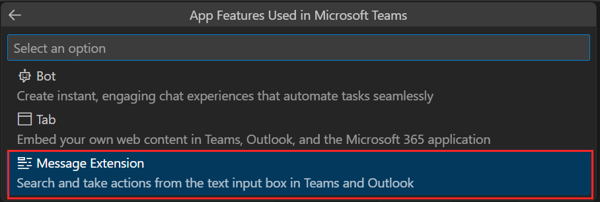
API-based message extensions only support search commands.
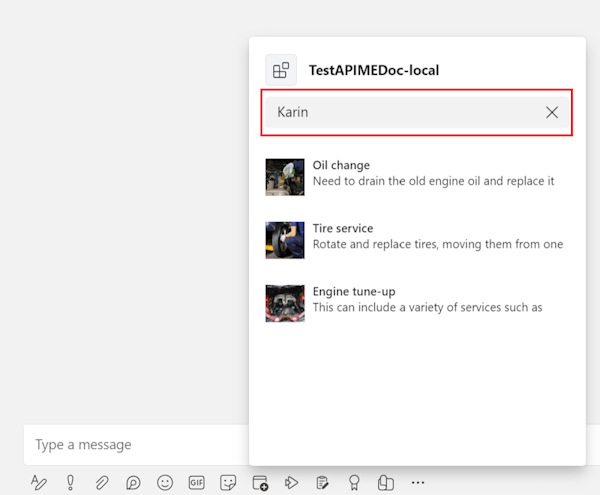
API-based message extensions are a Microsoft Teams app capability that integrates external APIs directly into Teams, enhancing your app's usability and offering a seamless user experience. API-based message extensions support search commands and can be used to fetch and display data from external services within Teams, streamlining workflows by reducing the need to switch between applications.
Note
Agents provide a more flexible, intelligent, and future‑ready experience that enables richer reasoning, simpler development, and better alignment with the evolving Teams and Microsoft 365 platform. We recommend that you explore and build agents.
For more information, see build declarative agents and build agents in Teams.
If you have an existing bot-based message extension, you can extend it as an agent as well.
Before you get started, ensure that you meet the following requirements:
1. OpenAPI Description (OAD)
Ensure that you adhere to following guidelines for OpenAPI Description (OAD) document:
- OpenAPI versions 2.0 and 3.0.x are supported.
- JSON and YAML are the supported formats.
- The request body, if present, must be application/Json.
- Define an HTTPS protocol server URL for the
servers.urlproperty. - Only POST and GET HTTP methods are supported.
- The OpenAPI Description document must have an
operationId. - Only one required parameter without a default value is allowed.
- A required parameter with a default value is considered optional.
- Users must not enter a parameter for a header or cookie.
- The operation must not have a required header or cookie parameters without default values.
- Ensure that there are no remote references in the OpenAPI Description document.
- Constructing arrays for the request isn’t supported; however, nested objects within a JSON request body are supported.
- Teams doesn't support the
oneOf,anyOf,allOf, andnot(swagger.io) constructs.
The following code is an example of an OpenAPI Description document:
openapi: 3.0.1
info:
title: OpenTools Plugin
description: A plugin that allows the user to find the most appropriate AI tools for their use cases, with their pricing information.
version: 'v1'
servers:
- url: https://gptplugin.opentools.ai
paths:
/tools:
 get:
   operationId: searchTools
   summary: Search for AI Tools
   parameters:
     - in: query
       name: search
       required: true
       schema:
         type: string
       description: Used to search for AI tools by their category based on the keywords. For example, ?search="tool to create music" will give tools that can create music.
   responses:
     "200":
       description: OK
       content:
         application/json:
           schema:
             $ref: '#/components/schemas/searchToolsResponse'
     "400":
       description: Search Error
       content:
         application/json:
           schema:
             $ref: '#/components/schemas/searchToolsError'
components:
schemas:
 searchToolsResponse:
   required:
     - search
   type: object
   properties:
     tools:
       type: array
       items:
         type: object
         properties:
           name:
             type: string
             description: The name of the tool.
           opentools_url:
             type: string
             description: The URL to access the tool.
           main_summary:
             type: string
             description: A summary of what the tool is.
           pricing_summary:
             type: string
             description: A summary of the pricing of the tool.
           categories:
             type: array
             items:
               type: string
             description: The categories assigned to the tool.
           platforms:
             type: array
             items:
               type: string
             description: The platforms that this tool is available on.
       description: The list of AI tools.
 searchToolsError:
   type: object
   properties:
     message:
       type: string
       description: Message of the error.
For more information, see OpenAPI structure.
2. App manifest
Ensure that you adhere to following guidelines for app manifest:
Set the app manifest version to
1.17.Set
composeExtensions.composeExtensionTypetoapiBased.Define
composeExtensions.apiSpecificationFileas the relative path to the OpenAPI Description file within the folder. This links the app manifest to the API specification.Define
apiResponseRenderingTemplateFileas the relative path to the response rendering template. This specifies the location of the template used for rendering API responses.Each command must have a link to the response rendering template. This connects each command to its corresponding response format.
The
Commands.idproperty in the app manifest must match theoperationIdin the OpenAPI Description.If a required parameter is without a default value, the command
parameters.namein the app manifest must match theparameters.namein the OpenAPI Description document.If there’s no required parameter, the command
parameters.namein the app manifest must match the optionalparameters.namein the OpenAPI Description.Make sure that the parameters for each command match exactly with the names of the parameters defined for the operation in the OpenAPI spec.
A response rendering template must be defined per command, which is used to convert responses from an API.
Full description must not exceed 128 characters.
{
"$schema": "https://developer.microsoft.com/json-schemas/teams/v1.17/MicrosoftTeams.schema.json",
+  "manifestVersion": "1.17",
"version": "1.0.0",
"id": "04805b4b-xxxx-xxxx-xxxx-4dbc1cac8f89",
"packageName": "com.microsoft.teams.extension",
"developer": {
    "name": "Teams App, Inc.",
    "websiteUrl": "https://www.example.com",
    "privacyUrl": "https://www.example.com/termofuse",
    "termsOfUseUrl": "https://www.example.com/privacy"
},
"icons": {
    "color": "color.png",
    "outline": "outline.png"
},
"name": {
    "short": "AI tools",
    "full": "AI tools"
},
"description": {
    "short": "AI tools",
    "full": "AI tools"
},
"accentColor": "#FFFFFF",
"composeExtensions": [
    {
+      "composeExtensionType": "apiBased",
+      "authorization": {
+        "authType": "apiSecretServiceAuth ",
+        "apiSecretServiceAuthConfiguration": {
+            "apiSecretRegistrationId": "9xxxxxxx-7xxx-4xxx-bxxx-1xxxxxxxxxxx"
+        }
+      },
+      "apiSpecificationFile": "aitools-openapi.yml",
       "commands": [
       {
          "id": "searchTools",
          "type": "query",
          "context": [
             "compose",
             "commandBox"
          ],
          "title": "search for AI tools",
          "description": "search for AI tools",
          "parameters": [
             {
             "name": "search",
             "title": "search query",
             "description": "e.g. search='tool to create music'"
             }
          ],
+          "apiResponseRenderingTemplateFile": "response-template.json"
       }
       ]
    }
],
"validDomains": []
}
Parameters
| Name | Description |
|---|---|
composeExtensions.composeExtensionType |
Compose extension type. Update the value to apiBased. |
composeExtensions.authorization |
Authorization related information for the API-based message extension |
composeExtensions.authorization.authType |
Enum of possible authorization types. Supported values are none, apiSecretServiceAuth, and microsoftEntra. |
composeExtensions.authorization.apiSecretServiceAuthConfiguration |
Object capturing details needed to do service auth. Applicable only when auth type is apiSecretServiceAuth. |
composeExtensions.authorization.apiSecretServiceAuthConfiguration.apiSecretRegistrationId |
Registration ID returned when developer submits the API key through Developer Portal. |
composeExtensions.apiSpecificationFile |
References an OpenAPI Description file in the app package. Include when type is apiBased. |
composeExtensions.commands.id |
Unique ID that you assign to search command. The user request includes this ID. The ID must match the OperationId available in the OpenAPI Description. |
composeExtensions.commands.context |
Array where the entry points for message extension is defined. The default values are compose and commandBox. |
composeExtensions.commands.parameters |
Defines a static list of parameters for the command. The name must map to the parameters.name in the OpenAPI Description. If you're referencing a property in the request body schema, then the name must map to properties.name or query parameters. |
composeExtensions.commands.apiResponseRenderingTemplateFile |
Template used to format the JSON response from developer’s API to Adaptive Card response. [Mandatory] |
For more information, see composeExtensions.
3. Response rendering template
- Define the schema reference URL in the
$schemaproperty to establish the structure of your template. - The supported values for
responseLayoutarelistandgrid, which determine how the response is visually presented. - A
jsonPathis recommended for arrays or when the data for the Adaptive Card isn't the root object. For example, if your data is nested underproductDetails, your JSON path would beproductDetails. - Define
jsonPathas the path to the relevant data or array in the API response. If the path points to an array, then each entry in the array binds with the Adaptive Card template and returns as a separate result. [Optional] - Get a sample response for validating the response rendering template. This serves as a test to ensure your template works as expected.
- Use tools such as Fiddler or Postman to call the API and ensure that the request and the response are valid. This step is crucial for troubleshooting and confirming that your API is functioning correctly.
- You can use the Adaptive Card Designer to bind the API response to the response rendering template and preview the Adaptive Card. Insert the template in the CARD PAYLOAD EDITOR and insert the sample response entry in the SAMPLE DATA EDITOR.
The following code is an example of a Response rendering template:
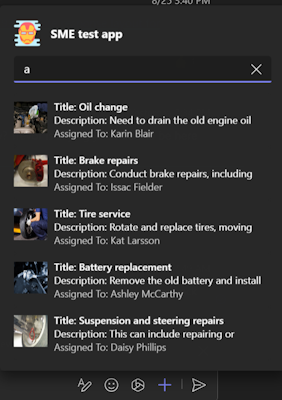
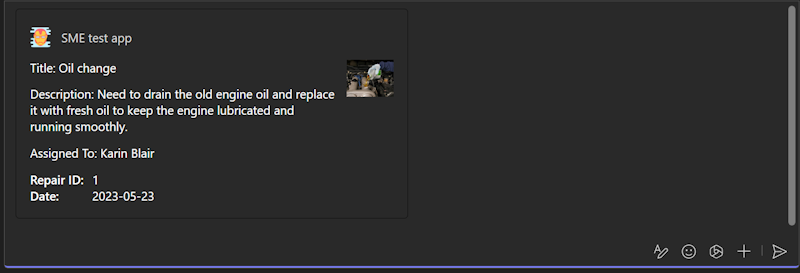
Response rendering template example
{
"version": "1.0",
"jsonPath": "repairs",
"responseLayout": "grid",
"responseCardTemplate": {
  "$schema": "http://adaptivecards.io/schemas/adaptive-card.json",
  "type": "AdaptiveCard",
  "version": "1.4",
  "body": [
    {
      "type": "Container",
      "items": [
        {
          "type": "ColumnSet",
          "columns": [
            {
              "type": "Column",
              "width": "stretch",
              "items": [
                {
                  "type": "TextBlock",
                  "text": "Title: ${if(title, title, 'N/A')}",
                  "wrap": true
                },
                {
                  "type": "TextBlock",
                  "text": "Description: ${if(description, description, 'N/A')}",
                  "wrap": true
                },
                {
                  "type": "TextBlock",
                  "text": "Assigned To: ${if(assignedTo, assignedTo, 'N/A')}",
                  "wrap": true
                },
                {
                  "type": "Image",
                  "url": "${image}",
                  "size": "Medium",
                  "$when": "${image != null}"
                }
              ]
            },
            {
              "type": "Column",
              "width": "auto",
              "items": [
                {
                  "type": "Image",
                  "url": "${if(image, image, '')}",
                  "size": "Medium"
                }
              ]
            }
          ]
        },
        {
          "type": "FactSet",
          "facts": [
            {
              "title": "Repair ID:",
              "value": "${if(id, id, 'N/A')}"
            },
            {
              "title": "Date:",
              "value": "${if(date, date, 'N/A')}"
            }
          ]
        }
      ]
    }
  ]
  },
  "previewCardTemplate": {
  "title": "Title: ${if(title, title, 'N/A')}",
  "subtitle": "Description: ${if(description, description, 'N/A')}",
  "text": "Assigned To: ${if(assignedTo, assignedTo, 'N/A')}",
  "image": {
    "url": "${image}",
    "$when": "${image != null}"
    }
  }
 }
Preview Card
Expanded Adaptive Card
Parameters
| Property | Type | Description | Required |
|---|---|---|---|
version |
string |
The schema version of the current response rendering template. | Yes |
jsonPath |
string |
The path to the relevant section in the results to which the responseCardTemplate and previewCardTemplate should be applied. If not set, the root object is treated as the relevant section. If the relevant section is an array, each entry is mapped to the responseCardTemplate and the previewCardTemplate. | No |
responseLayout |
responseLayoutType |
Specifies the layout of the results in the message extension flyout. The supported types are list and grid. |
Yes |
responseCardTemplate |
adaptiveCardTemplate |
A template for creating an Adaptive Card from a result entry. | Yes |
previewCardTemplate |
previewCardTemplate |
A template for creating a preview card from a result entry. The resulting preview card is displayed in the message extension flyout menu. | Yes |
JSON path
The JSON path is optional but can be used for arrays or where the object to be used as the data for an Adaptive Card isn't the root object. The JSON path must follow the format defined by Newtonsoft. If the JSON path points to an array, then each entry in that array is bound with the Adaptive Card template and returns as separate results.
Example Let's say you have the below JSON for a list of products and you want to create a card result for each entry.
{
   "version": "1.0",
   "title": "All Products",
   "warehouse": {
      "products": [
        ...
      ]
   }
}
As you can see, the array of results is under "products", which is nested under "warehouse", so the JSON path would be "warehouse.products".
Use Adaptive Card Designer to preview an Adaptive Card by inserting the template into Card Payload Editor. Take a sample response entry from your array or for your object and insert it into Sample Data Editor. Ensure that the card renders properly and is to your liking.
Schema mapping
The properties in OpenAPI Description document are mapped to the Adaptive Card template as follows:
string,number,integer,booleantypes are converted to a TextBlock.Example
Source Schema:
string,number,integer, andbooleanname: type: string example: doggieTarget Schema:
Textblock{ "type": "TextBlock", "text": "name: ${if(name, name, 'N/A')}", "wrap": true }
array: An array is converted to a container inside Adaptive Card.Example
Source schema:
arraytype: array items: required: - name type: object properties: id: type: integer category: type: object properties: name: type: stringTarget Schema:
Container{ "type": "Container", "$data": "${$root}", "items": [ { "type": "TextBlock", "text": "id: ${if(id, id, 'N/A')}", "wrap": true }, { "type": "TextBlock", "text": "category.name: ${if(category.name, category.name, 'N/A')}", "wrap": true } ] }
object: An object is converted to a nested property in Adaptive Card.Example
Source Schema:
objectcomponents: schemas: Pet: category: type: object properties: id: type: integer name: type: stringTarget Schema: Nested property in an Adaptive Card
{
  "type": "TextBlock",
  "text": "category.id: ${if(category.id, category.id, 'N/A')}",
  "wrap": true
},
{
  "type": "TextBlock",
  "text": "category.name: ${if(category.name, category.name, 'N/A')}",
  "wrap": true
}
image: If a property is an image URL, then it converts to an Image element in the Adaptive Card.Example
Source schema:
imageimage: type: string format: uri description: The URL of the image of the item to be repairedTarget Schema:
"Image"{ "type": "Image", "url": "${image}", "$when": "${image != null}" }
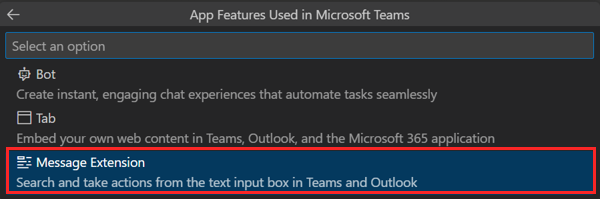
You can create an API-based message extension using Developer Portal for Teams, Microsoft 365 Agents Toolkit (previously known as Teams Toolkit) for Visual Studio Code, command line interface (CLI), or Visual Studio.
To create an API-based message extension using Developer Portal, follow these steps:
Go to Developer Portal.
Go to Apps.
Select + New app.
Enter a name of the app and select the Manifest version as Public developer preview (devPreview).
Select Add.

In the left pane, under Configure, update the following Basic information:
- Full name
- Short description
- Long description
- Developer or company name
- Website (must be a valid HTTPS URL)
- Privacy policy
- Terms of use
Select Save.
Select App features.
Select Message extension.
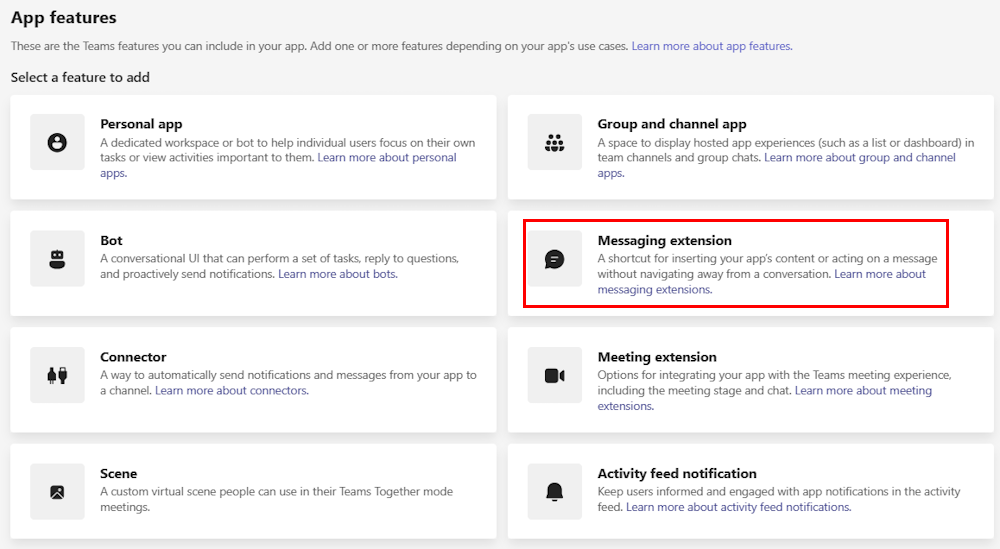
Under Message extension type, select API.
- If you get a disclaimer that reads Bot message extension is already in use by users. Would you like to change message extension type to API?, select Yes, change.
Under OpenAPI spec, select Upload now.

Select the OpenAPI Description document in the JSON or YAML format and select Open.
Select Save. A pop-up appears with the message API spec saved successfully.
Select Got it.


Add commands
Note
Message extensions built from an API only support a single parameter.
You can add commands and parameters to your message extension, to add commands:
Under Message extension type, select Add.

An Add a command pop-up appears with a list of all the available APIs from the OpenAPI Description document.
Select an API from the list and select Next.

Under Response template, select Upload now.

Note
If you have more than one API, ensure that you upload the Adaptive Card response template for each API.
Select the Adaptive Card response template file in JSON format and select Open.
The following attributes are updated automatically from the Adaptive Card template:
- Command Type
- Command ID
- Command title
- Parameter name
- Parameter description
Under Details, update the Command description.
If you want to launch a command using a trigger in Microsoft 365 Copilot, turn on the Automatically run this command when a user opens the extension toggle.
Select Add. The command is added successfully.

Select Save.
Under Authentication and authorization, select any of the following options:
- No Authentication (not recommended)
- API key
- OAuth

An API-based message extension is created.

To test your API-based message extension created in Developer Portal, you can use the following methods:
Preview in Teams: Open your message extension and select Preview in Teams in the upper-right corner. You're redirected to Teams, where you can add the app to Teams to preview the app.
Download app package: On the message extension page, select App package from the left pane and then, in the upper-left corner of the window, select Download app package. The app package is downloaded to your local machine in a .zip file. You can upload the app package to teams and test the message extension.


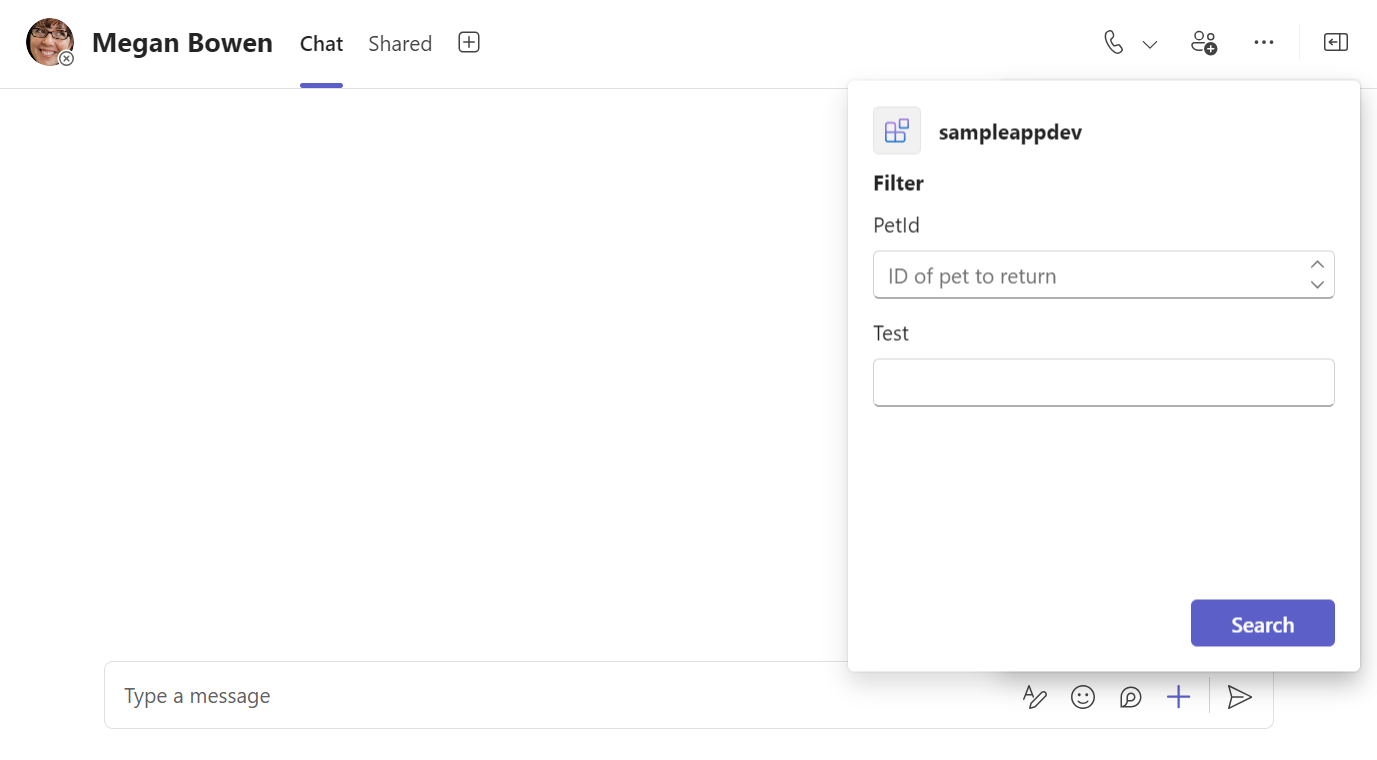
Multi parameters
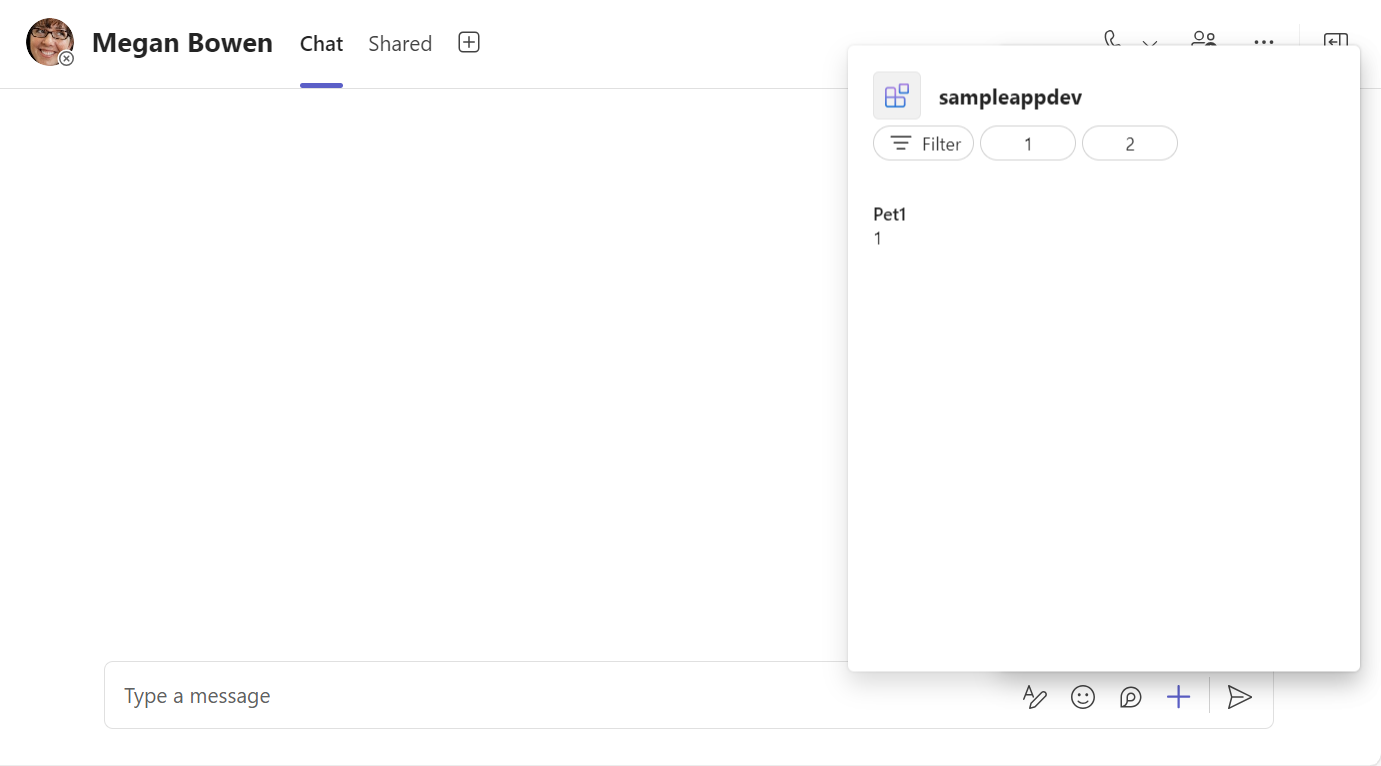
Multi parameters allow API-based message extensions to have more than one input type for query commands. For example, you can search for anime by genre, rating, status, and date.
You can specify the input types, titles, descriptions, and required fields for the parameters in the manifest.
- The
isRequiredproperty in the parameter field indicates if a parameter is mandatory for the query command. - The
nameproperty of theparametersfield in the app manifest must match theidfield in the OpenAPI Description document for the corresponding parameter.
Example
"composeExtensions": [
{
"composeExtensionType": "apiBased",
"apiSpecificationFile": "apiSpecificationFiles/openapi.json",
"commands": [
{
"context": [
"compose"
],
"type": "query",
"title": "Search Animes",
"id": "getAnimeSearch",
"parameters": [
{
"name": "q",
"title": "Search Query",
"description": "The search query",
"isRequired": true
},
{
"name": "type",
"inputType": "choiceset",
"title": "Type",
"description": "Available anime types",
"choices": [
{
"title": "TV",
"value": "tv"
},
{
"title": "OVA",
"value": "ova"
},
{
"title": "Movie",
"value": "movie"
},
{
"title": "Special",
"value": "special"
},
{
"title": "ONA",
"value": "ona"
},
{
"title": "Music",
"value": "music"
}
]
},
{
"name": "status",
"inputType": "choiceset",
"title": "Status",
"description": "Available airing statuses",
"choices": [
{
"title": "Airing",
"value": "airing"
},
{
"title": "Completed",
"value": "complete"
},
{
"title": "Upcoming",
"value": "upcoming"
}
]
},
{
"name": "rating",
"inputType": "choiceset",
"title": "Rating",
"description": "Available ratings",
"choices": [
{
"title": "G",
"value": "g"
},
{
"title": "PG",
"value": "pg"
},
{
"title": "PG-13",
"value": "pg13"
},
{
"title": "R",
"value": "r17"
},
{
"title": "R+",
"value": "r"
},
{
"title": "Rx",
"value": "rx"
}
]
}
],
"description": "Search animes",
"apiResponseRenderingTemplateFile": "response_json/getAnimeSearch.json"
},
{
"context": [
"compose"
],
"type": "query",
"title": "Search mangas",
"id": "getMangaSearch",
"parameters": [
{
"name": "q",
"title": "Search Query",
"description": "The search query",
"isRequired": true
},
{
"name": "type",
"inputType": "choiceset",
"title": "Type",
"description": "Available manga types",
"choices": [
{
"title": "Manga",
"value": "manga"
},
{
"title": "Novel",
"value": "novel"
},
{
"title": "Light Novel",
"value": "lightnovel"
},
{
"title": "One Shot",
"value": "oneshot"
},
{
"title": "Doujin",
"value": "doujin"
},
{
"title": "Manhwa",
"value": "manhwa"
},
{
"title": "Manhua",
"value": "manhua"
}
]
},
{
"name": "status",
"inputType": "choiceset",
"title": "Status",
"description": "Available manga statuses",
"choices": [
{
"title": "Publishing",
"value": "publishing"
},
{
"title": "Complete",
"value": "complete"
},
{
"title": "Hiatus",
"value": "hiatus"
},
{
"title": "Discontinued",
"value": "discontinued"
},
{
"title": "Upcoming",
"value": "upcoming"
}
]
},
{
"name": "start_date",
"title": "Start Date",
"description": "Start date of the manga",
"inputType": "date"
},
{
"name": "end_date",
"title": "End Date",
"description": "End date of the manga",
"inputType": "date"
}
],

Step-by-step guides
To build an API-based message extension, see build an API-based message extension.
See also
Collaborate with us on GitHub
The source for this content can be found on GitHub, where you can also create and review issues and pull requests. For more information, see our contributor guide.
Platform Docs