Build a dashboard in Teams
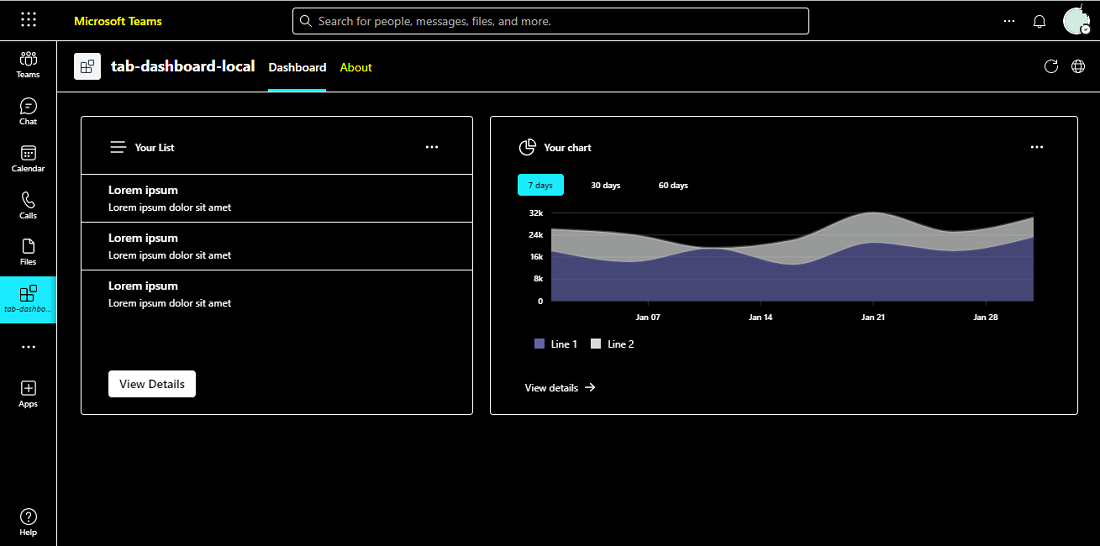
This step-by-step guide helps you to create a dashboard tab, add a new widget to the dashboard, and implement Graph API. You see the following output:

Prerequisites
| Install | For using |
|---|---|
| Visual Studio Code | JavaScript, TypeScript, or SharePoint Framework (SPFx) build environments. Use version 1.55 or later. |
| Teams Toolkit or TeamsFx CLI | Microsoft Visual Studio Code extension that creates a project scaffolding for your app. Use Teams Toolkit v5. |
| Microsoft 365 developer program | Teams account with the appropriate permissions to install an app. |
| Node.js | Back-end JavaScript runtime environment. For more information, see Node.js version compatibility table for project type. |
| Microsoft Teams | Microsoft Teams to collaborate with everyone you work with through apps for chat, meetings, and call-all in one place. |
| Microsoft Edge (recommended) or Google Chrome | A browser with developer tools. |
Create a new dashboard
Teams Toolkit supports to create a dashboard and scaffolding.
To create a new dashboard:
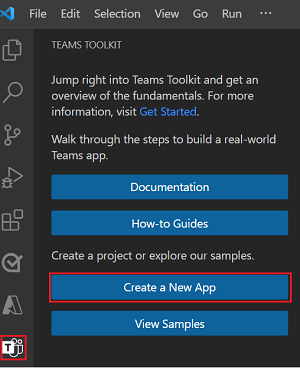
Select the Teams Toolkit icon in the Visual Studio Code Activity Bar.
Select Create a New App.
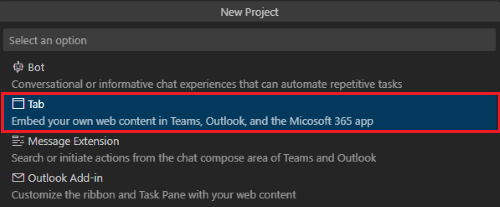
Select Tab to create a new tab project.
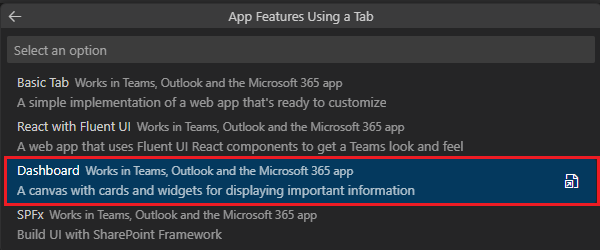
Select Dashboard.
Select TypeScript as the programming language.

Select Default folder to store your project root folder in default location.

Enter a suitable name for your app and select Enter.

The Teams tab app is created in few seconds.
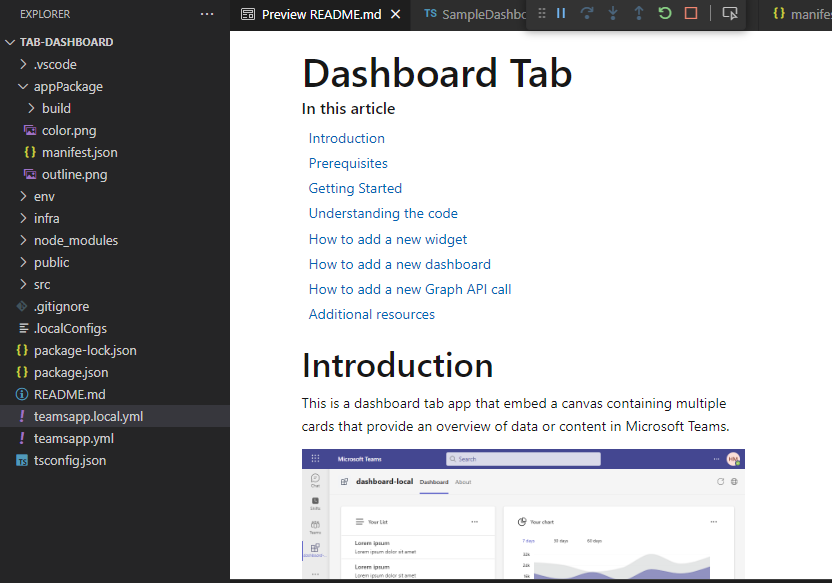
After your app is created, Teams Toolkit displays the following message:

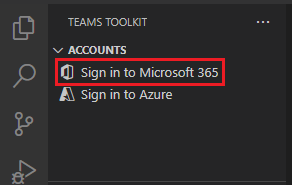
Select the Teams Toolkit icon in sidebar.
Select Sign in to Microsoft 365.
Select Sign in.

Select F5 to run the application in debug mode.
Select Add.
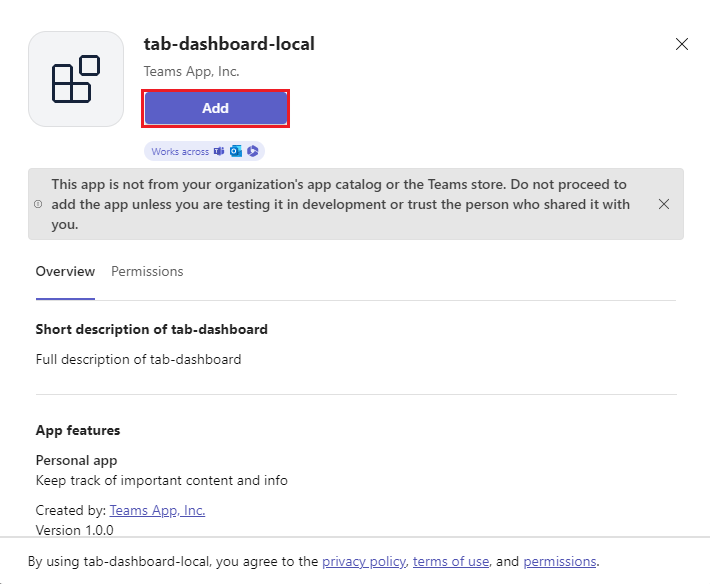
Select Open.

Tab app dashboard is successfully created in Teams.

Teams also supports different themes, including dark and high contrast themes.
The following image shows the use of Dark theme in the Teams desktop client:

In TeamsFx CLI,
If you prefer an interactive mode, execute
teamsfx newcommand and then use the keyboard to go through the same flow as in Visual Studio Code.If you prefer non-interactive mode, enter all the required parameters in one command:
teamsfx new--interactive false--capabilities "dashboard-tab"--programming-language "TypeScript"--folder "./"--app-name dashboard-cli-001
Take a tour of the app source code
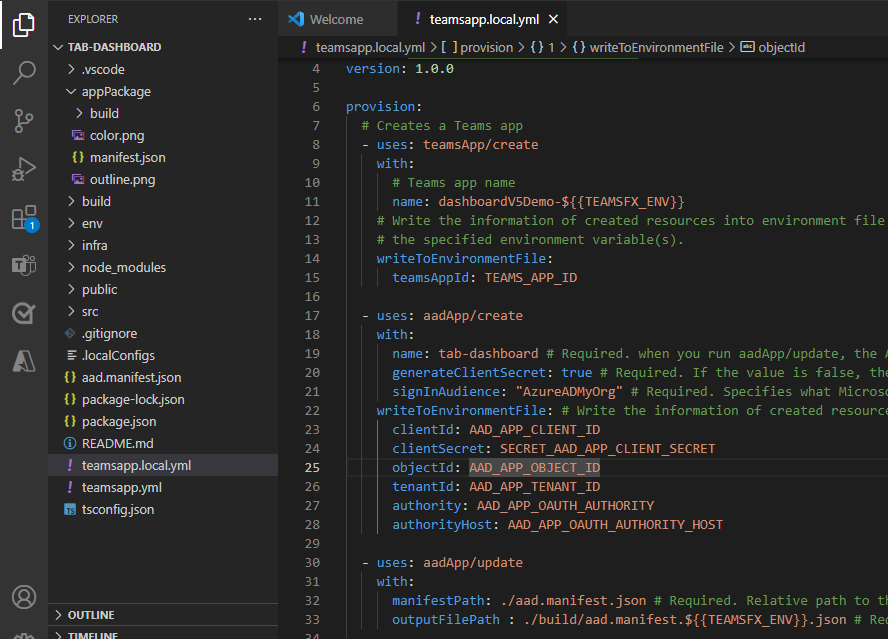
After creating the project, you can view the project folders and files in the Explorer in the Visual Studio Code. The core implementation of the dashboard is in the tabs folder.
| Folder | Contents |
|---|---|
.vscode |
Visual Studio Code files for debugging. |
appPackage |
Templates for the Teams application manifest. |
env |
Environment files. |
infra |
Templates for provisioning Azure resources. |
src |
The source code for the dashboard Teams application. |
The following files provide the business logic for the dashboard tab. You can update the files to fit your business logic requirements. The default implementation provides a starting point to help you get started.
| File | Contents |
|---|---|
src/models/chartModel.ts |
Data model for the chart widget. |
src/models/listModel.ts |
Data model for the list widget. |
src/services/chartService.ts |
A data retrieve implementation for the chart widget. |
src/services/listService.ts |
A data retrieve implementation for the list widget. |
src/dashboards/SampleDashboard.tsx |
A sample dashboard layout implementation. |
src/styles/ChartWidget.css |
The chart widget style file. |
src/styles/ListWidget.css |
The list widget style file. |
src/widgets/ChartWidget.tsx |
A widget implementation that can display a chart. |
src/widgets/ListWidget.tsx |
A widget implementation that can display a list. |
src/App.css |
The style of application route. |
src/App.tsx |
Application route. |
The following files are project-related files. Generally, you don't need to customize these files.
| File | Contents |
|---|---|
src/index.css |
The style of application entry point. |
src/index.tsx |
Application entry point. |
src/internal/addNewScopes.ts |
Implementation of new scopes add. |
src/internal/context.ts |
TeamsFx Context. |
src/internal/login.ts |
Implementation of sign-in. |
src/internal/singletonContext.ts |
Implementation of the TeamsUserCredential instance singleton. |
Add a widget to the dashboard
To add a new widget to the dashboard, follow these steps:
- Define a data model
- Create a data retrieve service
- Create a widget file
- Add the widget to the dashboard
Define a data model
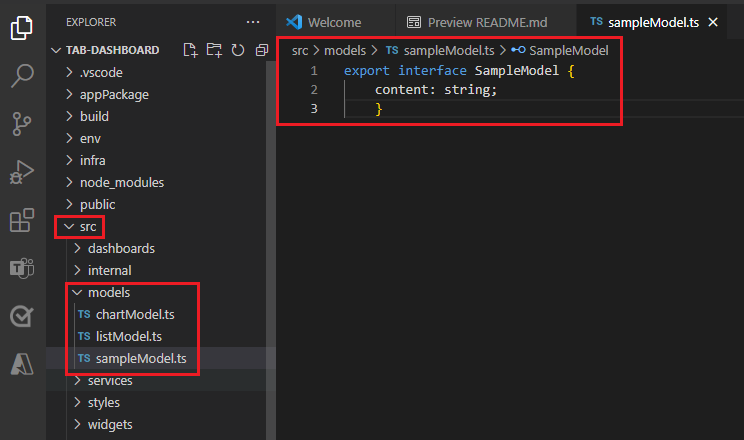
In Visual Studio Code, go to EXPLORER > src > models.
Create a sampleModel.ts file.
Add the following code in the sampleModel.ts file:
  export interface SampleModel {
  content: string;
  }
Create a data retrieve service
Note
You can implement a service to retrieve data from the backend service or from Microsoft Graph API.
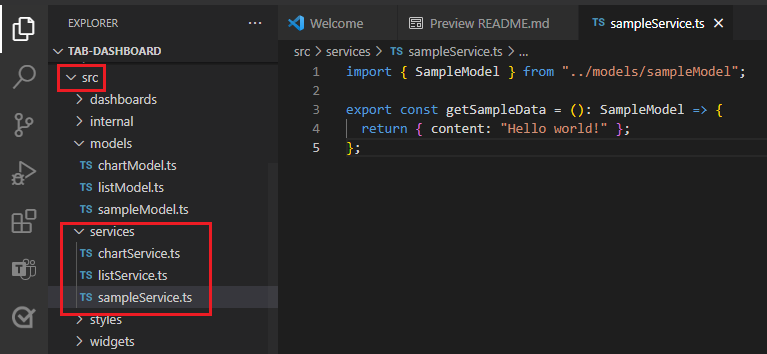
In Visual Studio Code, go to EXPLORER > src > services.
Create a sampleService.ts file.
Add the following code in the sampleService.ts file:
import { SampleModel } from "../models/sampleModel";

export const getSampleData = (): SampleModel => {
  return { content: "Hello world!" };
  };
Create a widget file
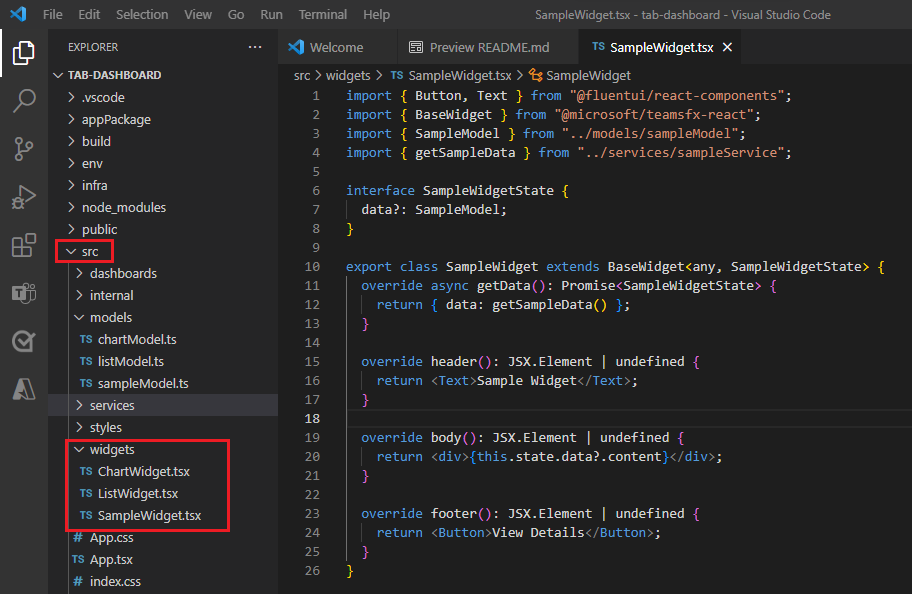
In Visual Studio Code, go to EXPLORER > src > widgets.
Create a SampleWidget.tsx file.
Add the following code in the SampleWidget.tsx file:
import { Button, Text } from "@fluentui/react-components";
import { BaseWidget } from "@microsoft/teamsfx-react";
import { SampleModel } from "../models/sampleModel";
import { getSampleData } from "../services/sampleService";
interface SampleWidgetState
{
  data?: SampleModel;
}
export class SampleWidget extends BaseWidget<any, SampleWidgetState>
{
  override async getData(): Promise<SampleWidgetState>
  {
    return { data: getSampleData() };
  }
  override header(): JSX.Element | undefined
  {
    return <Text>Sample Widget</Text>;
  }
  override body(): JSX.Element | undefined
  {
    return <div>{this.state.data?.content}</div>;
  }
  override footer(): JSX.Element | undefined
  {
    return <Button>View Details</Button>;
  }
}
Add the widget to the dashboard
To add a widget to the dashboard, follow these steps:
In Visual Studio Code, go to Explorer > src > dashboards > SampleDashboard.tsx.
Add the widget to the dashboard by updating the
override layout()method:override layout(): JSX.Element | undefined { return (<> <ListWidget /> <ChartWidget /> <SampleWidget /> </> ); }
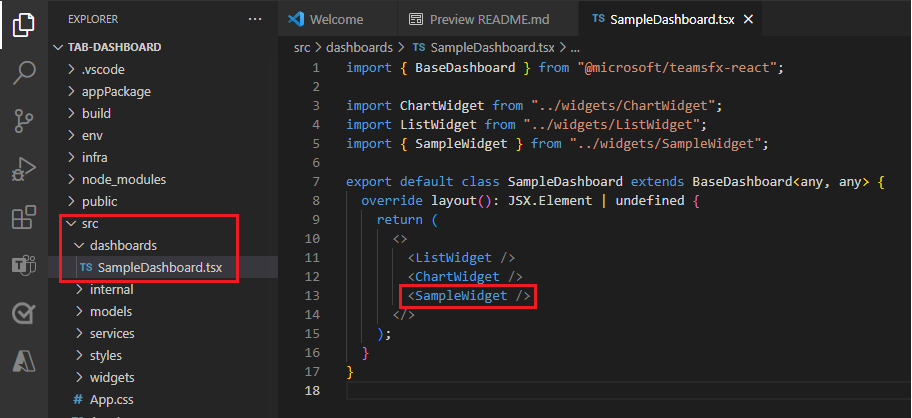
Optional: Refer the following code to add your widget in a column:
.one-column {
  display: grid;
  gap: 20 px;
  grid-template-rows: 1fr 1fr;
}
override layout(): JSX.Element | undefined { return (<> <ListWidget /> <div className="one-column"> <ChartWidget /> <SampleWidget /> </div> </> ); }After adding all the relevant details for creating a widget, save the respective files.
You can view the changed layout and the calendar widget on the dashboard.
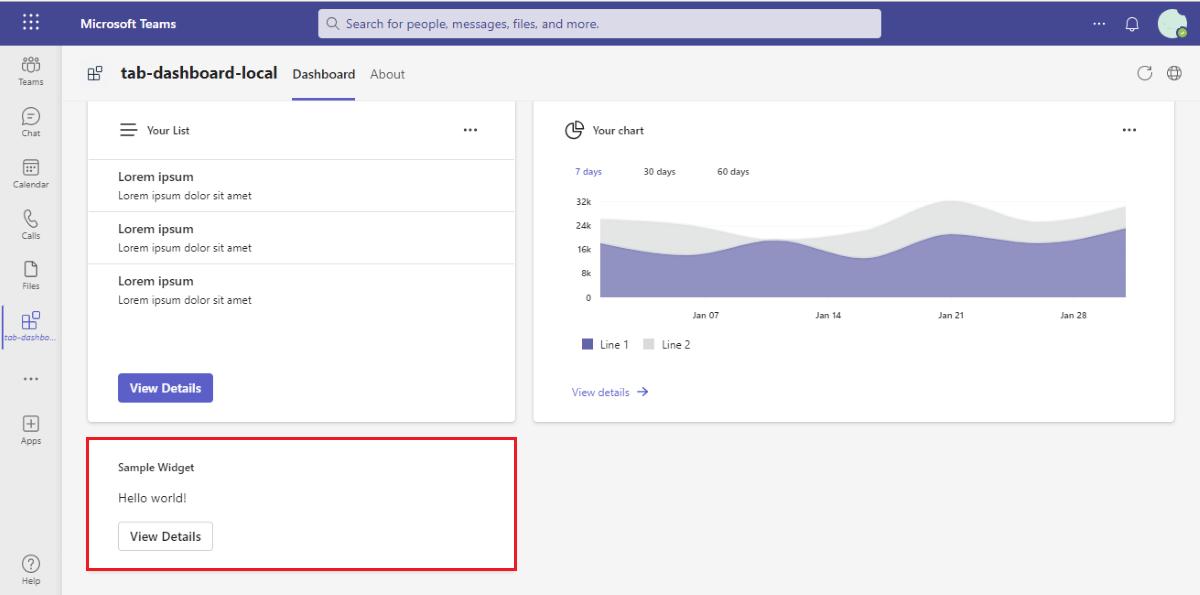
Add SSO and Graph API call
You learnt how to create a dashboard tab and add a new widget to the dashboard. Let's add Single Sign-on (SSO) and graph API call to the dashboard tab.
Add SSO
To add SSO, follow these steps:
1. Create Microsoft Entra app manifest.
To create a Microsoft Entra app manifest, follow these steps:
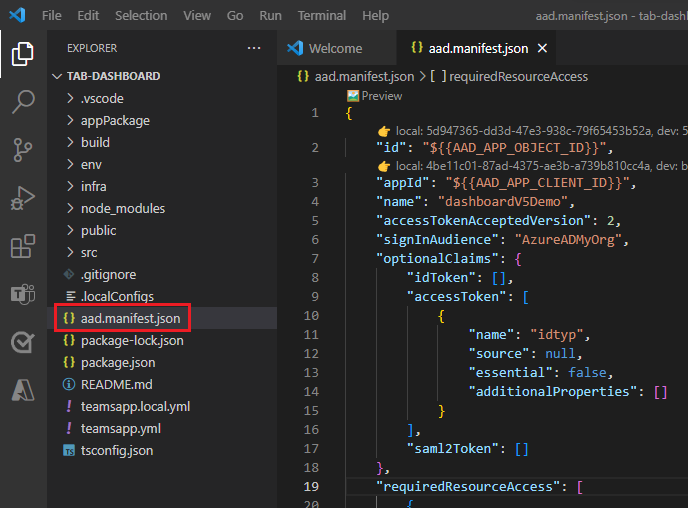
In Visual Studio Code, go to EXPLORER.
Create a aad.manifest.json file.
Add the following code in aad.manifest.json file:
{
  "id": "${{AAD_APP_OBJECT_ID}}",
  "appId": "${{AAD_APP_CLIENT_ID}}",
  "name": "dashboardDemo",
  "accessTokenAcceptedVersion": 2,
  "signInAudience": "AzureADMyOrg",
  "optionalClaims": {
      "idToken": [],
      "accessToken": [
          {
            "name": "idtyp",
            "source": null,
            "essential": false,
            "additionalProperties": []
          }
      ],
      "saml2Token": []
  },
  "requiredResourceAccess": [
      {
        "resourceAppId": "Microsoft Graph",
        "resourceAccess": [
            {
              "id": "User.Read",
              "type": "Scope"
            }
        ]
      }
  ],
   "oauth2Permissions": [
      {
        "adminConsentDescription": "Allows Teams to call the app's web APIs as the current user.",
        "adminConsentDisplayName": "Teams can access app's web APIs",
        "id": "${{AAD_APP_ACCESS_AS_USER_PERMISSION_ID}}",
        "isEnabled": true,
        "type": "User",
        "userConsentDescription": "Enable Teams to call this app's web APIs with the same rights that you have",
        "userConsentDisplayName": "Teams can access app's web APIs and make requests on your behalf",
        "value": "access_as_user"
      }
  ],
  "preAuthorizedApplications": [
      {
          "appId": "1fec8e78-bce4-4aaf-ab1b-5451cc387264",
          "permissionIds":
          ["${{AAD_APP_ACCESS_AS_USER_PERMISSION_ID}}"]
      },
      {
          "appId": "5e3ce6c0-2b1f-4285-8d4b-75ee78787346",
          "permissionIds":
          ["${{AAD_APP_ACCESS_AS_USER_PERMISSION_ID}}"]
      },
      {
          "appId": "d3590ed6-52b3-4102-aeff-aad2292ab01c",
          "permissionIds":
          ["${{AAD_APP_ACCESS_AS_USER_PERMISSION_ID}}"]
      },
      {
          "appId": "00000002-0000-0ff1-ce00-000000000000",
          "permissionIds":
          ["${{AAD_APP_ACCESS_AS_USER_PERMISSION_ID}}"]
      },
      {
          "appId": "bc59ab01-8403-45c6-8796-ac3ef710b3e3",
          "permissionIds":
          ["${{AAD_APP_ACCESS_AS_USER_PERMISSION_ID}}"]
      },
      {
          "appId": "0ec893e0-5785-4de6-99da-4ed124e5296c",
          "permissionIds":
          ["${{AAD_APP_ACCESS_AS_USER_PERMISSION_ID}}"]
      },
      {
          "appId": "4765445b-32c6-49b0-83e6-1d93765276ca",
          "permissionIds":
          ["${{AAD_APP_ACCESS_AS_USER_PERMISSION_ID}}"]
      },
      {
          "appId": "4345a7b9-9a63-4910-a426-35363201d503",
          "permissionIds":
          ["${{AAD_APP_ACCESS_AS_USER_PERMISSION_ID}}"]
      }
  ],
  "identifierUris":
  ["api://${{TAB_DOMAIN}}/${{AAD_APP_CLIENT_ID}}"],
  "replyUrlsWithType": [
    {
      "url": "${{TAB_ENDPOINT}}/auth-end.html",
      "type": "Web"
    },
    {
      "url": "${{TAB_ENDPOINT}}/auth-end.html?clientId=${{AAD_APP_CLIENT_ID}}",
      "type": "Spa"
    },
    {
      "url": "${{TAB_ENDPOINT}}/blank-auth-end.html",
      "type": "Spa"
    }
  ]
}
2. Update Teams app manifest.
To update Teams app manifest, follow these steps:
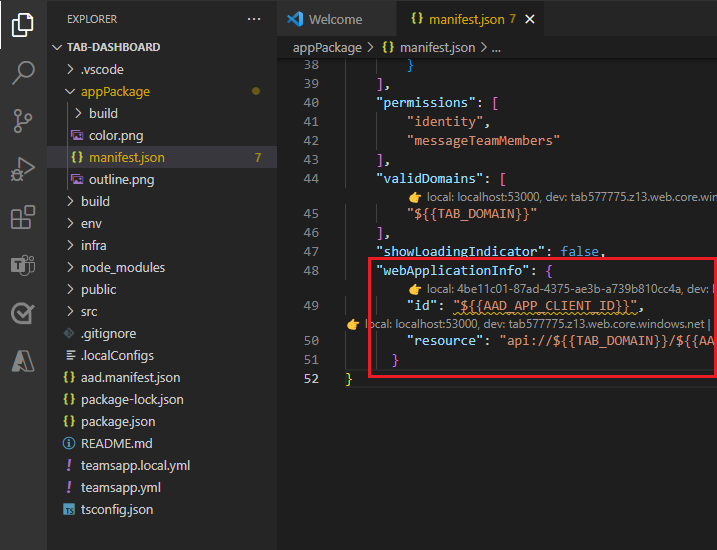
In Visual Studio Code, go to EXPLORER > appPackage > manifest.json.
Add the following code after the valid domains property in the manifest.json file:
  "webApplicationInfo": {
  "id": "${{AAD_APP_CLIENT_ID}}",
  "resource": "api://${{TAB_DOMAIN}}/${{AAD_APP_CLIENT_ID}}"
  }
3. Update Teams Toolkit configuration files.
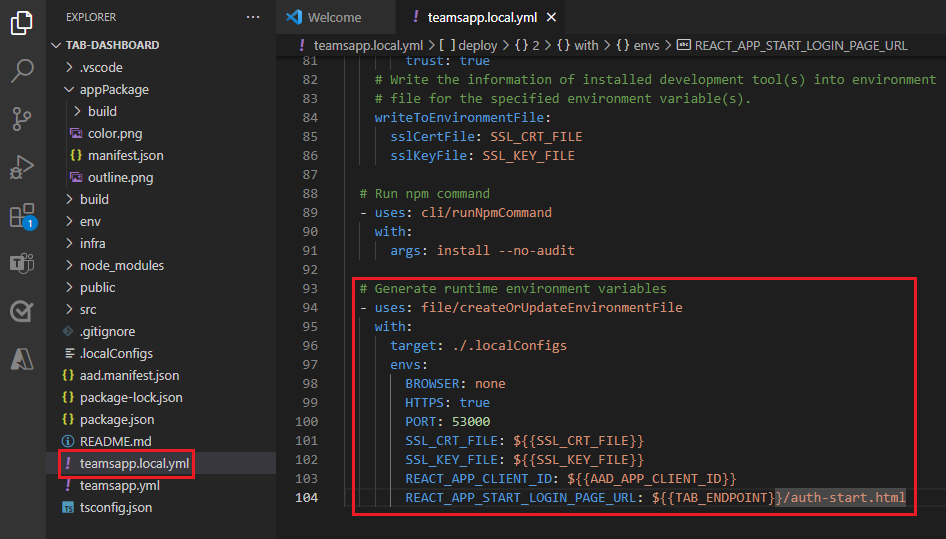
To update Teams Toolkit configuration code in teamsapp.yml and teamsapp.local.yml files, follow the steps:
Add the code under
provision.- uses: aadApp/create with: name: "YOUR_AAD_APP_NAME" generateClientSecret: true signInAudience: "AzureADMyOrg" writeToEnvironmentFile: clientId: AAD_APP_CLIENT_ID clientSecret: SECRET_AAD_APP_CLIENT_SECRET objectId: AAD_APP_OBJECT_ID tenantId: AAD_APP_TENANT_ID authority: AAD_APP_OAUTH_AUTHORITY authorityHost: AAD_APP_OAUTH_AUTHORITY_HOST - uses: aadApp/update with: manifestPath: "./aad.manifest.json" outputFilePath: ./build/aad.manifest.${{TEAMSFX_ENV}}.json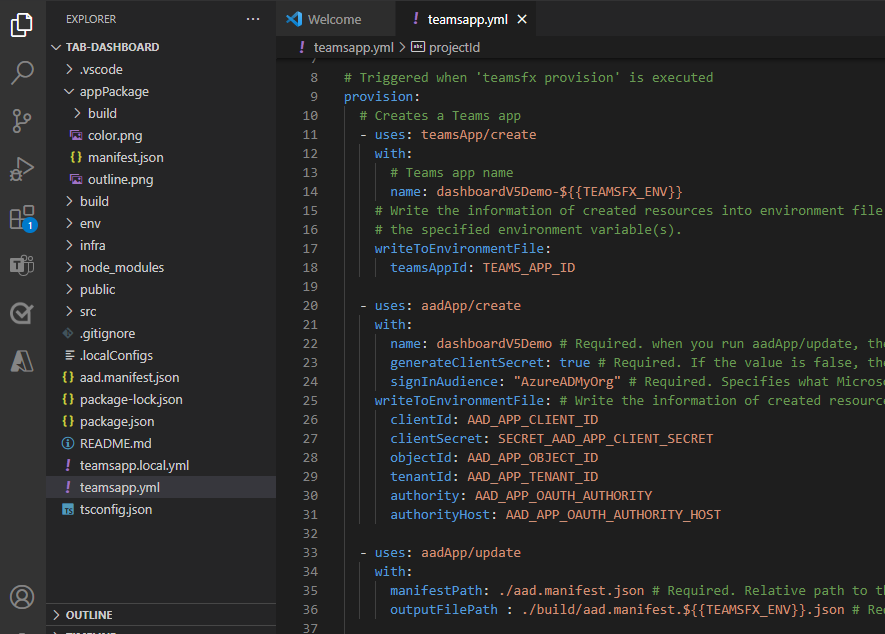
Add the following code, under the action
cli/runNpmCommandand thebuild appname:env: REACT_APP_CLIENT_ID: ${{AAD_APP_CLIENT_ID}} REACT_APP_START_LOGIN_PAGE_URL: ${{TAB_ENDPOINT}}/auth-start.html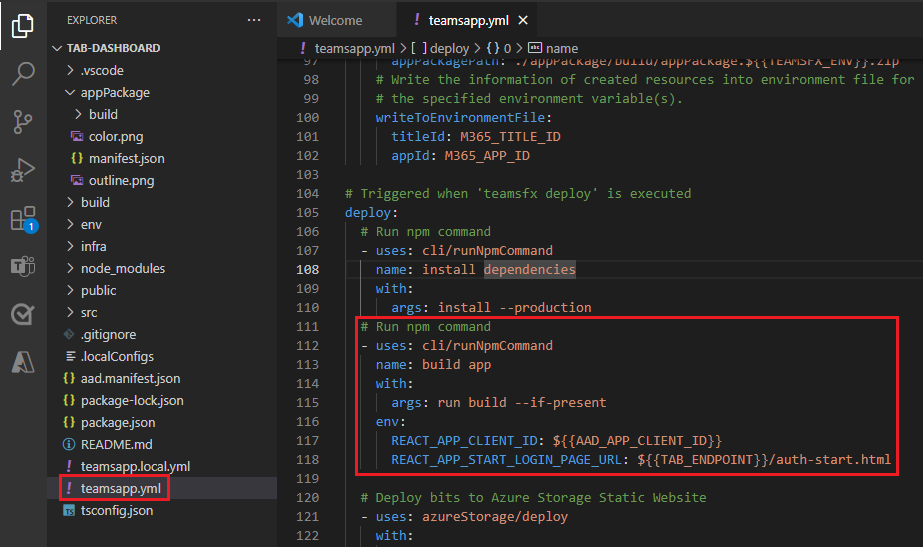
4. Update source code.
Create auth-start.html and auth-end.html files in public folder.
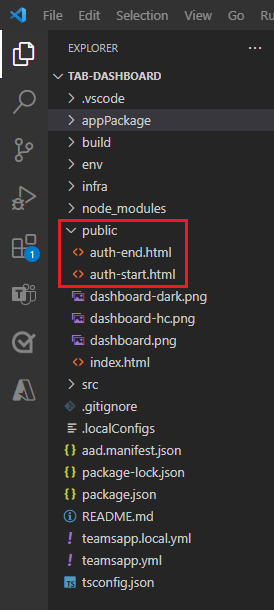
Add the code in auth-start.html and auth-end.html files.
Add the following code in auth-start.html:
  <!--The Teams authentication flow process uses this file to assist with retrieval of the access token.-->
  <!--If you're not familiar with this process, don't alter or remove this file from your project.-->
  <html>
    <head>
      <title>Sign-in Start Page</title>
      <meta charset="utf-8" />
    </head>

    <body>
    <script src="https://res.cdn.office.net/teams-js/2.7.1/js/MicrosoftTeams.min.js" integrity="sha384-4Gy2G+qxzDVdrdemcVqKVQvaSK1Ghg3x6xcsaMLPc/pw7KPtiogHGM97LTWF2PWg" crossorigin="anonymous"></script>
      <script
        type="text/javascript"
        src="https://alcdn.msauth.net/browser/2.21.0/js/msal-browser.min.js"
        integrity="sha384-s/NxjjAgw1QgpDhOlVjTceLl4axrp5nqpUbCPOEQy1PqbFit9On6uw2XmEF1eq0s"
        crossorigin="anonymous">
      </script>
      <script type="text/javascript">
        microsoftTeams.app.initialize().then(() => {
          microsoftTeams.app.getContext().then(async (context) => {
            // Generate random state string and store it, so we can verify it in the callback
            var currentURL = new URL(window.location);
            var clientId = currentURL.searchParams.get("clientId");
            var scope = currentURL.searchParams.get("scope");
            var loginHint = currentURL.searchParams.get("loginHint");

            const msalConfig = {
              auth: {
                clientId: clientId,
                authority: `https://login.microsoftonline.com/${context.user.tenant.id}`,
                navigateToLoginRequestUrl: false
              },
              cache: {
                cacheLocation: "sessionStorage",
              },
            }
            const msalInstance = new msal.PublicClientApplication(msalConfig);
            const scopesArray = scope.split(" ");
            const scopesRequest = {
              scopes: scopesArray,
              redirectUri: window.location.origin + `/auth-end.html?clientId=${clientId}`,
              loginHint: loginHint
            };
            await msalInstance.loginRedirect(scopesRequest);
          });
        });
        </script>
    </body>
  </html>
You added the SSO files to your project and need to call Graph APIs next.
Add Graph API call
To add Graph API, follow these steps:
TeamsFx SDK implements the graph API call.
In Visual Studio Code, go to EXPLORER > src > services > listService.ts.
Update the following code in the listService.ts:
/**
  * Retrieve sample data
  * @returns data for list widget
  */
import {TeamsUserCredentialContext} from "../internal/singletonContext";
import {
  createMicrosoftGraphClientWithCredential,
  TeamsUserCredential,
  } from "@microsoft/teamsfx";
  import { ListModel } from "../models/listModel";
  import { loginAction } from "../internal/login";
export const getListData = async (): Promise<ListModel[]> => {
  await loginAction(["User.Read"]);
  let credential = TeamsUserCredentialContext.getInstance().getCredential();
  const graphClient = createMicrosoftGraphClientWithCredential(credential,
  ["User.Read",
  ]);
  const me = await graphClient.api("/me").get();
  return [
    {
      id: me.id,
      title: me.displayName,
      content: me.mail,
    },
  ];
  // {
  //   id: "id1",
  //   title: "Sample title",
  //   content: "Sample description",
  // },
  // {
  //   id: "id2",
  //   title: "Sample title",
  //   content: "Sample description",
  // },
  // {
  //   id: "id3",
  //   title: "Sample title",
  //   content: "Sample description",
  // },
}
Go to EXPLORER > src > widgets > ListWidget.tsx.
Update the
export default class ListWidget()to add user profile widget.export default class ListWidget extends BaseWidget<any, IListWidgetState> { async getData(): Promise<IListWidgetState> { return { data: await getListData() };SSO and Graph API shows the signed-in user profile in the list widget.
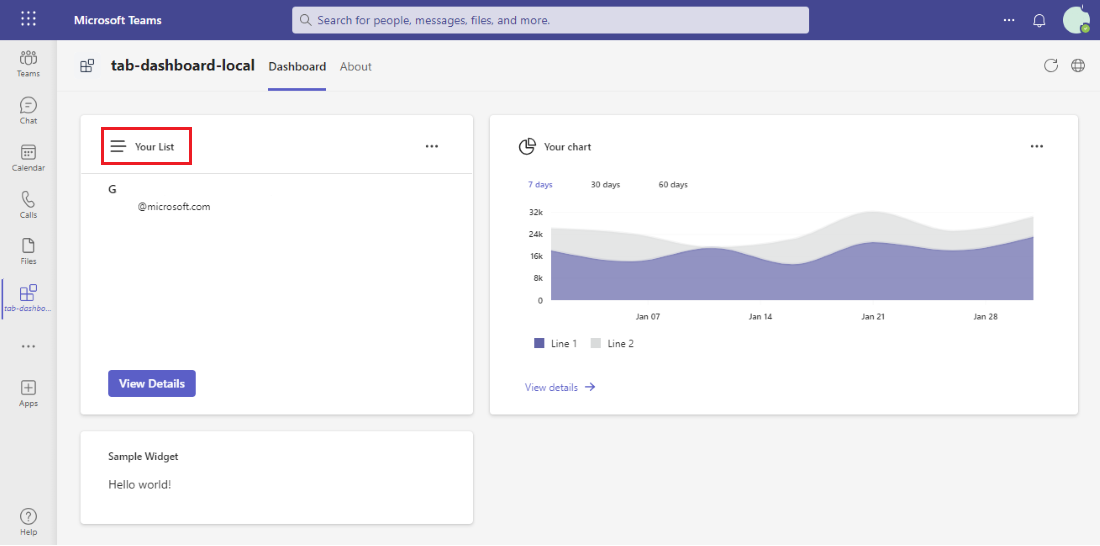
Complete challenge
Did you come up with something like this?

Congratulations!
You completed the tutorial!
Have an issue with this section? If so, please give us some feedback so we can improve this section.
Platform Docs
