Set up CI/CD pipelines
You can set up a Continuous Integration and Continuous Deployment (CI/CD) pipeline for Microsoft Teams apps created with Teams Toolkit. A Teams app CI/CD pipeline consists of three parts:
Build the project.
Deploy the project to cloud resources.
Generate Teams app package.
Note
To create a pipeline for a Teams app, it's required to prepare the necessary cloud resources, such as Azure Web App, Azure Functions, or Azure Static Web App, and configure the app settings.
To build the project, you must compile the source code and create the required deployment artifacts. There are two methods to deploy the artifacts:
Set up CI/CD pipelines with Teams Toolkit CLI. [Recommended]
Set up CI/CD pipelines using your own workflow. [Optional]
Set up CI/CD pipelines with Teams Toolkit CLI
Note
Use Teams Toolkit version 5.6.0 or a later.
You can use Teams Toolkit command line interface (CLI) to set up CI/CD pipeline for your Teams app.
Prerequisites
| Item | Description |
|---|---|
| Set up required resources for your Teams app, such as Teams app ID, bot ID, and so on. | • Manually extract the resources from the manifest.json file under the appPackage folder. • Automatically generate to run the Provision command in Teams Toolkit. |
| Configure Azure resources | • Manually prepare the resources by examining the bicep files under the infra folder. • Automatically prepare the resources using the Provision command in Teams Toolkit. |
| Ensure you've a properly configured service principal with appropriate access policies on resources. | The Teamsapp command-line interface (CLI) supports Azure login through certificate-based authentication or password-based authentication (application secret). You can either create a service principal with certificate-based authentication and save the generated certificate, appId (client ID) and tenant (tenant ID) or create a secret and save the client ID, client secret, and tenant ID of the service principal. 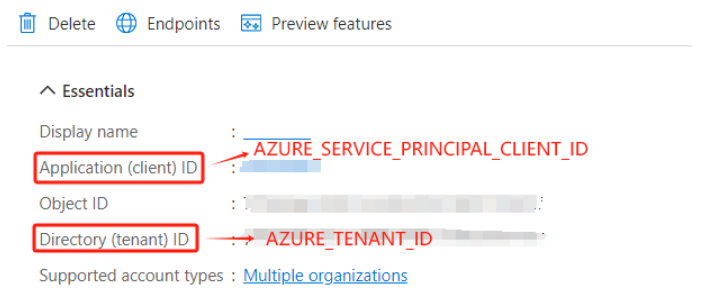
For more information about service principal, see: • Create service principal using Entra portal. • Create service principal using Azure CLI. |
After you've completed the prerequisites, let's set up a pipeline:
Set up pipeline with GitHub
To set up the pipeline with GitHub, follow these steps:
Open Visual Studio Code.
Create a
cd.ymlfile in your project under.github/workflowsfolder and add the following code in the file:on: push: branches: - main jobs: build: runs-on: ubuntu-latest env: TEAMSAPP_CLI_VERSION: "3.0.4" # Add extra environment variables here so that teamsapp cli can use them. steps: - name: "Checkout GitHub Action" uses: actions/checkout@v4 - name: Setup Node 20.x uses: actions/setup-node@v1 with: node-version: "20.x" - name: install cli run: | npm install @microsoft/teamsapp-cli@${{env.TEAMSAPP_CLI_VERSION}} - name: Retrieve the secret and decode it to a file env: CERTIFICATE_BASE64: ${{ secrets.AZURE_SERVICE_PRINCIPAL_CERTIFICATE_BASE64 }} run: | echo $CERTIFICATE_BASE64 | base64 --decode > cert.pem - name: Login Azure by service principal run: | npx teamsapp auth login azure --username ${{vars.AZURE_SERVICE_PRINCIPAL_CLIENT_ID}} \ --service-principal true \ --tenant ${{vars.AZURE_TENANT_ID}} \ --password cert.pem \ --interactive false - name: Deploy to hosting environment run: | npx teamsapp deploy --ignore-env-file true \ --interactive false - name: Package app run: | npx teamsapp package - name: upload appPackage uses: actions/upload-artifact@v4 with: name: artifact path: appPackage/build/appPackage.zipGo to GitHub.
Update the following variables and secrets you created during the prerequisites:
AZURE_SERVICE_PRINCIPAL_CLIENT_ID,AZURE_TENANT_ID, andAZURE_SERVICE_PRINCIPAL_CERTIFICATE_BASE64.AZURE_SERVICE_PRINCIPAL_CERTIFICATE_BASE64is the Base64 string encoded content of the certificate that you've generated.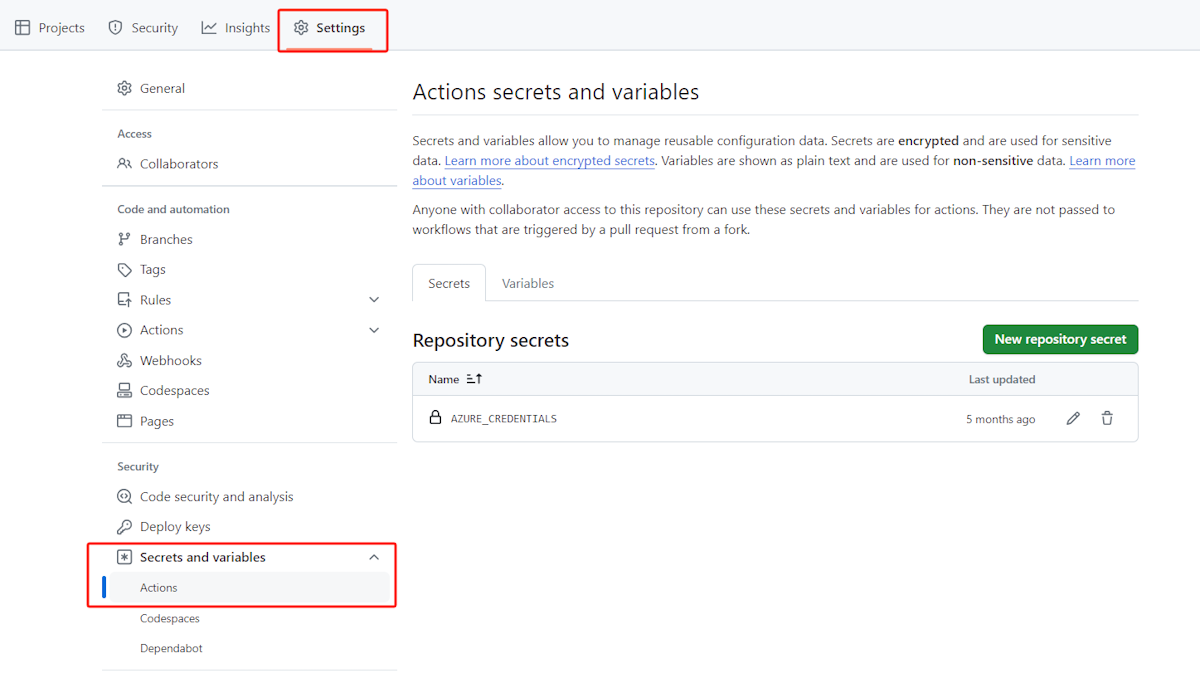
Note
The
AZURE_SERVICE_PRINCIPAL_CERTIFICATE_BASE64variable must be set as secret. Use the GitHub environment for different variable sets.Go to the
teamsapp.ymlfile. In thedeploystage, the values enclosed in${{}}are the required variable keys. If you've used theprovisioncommand from Teams Toolkit, you can locate the values in the environment files in the.envfolder.Set the
BOT_AZURE_APP_SERVICE_RESOURCE_IDas a repository variable: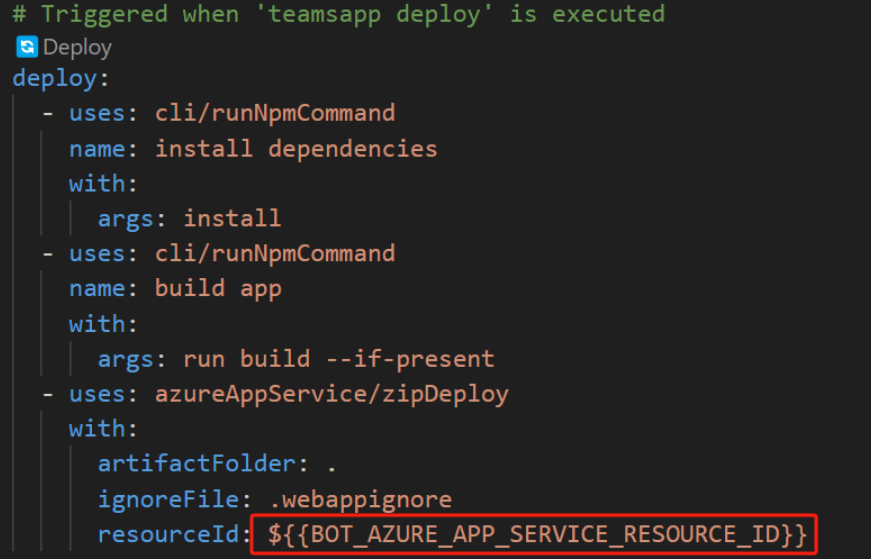
Go to the
appPackage/manifest.jsonfile. The values enclosed in${{}}are the required variable keys. If you've used theprovisioncommand from Teams Toolkit, you can locate the values in the environment files in the.envfolder.Set the
TEAMS_APP_IDas a repository variable: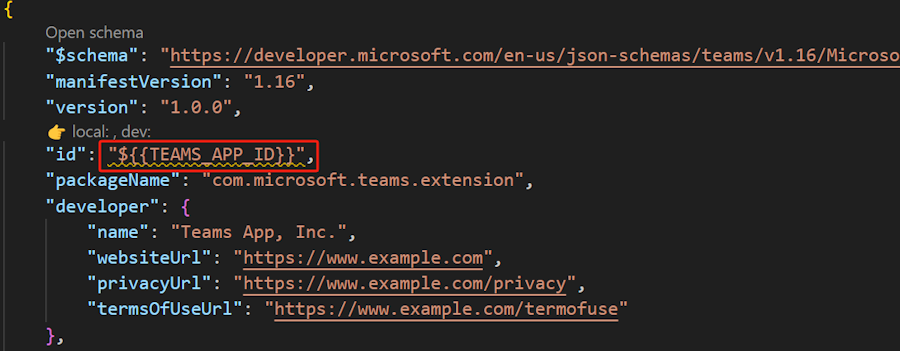
In the GitHub, navigate to your repository’s Settings and select Secrets and variables > Actions.
Update the variable keys that you've gathered for the following variables:
AZURE_SERVICE_PRINCIPAL_CLIENT_IDAZURE_TENANT_IDAZURE_SERVICE_PRINCIPAL_CLIENT_SECRETorAZURE_SERVICE_PRINCIPAL_CERTIFICATE_BASE64BOT_AZURE_APP_SERVICE_RESOURCE_IDTEAMS_APP_ID
Add the variables defined in your repo directly into your yml file, excluding the following three variables:
AZURE_SERVICE_PRINCIPAL_CLIENT_IDAZURE_TENANT_IDAZURE_SERVICE_PRINCIPAL_CLIENT_SECRETorAZURE_SERVICE_PRINCIPAL_CERTIFICATE_BASE64
Run the pipeline.
Push code to the repo to trigger pipeline.
Note
You don't need to commit env files under env folder to the repo. The env variables required for executing the CI/CD pipeline are already set in the repo variables.
After the pipeline executes successfully, the log displays that the code is deployed to Azure and the
appPackageis generated in the artifacts.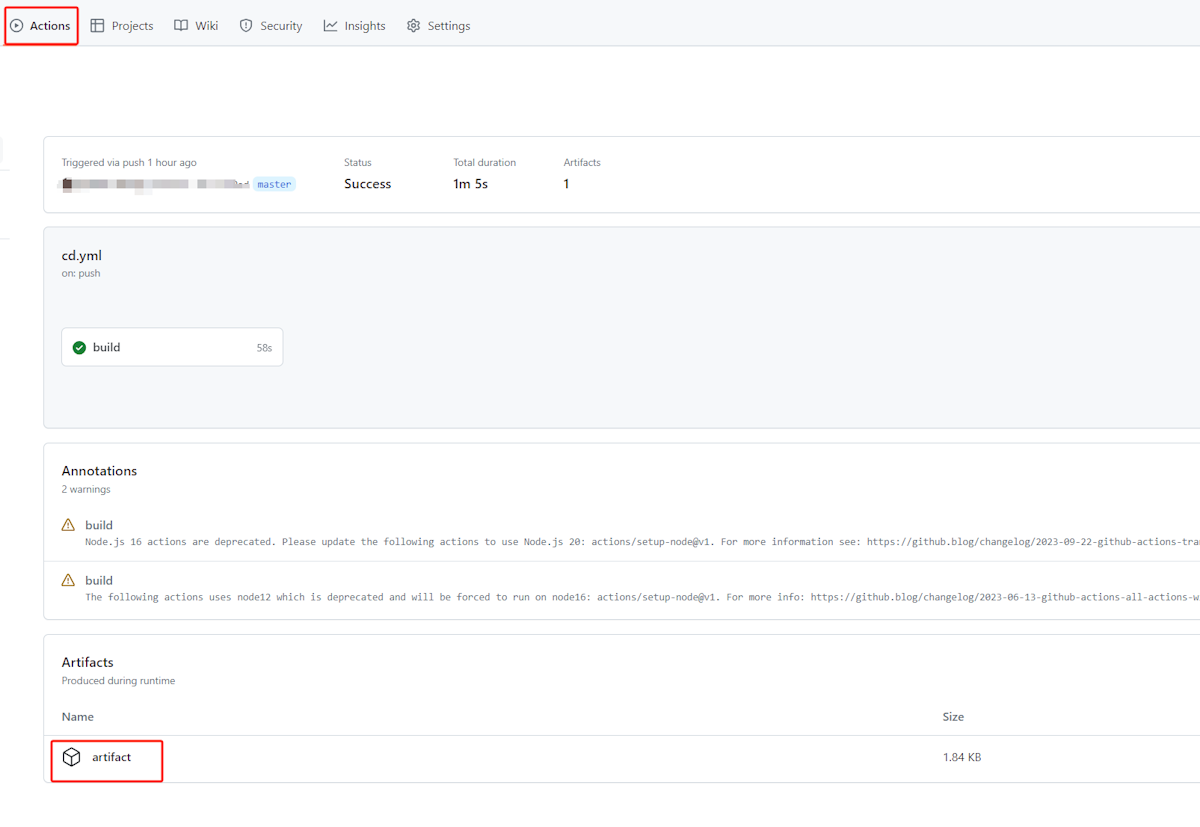
Set up pipeline with Azure DevOps
To set up the pipeline with Azure DevOps, follow these steps:
Open Visual Studio Code.
Create a
cd.ymlfile in your project and add the following code in the file:trigger: - main pool: vmImage: ubuntu-latest variables: TEAMSAPP_CLI_VERSION: 3.0.4 steps: - task: NodeTool@0 inputs: versionSpec: "20" checkLatest: true - script: | npm install @microsoft/teamsapp-cli@$(TEAMSAPP_CLI_VERSION) displayName: "Install CLI" - task: DownloadSecureFile@1 name: certFile displayName: 'Download Certificate File' inputs: secureFile: 'azure_sp_cert.pem' - script: | npx teamsapp auth login azure --username $(AZURE_SERVICE_PRINCIPAL_CLIENT_ID) --service-principal true --tenant $(AZURE_TENANT_ID) --password $(certFile.secureFilePath) --interactive false displayName: "Login Azure by service principal" - script: | npx teamsapp deploy --ignore-env-file true --interactive false displayName: "Deploy to Azure" workingDirectory: $(System.DefaultWorkingDirectory) - script: | npx teamsapp package displayName: "Package app" workingDirectory: $(System.DefaultWorkingDirectory) - publish: $(System.DefaultWorkingDirectory)/appPackage/build/appPackage.zip artifact: artifactPush the code to the repo.
Setup Azure pipeline.
After you push your code to the repo, navigate to Pipelines and select New pipeline. Select your repo and the existing yml file to configure your pipeline.
Update the following variables and set the certificate that you've created during the prerequisites:
AZURE_SERVICE_PRINCIPAL_CLIENT_ID,AZURE_TENANT_IDGo to the
teamsapp.ymlfile. In thedeploystage, the values enclosed in${{}}are the required variable keys. If you've used theprovisioncommand from Teams Toolkit, you can locate the values in the environment files in the.envfolder.Set the
BOT_AZURE_APP_SERVICE_RESOURCE_IDas a repository variable:
Go to the
appPackage/manifest.jsonfile. The values enclosed in${{}}are the required variable keys. If you've used theprovisioncommand from Teams Toolkit, you can locate the values in the environment files in the.envfolder.Set the
TEAMS_APP_IDas a repository variable:
You need to set the following key name variables in the repo:
AZURE_SERVICE_PRINCIPAL_CLIENT_IDAZURE_TENANT_IDBOT_AZURE_APP_SERVICE_RESOURCE_IDTEAMS_APP_ID
To set variables in your pipeline, go to your pipeline and select Edit > Variables.
In your Azure DevOps project, navigate to Pipelines > Library and add a new secure file. Upload the certificate (.pem) file and name the file as
azure_sp_cert.pem.Run the pipeline.
Push code to the repo to trigger pipeline.
Note
There's no need to commit env files under env/ folder to the repo. The env variables required for executing the CI/CD pipeline are already established in the pipeline variables.
After the pipeline executes successfully, the log displays that the code is deployed to Azure and the
appPackageis generated in the artifacts.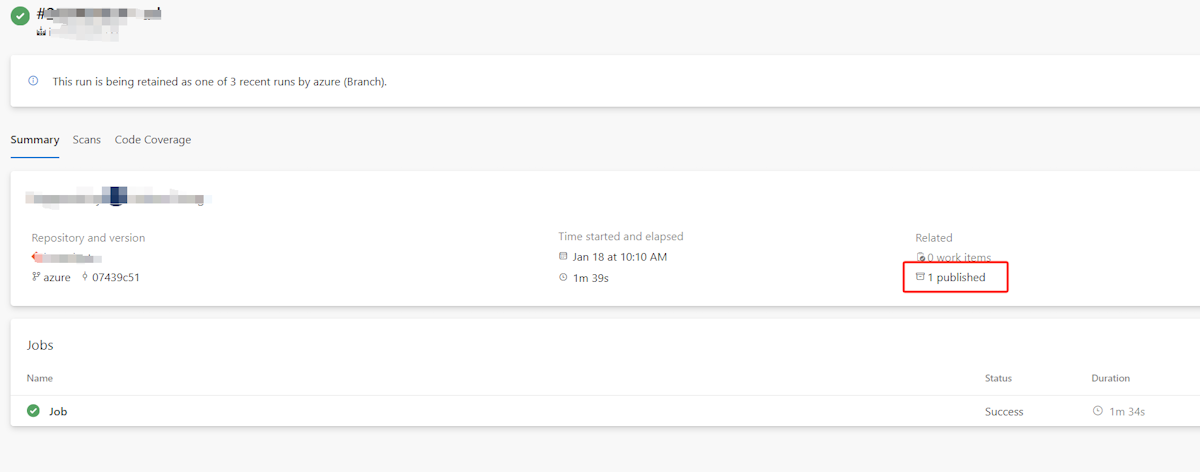

Set up CI/CD pipelines using your own workflow
If the Teams App CLI doesn't meet your pipeline requirements, you can develop a custom deployment process that suits your needs. This section provides guidance on deploying to Azure with custom methods.
Note
If you already have a complete CI/CD pipeline for deploying to your Azure resource, and your Teams app needs to read environment variables during runtime, configure these environment variables in the settings of your Azure resource. For post-deployment testing, see generate Teams app package.
The teamsapp deploy command executes the actions defined in the deploy stage of the teamsapp.yml file. The deploy stage consists of build and deploy actions. To create a custom deployment method, rewrite these actions based on your specific requirements and preferences.
As an example, a basic bot TypeScript project has the following deploy stage in its teamsapp.yml:
deploy:
  # Run npm command
  - uses: cli/runNpmCommand
    name: install dependencies
    with:
      args: install
  - uses: cli/runNpmCommand
    name: build app
    with:
      args: run build --if-present
  # Deploy your application to Azure App Service using the zip deploy feature.
  # For additional details, refer to this link.
  - uses: azureAppService/zipDeploy
    with:
      # Deploy base folder
      artifactFolder: .
      # Ignore file location, leave blank will ignore nothing
      ignoreFile: .webappignore
      # The resource id of the cloud resource to be deployed to.
      # This key will be generated by arm/deploy action automatically.
      # You can replace it with your existing Azure Resource id
      # or add it to your environment variable file.
      resourceId: ${{BOT_AZURE_APP_SERVICE_RESOURCE_ID}}
These actions perform the following tasks:
- Run
npm installandnpm buildto build the project. - Deploy code to Azure app service.
You can customize these actions in your CI/CD pipeline. Here's an example that utilizes GitHub's actions:
# build
- name: Setup Node 20.x
  uses: actions/setup-node@v1
  with:
    node-version: '20.x'
- name: 'npm install, build'
  run: |
    npm install
    npm run build --if-present

- name: 'zip artifact for deployment'
  run: |
    zip -r deploy.zip . --include 'node_modules/*' 'lib/*' 'web.config'

# deploy
- name: 'Login via Azure CLI'
  uses: azure/login@v1
  with:
    client-id: ${{ vars.CLIENT_ID }}
    tenant-id: ${{ vars.TENANT_ID }}
    subscription-id: ${{ vars.SUBSCRIPTION_ID }}

- name: 'Run Azure webapp deploy action using azure RBAC'
  uses: azure/webapps-deploy@v2
  with:
    app-name: ${{ vars.AZURE_WEBAPP_NAME }}
    package: deploy.zip
The Teams Toolkit supports Teams app projects, written in various programming languages and designed for hosting on different Azure services. The following actions for building and deploying. Use these actions when setting CI/CD deployment pipelines.
Build:
| Language | GitHub | Azure Pipeline |
|---|---|---|
| JS or TS | actions/setup-node | NodeTool@0 |
| C# | actions/setup-dotnet | DotNetCoreCLI@2 |
Deploy:
| Resource | GitHub | Azure Pipeline |
|---|---|---|
| Azure App Service | azure/webapps-deploy | AzureWebApp@1 |
| Azure Functions | Azure/functions-action | AzureFunctionApp@2 |
| Azure Static Web Apps | Azure/static-web-apps-deploy | AzureStaticWebApp@0 |
Credential needed for login to Azure
When you deploy app code to Azure App Service, Azure Functions, or Azure Container App through CI/CD, you need a service principal for Azure login. You can log in to Azure using a service principal in two ways:
OpenID Connect (OIDC):
For GitHub action, see how to use the Azure login action with OpenID Connect.
For Azure pipeline, see how to create an Azure Resource Manager service connection that uses workload identity federation.
Secret: The TeamsApp CLI supports sign-in using a service principal with a secret. For more information, see how to create a new client secret.
Generate Teams app package
To distribute your Teams app, the appPackage is required. You can automatically create the appPackage.zip using the teamsapp package command in Teamsapp CLI. If you're unable to use Teamsapp CLI, follow these steps to manually create the appPackage:
- Prepare a
appPackagefolder. - Place the
manifest.jsonfile in theappPackagefolder. The defaultmanifest.jsonfile in the Teams Toolkit project contains placeholders, denoted by ${{}}. Replace these placeholders with the correct values. - Place your app icons in the
appPackagefolder. To prepare your app icon, see app icons. - Zip the files in the
appPackagefolder.
See also
Platform Docs