Note
Access to this page requires authorization. You can try signing in or changing directories.
Access to this page requires authorization. You can try changing directories.
A meeting room is equipped with a Microsoft Teams Rooms device and other peripherals such as a camera, microphone, or speaker to create an inclusive and effective meeting experience. Equipment from different kinds of OEMs provides the exact organizational experience desired; however, they must be maintained with software and firmware on an ongoing basis.
Microsoft Teams Rooms Pro Management provides the assurance that each room in your organization is maintained to deliver a Teams Room that's always ready. Microsoft's goal is to reduce complexity and legwork for your operational staff with intelligence and automation. Troubleshooting or diagnostics is performed as quickly as possible.
Licensing requirements
Teams Rooms with Teams Rooms Pro licenses can orchestrate their updates through Teams Rooms Pro Management update rings. For Teams Rooms devices that have a Teams Rooms Basic or legacy Teams Rooms license, their updates are managed through the device's nightly maintenance window automatically.
Where to view updates and make changes
To view updates, sign in to the Teams Rooms Pro Management Portal and select the Updates tab on the left navigation menu.
The Updates pane displays a high-level overview of update management for your devices with the following tabs:
- Updates: Software or firmware updates that are applicable to your organizations devices.
- Rooms: The Rooms tab provides a view of rooms and rings to which each room belongs.
- Rings: The Rings tab shows the rings of rooms for your organization.
How updates get deployed
Updates are installed on a device based following update Rings. Rings allow administrators control over when different devices receive updates. This ring system can allow an administrator to preview updates on specific devices and monitor prior to a broader scale deployment throughout an organization or delay updates to allow for end user communications or other changes notifications.
Within the updates tab, updates for your tenant and their respective status are shown. To view past updates that are no longer active, select the Include past updates toggle to ON.
Updates are scheduled for rooms based on the equipment in the room and if they aren't meeting recommended standards for applicable software and firmware.
- Updates are sequenced based on the need in a particular room.
- If you have setup rings to validate the updates, the update progresses through the ring order.
- A new update can supersede an existing update that's queued.
- Updates are typically applied during our nightly maintenance window – which is room local time 12:00am – 5:00am.
- With ring validation, attempts are made to ensure that rooms aren't past due on recommended updates. Depending on the situation, a room might receive "catch up" updates to ensure it complies with Microsoft recommendations.
Update states
| Status | Description |
|---|---|
| Scheduled | An update is scheduled for the rooms in a given ring. Please keep in mind that an update will only show Scheduled after the progression hits the ring the room is in. For example, if a new update is in the Staging ring, it would only show Scheduled for rooms in the Staging ring. Other rings have a "Not required" status until the update progresses to that ring. |
| In progress | An update is in progress, and individual rings show status. This state shows the overall ring status, and therefore if an update applies to a single room in the Staging ring in your tenant, the update has an "In Progress" state until the Executive ring is reached. |
| Completed with failures | An update has completed progression through all your configured rings and failed in at least one room. |
| Completed | An update has completed progression through all your configured rings and successfully installed on all applicable rooms. |
| Deprecated | An update has been deactivated. Further deployment is halted. This is typical because the update has been superseded by a new version. |
| Paused | An update is in a paused state. |
| Not Required | The update is either not yet evaluated for the room or doesn't apply to the room. |
Controlling updates
Automated updates in Pro Management orchestrate updates throughout your organization. However, you have the visibility and control to intervene if needed. Here are the ways:
- In the event of an update failure, a incident is automatically generated for tracking.
- If you see an update causing issues, you can pause the update with the Pause button. Once the update is Paused, it remains paused forever.
- If you see an update has failed in a room and you have corrected a plausible reason, such as network disconnect, you can retry the update with Retry all failed button.
- There may be urgent situations when you may decide to make an update available earlier. In this case, you can use the Force updates button. When using the Force Update option, you have the choice to force the update immediately or when next the room is available.
Important
While the Pro Management Portal offers the ability to control updates as well as pause individual updates, Microsoft support policy states that all support for a particular version (N) expires or if more than two updates have been released (N-2). Then, customers must update to a supported version (N or N-1). Reference Microsoft Teams Rooms app version support for detailed service description.
Where updates are populated from
For Teams Rooms on Windows devices, updates to the Teams Rooms application come directly from Microsoft and updates to drivers and firmware come from the Teams Rooms OEM who releases the updates to Windows Update and the Pro Management Portal sees these updates available, lists them for your devices, and then manages deployment via your configured update rings. If you have a device which needs an update not shown in the Pro Management Portal consult with your Teams Rooms OEM for guidance on when that update will be available in Windows Update.
Note
If a recently released update doesn't appear in the updates list, it's likely an applicable device isn't in your earliest release ring for the update to be listed. You can either wait for the update to be old enough to progress to a release ring with an applicable device OR you can move an applicable device to your earliest ring and wait 24 hours.
Update Rings
Rings are used to reduce the risk of issues derived from the deployment of the feature updates. This is done by gradually deploying the update to the entire site. Each ring should have a list of Microsoft Teams Rooms and a corresponding rollout schedule. Defining rings is generally a one-time event (or at least infrequent), but IT should revisit these groups from time to time to ensure that the sequencing is still correct.
The Rings tab lists all the rings in your tenant. There are three preconfigured rings:
Staging: Assign rooms to the Staging ring, which is your testbed. All new updates roll out here first. Generally, you'll want to ensure that your staging ring represents rooms with the diversity of device types in your environment. If there are certain types of rooms with an uncommon configuration or a history of seeing issues, please consider representing them in Staging.
General: By default, all rooms are placed in this ring. Most of the room devices being used across the enterprise fall into this category.
Executive: This group should include your most high-profile rooms where you want to minimize disruption proactively. A good example is a large conference room used for executive meetings or large team meetings.
Specifying rollout timeline
Updates can't exceed 60 days to complete across all rings.
| Parameter | Explanation |
|---|---|
| Deferment Period | Once an update starts with the first ring, the deferment period is the delay in days before the update is initiated on this ring. |
| Rollout duration | Once the update commences on this ring, this is the time to deploy in this ring. For example, if the duration is five days, it deploys over five days to the rooms in this ring once the update starts on this ring. |
| Test Period | The number of days to test/validate the update in a ring once applied to the ring. The test period starts after the rollout is completed, and once complete, the update moves to the next ring. |
| Completion Time | The "Completion time" column indicates the total number of days (rollout duration + test period) for this ring to complete. |
| Total Time | At the bottom is the "Total" row that indicates how long an update takes to complete from the first to the last ring. |
Creating Custom Rings
- Navigate to the Rings tab.
- Select Add ring.
- Specify the order in which this ring receives the update, where 1 is first, and 9 is last.
- Give this ring a name.
- Provide a description if desired.
- Specify the number of days the update rolls out in this ring.
- Specify the test period.
- Select Submit.
Note
The "Days set by other rings" is the total number of days an update will take to complete across all rings. The "Remaining days" indicates the maximum days for this ring to complete. The sum of "Rollout duration in days" and "Test period in days" can't exceed this amount.
Edit a ring
- Navigate to the Rings tab.
- Select on the ring to delete.
- Select Edit ring.
- Edit the number of days of rollout and testing, as necessary.
Delete a ring
- Navigate to the Rings tab.
- Select on the ring to delete.
- Select Delete ring.
Note
The default rings can't be deleted.
Assign Rooms to Rings
The Rooms tab shows all the rooms in your tenant and to which ring they belong.

To configure which ring a room should belong to:
- Select on the room to bring up the detailed view.
- Under Ring, select Change.
- Select the Ring to which the room should belong.
- Select Assign.
The detailed room view displays the relevant updates and their status under the Updates node.
Move rooms
Moving rooms from one ring to another is possible in two ways:
- Navigate to the Rings tab.
- Select on the ring that you want to move rooms from
- Select Move rooms.
- Select the rooms that you want to move in the List of Rooms.
- Choose the Target ring, which the selected rooms move to in the dropdown.
- Select Move rooms.
Or
- Open the room details for the room you wish to move (either through Incidents, Rooms, or Updates -> Rooms).
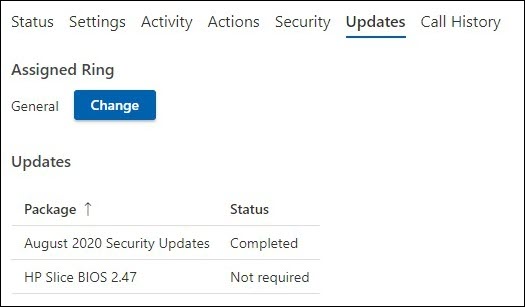
- Select the Updates tab.
- Under Assigned Ring, select Change.
- From the dropdown, select the new ring.
- Select Assign.
Platform specific update guidance
Teams Rooms on Windows
Teams Rooms on Windows devices have their updates orchestrated between midnight and 2 AM, the Pro Management Portal will install Teams Room application updates & peripheral firmware or drivers following the release rings configured within the Pro Management Portal. Windows quality/security updates are allowed to install automatically outside of the rings to ensure they're deployed as soon as possible. The Teams Room app limits the Windows feature version running on a device, when a new feature version is supported, a new Teams Rooms app will be made available which will allow the operating system to update to that new version.
Troubleshooting steps
Most unexpected update failures arise from changes in the base Teams Rooms configuration. The following readiness checks are recommended:
- Windows Update Settings: Disable Windows Update for Business (WUfB) or Windows Server Update Services (WSUS). Having either configured for your device will prevent the Pro Management Portal from controlling updates for the device. Controlling Windows feature updates can also place your devices in an unsupported state.
- Microsoft Store updates: The Microsoft Store policies shouldn't be modified to ensure Store applications can be updated.
- Third Party Software: Ensure no unsupported software is installed on the Teams Rooms device.
- Logitech Sync: If Logitech devices are connected, you may need the Logitech Sync application to successfully update certain Logitech devices.
- Base Image: The base image must be from the specific device OEM. If the device has been rebuilt in the past and shows unexpected failures or behaviors on common tasks, the base image must be restored.
- Base OS, Edition: The base OS and edition must match the requirements of Microsoft Teams Rooms on Windows devices. If this isn't so, it must be corrected as part of onboarding. Microsoft Teams Rooms requires the Windows IoT Enterprise or Windows Enterprise SKUs under Semi-Annual Channel servicing options. Consult the official Microsoft Teams Rooms guidance for more information.