Note
Access to this page requires authorization. You can try signing in or changing directories.
Access to this page requires authorization. You can try changing directories.
Branching Dialogue lets creators craft dynamic non-player character (NPC) dialogue scripts that can provide updated dialogue based on a player's in-game actions or responses.
The Branching Dialogue system has three parts: the NPC entity, the dialogue commands, and the resource scene files.
In this guide, you will learn:
- How to use the NPC Dialogue Command.
- How and why you'd create dialogue scene JSON files for dialogue options.
If you haven't completed the Create a Custom NPC tutorial yet, you should do that before following this guide. For best results, when creating your NPC, name them "Ducky".
NPC dialogue sample behavior pack
There is a sample NPC dialogue behavior pack available at the Minecraft Samples GitHub. You can use it to check your work after using this tutorial.
Creating NPC dialogue
We'll build on the Create a Custom NPC tutorial to create custom dialogue for that character. To start, we need to create a dialogue folder that contains a scene.json file in a behavior pack.
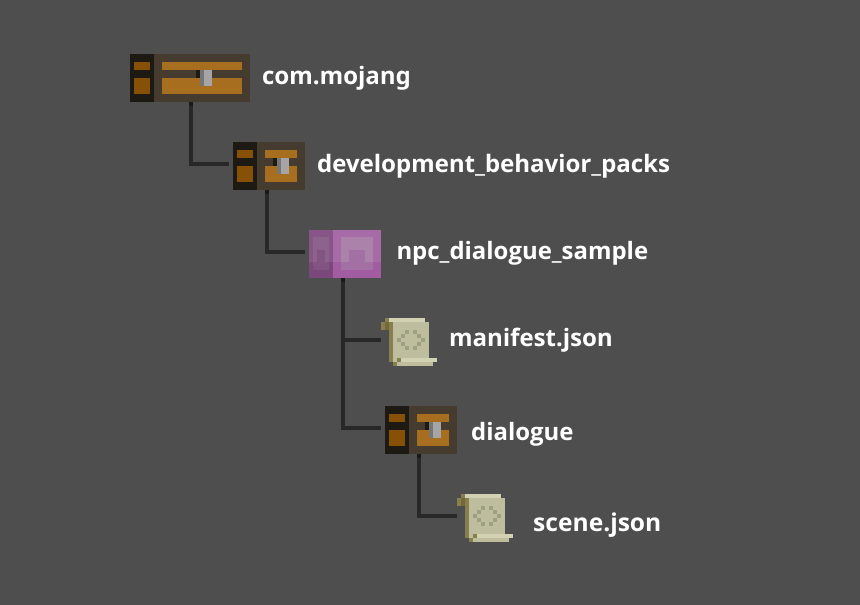
The scene.json file is located inside the dialogue folder in the root directory of your behavior pack that contains all the information needed for your branching dialogue.
Note
If you need help finding your com.mojang folder, review the Getting Started tutorial.
You can create as many scene files as you need. In fact, you can create a scene file for each NPC in your world, or a scene file for each chapter of your narrative, or one scene file for the entire world. The branching dialogue feature reads all of the files in the dialogue folder regardless of how they are organized.
Set up the Behavior Pack
- Inside your development_behavior_packs folder, create a folder and name it npc_dialogue_behavior_pack.
- Create a folder inside there and name it dialogue.
- Inside the dialogue folder, create a file and name it scene.json.
- Put this content into your scene.json file:
{
"format_version":"1.17",
"minecraft:npc_dialogue":{
"scenes":[
{
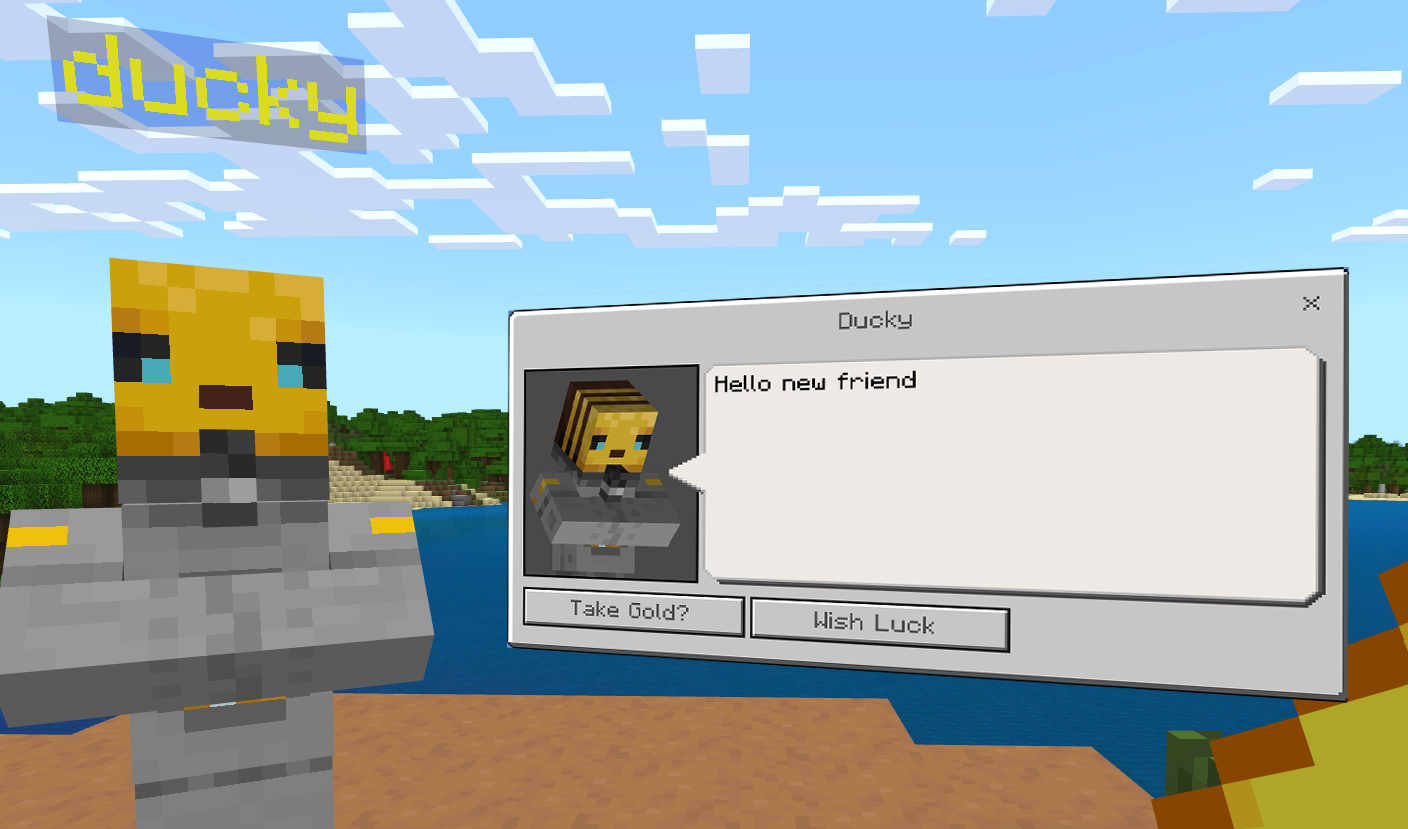
"scene_tag":"ducky_intro",
"npc_name":"Ducky",
"text":"Hello new friend",
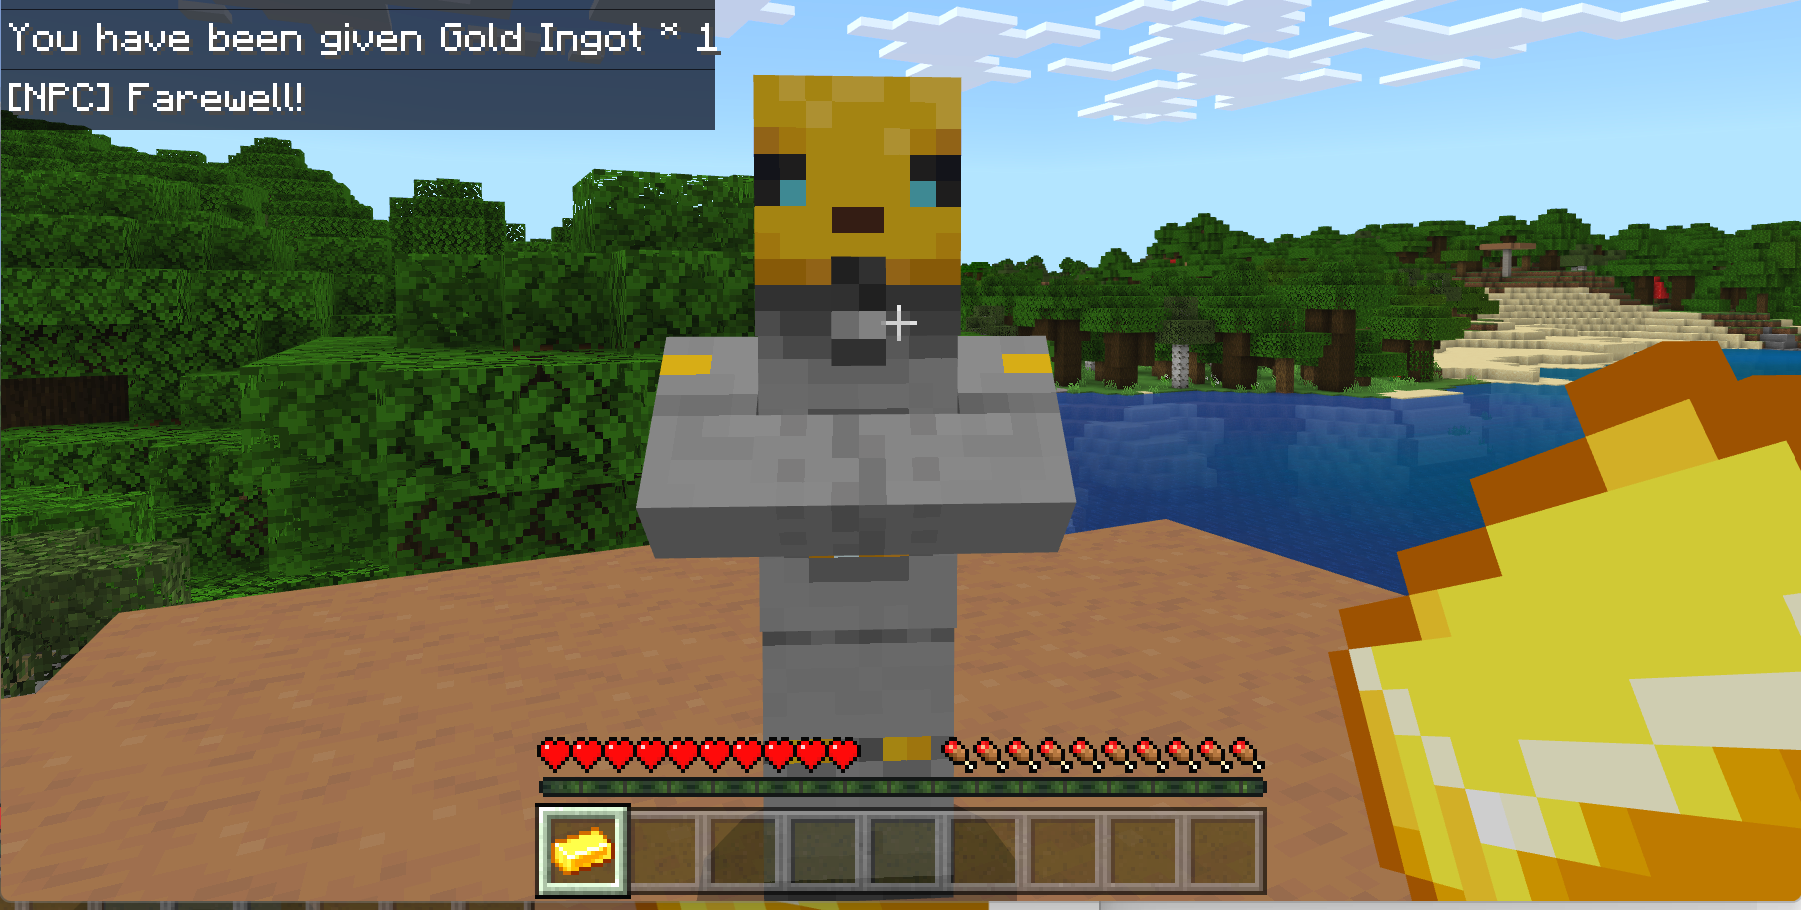
"on_open_commands":[
"/clear @p"
],
"on_close_commands":[
"/say Farewell! "
],
"buttons":[
{
"name":"Take Gold?",
"commands":[
"/give @initiator gold_ingot"
]
},
{
"name":"Wish Luck",
"commands":[
"/say Good luck!"
]
}
]
}
]
}
}
The "scenes" property is where all of the branching dialogue will live. Every new instance of NPC dialogue requires a new scene, which is defined in the scene.json file by creating a scene_tag. Use the scene tag in-game to call the text supplied in the scene file. You can also set up NPC buttons and commands that behave identically as they would if set up using the in-game NPC editor.
Scene properties
| Name | Type | Description |
|---|---|---|
scene_tag |
String | Required. The name you will use to call this scene in-game. |
npc_name |
String or rawtext | Optional. Add or change a name for your NPC dialogue box. Useful for dynamically changing NPC names. |
text |
String or rawtext | Optional. This is where you enter the dialogue you want your NPC to display in-game for this scene. You can type the dialogue text directly here or use raw text if you are using a language file. Without text, this will show an empty dialogue. |
on_open_commands |
Array containing commands | Optional. The commands that will fire when the NPC dialogue box opens. |
on_close_commands |
Array containing commands | Optional. The commands that will fire when the NPC dialogue box closes. |
buttons |
Object | Optional. Include this to create buttons for your NPC. Its properties are name and commands. The name property sets the text that is going to be displayed on your NPC's button. The commands property is the commands which will be run in-game when the button is pressed. These are required for NPC buttons to appear on the dialogue. |
Rawtext
You can learn more about the rawtext format here: Raw Message JSON
Dialogue command
The Dialogue command enables NPCs to open or read scene files. The command has two distinct modes, each with their own unique purpose and syntax.
Dialogue open
dialogue open is used to force open an NPC dialogue box to the targeted player(s). This command can be used on any NPC and doesn't require a behavior pack unless you want the NPC to use an optional scene file for its dialogue.
The syntax for dialogue open is:
/dialogue open <npc: target> <player: target> [sceneName:string]
/dialogue: The initial command.
open: The command variant.
<npc: target>: The NPC that you are targeting.
<player: target>: The player that you are targeting. This the player who will see the NPC dialog box.
[sceneName:string]: This is the name used if you want to use dialogue contained in a scene file. The string must be a valid scene tag name, or it will fail. This is an optional parameter.
Note
If no sceneName is specified, then the previous dialogue that NPC said remains displayed.
/dialogue open is primarily used in two ways:
The first is to initiate an NPC dialogue box without the player interacting directly with the NPC, essentially using the NPC as a 'pop-up' window that doesn't require the player to click the NPC. The NPC in this scenario doesn't have to be visible to the player in the world, but they must be in a loaded chunk and within ticking distance of the player receiving the dialogue. The NPC could be stashed underground or in another inaccessible location.
The second way /dialogue open is used is to create branching dialogue trees using the scene file. By using the /dialogue open command inside of an NPCs scene file, the NPC can automatically open the next dialogue box for a player. This is the basis for all dialogue tree branching paths.
Dialogue change
/dialogue change is used to direct an NPC to use the dialogue provided in a specifically designated scene file.
The command will instruct the targeted NPC to pull its dialogue from the location designated by the scene tag name.
The command should be run before the player initiates contact with the NPC.
The syntax for Dialogue open is:
/dialogue change <npc: target> <sceneName:string> [player: target]
/dialogue: The initial command.
change: The command variant.
<npc: target>: The NPC that you are targeting.
<sceneName:string>: This is the name used if you want to use dialogue contained in a scene file. The string must be a valid scene tag name, or it will fail.
[player: target]: The player that you are targeting (this is the player who will see the dialogue box). If omitted in a /dialogue change command, the NPC dialogue will be updated for all players.
/dialogue change is primarily used to change an NPC's dialogue using commands. The command can come from a player-triggered command block in the world, fired by another NPC, or can be run from the targeted NPC itself.
You may want to change an NPCs dialogue based on a player's actions in the world, such as entering a particular area, speaking with another NPC, or performing a specific task. If the action can be assessed, it can be used to run the dialogue command and change the NPC's dialogue.
/dialogue change does not display the NPC dialog box as Dialogue Open does, it simply points the NPC to the scene file dialogue that you want the player to see during their next interaction with that NPC.
Targeting
Targeting is a vital part of the NPC dialogue branching system. It determines which NPCs receive the commands and which players see the dialogue. It is also used to ensure that each player sees the dialogue you want them to see and does not lose the dialogue in multiplayer scenarios.
Targeting NPCs
To use the /dialogue command, you must target an NPC. This will act as the NPC 'saying' the dialogue and will use that NPC's image inside the dialog's portrait.
The NPC you want to trigger the dialog from must exist inside the world, but they can be hidden in an inacessible location.
Tagging
Use the /tag command to target an NPC in a scene.
/tag <entity: target> <add or remove> <name: string>
/tag: The initial command.
<entity: target> The NPC you're targeting.
<add or remove> To add or remove the tag.
<name: string> The name given to the NPC.
Targeting players
When using the /dialogue command, there will be times you will need to target players as well. To target players, use player selectors such as @a (all players) or @p (nearest player). Those will typically work well for a single-player experience. If you wish to have per-player scene changes, you will need to use a special target type called @initiator (the player interacting with the NPC).
Note
NPC Dialogue is the only place the @initiator selector is used.
Example:
"buttons":[
    {
        "name":"Take Gold?",
        "commands":[
            "/give @initiator gold_ingot"
        ]
    },
    {
        "name":"Wish Luck",
        "commands":[
            "/say Good luck!"
        ]
    }
]
Using this target selector with NPCs allows them to update their dialogue on a per-player basis, meaning that in multiplayer games, NPCs can remember each player's dialogue state and send unique dialogue accordingly.
This is useful for times where a player changing an NPCs dialogue could result in other players missing out on the complete dialogue branch, ensuring each player only receives one item from an NPC, not allowing that same player to return to the NPC for more items, or locking out other players from collecting their items.
Run the scene
- Change the game mode to Survival in Settings.
- Run the dialogue command while targeting the NPC.
- You can use the following command:
/dialogue open @e[type=npc, r=2] @p ducky_intro.- This command opens the dialogue, calls an entity with type NPC in a 2 block radius, targets the player, and then runs the
ducky_introfile.
- This command opens the dialogue, calls an entity with type NPC in a 2 block radius, targets the player, and then runs the
- Or you can tag the npc with
/tag @e[type=npc] add dustyand then run the dialogue command with/dialogue open @e[tag=dusty] @p ducky_intro.
- You can use the following command:
See more about target selectors here.