Custom Items
It's possible to customize or create items in Minecraft, just like you can create custom blocks and entities.
This tutorial shows you how to create the structure and files needed for the add-on packs for different items. Different types of items require different files, depending on what Minecraft needs to know about the item. For example, things a player wears, like a crown, will require a model file, among other things.
It's important to remember that each of these files have to be stored in a folder with the correct name, in the exact location specified.
Prerequisites
It is recommended that the following be completed before beginning this tutorial:
- Getting Started with Add-On Development
- Introduction to Resource Packs
- Introduction to Behavior Packs
- How to Add a Simple Custom Block
- Minecraft Item Wizard
Here is a link to the Vanilla Minecraft Add-on Packs in case you want to take a look at the pack structure there.
Minecraft Custom Items
Here are three items that do not currently exist in Vanilla Minecraft. They are listed here in order of complexity:
- Goo
- Wrench
- Crown
- Custom Chestplate with Vanilla Armor Trim
Use the following sections to create add-on packs for each item, or to do one set of packs for two or more items.
Here is the general process from the Add-on pack tutorials:
- Create Behavior Pack and Resource Pack folders.
- Create the folder and file structure for the item you want to create. Be sure to include the manifest.json files.
- Copy/paste the contents for the custom item files from the content in each section.
- Download and save the graphic files into the correct location.
- Load the packs into the development_behavior_pack and development_resource_pack folders in your com.mojang folder.
- Launch Minecraft: Bedrock Edition.
- Create a world with the behavior pack and resource packs activated.
- Choose either Creative Mode or Survival Mode with cheats toggled on.
- Go into your world and use the
/give @s demo:<item>command to get your custom item.
You can also experiment with different item components and edit the graphic and model files in an application like Blockbench
Here is the template for each manifest.json file, which is also found in the Resource Pack and Behavior Pack tutorials.
Be sure to put your own UUIDs in there.
Behavior Pack/manifest.json
{
  "format_version": 2,
  "header": {
    "description": "Custom Item Behavior Pack",
    "name": "Custom Item Behavior Pack",
    "uuid": "<ADD YOUR OWN UUID>",
    "version": [1, 0, 1],
    "min_engine_version": [1, 20, 30]
  },
  "modules": [
    {
      "description": "Custom Item Behavior Pack",
      "type": "data",
      "uuid": "<ADD YOUR OWN UUID>",
      "version": [1, 0, 1]
    }
  ]
}
Resource Pack/manifest.json
{
  "format_version": 2,
  "header": {
    "description": "Custom Item Resource Pack",
    "name": "Custom Item Resource Pack",
    "uuid": "<ADD YOUR OWN UUID>",
    "version": [1, 0, 1],
    "min_engine_version": [1, 20, 30]
  },
  "modules": [
    {
      "description": "Custom Item Resource Pack",
      "type": "resources",
      "uuid": "<ADD YOUR OWN UUID>",
      "version": [1, 0, 1]
    }
  ]
}
Goo
Goo is the simplest custom item. You don't wear it or eat it. It's just a handful of weird goo. It's useful for making sure your add-on packs work and for experimenting with stack size and the display name.
Goo Behavior Pack
items goo.json manifest.json

Goo Behavior Pack/items/goo.json
{
  "format_version": "1.20.30",
  "minecraft:item": {
    "description": {
      "identifier": "demo:goo",
      "category": "Items"
    },
    "components": {
      "minecraft:max_stack_size": 16,
      "minecraft:icon": {
        "texture": "demo:goo"
      },
      "minecraft:display_name": {
        "value": "Weird Goo"
      }
    }
  }
}
Goo Resource Pack
textures
  items
    goo.png
  item_texture.json
manifest.json

Goo Resource Pack/textures/item_texture.json
{
  "resource_pack_name": "Goo Resource Pack",
  "texture_data": {
    "demo:goo": {
      "textures": "textures/items/goo"
    }
  }
}
Goo Resource Pack/textures/items
Here is a.png file to download and use for the goo texture:

Custom Goo Result
After you create the packs, go into Minecraft, and give yourself goo, it should look like this:

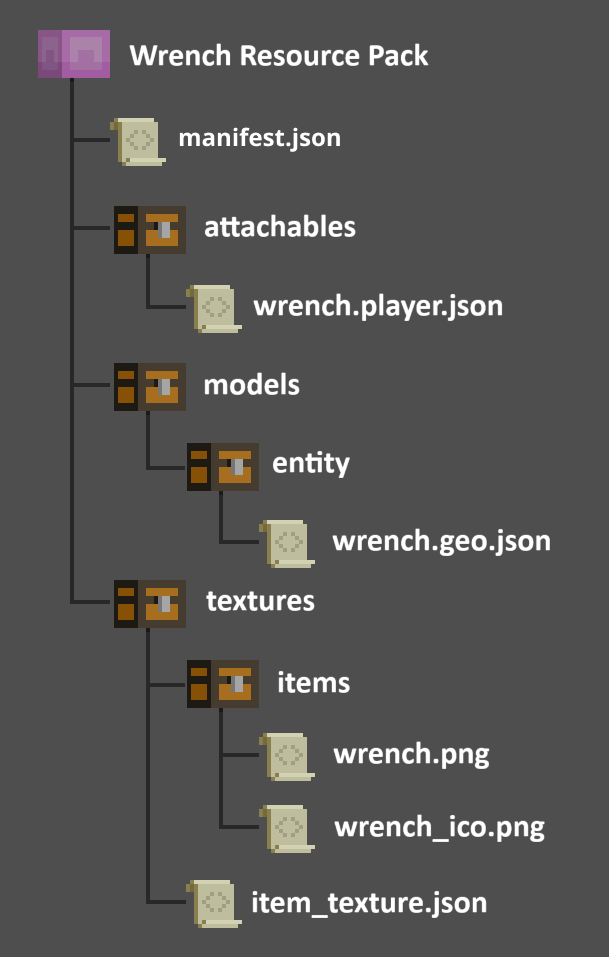
Wrench
An awesome giant wrench! This item has separate texture files for the version in your hotbar and the version you hold in your hand.
Wrench Behavior Pack
items
  wrench.json
manifest.json
Wrench Behavior Pack/items/wrench.json
{
  "format_version": "1.20.30",
  "minecraft:item": {
    "description": {
      "identifier": "demo:wrench",
      "category": "Items"
    },

    "components": {
      "minecraft:max_stack_size": 16,
      "minecraft:icon": {
        "texture": "demo:wrench"
      },
      "minecraft:wearable": {
        "dispensable": true,
        "slot": "slot.weapon.offhand"
      }
    }
  }
}
Wrench Resource Pack
attachables
  wrench.player.json
models
  entity
    wrench.geo.json
textures
  items
    wrench.png
    wrench_ico.png
  item_texture.json
manifest.json
Wrench Resource Pack/attachables/wrench.player.json
{
  "format_version": "1.20.30",
  "minecraft:attachable": {
    "description": {
      "identifier": "demo:wrench",
      "item": { "demo:wrench": "query.is_owner_identifier_any('minecraft:player')" },
      "materials": {
        "default": "entity",
        "enchanted": "entity_alphatest_glint"
      },
      "textures": {
        "default": "textures/items/wrench",
        "enchanted": "textures/misc/enchanted_item_glint"
      },
      "geometry": {
        "default": "geometry.wrench"
      },
      "animations": {
        "hold_first_person": "animation.steve_head.hold_first_person",
        "hold_third_person": "animation.steve_head.hold_third_person"
      },
      "scripts": {
        "animate": [
          {
            "hold_first_person": "context.is_first_person == 1.0"
          },
          {
            "hold_third_person": "context.is_first_person == 0.0"
          }
        ]
      },
      "render_controllers": ["controller.render.item_default"]
    }
  }
}
Wrench Resource Pack/models/entity/wrench.geo.json
{
  "format_version": "1.16.0",
  "minecraft:geometry": [
    {
      "description": {
        "identifier": "geometry.wrench",
        "texture_width": 32,
        "texture_height": 32,
        "visible_bounds_width": 3,
        "visible_bounds_height": 4,
        "visible_bounds_offset": [0, 1, 0]
      },
      "bones": [
        {
          "name": "bb_main",
          "pivot": [0.1, 19, -6],
          "rotation": [125, 0, 0],
          "binding": "q.item_slot_to_bone_name(context.item_slot)",
          "cubes": [
            {"origin": [-0.9, 9, -8], "size": [2, 16, 3], "uv": [0, 13]},
            {"origin": [-0.9, 25, -11], "size": [2, 4, 9], "uv": [0, 0]},
            {"origin": [-0.9, 29, -5], "size": [2, 2, 3], "uv": [13, 0]},
            {"origin": [-0.9, 29, -11], "size": [2, 1, 3], "uv": [10, 13]},
            {"origin": [-0.9, 30, -10], "size": [2, 1, 2], "uv": [10, 17]},
            {"origin": [-0.9, 31, -5], "size": [2, 1, 3], "uv": [13, 5]},
            {"origin": [-0.9, 32, -5], "size": [2, 1, 2], "uv": [0, 6]},
            {"origin": [-0.9, 31, -9], "size": [2, 1, 1], "uv": [17, 19]},
            {"origin": [-0.9, 33, -5], "size": [2, 1, 1], "uv": [16, 17]},
            {"origin": [-0.9, 24, -5], "size": [2, 1, 2], "uv": [0, 3]},
            {"origin": [-0.9, 24, -10], "size": [2, 1, 2], "uv": [0, 0]},
            {"origin": [-0.9, 23, -5], "size": [2, 1, 1], "uv": [17, 13]},
            {"origin": [-0.9, 23, -9], "size": [2, 1, 1], "uv": [7, 13]}
          ]
        }
      ]
    }
  ]
}
Wrench Resource Pack/textures/items
Here are the image files to use for the wrench icon and for the wrench itself.
Here is the wrench icon:

Here is the wrench texture:

Wrench Resource Pack/textures/item_texture.json
{
  "resource_pack_name": "Wrench Resource Pack",
  "texture_data": {
    "demo:wrench": {
      "textures": "textures/items/wrench_ico"
    }
  }
}
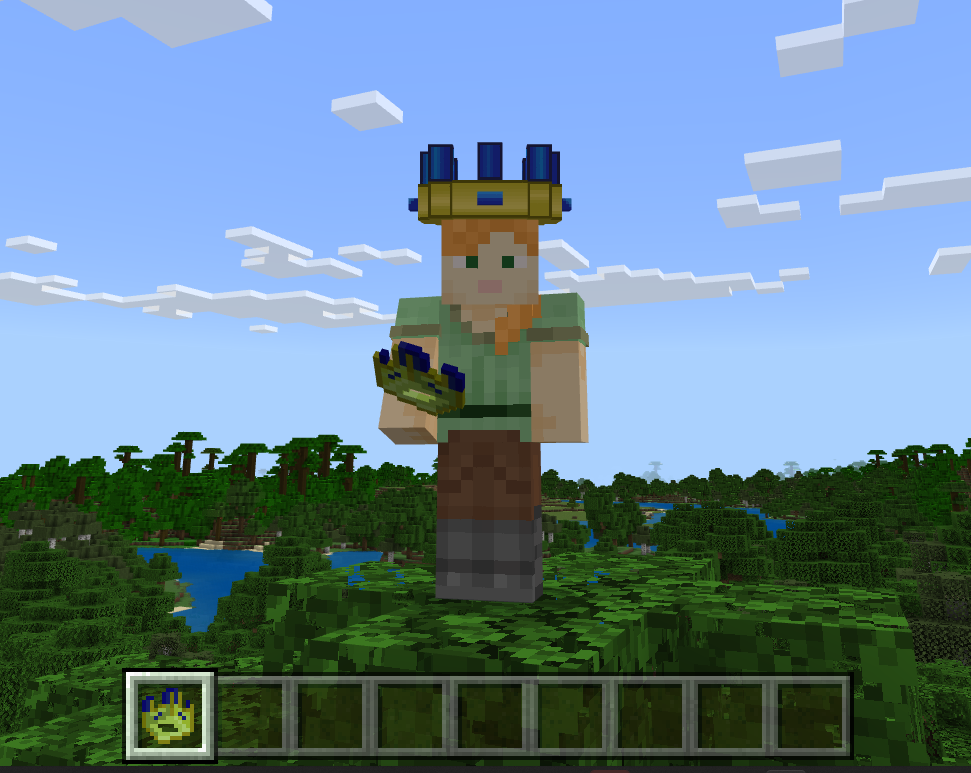
After you create the packs, go into Minecraft, and give yourself a wrench, it should look like this:

Crown
This is a crown created by customizing a helmet.
Crown Behavior Pack
items
  crown.json
manifest.json

Crown Behavior Pack/items/crown.json
{
  "format_version": "1.20.30",
  "minecraft:item": {
    "description": {
      "identifier": "demo:crown",
      "category": "Items"
    },
    "components": {
      "minecraft:max_stack_size": 1,
      "minecraft:icon": {
        "texture": "demo:crown"
      },
      "minecraft:wearable": {
        "dispensable": true,
        "slot": "slot.armor.head"
      }
    }
  }
}
Crown Resource Pack
attachables
  crown.player.json
models
  entity
    crown.geo.json
textures
  items
    crown_ico.png
    crown_minecraft.png
  item_texture.json
manifest.json

Crown Resource Pack/attachables/crown.player.json
{
  "format_version": "1.19.80",
  "minecraft:attachable": {
    "description": {
      "identifier": "demo:crown_hat.player",
      "item": { "demo:crown": "query.is_owner_identifier_any('minecraft:player')" },
      "materials": {
        "default": "armor",
        "enchanted": "armor_enchanted"
      },
      "textures": {
        "default": "textures/items/crown_minecraft",
        "enchanted": "textures/misc/enchanted_item_glint"
      },
      "geometry": {
        "default": "geometry.crown"
      },
      "scripts": {
        "parent_setup": "variable.helmet_layer_visible = 0.0;"
      },
      "render_controllers": ["controller.render.armor"]
    }
  }
}
Crown Resource Pack/models/entity/crown.geo.json
This file creates the custom shape of the crown that the texture will be mapped on to.
{
  "format_version": "1.16.0",
  "minecraft:geometry": [
    {
      "description": {
        "identifier": "geometry.crown",
        "texture_width": 32,
        "texture_height": 32,
        "visible_bounds_width": 2,
        "visible_bounds_height": 3.5,
        "visible_bounds_offset": [0, 1.25, 0]
      },
      "bones": [
        {
          "name": "Crownbase",
          "pivot": [0, 0, 0],
          "binding": "q.item_slot_to_bone_name(context.item_slot)",
          "cubes": [
            {"origin": [-3, 31, -6.4], "size": [6, 3, 2], "uv": [1, 0]},
            {"origin": [-5, 31, -6.4], "size": [6, 3, 2], "pivot": [-1, 31, -1.4], "rotation": [0, 90, 0], "uv": [0, 0]},
            {"origin": [-3, 31, 1.6], "size": [6, 3, 2], "pivot": [1, 31, -1.4], "rotation": [0, 90, 0], "uv": [0, 0]},
            {"origin": [-3, 31, 4.6], "size": [6, 3, 2], "uv": [1, 0]},
            {"origin": [3, 31, -5.4], "size": [2, 3, 2], "uv": [24, 0]},
            {"origin": [3, 31, 2.6], "size": [2, 3, 2], "uv": [22, 23]},
            {
              "origin": [-5, 31, -5.4],
              "size": [2, 3, 2],
              "uv": {
                "north": {"uv": [18, 22], "uv_size": [2, 3]},
                "east": {"uv": [16, 22], "uv_size": [2, 3]},
                "south": {"uv": [22, 22], "uv_size": [2, 3]},
                "west": {"uv": [20, 22], "uv_size": [2, 3]},
                "up": {"uv": [18, 20], "uv_size": [2, 2]},
                "down": {"uv": [20, 22], "uv_size": [2, -2]}
              }
            },
            {"origin": [-5, 31, 2.6], "size": [2, 3, 2], "uv": [20, 10]}
          ]
        },
        {
          "name": "crownprongs",
          "pivot": [0, 0, 0],
          "binding": "q.item_slot_to_bone_name(context.item_slot)",
          "cubes": [
            {"origin": [-5, 34, -5.4], "size": [2, 3, 2], "uv": [8, 20]},
            {"origin": [3, 34, 2.6], "size": [2, 3, 2], "uv": [20, 5]},
            {"origin": [3, 34, -5.4], "size": [2, 3, 2], "uv": [0, 20]},
            {"origin": [-5, 34, 2.6], "size": [2, 3, 2], "uv": [16, 15]}
          ]
        },
        {
          "name": "crownextraprongs",
          "pivot": [0, 0, 0],
          "binding": "q.item_slot_to_bone_name(context.item_slot)",
          "cubes": [
            {"origin": [-1, 34, -6.4], "size": [2, 3, 2], "uv": [8, 15]},
            {"origin": [-6, 34, -1.4], "size": [2, 3, 2], "uv": [0, 15]},
            {"origin": [-1, 34, 4.6], "size": [2, 3, 2], "uv": [12, 10]},
            {"origin": [4, 34, -1.4], "size": [2, 3, 2], "uv": [12, 5]}
          ]
        },
        {
          "name": "crownjewels",
          "pivot": [0, 0, 0],
          "binding": "q.item_slot_to_bone_name(context.item_slot)",
          "cubes": [
            {"origin": [-7, 32, -1.4], "size": [1, 1, 2], "uv": [6, 25]},
            {"origin": [5, 32, -2.4], "size": [1, 1, 2], "pivot": [0, 31, -1.4], "rotation": [0, 90, 0], "uv": [0, 25]},
            {"origin": [-6, 32, 0.6], "size": [1, 1, 2], "pivot": [0, 31, 1.6], "rotation": [0, 90, 0], "uv": [22, 18]},
            {"origin": [6, 32, -1.4], "size": [1, 1, 2], "uv": [24, 15]}
          ]
        }
      ]
    }
  ]
}
Crown Resource Pack/textures/items
Here are the image files to download and use for the crown icon and the crown texture itself.
Here is the crown icon:

Here is the crown texture:

Crown Resource Pack/textures/item_texture.json
{
  "resource_pack_name": "crown_resource_pack",
  "texture_data": {
    "demo:crown": {
      "textures": "textures/items/crown"
    }
  }
}
Custom Crown Result
After you create the packs, go into Minecraft, give yourself a crown, and put it on, you should look like this:
Custom Chestplate with Vanilla Armor Trim
If you create a custom chestplate, either by hand or through using the Minecraft Item Wizard, you can have it support all the Armor Trims available as of release 1.20.70. You can modify the trim patterns to better fit your custom armor too!
To use armor trim on your custom armor, you need to set your format versions on the item and attachable to a minimum of 1.20.60.
Custom Chestplate with Vanilla Armor Trim Behavior Pack
items
  custom_chestplate.item.json
manifest.json
Chestplate Behavior Pack/items/custom_chestplate.item.json
{
"format_version": "1.20.60",
  "minecraft:item": {
    "description": {
      "identifier": "demo:custom_chestplate",
      "menu_category": {
        "category": "equipment",
        "group": "itemGroup.name.chestplate"
      }
    },
    "components": {
      "minecraft:max_stack_size": 1,
      "minecraft:icon": {
        "textures": {
          "default": "custom_chestplate" }
      },
      "minecraft:wearable": {
        "protection": 10,
        "slot": "slot.armor.chest"
      },
      "minecraft:durability": {
        "damage_chance": {
          "min": 10,
          "max": 50
      },
        "max_durability": 1560
      },
      "minecraft:repairable": {
        "repair_items": [
          {
            "items": ["pink_dye"],
            "repair_amount": 390
          }
        ]
      },
      "minecraft:tags": {
        "tags": [
          "minecraft:is_armor",
          "minecraft:trimmable_armors"
        ]
      }
    }
  }
}
Chestplate Resource Pack
attachables
  custom_chestplate.attachable.json
models
  entity
    custom_chestplate.geo.json
textures
  items
    custom_chestplate_ico.png
    custom_chestplate.png
  item_texture.json
manifest.json
Chestplate Resource Pack/attachables/custom_chestplate.attachable.json
This file defines which geometry will appear for the chestplate, as well as the armor trim palette that will be used and any adjusted trim patterns.
{
  "format_version": "1.20.60",
  "minecraft:attachable": {
    "description": {
      "identifier": "demo:custom_chestplate",
      "render_controllers": ["controller.render.armor"],
      "materials": {
        "default": "entity_alphatest",
        "enchanted": "entity_alphatest_glint"
      },
      "textures": {
        "default": "textures/entity/attachable/custom_chestplate",
        "enchanted": "textures/misc/enchanted_item_glint",
        "wild_trim": "textures/models/armor/custom_wild",
        "iron_palette": "textures/trims/color_palettes/diamond_darker"
      },
      "geometry": {
        "default": "geometry.custom_chestplate"
      }
    }
  }
}
You can add any of the existing vanilla armor trim patterns to the textures section to supply adjusted trim textures to your new armor.
Chestplate Resource Pack/models/entity/custom_chestplate.geo.json
This file creates the custom shape of the chestplate that the texture and armor trim will be mapped on to.
{
  "format_version": "1.16.0",
  "minecraft:geometry": [
    {
      "description": {
        "identifier": "geometry.custom_chestplate",
        "texture_width": 32,
        "texture_height": 32,
        "visible_bounds_width": 3,
        "visible_bounds_height": 2.5,
        "visible_bounds_offset": [0, 0.75, 0]
      },
      "bones": [
        {
          "name": "body",
          "pivot": [0, 14, 0]
        },
        {
          "name": "chestplate",
          "parent": "body",
          "pivot": [0, 0, 0],
          "binding": "'body'",
          "cubes": [
            {"origin": [-4, 2, -2], "size": [8, 12, 4], "inflate": 1.01, "uv": [0, 0]}
          ]
        },
        {
          "name": "arm_right",
          "pivot": [-5, 12, 0]
        },
        {
          "name": "arm_plate_right",
          "parent": "arm_right",
          "pivot": [-5, 12, 0],
          "binding": "'rightarm'",
          "cubes": [
            {"origin": [-8, 2, -2], "size": [4, 12, 4], "inflate": 1, "uv": [0, 16]}
          ]
        },
        {
          "name": "arm_left",
          "pivot": [5, 12, 0]
        },
        {
          "name": "arm_plate_left",
          "parent": "arm_left",
          "pivot": [5, 12, 0],
          "binding": "'leftarm'",
          "cubes": [
            {"origin": [4, 2, -2], "size": [4, 12, 4], "inflate": 1, "uv": [0, 16], "mirror": true}
          ]
        }
      ]
    }
  ]
}
Chestplate Resource Pack/textures/items
Here are the image files to download and use for the custom chestplate icon and the geometry's texture itself.
Here is the chestplate icon:

Here is the chestplate texture:

Here is the modified "wild" trim pattern:

Chestplate Resource Pack/textures/item_texture.json
{
    "texture_data": {
        "custom_chestplate": {
            "textures": "textures/items/custom_chestplate.png"
        }
    }
}
Custom Chestplate Result
After you create the packs, go into Minecraft, give yourself the custom chestplate, and put it on. You should look like this:

Give yourself the wild armor trim template and combine your chestplate with the wild template at a smithing table, and put it back on, you should now look like this:

If your chestplate instead looks like this...

... then check the paths to your textures in the item_texture.json and custom_chestplate.attachable.json files. If there are any spelling errors or textures in incorrect folders, the geometry will display the "missing texture pattern" on your armor.
Dyeable Custom Items
Custom items can now be dyed in cauldrons. To use the dyeable component the format version on the item and the attachable needs to be 1.21.30 or higher.
This section of the tutorial assumes that you have successfully completed the previous section: Custom Chestplate with Vanilla Armor Trim.
Start by creating a copy of your Custom Chestplate with Vanilla Armor Trim add-on packs.
Dyable Custom Chestplate Behavior Pack
Chestplate Behavior Pack/textures/item_texture.json
Inside the behavior pack, open textures/item_texture.json and do this:
Edit the format version to be 1.21.30.
Edit
minecraft:icon:
"minecraft:icon": {
  "textures": {
    "default": "custom_chestplate_icon",
    "dyed": "custom_chestplate_icon_gray"
    }
},
- Add
minecraft:dyeable.
"minecraft:dyeable": {
  "default_color":  "#175882"
}
... So that the final version of item_texture.json looks like this:
{
"format_version": "1.21.30",
  "minecraft:item": {
    "description": {
      "identifier": "demo:custom_chestplate",
      "menu_category": {
        "category": "equipment",
        "group": "itemGroup.name.chestplate"
      }
    },
    "components": {
      "minecraft:max_stack_size": 1,
      "minecraft:icon": {
        "textures": {
          "default": "custom_chestplate_icon",
          "dyed": "custom_chestplate_icon_gray"
        }
      },
      "minecraft:wearable": {
        "protection": 10,
        "slot": "slot.armor.chest"
      },
      "minecraft:durability": {
        "damage_chance": {
          "min": 10,
          "max": 50
      },
        "max_durability": 1560
      },
      "minecraft:repairable": {
        "repair_items": [
          {
            "items": ["pink_dye"],
            "repair_amount": 390
          }
        ]
      },
      "minecraft:tags": {
        "tags": [
          "minecraft:is_armor",
          "minecraft:trimmable_armors"
        ]
      },
      "minecraft:dyeable": {
        "default_color":  "#175882"
      }
    }
  }
}
If you do not want a default color you can leave the "default_color" off and the texture will be the same as if you did not have the component until it is dyed.
For the icon to be dyed correctly. you need to provide a grayscale .tga version of your icon image. To do this, make a copy of the .png file, change the extension to .tga, and then change the configuration to grayscale.
Hint: You can use the icon graphics from the previous section.
Dyeable Custom Chestplate Resource Pack:
 attachables
   custom_chestplate.attachable.json
 models
   entity
     custom_chestplate.geo.json
 render_controllers (NEW)
   custom_chestplate.render_controllers.json (NEW)
 textures
   items
     custom_chestplate_ico.png
     custom_chestplate.png
     custom_chestplate_grayscale.tga
     custom_chestplate_icon_grayscale.tga
   item_texture.json
 manifest.json
You edit Pack/attachables/custom_chestplate.attachable.json like this...
Edit the format version to be 1.21.30.
Edit "render_controllers" like this...
"render_controllers": [ "controller.render.custom_chestplate" ],
- Edit materials to be:
"materials": {
  "default": "armor",
  "dyed": "entity_alphatest_change_color"
},
- Edit textures to be:
"textures": {
  "default": "textures/items/custom_chestplate.png",
  "dyed": "textures/items/custom_chestplate_grayscale.tga"
},
- Add scripts:
"scripts": {
  "pre_animation": [
    "variable.is_dyed = query.armor_color_slot(1, 0) != 0.0 || query.armor_color_slot(1, 1) != 0.0 || query.armor_color_slot(1, 2) != 0.0 || query.armor_color_slot(1, 3) != 0.0;"
  ]
}
So that the final version of custom_chestplate.attachable.json looks like this:
{
  "format_version": "1.20.60",
  "minecraft:attachable": {
    "description": {
      "identifier": "demo:custom_chestplate",
      "render_controllers": ["controller.render.armor"],
      "materials": {
        "default": "armor",
        "dyed": "entity_alphatest_change_color"
      },
      "textures": {
        "default": "textures/items/custom_chestplate.png",
        "dyed": "textures/items/custom_chestplate_grayscale.tga"
      },
      "geometry": {
        "default": "geometry.custom_chestplate"
      },
      "scripts": {
        "pre_animation": [
          "variable.is_dyed = query.armor_color_slot(1, 0) != 0.0 || query.armor_color_slot(1, 1) != 0.0 || query.armor_color_slot(1, 2) != 0.0 || query.armor_color_slot(1, 3) != 0.0;"
        ]
      }
    }
  }
}
custom_chestplate.render_controllers.json
In the resource pack, add the render_controllers directory and put a new file in there named: custom_chestplate.render_controllers.json.
Copy and paste this content in there:
{
  "format_version": "1.8.0",
  "render_controllers": {
    "controller.render.custom_chestplate": {
      "geometry": "Geometry.default",
      "materials": [ { "*": "variable.is_dyed ? Material.dyed : Material.default" }
],
      "textures": [
        "variable.is_dyed ? Texture.dyed : Texture.default"
      ]
    }
  }
}
Chestplate Resource Pack/items/item_texture
{
  "texture_data": {
    "custom_chestplate": {
      "textures": "textures/items/custom_chestplate.png"
    },
    "custom_chestplate_icon_gray": {
      "textures": "textures/items/custom_chestplate_icon_grayscale.tga"
    }
  }
}
After you have edited and saved all of the files, you should be able to dye your custom chestplate in a cauldron full of dye and it will look like this:

To learn more about the dyeable item component, take a look at the minecraft:dyeable reference page.
Next Steps
After you create the custom item packs and get them to work, you could take a look at the item components and try adding some of these to your own custom items.
Or, you could go through the Custom Item Wizard and compare the add-on packs created by the Wizard to the ones you created on your own.