Note
Access to this page requires authorization. You can try signing in or changing directories.
Access to this page requires authorization. You can try changing directories.
Sounds are a great way to add a sense of immersion to your content. Whether it's blocks, animals, or the ever-important music disc, the sounds you hear while playing Minecraft pull you into the experience. In this tutorial, we'll be adding a custom sound that will play when we open a chest, increasing the immersion and personalization of your world.
Prerequisites
We recommend completing the following before beginning this tutorial:
- Getting Started with Add-On Development
- Introduction to Resource Packs
- Introduction to Behavior Packs
You will also need to download the Vanilla resource pack.
Create a resource pack
The first step in our journey is to create a resource pack to hold your custom sounds. If you completed the prerequisites as suggested (hint, hint), you're already familiar with this process. Name your resource pack custom_sound_pack
For a quick refresher, see Introduction to Resource Packs.
For detailed information on resource packs, see the Comprehensive Resource Pack guide.
Setting up a sound directory
Now that the resource pack has been created, it's time to set up a place for our sound files.
In File Explorer, navigate to the com.mojang folder.
- Press Win+R to open Run.
- If you are using main Minecraft releases, copy and paste the following into the Open field:
%localappdata%\Packages\Microsoft.MinecraftUWP_8wekyb3d8bbwe\LocalState\games\com.mojang - Alternatively, if you are using preview Minecraft preleases, copy and paste the following into the Open field:
%localappdata%\Packages\Microsoft.MinecraftWindowsBeta_8wekyb3d8bbwe\LocalState\games\com.mojang - Click OK.
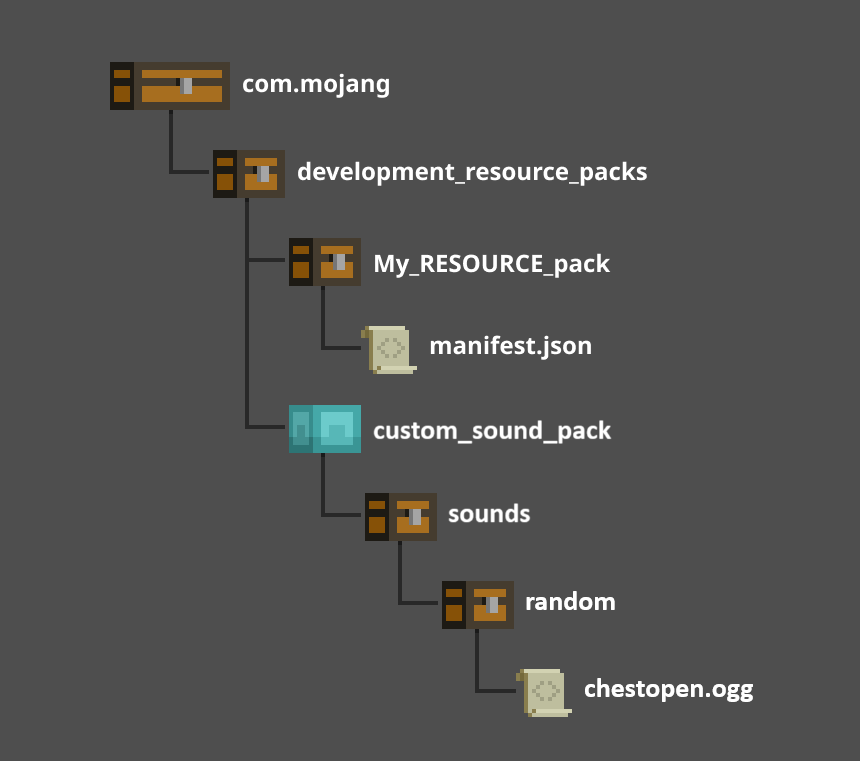
Open the development_resource_packs folder.
Open custom_sound_pack.
Create a folder called sounds.
When you're finished, your file structure will look like this:
You'll need to create more sub-folders along the way, but we'll get into that at in a bit.
Finding the right sound
The stage is set, and now it's time to get your custom sound ready! For our example, we will be using Audacity. However, any audio processing software will work as long as it can export files in the .OGG format.
You can either record a sound using your audio software, or use the software to open a sound that has been saved to your computer. Once your file is open in the audio software, it needs to be exported as a .OGG file. This can be done in Audacity by navigating to File > Export > Export as OGG.
For this tutorial, we'll export a custom sound file with the name chestopen.ogg (you'll see why, later).
If you'd like an example sound file to use, download this sample .OGG file.
Housing your sound
Congratulations, things are moving along nicely. You have a sound to replace, a new sound ready, and your resource pack is set up. Now it's time to figure out where your sound will live.
The vanilla resource pack contains every sound in vanilla Minecraft, and this folder will show you how to structure your custom resource pack so that you can replace the sounds you want.
From here, you could scroll through the list of every Minecraft sound and find the sound file for a chest opening. Instead, we recommend using CTRL+F to find the file. For our example, the file we are looking for is the chestopen file; it happens to be located at sounds/random/chestopen.
Now we know where to place our custom sound file. Navigate to com.mojang > development_resource_packs > custom_sound_pack > sounds. In the sounds folder, create a new folder named random and place your custom chestopen.ogg file into it.
If you want to replace other sounds, locate them in the vanilla resource pack and recreate the folder structure in your resource pack. For example, if you want to change one of the sounds for rain in your world, you'll need to create the following sub-folders:
com.mojang > development_resource_packs > sounds > ambient > weather
Inside the weather folder you can add files for the rain sounds you want to replace.
Note
You must give your new sound file the exact same name as the file you want to replace; however, you do not need to use the same format. So you can replace rain1.fsb with rain1.ogg, as long as the file name before the extension matches exactly.
Testing your sound
The hard work is over, and now it's time to the test our custom sound! In order to test our sound, create a test world with your custom_sound_pack enabled and cheats turned ON, which will allow you to use the /give command.
- Open the chat box
- Type the following command:
/give @s chest
Opening the chest should result in your custom sound playing. If that doesn't happen, some troubleshooting may be needed. Some common steps include:
- Checking your file structure
- Checking the file type of your custom sound file
Adding new sounds
So four different types of rain sounds aren't enough for you? Then let's discover how to add brand new sounds to Minecraft. For this task, we'll dive into the sounds.json and sound_defnitions.json files. If you don't already have them, create sounds.json under com.mojang > development_resource_packs > custom_sound_pack and sound_definitions.json under com.mojang > development_resource_packs > custom_sound_pack > sounds.
Use the sample sounds.json file in the vanilla resource pack to locate the category of sound you want to add.
So now, instead of replacing the sound of a chest opening, like we did earlier, let's say we want to have two different sounds that play randomly when we open a chest. Navigate back to your com.mojang > development_resource_packs > custom_sound_pack > sounds > random folder and rename chestopen.ogg to chestopen2.ogg
In sounds.json, add the following code:
{
    "individual_event_sounds" : {
        "events" : {
            "chest.open" : {
                "pitch" : [ 0.90, 1.0 ],
                "sound" : "random.chestopen",
                "volume" : 0.50
            }
        }
    }
}
In sound_definitions.json, add the following code:
"format_version" : "1.20.20",
"sound_definitions" : {
    "random.chestopen" : {
        "__use_legacy_max_distance" : "true",
        "category" : "block",
        "max_distance" : null,
        "min_distance" : null,
        "sounds" : [
            "sounds/random/chestopen",
            "sounds/random/chestopen2"
        ]
    }
}
When we test our sound again, you should notice that opening a chest will play one of your two chest open sounds randomly!
Using the /playsound command
You can also add custom sounds that aren't played by in-game events. You can use the /playsound command to play any sound in the game, including the sounds added in your resource packs. Even if your sounds don't play automatically, you can still play them manually or use resources like command blocks to play your sounds at appropriate times based on your world and game modes.
To learn more about the /playsound command, see the reference docs.
Next steps
Congratulations, you've successfully added a custom sound to your world! Now you can create a world that sounds the way you want to hear. You can make blocks that squeak, swords that apologize when you attack with them, or a world where everything is voiced by you! As always, the only limit is what you can imagine.