Camera Command
The Bedrock version of Minecraft has a /camera command that adds the ability to control how players view the game or adds full-screen fades for a more polished experience. This document goes into all the relevant detail of how it works and can be used to make interesting new experiences.
This new feature adds the concept of Camera Presets, plus a new command to interact with those presets.
Camera Presets
Camera Presets define individual cameras which can be specified by the camera command. They can be built-in or can be defined by creator content in behavior packs.
The built-in Camera Preset names are:
- "minecraft:first_person"
- "minecraft:third_person"
- "minecraft:third_person_front"
- "minecraft:free"
The first three names correspond to the standard gameplay perspective options which you can cycle through by pressing F5 on the keyboard, pressing "up" on the controller directional pad, or by selecting the perspective you want in the Settings menu.
The last name is for the new free camera, which just floats in space and does nothing.
Custom content can define its own Camera Presets. For example, an "example:sky" camera might be defined based on the "minecraft:free" camera, but with a custom position and rotation to view the world at a specific angle.
Adding one or more Camera Presets to a Behavior Pack
Inside the com.mojang folder for the version of Minecraft you want the camera to appear in, open your development_behavior_packs folder and do this:
Create a Behavior Pack folder, as shown in the Behavior Pack tutorial.
Inside the Behavior Pack folder, create another folder and name it Cameras.
On the same level as the Cameras folder, add a manifest.json file. This manifest file should not reference a resource pack.
Inside the Cameras folder, create another folder and name it Presets.
Inside the Presets folder, create a text file and name it camera.json. (It does not have to be this name, but it should be different from the built-in preset camera names listed in the Camera Presets section.)
Open the camera.json file and paste in the example JSON below. Then, adjust the variables as you like.
Your folder structure should look like this:
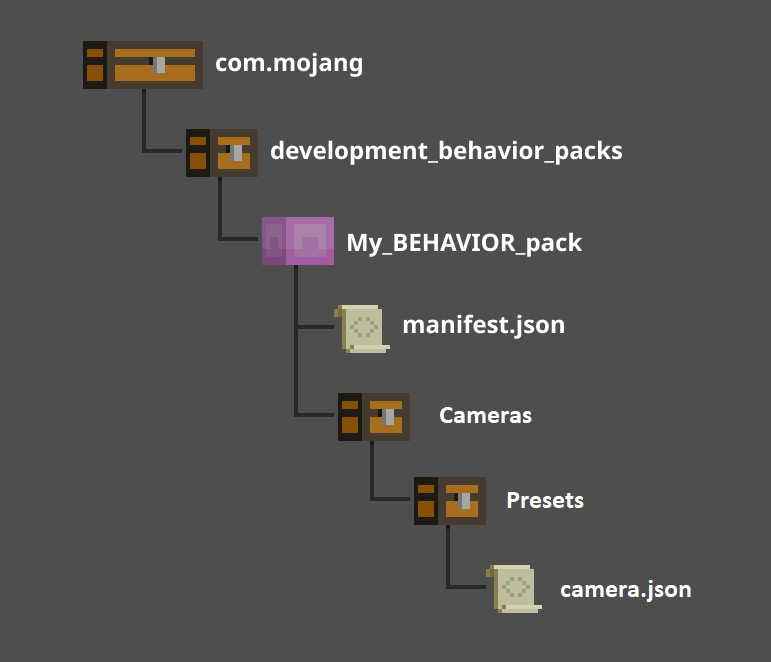
You should now be able to create a world using this add-on and transition to the camera by using the identifier in the JSON.
You can add multiple camera files to the Presets folder and call to the different cameras in the game by giving each one a unique identifier.
If everything is working, your custom camera preset should show up in the auto-complete list when typing the camera command.
Camera Presets are specified in JSON files in the game's behavior packs, for example:
{
  "format_version": "1.19.50",
  "minecraft:camera_preset": {
    "identifier": "example:custom",
    "inherit_from": "minecraft:free",
    "pos_x": 30,
    "pos_y": 90,
    "pos_z": -20,
    "rot_x": 10,
    "rot_y": 40
  }
}
This defines a new Camera Preset named "example:custom" which inherits settings and behaviors from the "minecraft:free" camera, then specifies its own default position as "x=30", "y=90", "z=-20" and a rotation of "x=10", "y=40".
"format_version" behaves like it does in many other Bedrock Minecraft JSON files. It allows Mojang to change the expected JSON format of the file without invalidating old files. For now, you can just use "1.19.50".
"identifier" names the Camera Preset. All Camera Preset identifiers must be namespace-qualified, and like with other content, custom presets must use a namespace other than "minecraft".
"inherit_from" says what other Camera Preset to inherit values and behaviors from. A custom Camera Preset can inherit from other custom Camera Presets, or from the "minecraft:free" preset. For now, the other built-in camera perspectives can't be specified here. This can let a creator define a hierarchy of Camera Presets if they desire, for example an "example:security_base" camera could have an elevation and pitch defined in its "pos_y" and "rot_x" fields, and "example_security_1" through "example_security_5" could use "inherit_from" to use that preset's values, and only specify their X/Z positions via "pos_x" and "pos_z" and the yaw via "rot_y". With something like that set up, it would only take one edit to the base security camera to modify the elevation of all the security cameras.
"pos_x", "pos_y", and "pos_z" specify the default constant x, y, and z positions of the camera. If these are omitted, the value from the "inherit_from" Camera Preset will be used. "minecraft:free" uses a value of zero for all of its position settings. Be sure to set more useful positions here or via the camera command or your camera perspective will be underground.
"rot_x" and "rot_y" specify the default rotations of the camera, around each of those axes. "rot_x" is equivalent to the pitch of the camera, though with positive values looking downward and negative values looking up, which matches the convention of the teleport command. "rot_y" is equivalent to the yaw, or compass direction of the camera, also matching the behavior of the teleport command. Both values are specified in degrees, and "rot_x" must be no lower than –90 and no higher than 90, to prevent the camera from going upside-down.
Note
See more reference samples at the end of this article.
Player state affecting rendering
With this version of Minecraft, the minecraft:free Preset (and any presets based on it, which includes all custom presets) will not by default use the state of the player when the game is rendered. This includes a number of effects such as night vision and blindness. This can be enabled by adding "player_effects": true to the Camera Preset's JSON file.
Player inside block rendering
In typical Minecraft gameplay, there is a screen effect that covers the screen when the player's head is inside of a block and the camera is in a third-person perspective. Since the minecraft:free camera is not directly connected to the player, this was somewhat confusing to users, for example if the minecraft:free camera was active and the player teleported inside a mountain, the screen would go black. This functionality has been disabled for the minecraft:free camera and other custom Camera Presets.
Player-camera distance affecting entity rendering
The game typically only renders entities, players, and chunks in an area surrounding the player’s position. Because of this, setting the camera a long distance from the player or moving the player a long distance from the camera could result in unexpected visual results. If you have Content Log messages enabled, you may see a warning alerting you to this, but players typically do not have those messages enabled and will probably not see the warning.
In addition, for entities to render, they need to be in loaded and ticking chunks. When a camera is set to move away from the player, it should sync player and entity data resulting in performant rendering at most gameplay distances.
In the camera.json file, extend_player_rendering extends this maximum distance. As long as the camera and entities are in chunks that are loaded and ticking, they will render on the client when the camera moves. This has been optimized to show the player and any rides or entities connected by a leash. This may also show mobs and other entities that are between the player and the camera. This is an enhancement, and no action is needed to apply this functionality. This will make it possible to do a cutscene with the free camera flying over a large distance away from the player.
Audio listener position
With Minecraft 1.20.10, the position and orientation of the camera is now used by default for how the game's audio system directs sounds to your device's speakers. For example, if a sound is to the left of the camera it should play out of the left speaker regardless of the player's position or rotation in the world. Previously this was based on the player's head position and rotation. If you want a custom Camera Preset to use the player position for the audio listener position, simply add "listener":"player" to the Preset's JSON file. An example "example:example_player_listener" JSON has been included in the experimental Cameras behavior pack to demonstrate this feature.
Camera Command Syntax
This command has the following syntax options:
/camera <players> set <preset> [ease <easeTime> <easeType>] [pos <x> <y> <z>] [rot <xRot> <yRot>]
/camera <players> set <preset> [ease <easeTime> <easeType>] [default]
/camera <players> clear
/camera <players> fade [time <fadeInSeconds> <holdSeconds> <fadeOutSeconds>] [color <red> <green> <blue>]
Every version of the camera command starts with a player selector, which is used to specify the player or players who will be affected by the command. After that, there are three options that you can specify: "set", "clear", or "fade". "set" will cause the targeted player(s) to use a specified camera perspective. "clear" will return the targeted player(s) back to their usual camera mode. "fade" will cause a full-screen fade, like what players see when sleeping in a bed.
The "set" Option
The "set" option for the camera command will cause the selected players to view the game through the specified Camera Preset. Until they disconnect from the game or a camera command using "clear" is used, they will use the specified Preset. This overrides things that normally control camera perspective like the settings menu option.
When no additional parameters are specified, this will cause the user's camera perspective to immediately snap to the specified Camera Preset. There are several additional options that can be used with the "set" option.
The "ease" sub-option
The ease option will cause the transition between the views to be done over some specified number of seconds, rather than instantly. It requires specifying an 'easeType', which is the name of one of the various easing methods available. The 32 different options are "linear", "spring", or the thirty other options that can be viewed at on Easing Functions Cheat Sheet (easings.net)
Eased motions always start from where the camera currently is, so an ease from A to B which is interrupted with another ease to C will start from somewhere in between A and B.
Eased transitions to the three standard gameplay perspectives are not allowed, as they are tied strongly to the player, and if the player moves or turns in drastic ways, the eased transition to those perspectives can be very unpleasant to experience.
The "pos" sub-option
This sub-option of the "set" option allows the camera command to specify an override to the position that is defined in the Camera Preset's JSON file. It supports the "~" and "^" characters like other commands do, allowing the command to set the camera to a dynamically calculated position.
Warning: Setting the position of a camera to an area of the world that isn't loaded is not a supported scenario, though there is not a plan currently to programmatically prevent it. The chunks of the world will still only load if the player is nearby and the device's render distance option is high enough. Positioning the camera in ways that look beyond what is loaded is something that may not function consistently in the future. It's recommended to keep the camera somewhat near the player and to double-check content on lower-end devices or with a lower render distance setting to ensure that things will work for all users.
The "rot" sub-option
Like the "pos" sub-option, the "rot" sub-option overrides the rotation of the Camera Preset. The "~" character is supported here to specify relative rotations. The "xRot" and "yRot" values in this command correspond to the "rot_x" and "rot_y" properties in the Camera Preset JSON file. As with the "rot_x" property, the result of the "xRot" value is clamped to no less than –90 degrees and no more than 90 degrees, to prevent the camera from going upside-down.
Camera Pitch Limits
To avoid the camera going fully upside-down, the pitch of the camera has been limited to not more than 90 degrees and not less than negative 90 degrees. This applies to the "rot_x" rotation specified in a Camera Preset JSON file and to values specified in the /camera command. If a value outside of this range is specified directly in JSON or a command, a content error message will be displayed and the Preset or command won't work. If a relative rotation (like ~20) happens to go outside of this range, the resulting pitch value will be clamped to the [–90,90] range and the command will work.
The "default" sub-option
This sub-option of the "set" option will use the position and rotation of the Camera Preset according to its JSON definition in the behavior pack. In other words, this causes any previous "pos" or "rot" overrides to be discarded.
The facing alternative for the /camera command
To make it easier to point a camera at a particular location, a ‘facing' option has been added to the /camera command. Wherever a rotation could be previously specified with the ‘rot' option, now ‘facing' can be used instead. ‘facing' should be followed either by an entity selector like [type=cow] or by x y z coordinates. This works a similar way the ‘facing' option functions with the /teleport command. The x y z position or the center of the targeted entity's bounding box is put through some math relative to the camera's current position, and an equivalent x and y rotation are calculated and used as if the ‘rot' option was used in the first place with those desired angles.
The "clear" Option
The "clear" option for the camera command takes no additional arguments. It causes the specified players to end any in-progress camera perspectives, including any eased camera motions, and return to normal. For example, to return all players back to normal camera functionality, run:
/camera @a clear
After a "clear" command, players will see the game through the perspective they have selected in the option menu, and will be able to resume using the perspective change key (i.e., F5 on keyboard) to change that setting. VR users will also be able to transition from the virtual Living Room back to the Immersive first-person view if desired.
The "fade" Option
The "fade" option of the camera command causes a full-screen color to fade in, wait, then fade out. It uses the same effect as when the player sleeps in a bed.
/camera <players> fade [time <fadeInSeconds> <holdSeconds> <fadeOutSeconds>] [color <red> <green> <blue>]
The "time" sub-option
This sub-option allows for customizing the timing of the fade effect. If not specified, this will use a 1 second fade in, a 0.5 second hold, and a 1 second fade out. Fade in, hold, and fade out are each limited to no more than 10 seconds. If a longer fade (or dynamically timed fade out) is needed, multiple fade commands can be used – see the "Combining fades" section.
The "color" sub-option
This sub-option allows for customizing the color of the fade effect. The red, green, and blue values should each be an integer value from 0 to 255. The target opacity of the fade is always fully opaque. If this is not specified, it will use 0 for each value, which causes a fade to black.
Fade timing, networked gameplay, and game performance
Because Minecraft content can be played over a network connection or on a device that isn't running at a perfect frame rate, it's important to keep in mind that the timing of camera fades may not always show up at exactly the desired moment. When authoring a fade effect, it's a good idea to consider adding more time to the ‘holdSeconds' value or to test on less powerful platforms to check that the presentation is acceptable.
Camera Fade Changes
The fade command parameters are now integers that can be as low as 0 and as high as 255.
The timing of fades has had a limit added, which is that none of the three timing values can exceed 10 seconds. This is to avoid accidental fades that last far longer than intended. As before, issuing multiple fade instructions will continue to combine the timing together, so fades beyond ten seconds are still possible.
Combining fades
It's possible (and valid) to issue a camera fade command while a camera fade is already in progress. When that happens, the fades are combined with the following logic. This can be useful for extending fades dynamically until some other event takes place.
The timing of the fade will combine in a way that will fade in with the faster of either the remaining fade-in time or the new fade's fade-in time. The fade out will start when both fades are ready to fade out (whichever is later). The fade out will similarly complete when both fades would complete (whichever is later).
The amount of fade transparency will always start with the current fade amount. For example, if a slow fade is in progress and half complete, and a new quick fade command is received, the user will see a quick fade from half opaque to fully opaque.
The target color (red, green, blue) of a combined fade is always the color of the in-progress fade. See "Limitations on fades" below.
Limitations on fades
For user comfort, fades follow two additional rules.
First, all fades must take at least 0.5 seconds so they won't happen more than two times per second. If a camera fade starts where the combined fade in plus hold plus fade out time is less than 0.5 seconds, the hold time will be increased to make up the difference.
Second, if a fade is already in progress, new fades will continue to use the same color as the in-progress fade effect. This prevents full-screen changes between different colors.
Additional Notes and Nuances
User Input during the "minecraft:free" camera
When the "minecraft:free" camera (or a custom camera based on it) is used via the "set" option of the Camera command, user input will be handled as if the player is in the first-person camera view. This means that the player can continue to turn around, place blocks, or otherwise interact with the world as usual, they just will not see it from the typical viewpoint. If player input is not desired when the "minecraft:free" camera is active, other commands can be used to limit the player's abilities. See "Combining Multiple Commands Together" below for some suggestions.
Persistence of Camera State
There will be no persistence of camera state for players across game sessions. For example, if a player is under the effect of "/camera … set", then they exit the game in any way and rejoin later, they will load into the world as if no camera command is active. It will be up to the created world's logic to put rejoined players back into the desired camera state.
During the time a player is loaded into a particular world, it will persist any position or rotation values that have been specified to override a camera's default JSON state.
For example, if a player is set to a custom camera with a custom position:
/camera @a set example:my_camera pos 100 100 100
Then the player is put back to normal:
/camera @a clear
Later, the camera is put back to the custom camera:
/camera @a set example:my_camera
The example:my_camera camera will be at 100 100 100 instead of its default position specified in the JSON file.
To return that camera back to normal, the player could either exit and rejoin the game, or the following command could activate the camera while returning it back to its default state:
/camera @a set example:my_camera default
How the Camera Command Affects VR Users
When using a Virtual Reality headset, players can be in an immersive first-person view, or in a virtual living room with a virtual television that displays a flat view of the game. When a camera command using "set" targets a VR player in the immersive first-person view, they will be transitioned to the virtual living room and the specified Camera Preset will appear on the virtual screen. While a "set" is active to force the player to a particular perspective (including "minecraft:first_person"), pressing the perspective change button will display a message explaining the situation, and the transition to the immersive view will be prevented.
Camera commands using "fade" will not do anything for VR users in the immersive first-person mode, but players in the virtual living room will still see it.
Combining Multiple Commands Together
The new Camera Command allows for a variety of new simple features, but combining multiple commands together can allow for a wider array of possibilities. Here are some examples:
Making a simple non-interactive cutscene
To make a simple non-interactive cutscene, a camera command can be combined with the /inputpermission command to disable player movement and rotation:
/camera @a set example:cutscene_camera
/inputpermission @a camera disabled
/inputpermission @a movement disabled
Then at the end of the cutscene animations:
/camera @a clear
/inputpermission @a camera enabled
/inputpermission @a movement enabled
Hiding a teleport
To hide a player or other mob teleport, use the camera fade command combined with some delayed teleport commands:
/camera @a fade time 0.5 0.5 0.5
Then after half a second, teleport the player to the desired location:
/tp @a <x y z coordinates here>
If this is being used to teleport the player to an area that may not have loaded yet, increase the middle number (the "holdSeconds") to give the player's device enough time to load the surrounding area.
Transitioning to and from a flyover camera
When a player encounters a new part of an adventure map, showing a dramatic flyover of the area can add some interest to the upcoming experience. This can be done with a series of camera commands:
First, start a camera fade to hide the next transition...
/camera @a fade time 0.5 0.2 0.5
After 0.5 seconds (the "fadeInSeconds" time), issue a command to cut to one position and another command to start an eased camera motion. This assumes that Camera Presets named "example:flyover_start" and "example:flyover_end" have been defined in a behavior pack.
/camera @a set example:flyover_start
/camera @a set example:flyover_end ease 5 linear
Then after three seconds (before that five second movement ends and with enough time to fade again) issue another fade command.
/camera @a fade time 0.5 0.2 0.5
Then after another 0.5 seconds, return the camera back to normal.
/camera @a clear
The Camera Command and Split-screen Gameplay
When multiple people are playing in split-screen on the same device, they have separate cameras and separate targetable player entities. When the new Camera command is used (whether for "set" or "fade" options), that separation is not changed. Each player's camera can be separately affected. There are no plans for combining views in split-screen scenarios, or for supporting multiple split-screen-like views for individual players.
Additional free camera preset examples:
Player listener
This controls what is used for the audio listener.
Creators will sometimes want the player’s position to continue being where the audio system’s “ears” are, and other times they will want this listener position to be where the camera is.
{
  "format_version": "1.19.50",
  "minecraft:camera_preset": {
    "identifier": "example:example_player_listener",
    "inherit_from": "minecraft:free",
    "listener": "player"
  }
}
Player effect
Optional, defaults to false. Specify true to allow effects on the player to affect how the game renders when this preset is active.
Basically, it determines whether the player state can affect rendering. A security camera's view of a player who is on fire shouldn't look like the security camera is on fire, for example.
{
  "format_version": "1.19.50",
  "minecraft:camera_preset": {
    "identifier": "example:example_player_effects",
    "inherit_from": "minecraft:free",
    "player_effects": true
  }
}
Feedback
Coming soon: Throughout 2024 we will be phasing out GitHub Issues as the feedback mechanism for content and replacing it with a new feedback system. For more information see: https://aka.ms/ContentUserFeedback.
Submit and view feedback for