Note
Access to this page requires authorization. You can try signing in or changing directories.
Access to this page requires authorization. You can try changing directories.
You can add new entity types to Minecraft: Bedrock Edition using a combination of behavior packs and resource packs. As you learned from the recommended tutorials, the behavior of entity types can be changed with a behavior pack, and you can change the appearance with a resource pack. Both are required to add a new entity type to the game.
This guide has two parts: the first part covers the files and folder structure needed to add a custom entity type to Minecraft. The second part shows you how to breathe life into the entity using behavior components and animations.
In this tutorial you'll learn:
- How to create a new custom entity type using behavior and resource packs.
- How to apply various features to the entity type, including components and animations.
- Make use of translations for entity names.
It's recommended you complete these before beginning this tutorial:
- Introduction to Behavior Packs
- Introduction to Resource Packs
- Download the min robot and full robot resource and behavior packs
In addition, it will be helpful if you have a code editor like Visual Studio Code, and if you're familiar with how the JSON format works.
File structure
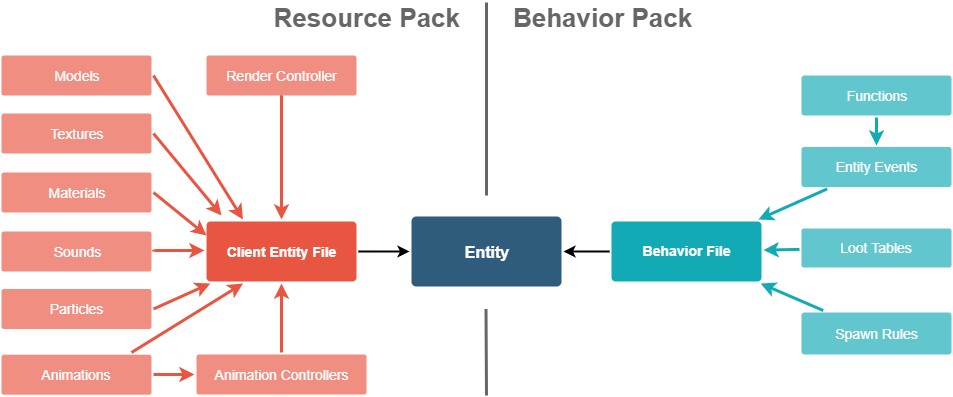
In the behavior pack, an entity file is responsible for defining the entity on the server side. In the resource pack, a client entity file is responsible for telling the game how the entity will look. The following graphic shows how different files can interact to create a custom entity:
Robot entity example (minimum)
To give you a point of reference for this tutorial, we are providing two versions of the same entity: a robot that can spawn randomly in the world and has three random textures, a wheel animation, various components, and a custom water mechanic. The download link is in the Requirements section above.
To see the robot in action, pick one of the sets of resource and behavior packs you just downloaded. (We recommend trying the minimum one for now.) Put the resource and behavior packs in their respective com.mojang sub-folders, launch a world with cheats enabled, and use /summon sample:robot.
This is the structure of the finished "minimum robot" behavior pack and resource pack:
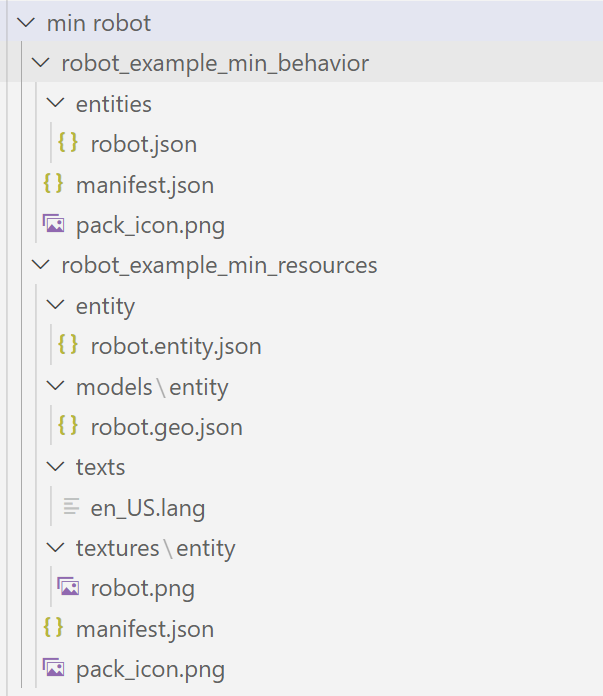
This looks like a lot, but you only have to think about the files with "robot" in the name and where they are stored.
After you get an idea how the robot acts in the game, you can remove the finished robot resource and behavior packs and re-create them from scratch with the steps of this tutorial to get an idea how all the files work together.
A good starting point would be to use the resource and behavior packs you created in the earlier tutorials. You might want to remove the attack cow entity, but that's a personal preference.
Naming
When you create an entity, one of the first things to consider is what ID you're going to give it. The files in your resource and behavior packs will need to be synced using the entity ID that you give your entity. This ID consists of a namespace and a name separated by a colon. That was the sample:robot ID we used previously to summon the robot.
Your own namespace can be a short version of your team name or product name. The ID should only include lower case letters, digits, and underscores. Don't use "minecraft" as the namespace for your custom content. The "minecraft" namespace is reserved for vanilla resources, so you should only use "minecraft" if you are overwriting vanilla content.
Most files that define the entity will be JSON files. To avoid confusion, we suggest you follow a standard naming convention as you create each of these files. The game ignores file names in most cases, but when working on an Add-On, messy file names can be confusing. The standard conventions are:
| File Type | File Name |
|---|---|
| Client Entity Files | entity_name.entity.json |
| Model Files | entity_name.geo.json |
| Animation Files | entity_name.animation.json |
| Animation Controllers | entity_name.animation_controllers.json |
| Render Controllers | entity_name.render_controllers.json |
entity_name should be replaced by the name of your entity, not including the namespace.
Format versions
Each JSON file should have a format_version tag. This tag is important for the game to correctly read the file. Files made in older formats will still work in newer versions of the game, but only if the format version is set correctly. Incorrect format versions are a frequent source of errors.
Behavior pack definition
The first step to add a robot into the game starts in the behavior pack. Create a new file in the entities folder of the behavior pack and name it robot.json. Copy and paste in this code.
{
    "format_version": "1.12.0",
    "minecraft:entity": {
        "description": {
            "identifier": "sample:robot",
            "is_spawnable": true,
            "is_summonable": true
        },
        "components": {}
    }
}
Inside the description tag, we define basic attributes of the entity:
identifiersets the ID for the entity.is_spawnableadds a spawn egg into the game that allows the player to spawn this mob.is_summonablemakes the entity work with the/summoncommand.
Inside components, we're going to add components to change the behavior of the entity. For now, we are adding only the minecraft:physics component. This will give the entity gravity and regular collision behavior.
"components": {
    "minecraft:physics": {}
}
Save your robot.json file and move on to the next step.
Client entity definition
Now, we need to add the entity to the resource pack to give it a visual appearance. In the entity folder of the resource pack, create a new JSON file called robot.entity.json.
{
    "format_version": "1.10.0",
    "minecraft:client_entity": {
        "description": {
            "identifier": "sample:robot",
            "spawn_egg": {
                "base_color": "#505152",
                "overlay_color": "#3b9dff"
            }
        }
    }
}
This is the basic structure of the file. So far, it's similar to the behavior-side file we made in the previous section. Note that we now use client_entity instead of just entity. At the time of writing this article, 1.10.0 is the latest format version for this file.
The spawn_egg tag defines how the spawn egg will look in the inventory. Using this method, it will look like a vanilla spawn egg, but with customized colors.
Visuals
Before we can add the entity into the game, it needs a model. The Entity Modeling and Animation article explains how to create a custom model and texture, but creating a model is a lot to learn and we're not done with this tutorial yet! So for now, pretend you already created a model by copying and pasting the files from the robot resource pack. Use these same steps later to add the model you create.
- Save the model inside the folder
models/entityasrobot.geo.json. - Save the texture in
textures/entityasrobot.png.
Now that the model files are in place, we need a render controller to link the model, texture, and material that's used for the entity.
Open the robot.entity.json file in the entity folder in your resources pack.
For most entities (such as our robot), we can use the default render controller that's provided by the game. We will talk more about render controllers later in the more advanced part of this tutorial. For now, just know that this is where it goes and this should be the content:
{
    "format_version": "1.10.0",
    "minecraft:client_entity": {
        "description": {
            "identifier": "sample:robot",
            "materials": {
                "default": "entity"
            },
            "textures": {
                "default": "textures/entity/robot"
            },
            "geometry": {
                "default": "geometry.robot"
            },
            "render_controllers": [
                "controller.render.default"
            ],
            "spawn_egg": {
                "base_color": "#505152",
                "overlay_color": "#3b9dff"
            }
        }
    }
}
The model is referenced by the geometry name. If you create a model in Blockbench, make sure the geometry name in the project settings is set to your entity name—in this case, "robot".
Unlike geometries, textures are linked by their path in the resource pack, minus the file extension, as shown in the example.
In most cases, a custom material is not required. Instead, you can use a default material. In this example, we use entity. If the texture has transparent parts, you can use entity_alphatest, or if your texture is translucent (like stained glass), you can use entity_alphablend.
Translation strings
Right now, neither the entity itself nor the spawn egg has a proper name in game. To define a name, we need a language file.
Create a new folder called texts inside your resource pack and create a new file called en_US.lang. This is the only language file required for custom entities, as it's used as a fallback for translations when strings in other languages aren't available.
Inside this file, add these two lines:
entity.sample:robot.name=Robot
item.spawn_egg.entity.sample:robot.name=Spawn Robot
The first line defines the name of the entity. This will be visible in death messages and in the output of some commands. Key and value are always separated by an equals sign. The first line can be broken down into:
entity.
<identifier>.name=<Name>
The second line defines the item name of the spawn egg:
item.spawn_egg.entity.
<identifier>.name=<Name>
Testing
Make sure to test early and often. Encountering an issue early on helps to simplify tracking it down, which can make it easier to fix. Testing often will reveal issues soon after making changes, which helps to narrow down the cause to those recent changes.
You should be able to spawn your entity in game using the spawn egg or the summon command. If you just want a static entity, you're good to go. But if you want to customize the entity even more, keep on reading.
Robot entity example (full)
Now would be a good time to try the full robot resource and behavior packs. Compare the collection of folders and files. Then, put back your minimal robot packs so we can continue adding functionality.
Components
Components tell the entity how to act in game. Let's add a few components and explain in detail what they do.
In the behavior pack/entities/ folder, open robot.json and replace the single entry of "minecraft:physics": {} with all of this:
   "components": {
        "minecraft:physics": {},
        "minecraft:nameable": {},
        "minecraft:movement": {
            "value": 0.25
        },
        "minecraft:movement.basic": {},
        "minecraft:jump.static": {},
        "minecraft:navigation.walk": {
            "avoid_water": true
        },
        "minecraft:behavior.tempt": {
            "priority": 1,
            "speed_multiplier": 1.4,
            "items": ["diamond"],
            "within_radius": 7.0
        },
        "minecraft:behavior.random_stroll":
        {
            "priority": 3,
            "speed_multiplier": 0.8
        },
        "minecraft:experience_reward": {
            "on_death": 8
        }
   }
| Component Name | Description |
|---|---|
minecraft:nameable |
Allows the player to name the entity with a name tag. |
minecraft:movement |
Tells the entity how fast to move. 0.25 is the regular speed of most animals in Minecraft. |
minecraft:movement.basic |
Gives the entity the ability to move on the ground. |
minecraft:jump.static |
Allows the entity to jump in order to walk up blocks. |
minecraft:navigation.walk |
Allows the entity to navigate through the world. Avoid water is one of the options that this component comes with. |
minecraft:behavior.tempt |
Makes the entity follow players who hold diamonds in their hand. We are giving this behavior a higher priority so it will prioritize this action (lower number = higher priority). |
minecraft:behavior.random_stroll |
Will make the entity randomly walk around the place. We're setting the priority to a higher number so the entity will only do this when it has nothing else to do. The speed multiplier will decrease the speed while using this walk behavior. |
minecraft:experience_reward |
Lets the entity drop experience when killed by a player. |
Animations
In this section, we'll add a simple wheel animation to the robot. If you want to learn more about animations, how to use animation controllers, and how to create animations in BlockBench, read this guide.
Animations are stored in animation files. So the first thing we need to do is create a folder called animations in the resource pack and create a file called robot.animation.json inside it. In that file, we'll create a new animation called animation.robot.drive. We also want to set loop to true so the animation will keep playing. The file should look like this:
{
    "format_version": "1.8.0",
    "animations": {
        "animation.robot.drive": {
            "loop": true
        }
    }
}
Animations allow us to animate the position, rotation, and scale of each bone. (If you don't know what "bone" means in that context yet, that's okay—you'll learn about bones when you learn Blockbench. For now, just know that it means a chunk of the model, like a leg or a wheel.) Animations can be done with keyframes, Molang expressions, or a combination of both. In this example, we'll just use Molang expressions.
Molang is a language just for resource and behavior packs. It allows us to get various numbers from the entity using a query and calculate a result out of these numbers using math expressions. For example, the query query.modified_distance_moved will return the distance the entity has moved. We can use it to calculate the rotation of the robot wheel on the X-axis, which will result in an animation that makes the robot look like it is driving. You have to play around with the numbers, but for this model 60 worked quite well.
{
    "format_version": "1.8.0",
    "animations": {
        "animation.robot.drive": {
            "loop": true,
            "bones": {
                "wheel": {
                    "rotation":["query.modified_distance_moved*60", 0, 0]
                }
            }
        }
    }
}
Now that the animation is created, we need to link it in the client entity file. (Remember, the resource pack is the client, so open <resource pack>/entity/robot.entity.json for this next part.) The animations tag links all animations and animation controllers that are used by the entity. Each animation gets a short name that can be used to play the animation in an animation controller or directly in the file, in this case drive.
The scripts and animate sections can be used to directly play animations:
        "animations": {
            "drive": "animation.robot.drive"
        },
        "scripts": {
            "animate": ["drive"]
        }
With these two tags added in the description tag of the client entity file, the drive animation will always be active and advance the wheel rotation while the entity is moving.
Render controllers
Render controllers allow us to change the geometry, textures, and materials of the entity using Molang. The following example shows how to use the geometry, material, and texture that have been linked in the client entity file as default:
{
    "format_version": "1.8.0",
    "render_controllers": {
        "controller.render.robot": {
            "geometry": "Geometry.default",
            "materials": [ { "*": "Material.default" }],
            "textures": [ "Texture.default" ]
        }
    }
}
If we just want to use one default geometry, material, and texture, we can just leave it pointing to the default render controller as we did before. But this is a good time to learn how to add random textures, so let's break down how render controllers work.
One entity file can contain more than one render controller. Each controller goes between the braces in the value of the render_controllers key.
Each controller is named using the scheme controller.render.<entity-name>. Our one controller is named controller.render.robot. For a multi-purpose render controller, we can also use another keyword instead of the entity name.
Inside the render controller tag, the different resources are specified, but you'll notice each one uses a different JSON value.
Geometry
One render controller can display only one geometry at a time, so the geometry key can only be a single string value. This string can be a Molang expression and should always return a geometry. In this case, it's calling Geometry.default, which means that it will return the geometry that's linked as default by whatever entity using the render controller.
You can render multiple geometries on one entity by using multiple render controllers. This can be tricky though, and can lead to unexpected behavior. Therefore, it's only recommended for experienced creators.
Materials
Unlike geometry, the materials value is an array of objects. We can assign each bone a separate material. Each object in the array can have one key-value pair. The key selects a set of bones. An asterisk is used as a wildcard. This means that all bones, no matter the name, will have the default material assigned. Note that materials are assigned in order, meaning that materials further down in the list can overwrite previous materials.
  "materials": [
    { "*": "Material.default" },
    { "*_arm": "Material.transparent" }
  ],
In this example, we first apply the default material to all bones. Then, we overwrite the material with the transparent material on all bones that end in _arm. That way, all arm bones would support transparency.
Textures
Textures are specified as an array of strings. In most cases, only one texture will be linked here, since entities don't support separate textures. There is one exception: materials can support multiple textures layered on top of each other, such as the material entity_multitexture. For example, this is used by llamas to overlay the décor.
Arrays
When working with multiple resources of one type, it can be useful to use an array. An array is a list of resource links that are defined in the render controller, and that you can pick one resource from using Molang.
We can define an array for the robot like this:
  "controller.render.robot": {
    "arrays": {
      "textures": {
        "Array.variant": [
          "Texture.default",
          "Texture.variant_b",
          "Texture.variant_c"
        ]
      }
    }
  }
In the arrays section we can define arrays for each of the three categories: textures, materials, and geometries. Inside the category, you can define arrays using Array.<array name> as the name. Each line inside the array links one texture that's defined in the client entity file.
You can access the array using Molang. Arrays are 0-based (that is, the first item is numbered 0, the second 1, and so on), so the first texture in this array can be accessed through Array.variant[0].
In this example, we're using the variant query to pick a texture from the array. The variant of a mob can be changed through the minecraft:variant component in the behavior file.
"textures": [ "Array.variant[ query.variant ]" ]
Now we need to link the additional textures in the client entity file. The regular, blue robot texture is already linked as default, and we will now create two copies of the robot texture file, edit the color, and link them as variant_b and variant_c.
            "textures": {
                "default": "textures/entity/robot",
                "variant_b": "textures/entity/robot_b",
                "variant_c": "textures/entity/robot_c"
            },
Now, the textures are linked. The last step is to randomize the variant in the behavior file. We'll use component groups for this. Those are a way to add and remove a set of components from the entity at any time. We'll also use an event that randomizes which component group to add.
        "description": {
            ...
        },
        "components": {
            ...
        },
        "component_groups": {
            "sample:color_0": {
                "minecraft:variant": {"value": 0}
            },
            "sample:color_1": {
                "minecraft:variant": {"value": 1}
            },
            "sample:color_2": {
                "minecraft:variant": {"value": 2}
            }
        },
        "events": {
            "minecraft:entity_spawned": {
                "randomize": [
                    {
                        "add": {
                            "component_groups": ["sample:color_0"]
                        }
                    }, {
                        "add": {
                            "component_groups": ["sample:color_1"]
                        }
                    }, {
                        "add": {
                            "component_groups": ["sample:color_2"]
                        }
                    }
                ]
            }
        }
Now, when we first spawn the entity, it will randomly choose a component group and therefore a variant. This is a very common technique to randomize the appearance of an entity.
Spawning
Spawn rules define how entities randomly spawn in the world. We'll create a spawn rules file for our robot.
First, create a folder called spawn_rules in your behavior pack. Inside the folder, create a new text file called robot.json. The content of the file should look like this:
{
  "format_version": "1.8.0",
  "minecraft:spawn_rules": {
    "description": {
      "identifier": "sample:robot",
      "population_control": "animal"
    },
  "conditions": []
  }
}
Inside minecraft:spawn_rules, there are two things that we need to consider: population control and conditions.
description defines the basic properties of the file. identifier should match the identifier of our entity. population_control defines how the game knows how many mobs to spawn and is a little more complicated.
Population control
There are different pools of entities. When the pool defined here is considered full, the game will no longer spawn mobs of this pool. There are three different options:
- "animal": Passive mobs such as cows and pigs
- "water_animal": Water-based mobs such as tropical fish and dolphins
- "monster": Hostile mobs such as skeletons and zombies
For the robot, we're using the animal pool.
Conditions
conditions is an array of possible conditions that allow a mob to spawn in the world. Each of the conditions consists of a group of components that define when and when not to spawn the mob.
For a basic spawn rule, one condition is enough. For the robot, we will use this configuration:
{
    "format_version": "1.8.0",
    "minecraft:spawn_rules": {
        "description": {
            "identifier": "sample:robot",
            "population_control": "animal"
        },
        "conditions": [
            {
                "minecraft:spawns_on_surface": {},
                "minecraft:brightness_filter": {
                    "min": 12,
                    "max": 15,
                    "adjust_for_weather": false
                },
                "minecraft:weight": {
                    "default": 40
                },
                "minecraft:biome_filter": {
                    "test": "has_biome_tag",
                    "value": "animal"
                }
            }
        ]
    }
}
| Component Name | Description |
|---|---|
minecraft:spawns_on_surface |
The mob spawns on the surface |
minecraft:brightness_filter |
Only spawn the entity at a certain brightness. Accepts three options, min, max, and adjust_for_weather. Light levels range from 0 to 15. If adjust_for_weather is set to true, the light level decrease due to rain and thunderstorms will be taken into account. |
minecraft:weight |
The weight of the entity in spawning. The higher the number, the more often the mob will spawn. |
minecraft:biome_filter |
Filters the biome the mob is allowed to spawn in. Biome filters work similarly to filters in behavior, which means that operators like all_of and any_of are allowed. Biomes have different tags that indicate the biome type, variant, dimension, and features like monster and animal. |
Robots will now spawn anywhere on the surface where animals can spawn and where there is sufficient light. With a weight of 40, they'll also spawn quite frequently.
Behavior animations
Behavior animations work similarly to regular animations but run in the behavior pack. While regular animations animate the movement of the model as well as sounds and particles, behavior animations can run regular commands, trigger entity events, or run Molang expressions. Behavior animations are also often referred to as Entity Events, although that name tends to be a bit confusing.
Since robots don't like water, we'll add a mechanic to damage robots in water or rain. First, we're going to create an animation controller to test when the entity is in water using a Molang query. Create a new folder in the behavior pack called animation_controllers and create the file robot.animation_controllers.json inside it:
{
  "format_version": "1.10.0",
  "animation_controllers": {
    "controller.animation.robot.in_water": {
      "states": {
        "default": {
          "transitions": [
            {"in_water": "query.is_in_water_or_rain"}
          ]
        },
        "in_water": {
          "transitions": [
            {"default": "query.is_in_water_or_rain == 0"}
          ]
        }
      }
     }
  }
}
The animation controller looks very similar to regular client-side animation controllers. It has two states that get toggled depending on whether the robot is in water or not.
Now, let's add an animation to give a poison effect to the robot. Create the folder animations inside the behavior pack and create a file called robot.animation.json:
{
    "format_version": "1.8.0",
    "animations": {
        "animation.robot.poison": {
            "loop": true,
            "animation_length": 1,
            "timeline": {
                "0.0": [
                    "/effect @s poison 2 0 true"
                ]
            }
        }
    }
}
Instead of using the bone tag here to animate bones, we're using the timeline tag. In resource packs, timelines can only be used to run Molang code. In behavior animations, you can use this to run Molang code, commands, or trigger entity events. Note that all these are provided as a string. The game will figure out the type of the string from its content. If the string starts with a slash, it will run as a command. If it matches a scheme such as @s namespace:event, it will run as an entity event. If it looks like Molang, it will run as Molang.
For that reason, it's important to start commands with a slash in behavior animations. Also, note that we're applying poison for two seconds because one would not be enough to actually apply damage. The true at the end of the command makes the status effect ambient, meaning that there won't be any particles.
As with animations in resource packs, we need to link all of our animations and animation controllers in the description tag of our entity like this:
  "description": {
    "identifier": "sample:robot",
     "is_spawnable": true,
     "is_summonable": true,
     "animations": {
        "poison": "animation.robot.poison",
        "in_water": "controller.animation.robot.in_water"
      },
      "scripts": {
        "animate": [
          "in_water"
        ]
      }
  }
The animations section lists all animations and animation controllers that the entity uses and gives them a short name. In the scripts/animate section, we list the animations that should always run. We want the controller to detect the state to always run, but not the poison effect.
Now, we need to go back to the animation controller and add the poison effect. We'll also add a little regeneration mechanic along with a sound effect, so the robot won't die as easily.
  "states": {
    "default": {
      "transitions": [
         {"in_water": "query.is_in_water_or_rain"}
      ]
    },
    "in_water": {
      "animations": [
        "poison"
      ],
      "on_exit": [
        "/effect @s regeneration 2 4 true",
        "/playsound random.fizz @a[r=16]"
      ],
          "transitions": [
        {
          "default": "query.is_in_water_or_rain == 0"
        }
      ]
    }
  }
In the animations array, we list all the animations that should be running in this state, which is just poison in our case.
In the on_exit tag, we add two commands that will run when the robot exits the water. The first command will give the robot a regeneration effect level four for two seconds. The second command will play a fizzing sound effect.
Note that we could have also run the command in the on_entry array of the default state, but that would've also played the effects when spawning the robot or reloading the world because the game will always first transition into the default state.
To summarize the relationship between controllers and animations: an animation controller is used to control when an animation plays, while an animation itself is what occurs as a result of transitioning to the animation as determined by the controller. Animations and animation controllers are supplied to the entity behavior file.
What's Next?
In this guide we have added a complete custom entity to the game. If you used the existing model files instead of creating your own, now might be a good time to learn about Blockbench. Or, you can read more about entity behavior for the server.