Note
Access to this page requires authorization. You can try signing in or changing directories.
Access to this page requires authorization. You can try changing directories.
When your scripts don't behave as expected, having a solid debugging strategy makes the difference between hours of frustration and quickly finding the root cause. This guide covers everything from basic console logging to advanced debugging with Visual Studio Code, helping you become more effective at finding and fixing script issues.
Prerequisites
Before diving into debugging, you should be familiar with:
Debugging strategies overview
There are several approaches to debugging scripts in Minecraft, each with its own strengths:
| Approach | Best For | Difficulty |
|---|---|---|
| Console logging | Quick checks, simple issues | Easy |
| Content log | JSON errors, pack loading issues | Easy |
| VS Code debugger | Complex logic, variable inspection | Medium |
| Custom tooling | Variable inspection over time | Medium |
| Visual debug utilities | Spatial issues, entity tracking | Advanced |
| Script profiling | Performance problems | Advanced |
Console logging basics
The simplest debugging technique is printing messages to the console. To do that in Minecraft, you'll need to enable the content log.
To enable it, click Settings, then Creator. Scroll to Content Log Settings.
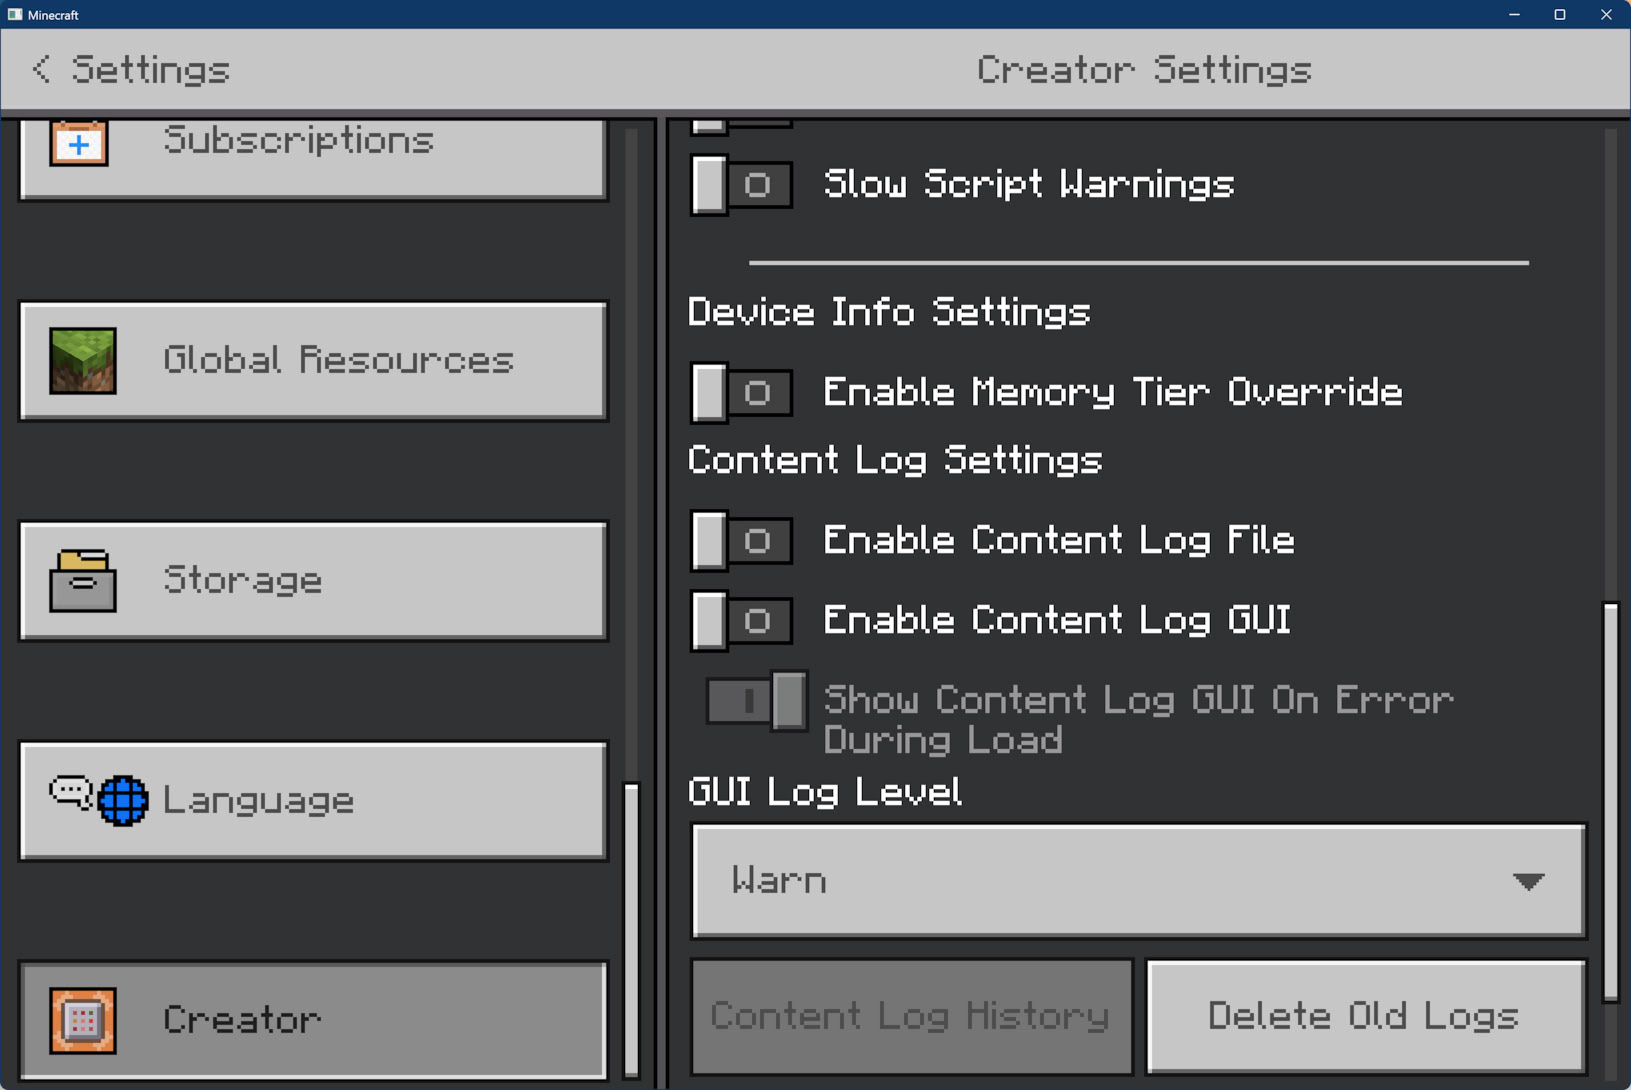
You can enable the following options:
- Content Log File writes the log output to a file. (See below for information on where to find the file!)
- Content Log GUI displays errors in the Minecraft UI in real time.
- The GUI Log Level can be set to Verbose (everything), Info (anything logged to the console, including warnings and errors), and Warn (just log warnings and errors).
To find the log file:
- Navigate to your Minecraft logs folder:
- GDK (1.21.120+):
%APPDATA%\Minecraft Bedrock\logs\ - Preview:
%APPDATA%\Minecraft Bedrock Preview\logs\ - Legacy UWP: See GDK Migration on Windows for older paths
- GDK (1.21.120+):
- Open the most recent
.logfile. - Search for your debug messages.
Content log
The most reliable way to output debug information is console.warn() or console.log():
import { world, system } from "@minecraft/server";

system.runInterval(() => {
    const players = world.getAllPlayers();
    console.warn(`Player count: ${players.length}`);

    for (const player of players) {
        console.warn(`Player ${player.name} at ${player.location.x}, ${player.location.y}, ${player.location.z}`);
    }
}, 100);
Tip
When you use console.warn(), messages will always appear in the content log regardless of the log level it's set at. If you use console.log(), messages will not appear in the log unless the log level is set to Verbose or Info.
Debug output tips
Sometimes it's useful to create more "structured" output with more information that's still easy to scan.
function debugEntity(entity, context) {
    console.warn(`=== DEBUG: ${context} ===`);
    console.warn(`  Entity: ${entity.typeId}`);
    console.warn(`  Location: ${JSON.stringify(entity.location)}`);
    console.warn(`  Health: ${entity.getComponent("health")?.currentValue ?? "N/A"}`);
    console.warn(`  Velocity: ${JSON.stringify(entity.getVelocity())}`);
    console.warn(`========================`);
}
You can also use conditional flags to zero in on specific elements you're trying to debug. In this example, we create a debugLog function that only outputs to the console when the DEBUG_MODE constant is set to true. The DEBUG_SPAWNING and DEBUG_COMBAT flags can be set independently to show specific categories.
const DEBUG_MODE = true;
const DEBUG_SPAWNING = true;
const DEBUG_COMBAT = false;

function debugLog(category, message) {
    if (!DEBUG_MODE) return;

    const categoryFlags = {
        "spawning": DEBUG_SPAWNING,
        "combat": DEBUG_COMBAT
    };

    if (categoryFlags[category]) {
        console.warn(`[${category.toUpperCase()}] ${message}`);
    }
}

// Usage
debugLog("spawning", `Spawned entity at ${location.x}, ${location.y}, ${location.z}`);
Using the Visual Studio Code debugger
For complex issues, the Visual Studio Code debugger lets you pause execution, inspect variables, and step through code line by line. You can read detailed documentation for the debugger at Minecraft VS Code Debugger.
Quick setup checklist
Install the debugger extension: Minecraft Bedrock Edition Debugger
Enable loopback (run once as Administrator):
# For Minecraft retail
CheckNetIsolation.exe LoopbackExempt -a -p=S-1-15-2-1958404141-86561845-1752920682-3514627264-368642714-62675701-733520436

# For Minecraft Preview
CheckNetIsolation.exe LoopbackExempt -a -p=S-1-15-2-424268864-5579737-879501358-346833251-474568803-887069379-4040235476
Create launch.json in your .vscode folder:
{
    "version": "0.3.0",
    "configurations": [
        {
            "type": "minecraft-js",
            "request": "attach",
            "name": "Debug with Minecraft",
            "mode": "connect",
            "localRoot": "${workspaceFolder}/",
            "port": 19144
        }
    ]
}
Start debugging in VS Code (F5), then connect from Minecraft:
/script debugger connect
Custom tooling
As an alternative or adjunct to Visual Studio Code's debugger, you can create your own extensible tool set that monitors changes in values over time. This is similar to the Watch panel in Code, but runs entirely in-game, and can display more targeted or complex information.
For a guide to this approach, read our article on Building Debug Tools.
Visual debug utilities
The @minecraft/debug-utilities module lets you render visual debugging information directly into the game world. With debug drawing utilities, you can build specialized tools that display targeted information.
Drawing debug shapes
import { world } from "@minecraft/server";
import { DebugDrawer, DebugBox, DebugLine } from "@minecraft/debug-utilities";

const drawer = new DebugDrawer();

// Draw a box around an area of interest
const box = new DebugBox(
    { x: 0, y: 64, z: 0 },    // min corner
    { x: 10, y: 74, z: 10 },  // max corner
    { red: 1, green: 0, blue: 0, alpha: 1 } // red color
);
drawer.draw(box);

// Draw a line showing entity velocity
function showVelocity(entity) {
    const loc = entity.location;
    const vel = entity.getVelocity();

    const line = new DebugLine(
        loc,
        { x: loc.x + vel.x * 10, y: loc.y + vel.y * 10, z: loc.z + vel.z * 10 },
        { red: 0, green: 1, blue: 0, alpha: 1 }
    );
    drawer.draw(line);
}
Use cases for visual debugging
- Collision bounds: Visualize selection or collision areas
- Pathfinding: Show entity navigation paths
- Spawn zones: Mark where entities should spawn
- Trigger areas: Display event trigger regions
- Direction vectors: Show facing or movement directions
Script profiling
When your script runs slowly, the profiler helps identify bottlenecks. For full details on how to profile your scripts, see Performance in Scripting.
Profiler commands
/script profiler start- Begin performance profiling session/script profiler stop- End profiling and generate .cpuprofile file
Diagnostics commands
/script diagnostics startcapture- Begin comprehensive diagnostics capture/script diagnostics stopcapture- End diagnostics capture session
Debugging checklist
When encountering issues, work through this checklist:
1. Check the Content Log
- Enable Content Log GUI in settings
- Look for error messages and stack traces
- Note the exact error message
2. Verify Pack Loading
- Pack appears in world settings
- No manifest.json errors in log
- Correct module versions in dependencies
3. Add Debug Output
- Add
console.warn()at key points - Log input values and intermediate results
- Verify code paths are being executed
4. Test in Isolation
- Create a minimal test case
- Remove unrelated code temporarily
- Test with fresh world
5. Use the Debugger
- Set breakpoints at problem areas
- Inspect variable values
- Step through suspicious code
Resolving errors
For a list of common issues, see Common Scripting Errors in Minecraft.