Note
Access to this page requires authorization. You can try signing in or changing directories.
Access to this page requires authorization. You can try changing directories.
Applies To:# OData WebApi v7 for aspnet webapi supported
 OData AspNet WebApi V7# OData Webapi for Webapi supported
 OData AspNet WebApi V6
We’re often asked by people if OData APIs can be secured. The name “Open Data Protocol” and the way we evangelize it (by focusing on how open a protocol it is and how it provides interoperability) may give people the impression that OData APIs doesn’t work with authentication and authorization.
The fact is that using OData is orthogonal to authentication and authorization. That is to say, you may secure an OData API in any way you can secure a generic RESTful API. We write this post to demonstrate it. The authentication methods we use in this post is the basic authentication over HTTPS. The service library we use is ASP.NET Web API for OData V4.0.
Secure an OData Web API using basic authentication over HTTPS
OData Protocol Version 4.0 has the following specification in section 12.1 Authentication:
OData Services requiring authentication SHOULD consider supporting basic authentication as specified in [RFC2617] over HTTPS for the highest level of interoperability with generic clients. They MAY support other authentication methods.
Supporting basic authentication over HTTPS is relatively easy for OData Web API. Suppose you already have a working OData service project. In this post, we implemented an OData API which has only one entity type Product and exposes only one entity set Products. In order to secure Products, the following steps needs to be taken:
1. Create a custom AuthorizeAttribute for the basic authentication
Add a class to your project as follows:
public class HttpBasicAuthorizeAttribute : AuthorizeAttribute
{
    public override void OnAuthorization(System.Web.Http.Controllers.HttpActionContext actionContext)
    {
        if (actionContext.Request.Headers.Authorization != null)
        {
            // get the Authorization header value from the request and base64 decode it
            string userInfo = Encoding.Default.GetString(Convert.FromBase64String(actionContext.Request.Headers.Authorization.Parameter));

            // custom authentication logic
            if (string.Equals(userInfo, string.Format("{0}:{1}", "Parry", "123456")))
            {
                IsAuthorized(actionContext);
            }
            else
            {
                HandleUnauthorizedRequest(actionContext);
            }
        }
        else
        {
            HandleUnauthorizedRequest(actionContext);
        }
    }

    protected override void HandleUnauthorizedRequest(System.Web.Http.Controllers.HttpActionContext actionContext)
    {
        actionContext.Response = new HttpResponseMessage(System.Net.HttpStatusCode.Unauthorized)
        {
            ReasonPhrase = "Unauthorized"
        };
    }
}
In this sample we name the attribute HttpBasicAuthorizeAttribute. It derives from System.Web.Http.AuthorizeAttribute. We override two of its methods: OnAuthorization and HandleUnauthorizedRequest.
In OnAuthorization, we first get the base64-encoded value of the header Authorization and decode it. Then we apply our custom authentication logic to verify if the decoded value is a valid one. In this sample, we compare the decoded value to “Parry:123456”. As is specified in [RFC2617], this value indicates that the username is “Parry” and password is “123456”.
In HandleUnauthorizedRequest, we handle unauthorized request by responding with HTTP status code 401 Unauthorized.
2. Decorate the controller with the custom AuthorizeAttribute
We decorate our ProductsController with HttpBasicAuthorizeAttribute:
[HttpBasicAuthorize]
public class ProductsController : ODataController
{
	…
}
3. Enable HTTPS
In the project properties window, enable the SSL and remember the SSL URL:

4. Create a custom AuthorizationFilterAttribute for HTTPS
Add a class to your project as follows:
public class RequireHttpsAttribute : AuthorizationFilterAttribute
{
    public override void OnAuthorization(HttpActionContext actionContext)
    {
        if (actionContext.Request.RequestUri.Scheme != Uri.UriSchemeHttps)
        {
            actionContext.Response = new HttpResponseMessage(System.Net.HttpStatusCode.Forbidden)
            {
                ReasonPhrase = "HTTPS Required"
            };
        }
        else
        {
            base.OnAuthorization(actionContext);
        }
    }
}
In this sample we name this class RequireHttpsAttribute. It derives from System.Web.Http.Filters.AuthorizationFilterAttribute and overrides its OnAuthorization method by responding with HTTP status code 403 HTTPS Required.
5. Decorate the controller with the custom AuthorizationFilterAttribute
We further decorate our ProductsController with RequireHttpsAttribute:
[HttpBasicAuthorize]
[RequireHttps]
public class ProductsController : ODataController
{
	…
}
6. Testing
We run the project to test it. When run for the first time, you’ll be asked to create a self-signed certificate. Follow the instruction to create the certificate and proceed.
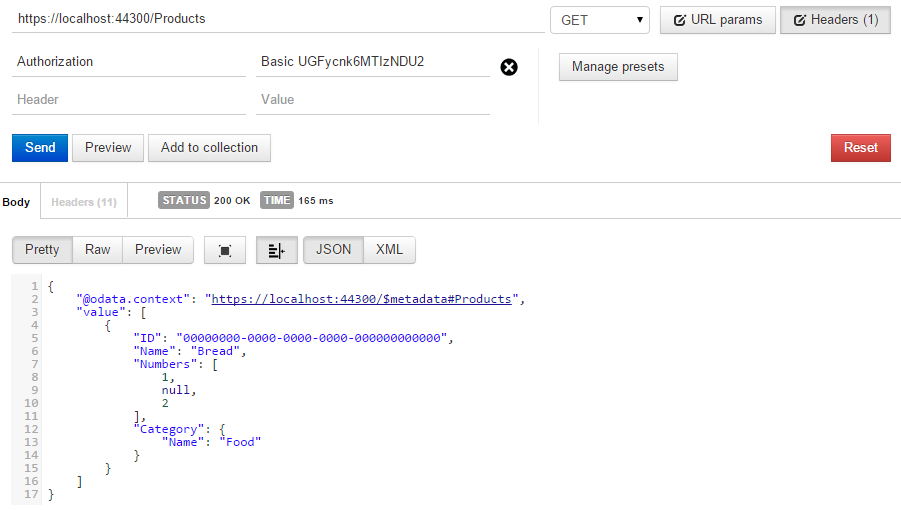
In the above steps, we’ve secured the OData API by allowing only HTTPS connections to the Products and responding with data only to requests that has a correct Authorization header value (the base64-encoded value of “Parry:123456”: UGFycnk6MTIzNDU2). Our HTTP service endpoint is https://localhost:53277/ and our HTTPS endpoint is https://localhost:43300/.
First of all, we send a GET request to https://localhost:53277/Products, and the service responds with an empty payload and the status code 403 HTTPS Required.

Then we send the request over HTTPS to https://localhost:43300/Products. Since the basic authentication info needs to be provided. The service responds with an empty payload and the status code 401 Unauthorized.

Finally, we set the value of the Authorization header to “Basic UGFycnk6MTIzNDU2” and send it over HTTPS to the same address again. The service now responds with the correct data.

Summary
In this post we demoed how an OData API can be secured by basic authentication over HTTPS. You may additionally add authorization logic to the API by further customizing the HttpBasicAuthorizeAttribute class we created. Furthermore, you may also use other authentication methods such as OAuth2 to secure your OData API. More information can be found at: https://www.asp.net/web-api/overview/security.