Note
Access to this page requires authorization. You can try signing in or changing directories.
Access to this page requires authorization. You can try changing directories.
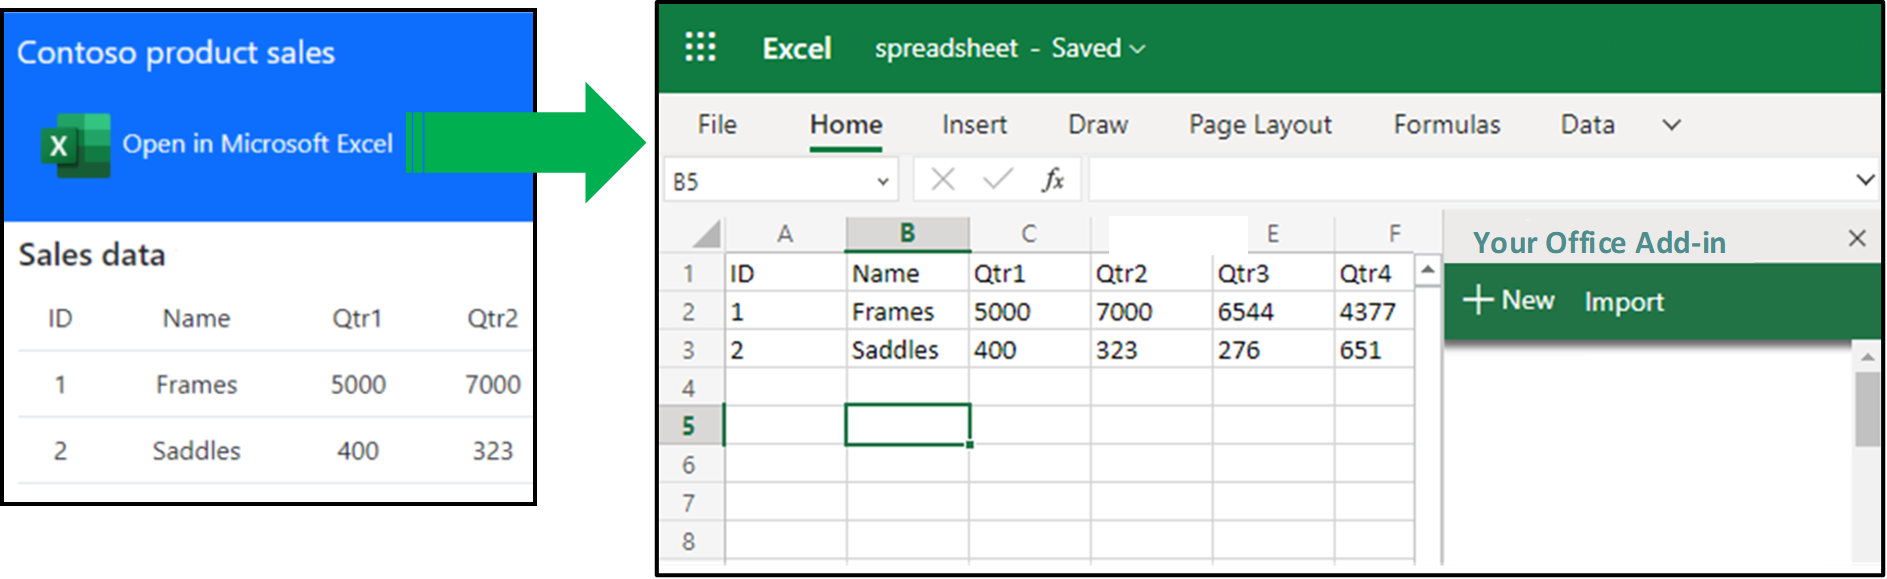
Microsoft partners with SaaS web applications know that their customers often want to open their data from a web page in an Excel spreadsheet. They use Excel to do analysis on the data, or other types of number crunching. Then they upload the data back to the web site.
Instead of multiple steps to export the data from the web site to a .csv file, import the .csv file into Excel, work with the data, then export it from Excel, and upload it back to the web site, we can simplify this process to one button click.
This article shows how to add an Excel button to your web site. When a customer chooses the button, it automatically creates a new spreadsheet with the requested data, uploads it to the customer's OneDrive, and opens it in Excel on a new browser tab. With one click the requested data is opened in Excel and formatted correctly. Additionally the pattern embeds your own Office Add-in inside the spreadsheet so that customers can still access your services from the context of Excel.
Microsoft partners who implemented this pattern have seen increased customer satisfaction. They've also seen a significant increase in engagement with their add-ins by embedding them in the Excel spreadsheet. We recommend that if you have a web site for customers to work with data, that you consider implementing this pattern in your own solution.
Prerequisites
- Visual Studio 2022 or later. Add the Office/SharePoint development workload when configuring Visual Studio.
- Visual Studio Code.
- Microsoft 365. You can get a free developer sandbox that provides a renewable 90-day Microsoft 365 E5 developer subscription. The developer sandbox includes a Microsoft Azure subscription that you can use for app registrations in later steps in this article. If you prefer, you can use a separate Microsoft Azure subscription for app registrations. Get a trial subscription at Microsoft Azure.
- One or more files and folders on OneDrive in the Microsoft 365 account.
Run the sample code
The sample code for this article is named Create a spreadsheet from your web site, populate it with data, and embed your Excel add-in To run the sample, follow the instructions in the readme.
Solution architecture

The solution described in this article adds an Open in Microsoft Excel button to the web site and interacts with Azure Functions, and the Microsoft Graph API. The following sequence of events occurs when the user wants to open their data in a new Excel spreadsheet.
- The user chooses the Open in Microsoft Excel button. The web page passes the data to a function in an Azure Functions app.
- The function uses the Open XML SDK to create a new Excel spreadsheet in memory. It populates the spreadsheet with the data, and embeds your Office Add-in.
- The function returns the spreadsheet as a Base64 encoded string to the web page.
- The web page calls the Microsoft Graph API to upload the spreadsheet to the user's OneDrive.
- Microsoft Graph returns the web url location of the new spreadsheet file.
- The web page opens a new browser tab to open the spreadsheet at the web url. The spreadsheet contains the data, and your add-in.
Key parts of the solution
The solution has two projects that you build:
- An Azure Functions app containing a
FunctionCreateSpreadsheetfunction. - A Node.js web application project.
The following sections describe important concepts and implementation details for constructing the solution. A full reference implementation can be found in the sample code for additional implementation details.
Excel button and Fluent UI

You need a button on the web site that creates the Excel spreadsheet. A best practice is to use the Fluent UI to help your users transition between Microsoft products. You should always use an Office icon to indicate which Office application will be launched from your web page. For more information, see Office Brand Icons on the Fluent UI developer portal.
Sign in the user
The sample code is built from the Microsoft identity sample named Vanilla JavaScript single-page application using MSAL.js to authenticate users to call Microsoft Graph. All authentication code and UI is from this sample. Please refer to this sample for more information about writing code for authentication and authorization. For a full list of identity samples for a wide range of platforms, see Microsoft identity platform code samples.
Create the spreadsheet with the Open XML SDK
The sample code uses the Open XML SDK to create the spreadsheet. Because the Open XML SDK uses .NET it is encapsulated in an Azure Functions app named FunctionCreateSpreadsheet. You can call this function from your Node.js web application. FunctionCreateSpreadsheet uses the SpreadsheetBuilder helper class to create a new spreadsheet in memory. The code is based on Create a spreadsheet document by providing a file name (Open XML SDK).
Populate the spreadsheet with data
The FunctionCreateSpreadsheet function accepts a JSON body containing the row and column data. This is passed to the SpreadsheetBuilder.InsertData method which iterates through all rows and columns and adds them to the worksheet.
Much of the SpreadsheetBuilder class contains code that was generated by the Open XML 2.5 SDK Productivity Tools. These are available at the link for the Open XML 2.5 SDK.
Embed your Office Add-in inside the spreadsheet
The SpreadsheetBuilder class also embeds the Script Lab add-in inside the spreadsheet and configures to display when the document is opened.
The SpreadsheetBuilder.GenerateWebExtensionPart1Content method in the SpreadsheetBuilder.cs file sets the reference to the ID of Script Lab in Microsoft Marketplace:
We.WebExtensionStoreReference webExtensionStoreReference1 = new We.WebExtensionStoreReference() { Id = "wa104380862", Version = "1.1.0.0", Store = "en-US", StoreType = "OMEX" };
- The StoreType value is "OMEX", an alias for Microsoft Marketplace.
- The Store value is "en-US" found in the Microsoft Marketplace culture section for Script Lab.
- The Id value is the Microsoft Marketplace asset ID for Script Lab.
You can change these values to embed your own Office Add-in. This makes it discoverable to the user and increases engagement with your add-in and web services. If your add-in is deployed through central deployment, use the following values instead.
We.WebExtensionStoreReference webExtensionStoreReference1 = new We.WebExtensionStoreReference() { Id = "<Your add-in GUID>", Version = "<Your version>", Store = "excatalog", StoreType = "excatalog" };
We.WebExtensionStoreReference webExtensionStoreReference2 = new We.WebExtensionStoreReference() { Id = "<Your add-in GUID>", Version = "<Your version>", Store = "omex", StoreType = "omex" };
webExtensionReferenceList1.Append(webExtensionStoreReference2);
For more information about alternative values for these attributes, see Automatically open a task pane with a document and [MS-OWEXML]: CT_OsfWebExtensionReference
Upload the spreadsheet to OneDrive
When the spreadsheet is fully constructed the FunctionCreateSpreadsheet function returns a Base64 encoded string version of the spreadsheet to the web application. Then the web application uses the Microsoft Graph API to upload the spreadsheet to the user's OneDrive. The web application creates the file at \openinexcel\spreadsheet.xlsx, but you can modify the code to use any folder and filename you prefer.
Additional considerations for your solution
Everyone’s solution is different in terms of technologies and approaches. The following considerations will help you plan how to modify your solution to open documents and embed your Office Add-in.
Read custom properties when your add-in starts
When you embed your add-in inside the spreadsheet, you can include custom properties. The SpreadsheetBuilder.cs file includes commented code that shows how to insert a user name if you have a userName variable.
    // CUSTOM MODIFICATION BEGIN
    // Uncomment the following code to add your own custom name/value pair properties for the add-in.
    // We.WebExtensionProperty webExtensionProperty2 = new We.WebExtensionProperty() { Name = "userName", Value = userName };
    // webExtensionPropertyBag1.Append(webExtensionProperty2);
    // CUSTOM MODIFICATION END
Uncomment the code and change it to add any customer properties you need. In your add-in, use the Office Settings get method to retrieve a custom property. The following sample shows how to get the user name property from the spreadsheet.
let userName = Office.context.document.settings.get('userName'));
Caution
Don't store sensitive information in custom properties such as auth tokens or connection strings. Properties in the spreadsheet are not encrypted or protected.
See Persist add-in state and settings for complete details on how to read custom properties when your add-in starts.
Use single sign-on
To simplify authentication, we recommend your add-in implements single sign-on. This ensure the user does not need to sign in a second time to access your add-in. For more information, see Enable single sign-on for Office Add-ins
See also
Collaborate with us on GitHub
The source for this content can be found on GitHub, where you can also create and review issues and pull requests. For more information, see our contributor guide.
Office Add-ins