Note
Access to this page requires authorization. You can try signing in or changing directories.
Access to this page requires authorization. You can try changing directories.
Saving your appointment notes and other details to a customer relationship management (CRM) or note-taking application can help you keep track of meetings you've attended.
In this article, you'll learn how to set up your Outlook mobile add-in to enable users to log notes and other details about their appointments to your CRM or note-taking application. Throughout this article, we'll be using a fictional CRM service provider named "Contoso".
You can opt to implement a function command or task pane add-in. With a function command implementation, users can log and view notes and other details about their appointments when they select the add-in button. With a task pane implementation, users can directly manage their appointment notes from a task pane interface. As you follow the instructions in this article, select the tab for the type of add-in you're developing.
Supported clients
Logging notes to an external application from an Outlook mobile add-in is supported in Outlook on Android and on iOS with a Microsoft 365 subscription.
Set up your environment
Complete the Outlook quick start to create an add-in project with the Yeoman generator for Office Add-ins.
Configure the manifest
To configure your add-in's manifest, select the type of manifest you're using.
Unified manifest for Microsoft 365
Open the quick start project in your code editor.
Open the manifest.json file located at the root of your project.
In the
"authorization.permissions.resourceSpecific"array, find the first object and set its"name"property to"MailboxItem.ReadWrite.User". It should look like the following when you're done.{ "name": "MailboxItem.ReadWrite.User", "type": "Delegated" }In the
"validDomains"array, ensure that the URL tohttps://www.contoso.comis included. The array should look like the following when you're done."validDomains": [ "https://www.contoso.com" ],In the
"extensions.runtimes"array, delete the object whose"id"is set to"TaskPaneRuntime".In the same array, navigate to the remaining object, whose
"id"is set to"CommandsRuntime", and replace it with the following object.{ "requirements": { "capabilities": [ { "name": "Mailbox", "minVersion": "1.3" } ] }, "id": "CommandsRuntime", "type": "general", "code": { "page": "https://localhost:3000/commands.html", "script": "https://localhost:3000/commands.js" }, "lifetime": "short", "actions": [ { "id": "logCRMEvent", "type": "executeFunction" } ] }In the
"ribbons"array, replace the existing object with the following code. Note the following about these changes.- The
"desktop"and"mobile"values in the"ribbons.requirements.formFactors"array configure the Log to Contoso button to appear in Outlook on mobile devices and on desktop clients. - The
"logEventMeetingDetailsAttendee"value in the"contexts"array configures the add-in button to appear in the Appointment Attendee surface, so that users can log their appointment notes. - The object in the
"ribbons.tabs.groups.controls"array configures the add-in button that calls the note-logging function in Outlook desktop clients. The"actionId"property must match the"actions.id"of the object in the"extensions.runtimes"array. - The object in the
"ribbons.tabs.customMobileRibbonGroups"array configures the add-in button that calls the note-logging function in Outlook on mobile devices. All nine of the objects specified in the"customMobileRibbonGroups.controls.icons"array are required for a mobile button. Additionally, the"customMobileRibbonGroups.controls.actionId"property must match the"actions.id"of the object in the"extensions.runtimes"array.
{ "requirements": { "formFactors": [ "desktop", "mobile" ] }, "contexts": [ "logEventMeetingDetailsAttendee" ], "tabs": [ { "builtInTabId": "TabDefault", "groups": [ { "id": "apptReadGroup", "label": "Contoso Add-in", "icons": [ { "size": 16, "url": "https://localhost:3000/assets/icon-16.png" }, { "size": 32, "url": "https://localhost:3000/assets/icon-32.png" }, { "size": 80, "url": "https://localhost:3000/assets/icon-80.png" } ], "controls": [ { "id": "desktopLogToCRM", "type": "button", "label": "Log to Contoso", "icons": [ { "size": 16, "url": "https://www.contoso.com/assets/icon-16.png" }, { "size": 32, "url": "https://www.contoso.com/assets/icon-32.png" }, { "size": 80, "url": "https://www.contoso.com/assets/icon-80.png" } ], "supertip": { "title": "Log to Contoso CRM", "description": "Log notes to Contoso CRM for this appointment." }, "actionId": "logCRMEvent" } ] } ], "customMobileRibbonGroups": [ { "id": "mobileApptReadGroup", "label": "Contoso Add-in", "controls": [ { "id": "mobileLogToCRM", "label": "Log to Contoso", "type": "mobileButton", "icons": [ { "scale": 1, "size": 25, "url": "https://contoso.com/assets/icon-25.png" }, { "scale": 1, "size": 32, "url": "https://contoso.com/assets/icon-32.png" }, { "scale": 1, "size": 48, "url": "https://contoso.com/assets/icon-48.png" }, { "scale": 2, "size": 25, "url": "https://contoso.com/assets/icon-25.png" }, { "scale": 2, "size": 32, "url": "https://contoso.com/assets/icon-32.png" }, { "scale": 2, "size": 48, "url": "https://contoso.com/assets/icon-48.png" }, { "scale": 3, "size": 25, "url": "https://contoso.com/assets/icon-25.png" }, { "scale": 3, "size": 32, "url": "https://contoso.com/assets/icon-32.png" }, { "scale": 3, "size": 48, "url": "https://contoso.com/assets/icon-48.png" } ], "actionId": "logCRMEvent" } ] } ] } ] }- The
Save your changes.
Add-in only manifest
To enable users to log appointment notes with your add-in, you must configure the MobileLogEventAppointmentAttendee extension point in the manifest under the parent element MobileFormFactor. Other form factors aren't supported.
Open the quick start project in your code editor.
Open the manifest.xml file located at the root of your project.
Select the entire
<VersionOverrides>node (including open and close tags) and replace it with the following XML. Make sure to replace all references to Contoso with your company's information.<VersionOverrides xmlns="http://schemas.microsoft.com/office/mailappversionoverrides" xsi:type="VersionOverridesV1_0"> <VersionOverrides xmlns="http://schemas.microsoft.com/office/mailappversionoverrides/1.1" xsi:type="VersionOverridesV1_1"> <Description resid="residDescription"></Description> <Requirements> <bt:Sets> <bt:Set Name="Mailbox" MinVersion="1.3"/> </bt:Sets> </Requirements> <Hosts> <Host xsi:type="MailHost"> <DesktopFormFactor> <FunctionFile resid="residFunctionFile"/> <!-- Configures the add-in button to appear in the Appointment Attendee surface of Outlook desktop clients. --> <ExtensionPoint xsi:type="AppointmentAttendeeCommandSurface"> <OfficeTab id="TabDefault"> <Group id="apptReadGroup"> <Label resid="residDescription"/> <Control xsi:type="Button" id="apptReadDesktopFunctionButton"> <Label resid="residLabel"/> <Supertip> <Title resid="residLabel"/> <Description resid="residTooltip"/> </Supertip> <Icon> <bt:Image size="16" resid="icon-16"/> <bt:Image size="32" resid="icon-32"/> <bt:Image size="80" resid="icon-80"/> </Icon> <Action xsi:type="ExecuteFunction"> <FunctionName>logCRMEvent</FunctionName> </Action> </Control> </Group> </OfficeTab> </ExtensionPoint> </DesktopFormFactor> <MobileFormFactor> <FunctionFile resid="residFunctionFile"/> <!-- Configures the add-in button to appear in the Appointment Attendee surface of Outlook on mobile devices. --> <ExtensionPoint xsi:type="MobileLogEventAppointmentAttendee"> <Control xsi:type="MobileButton" id="apptReadMobileFunctionButton"> <Label resid="residLabel"/> <Icon> <bt:Image size="25" scale="1" resid="icon-16"/> <bt:Image size="25" scale="2" resid="icon-16"/> <bt:Image size="25" scale="3" resid="icon-16"/> <bt:Image size="32" scale="1" resid="icon-32"/> <bt:Image size="32" scale="2" resid="icon-32"/> <bt:Image size="32" scale="3" resid="icon-32"/> <bt:Image size="48" scale="1" resid="icon-48"/> <bt:Image size="48" scale="2" resid="icon-48"/> <bt:Image size="48" scale="3" resid="icon-48"/> </Icon> <Action xsi:type="ExecuteFunction"> <FunctionName>logCRMEvent</FunctionName> </Action> </Control> </ExtensionPoint> </MobileFormFactor> </Host> </Hosts> <Resources> <bt:Images> <bt:Image id="icon-16" DefaultValue="https://contoso.com/assets/icon-16.png"/> <bt:Image id="icon-32" DefaultValue="https://contoso.com/assets/icon-32.png"/> <bt:Image id="icon-48" DefaultValue="https://contoso.com/assets/icon-48.png"/> <bt:Image id="icon-80" DefaultValue="https://contoso.com/assets/icon-80.png"/> </bt:Images> <bt:Urls> <bt:Url id="residFunctionFile" DefaultValue="https://contoso.com/commands.html"/> </bt:Urls> <bt:ShortStrings> <bt:String id="residDescription" DefaultValue="Log appointment notes and other details to Contoso CRM."/> <bt:String id="residLabel" DefaultValue="Log to Contoso"/> </bt:ShortStrings> <bt:LongStrings> <bt:String id="residTooltip" DefaultValue="Log notes to Contoso CRM for this appointment."/> </bt:LongStrings> </Resources> </VersionOverrides> </VersionOverrides>Save your changes.
Tip
To learn more about manifests for Outlook add-ins, see Office Add-in manifests and Add support for add-in commands in Outlook on mobile devices.
Capture appointment notes
In this section, learn how your add-in can extract appointment details when the user selects the Log button.
From the same quick start project, open the file ./src/commands/commands.js in your code editor.
Replace the entire content of the commands.js file with the following JavaScript.
let event;

// Add start-up logic code to the onReady function, if any.
Office.onReady();

function logCRMEvent(appointmentEvent) {
  event = appointmentEvent;
  console.log(`Subject: ${Office.context.mailbox.item.subject}`);
  Office.context.mailbox.item.body.getAsync(
    "html",
    { asyncContext: "This is passed to the callback" },
    (result) => {
      if (result.status === Office.AsyncResultStatus.Succeeded) {
        event.completed({ allowEvent: true });
      } else {
        console.error("Failed to get body.");
        event.completed({ allowEvent: false });
      }
    }
  );
}

// Register the function.
Office.actions.associate("logCRMEvent", logCRMEvent);
Save your changes.
Open the ./src/commands/commands.html file of your add-in project.
Locate
<script type="text/javascript" src="https://appsforoffice.microsoft.com/lib/1/hosted/office.js"></script>, then add the following code after it. This adds a reference to the commands.js file.<script type="text/javascript" src="commands.js"></script>Save your changes.
View appointment notes
The Log button label can be toggled to display View by setting the EventLogged custom property reserved for this purpose. When the user selects the View button, they can look at their logged notes for this appointment.
Your add-in defines the log-viewing experience. For example, in a function command implementation, you can display the logged appointment notes in a dialog when the user selects the View button. For details on how to implement dialogs, see Use the Office dialog API in your Office Add-ins.
In ./src/commands/commands.js, add the following function. This function sets the EventLogged custom property on the current appointment item.
function updateCustomProperties() {
  Office.context.mailbox.item.loadCustomPropertiesAsync((customPropertiesResult) => {
    if (customPropertiesResult.status === Office.AsyncResultStatus.Succeeded) {
      const customProperties = customPropertiesResult.value;
      customProperties.set("EventLogged", true);
      customProperties.saveAsync((setSaveAsyncResult) => {
        if (setSaveAsyncResult.status === Office.AsyncResultStatus.Succeeded) {
          console.log("EventLogged custom property saved successfully.");
          event.completed({ allowEvent: true });
          event = undefined;
        }
      });
    }
  });
}
Save your changes.
Call the updateCustomProperties function after the add-in successfully logs the appointment notes. For example, you can call it from logCRMEvent as shown in the following code.
function logCRMEvent(appointmentEvent) {
  event = appointmentEvent;
  console.log(`Subject: ${Office.context.mailbox.item.subject}`);
  Office.context.mailbox.item.body.getAsync(
    "html",
    { asyncContext: "This is passed to the callback" },
    (result) => {
      if (result.status === Office.AsyncResultStatus.Succeeded) {
        // Replace `event.completed({ allowEvent: true });` with the following statement.
        updateCustomProperties();
      } else {
        console.error("Failed to get body.");
        event.completed({ allowEvent: false });
      }
    }
  );
}
Delete the appointment log
If you'd like your users to undo logging or delete the logged appointment notes so a replacement log can be saved, you have two options.
- Use Microsoft Graph to clear the custom properties object when the user selects the appropriate button in the task pane.
- Create a function to clear the EventLogged custom property on the current appointment item (shown in the following example).
In ./src/commands/commands.js, add the following function to clear the EventLogged custom property on the current appointment item.
function clearCustomProperties() {
  Office.context.mailbox.item.loadCustomPropertiesAsync((customPropertiesResult) => {
    if (customPropertiesResult.status === Office.AsyncResultStatus.Succeeded) {
      const customProperties = customPropertiesResult.value;
      customProperties.remove("EventLogged");
      customProperties.saveAsync((removeSaveAsyncResult) => {
        if (removeSaveAsyncResult.status === Office.AsyncResultStatus.Succeeded) {
          console.log("Custom properties cleared");
          event.completed({ allowEvent: true });
          event = undefined;
        }
      });
    }
  });
}
Save your changes.
Call the clearCustomProperties function when you want to clear the custom property. For example, you can call it from logCRMEvent if setting the log failed in some way as shown in the following function.
function logCRMEvent(appointmentEvent) {
  event = appointmentEvent;
  console.log(`Subject: ${Office.context.mailbox.item.subject}`);
  Office.context.mailbox.item.body.getAsync(
    "html",
    { asyncContext: "This is passed to the callback" },
    (result) => {
      if (result.status === Office.AsyncResultStatus.Succeeded) {
        updateCustomProperties();
      } else {
        console.error("Failed to get body.");
        // Replace `event.completed({ allowEvent: false });` with the following statement.
        clearCustomProperties();
      }
    }
  );
}
Test and validate
- Follow the usual guidance to test and validate your add-in.
- After you sideload the add-in in Outlook on the web, on Windows (new or classic), or on Mac, restart Outlook on your Android or iOS mobile device.
- Open an appointment as an attendee, then verify that under the Meeting Insights card, there's a new card with your add-in's name alongside the Log button.
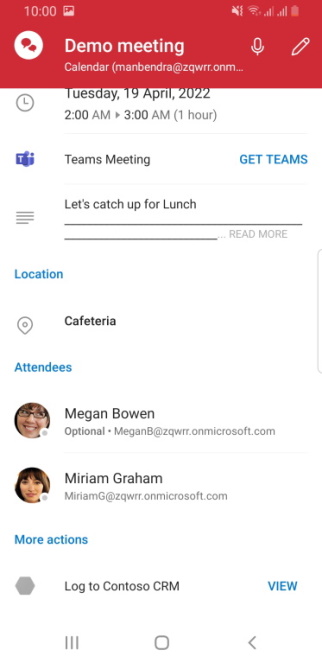
UI: Log the appointment notes
As a meeting attendee, you should see a screen similar to the following image when you open a meeting.
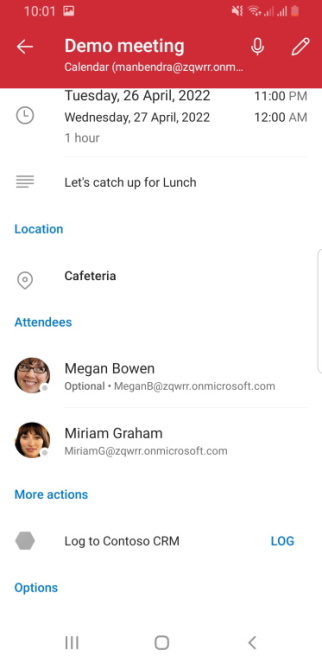
UI: View the appointment log
After successfully logging the appointment notes, the button should now be labeled View instead of Log. You should see a screen similar to the following image.
Available APIs
The following APIs are available for this feature.
- Dialog APIs
- Office.AddinCommands.Event
- Office.CustomProperties
- Office.RoamingSettings
- Appointment Read (attendee) APIs except the following:
To learn more about APIs that are supported in Outlook on mobile devices, see Outlook JavaScript APIs supported in Outlook on mobile devices.
Restrictions
Several restrictions apply.
- The Log button name can't be changed. However, there's a way for a different label to be displayed by setting a custom property on the appointment item. For more details, see View appointment notes.
- The EventLogged custom property must be used if you want to toggle the label of the Log button to View and back.
- The add-in icon should be in grayscale using hex code
#919191or its equivalent in other color formats. - The add-in should extract the meeting details from the appointment form within the one-minute timeout period. However, any time spent in a dialog box the add-in opened for authentication, for example, is excluded from the timeout period.
See also
Collaborate with us on GitHub
The source for this content can be found on GitHub, where you can also create and review issues and pull requests. For more information, see our contributor guide.
Office Add-ins