Note
Access to this page requires authorization. You can try signing in or changing directories.
Access to this page requires authorization. You can try changing directories.
Content add-ins are surfaces that can be embedded directly into Excel or PowerPoint documents. Content add-ins give users access to interface controls that run code to modify documents or display data from a data source. Use content add-ins when you want to embed functionality directly into the document.
Figure 1. Typical layout for content add-ins
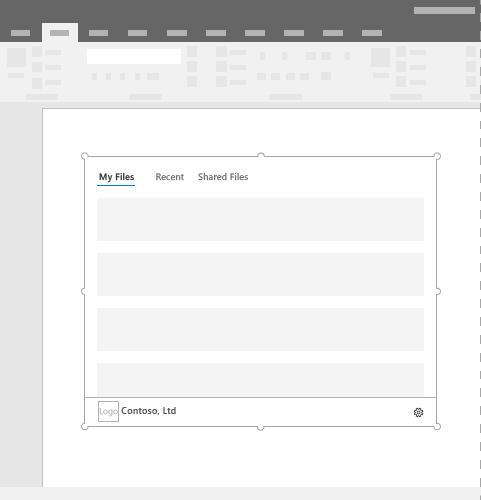
Best practices
- Include some navigational or commanding element such as the CommandBar or Pivot at the top of your add-in.
- Include a branding element such as the BrandBar at the bottom of your add-in (applies to Excel and PowerPoint add-ins only).
Variants
Content add-in sizes for Excel and PowerPoint in Office desktop and in a web browser are user specified.
Personality menu
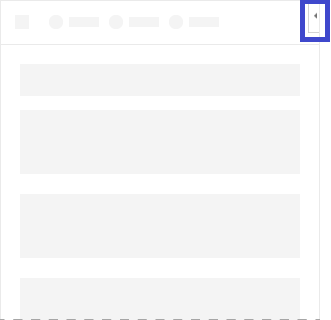
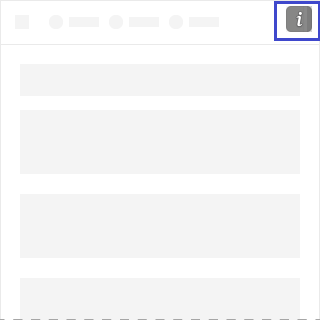
Personality menus can obstruct navigational and commanding elements located near the top right of the add-in. The following are the current dimensions of the personality menu on Windows and Mac.
For Windows, the personality menu measures 12x32 pixels, as shown.
Figure 2. Personality menu on Windows
For Mac, the personality menu measures 26x26 pixels, but floats 8 pixels in from the right and 6 pixels from the top, which increases the occupied space to 34x32 pixels, as shown.
Figure 3. Personality menu on Mac
Implementation
There are minor differences in the manifests between content add-ins and add-ins that use task panes. Open the tab for the type of manifest you're using.
Configure the manifest with the following steps.
- Add a
"contentRuntimes"child array to the extension object in the"extensions"array. - Remove the
"runtimes"property if it is present. The"runtimes"array is for task pane or mail add-ins. These cannot be combined with a content add-in. - Add an anonymous content runtime object in the
"contentRuntimes"array. - Set the
"id"property of the object to a descriptive name. - Set the
"code.page"object to the full URL of the custom content that you want to embed in the document. - Optionally, set the
"requestedWidth"and"requestedHeight"properties to a size between 32 and 1000 pixels. If these properties aren't used, the Office application determines the size. - Optionally, set the
"disableSnapshot"property totrueto prevent Office from saving a snapshot of the content component with the document.
The following is an example of a "contentRuntimes" property.
"contentRuntimes": [
    {
        "id": "ContentRuntime",
        "code": {
            "page": "https://localhost:3000/content.html"
        },
        "requestedWidth": 100,
        "requestedHeight": 100,
        "disableSnapshot": true,
    }
]
Samples on GitHub
There are content add-in code samples available in the Office-Add-in-samples GitHub repository. You can use any of them as the basis for your own add-in project. Several of them also give you the option to try the add-in without running it locally.
- Excel hello-world content add-in
- PowerPoint hello-world content add-in
- Excel data-visualization content add-in
- Excel content add-in: Humongous Insurance
Support considerations
- Check to see if your Office Add-in will work on a specific Office application or platform.
- Some content add-ins may require the user to "trust" the add-in to read and write to Excel or PowerPoint. You can declare what level of permissions you want your user to have in the add-in's manifest.
- In Office on the web, the Show as saved image option isn't supported. Even if the Show as saved image option was enabled from a desktop client, the content add-in remains interactive on the web client.
See also
Collaborate with us on GitHub
The source for this content can be found on GitHub, where you can also create and review issues and pull requests. For more information, see our contributor guide.
Office Add-ins