Note
Access to this page requires authorization. You can try signing in or changing directories.
Access to this page requires authorization. You can try changing directories.
Fluent UI React is the official open-source JavaScript front-end framework designed to build experiences that fit seamlessly into a broad range of Microsoft products, including Microsoft 365 applications. It provides robust, up-to-date, accessible React-based components which are highly customizable using CSS-in-JS.
Note
This article describes the use of Fluent UI React in the context of Office Add-ins. However, it's also used in a wide range of Microsoft 365 apps and extensions. For more information, see Fluent UI React and the Fluent UI Web open source repository.
This article describes how to create an add-in that's built with React and that uses Fluent UI React components.
Create an add-in project
You'll use the Yeoman generator for Office Add-ins to create an add-in project that uses React.
Install the prerequisites
Node.js (the latest Active LTS version). Visit the Node.js site to download and install the right version for your operating system.
The latest version of Yeoman and the Yeoman generator for Office Add-ins. To install these tools globally, run the following command via the command prompt.
npm install -g yo generator-officeNote
Even if you've previously installed the Yeoman generator, we recommend you update your package to the latest version from npm.
Office connected to a Microsoft 365 subscription (including Office on the web).
Note
If you don't already have Office, you might qualify for a Microsoft 365 E5 developer subscription through the Microsoft 365 Developer Program; for details, see the FAQ. Alternatively, you can sign up for a 1-month free trial or purchase a Microsoft 365 plan.
Create the project
Run the following command to create an add-in project using the Yeoman generator. A folder that contains the project will be added to the current directory.
yo office
Note
When you run the yo office command, you may receive prompts about the data collection policies of Yeoman and the Office Add-in CLI tools. Use the information that's provided to respond to the prompts as you see fit.
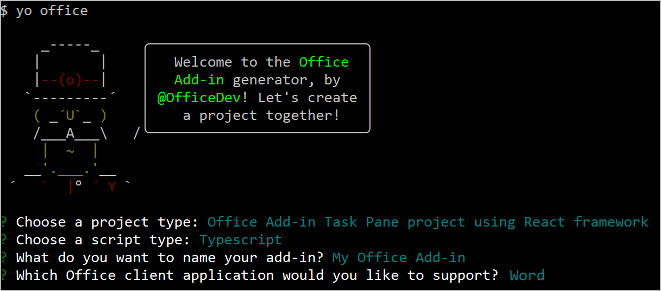
When prompted, provide the following information to create your add-in project.
- Choose a project type: Specify
Office Add-in Task Pane project using React framework. - Choose a script type: Specify either
TypeScriptorJavaScript. - What do you want to name your add-in? Specify
My Office Add-in. - Which Office client application would you like to support? Specify one of the hosts. (The screenshots in this article use
Word. Running the project for the first time is easier if you selectExcel,PowerPoint, orWord. See Try it out.)
The following is an example.
After you complete the wizard, the generator creates the project and installs supporting Node components.
Explore the project
The add-in project that you've created with the Yeoman generator contains sample code for a basic task pane add-in. If you'd like to explore the components of your add-in project, open the project in your code editor and review the following files. The file name extensions depend on which language you choose. TypeScript extensions are in parentheses. When you're ready to try out your add-in, proceed to the next section.
The ./manifest.xml or ./manifest.json file in the root directory of the project defines the settings and capabilities of the add-in. To learn more about the manifest.xml file, see Office Add-ins with the add-in only manifest. To learn more about the manifest.json file, see Office Add-ins with the unified app manifest for Microsoft 365.
The ./src/taskpane/taskpane.html file contains the HTML markup for the task pane and loads the Office JavaScript Library. It also tests whether the webview control supports Fluent UI React v9 and displays a special message if it doesn't.
The ./src/taskpane/index.jsx (tsx) file is the React root component. It loads React and Fluent UI React, ensures that the Office JavaScript library has been loaded, and applies the Fluent-defined theme.
The ./src/taskpane/office-document.js (ts) file contains the Office JavaScript API code that facilitates interaction between the task pane and the Office client application.
The ./src/taskpane/components/ folder contains the React component *.jss (tsx) files that create the UI.
Try it out
Navigate to the root folder of the project.
cd "My Office Add-in"Complete the following steps to start the local web server and sideload your add-in.
Note
Office Add-ins should use HTTPS, not HTTP, even while you're developing. If you're prompted to install a certificate after you run one of the following commands, accept the prompt to install the certificate that the Yeoman generator provides. You may also have to run your command prompt or terminal as an administrator for the changes to be made.
If this is your first time developing an Office Add-in on your machine, you may be prompted in the command line to grant Microsoft Edge WebView a loopback exemption ("Allow localhost loopback for Microsoft Edge WebView?"). When prompted, enter
Yto allow the exemption. Note that you'll need administrator privileges to allow the exemption. Once allowed, you shouldn't be prompted for an exemption when you sideload Office Add-ins in the future (unless you remove the exemption from your machine). To learn more, see "We can't open this add-in from localhost" when loading an Office Add-in or using Fiddler.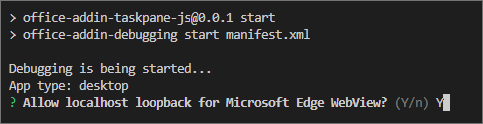
When you first use Yeoman generator to develop an Office Add-in, your default browser opens a window where you'll be prompted to sign in to your Microsoft 365 account. If a sign-in window doesn't appear and you encounter a sideloading or login timeout error, run
atk auth login m365.
Tip
If you're testing your add-in on Mac, run the following command before proceeding. When you run this command, the local web server starts.
npm run dev-serverTo test your add-in, run the following command in the root directory of your project. This starts the local web server and opens the Office host application with your add-in loaded.
npm startNote
If you're testing your add-in in Outlook,
npm startsideloads the add-in to both the Outlook desktop and web clients. For more information on how to sideload add-ins in Outlook, see Sideload Outlook add-ins for testing.To test your add-in in Excel, Word, or PowerPoint on the web, run the following command in the root directory of your project. When you run this command, the local web server starts. Replace "{url}" with the URL of a Word document on your OneDrive or a SharePoint library to which you have permissions.
Note
If you are developing on a Mac, enclose the
{url}in single quotation marks. Do not do this on Windows.npm run start -- web --document {url}The following are examples.
npm run start -- web --document https://contoso.sharepoint.com/:t:/g/EZGxP7ksiE5DuxvY638G798BpuhwluxCMfF1WZQj3VYhYQ?e=F4QM1Rnpm run start -- web --document https://1drv.ms/x/s!jkcH7spkM4EGgcZUgqthk4IK3NOypVw?e=Z6G1qpnpm run start -- web --document https://contoso-my.sharepoint-df.com/:t:/p/user/EQda453DNTpFnl1bFPhOVR0BwlrzetbXvnaRYii2lDr_oQ?e=RSccmNP
If your add-in doesn't sideload in the document, manually sideload it by following the instructions in Manually sideload add-ins to Office on the web.
Note
If this is the first time that you have sideloaded an Office add-in on your computer (or the first time in over a month), you're prompted first to delete an old certificate and then to install a new one. Agree to both prompts.
A WebView Stop On Load prompt appears. Select OK.
If the "My Office Add-in" task pane isn't already open, choose the Home tab, and then choose the Show Taskpane button on the ribbon to open the add-in task pane.
Note
If you're testing your add-in in Outlook, create a new message. Then, navigate to the Message tab and choose Show Taskpane from the ribbon to open the add-in task pane.
Enter text into the text box and then select Insert text.

When you're ready to stop the dev server and uninstall the add-in, run the following command.
npm stop
Migrate to Fluent UI React v9
If you have an existing add-in that implements an older version of Fluent UI React, we recommend migrating to Fluent UI v9. For guidance on the migration process, see Getting started migrating to v9.
Troubleshooting
- Ensure your environment is ready for Office development by following the instructions in Set up your development environment.
The automatic
npm installstep Yo Office performs may fail. If you see errors when trying to runnpm start, navigate to the newly created project folder in a command prompt and manually runnpm install. For more information about Yo Office, see Create Office Add-in projects using the Yeoman Generator.You may see warnings generated when running
npm installfor either Yeoman generator or the project. In most cases, you can safely ignore these warnings. Sometimes, dependencies become deprecated and their replacements aren't supported by other packages on which the project depends. If you would like to resolve these warnings, use thenpm-check-updatestool.- In the command prompt while in the root project directory, run
npm i -g npm-check-updates. This installs the tool globally. - Run
ncu -u. This provides a report of all packages and to what versions they will be updated. - Run
npm installto update all the packages.
For more information about warnings when running
npm install, see Warnings and dependencies in the Node.js and npm world.- In the command prompt while in the root project directory, run
If you don't see the add-in button on the ribbon (e.g., Show Task Pane), select the Add-ins button from the Home ribbon tab, then choose the test add-in.
See also
Collaborate with us on GitHub
The source for this content can be found on GitHub, where you can also create and review issues and pull requests. For more information, see our contributor guide.
Office Add-ins